
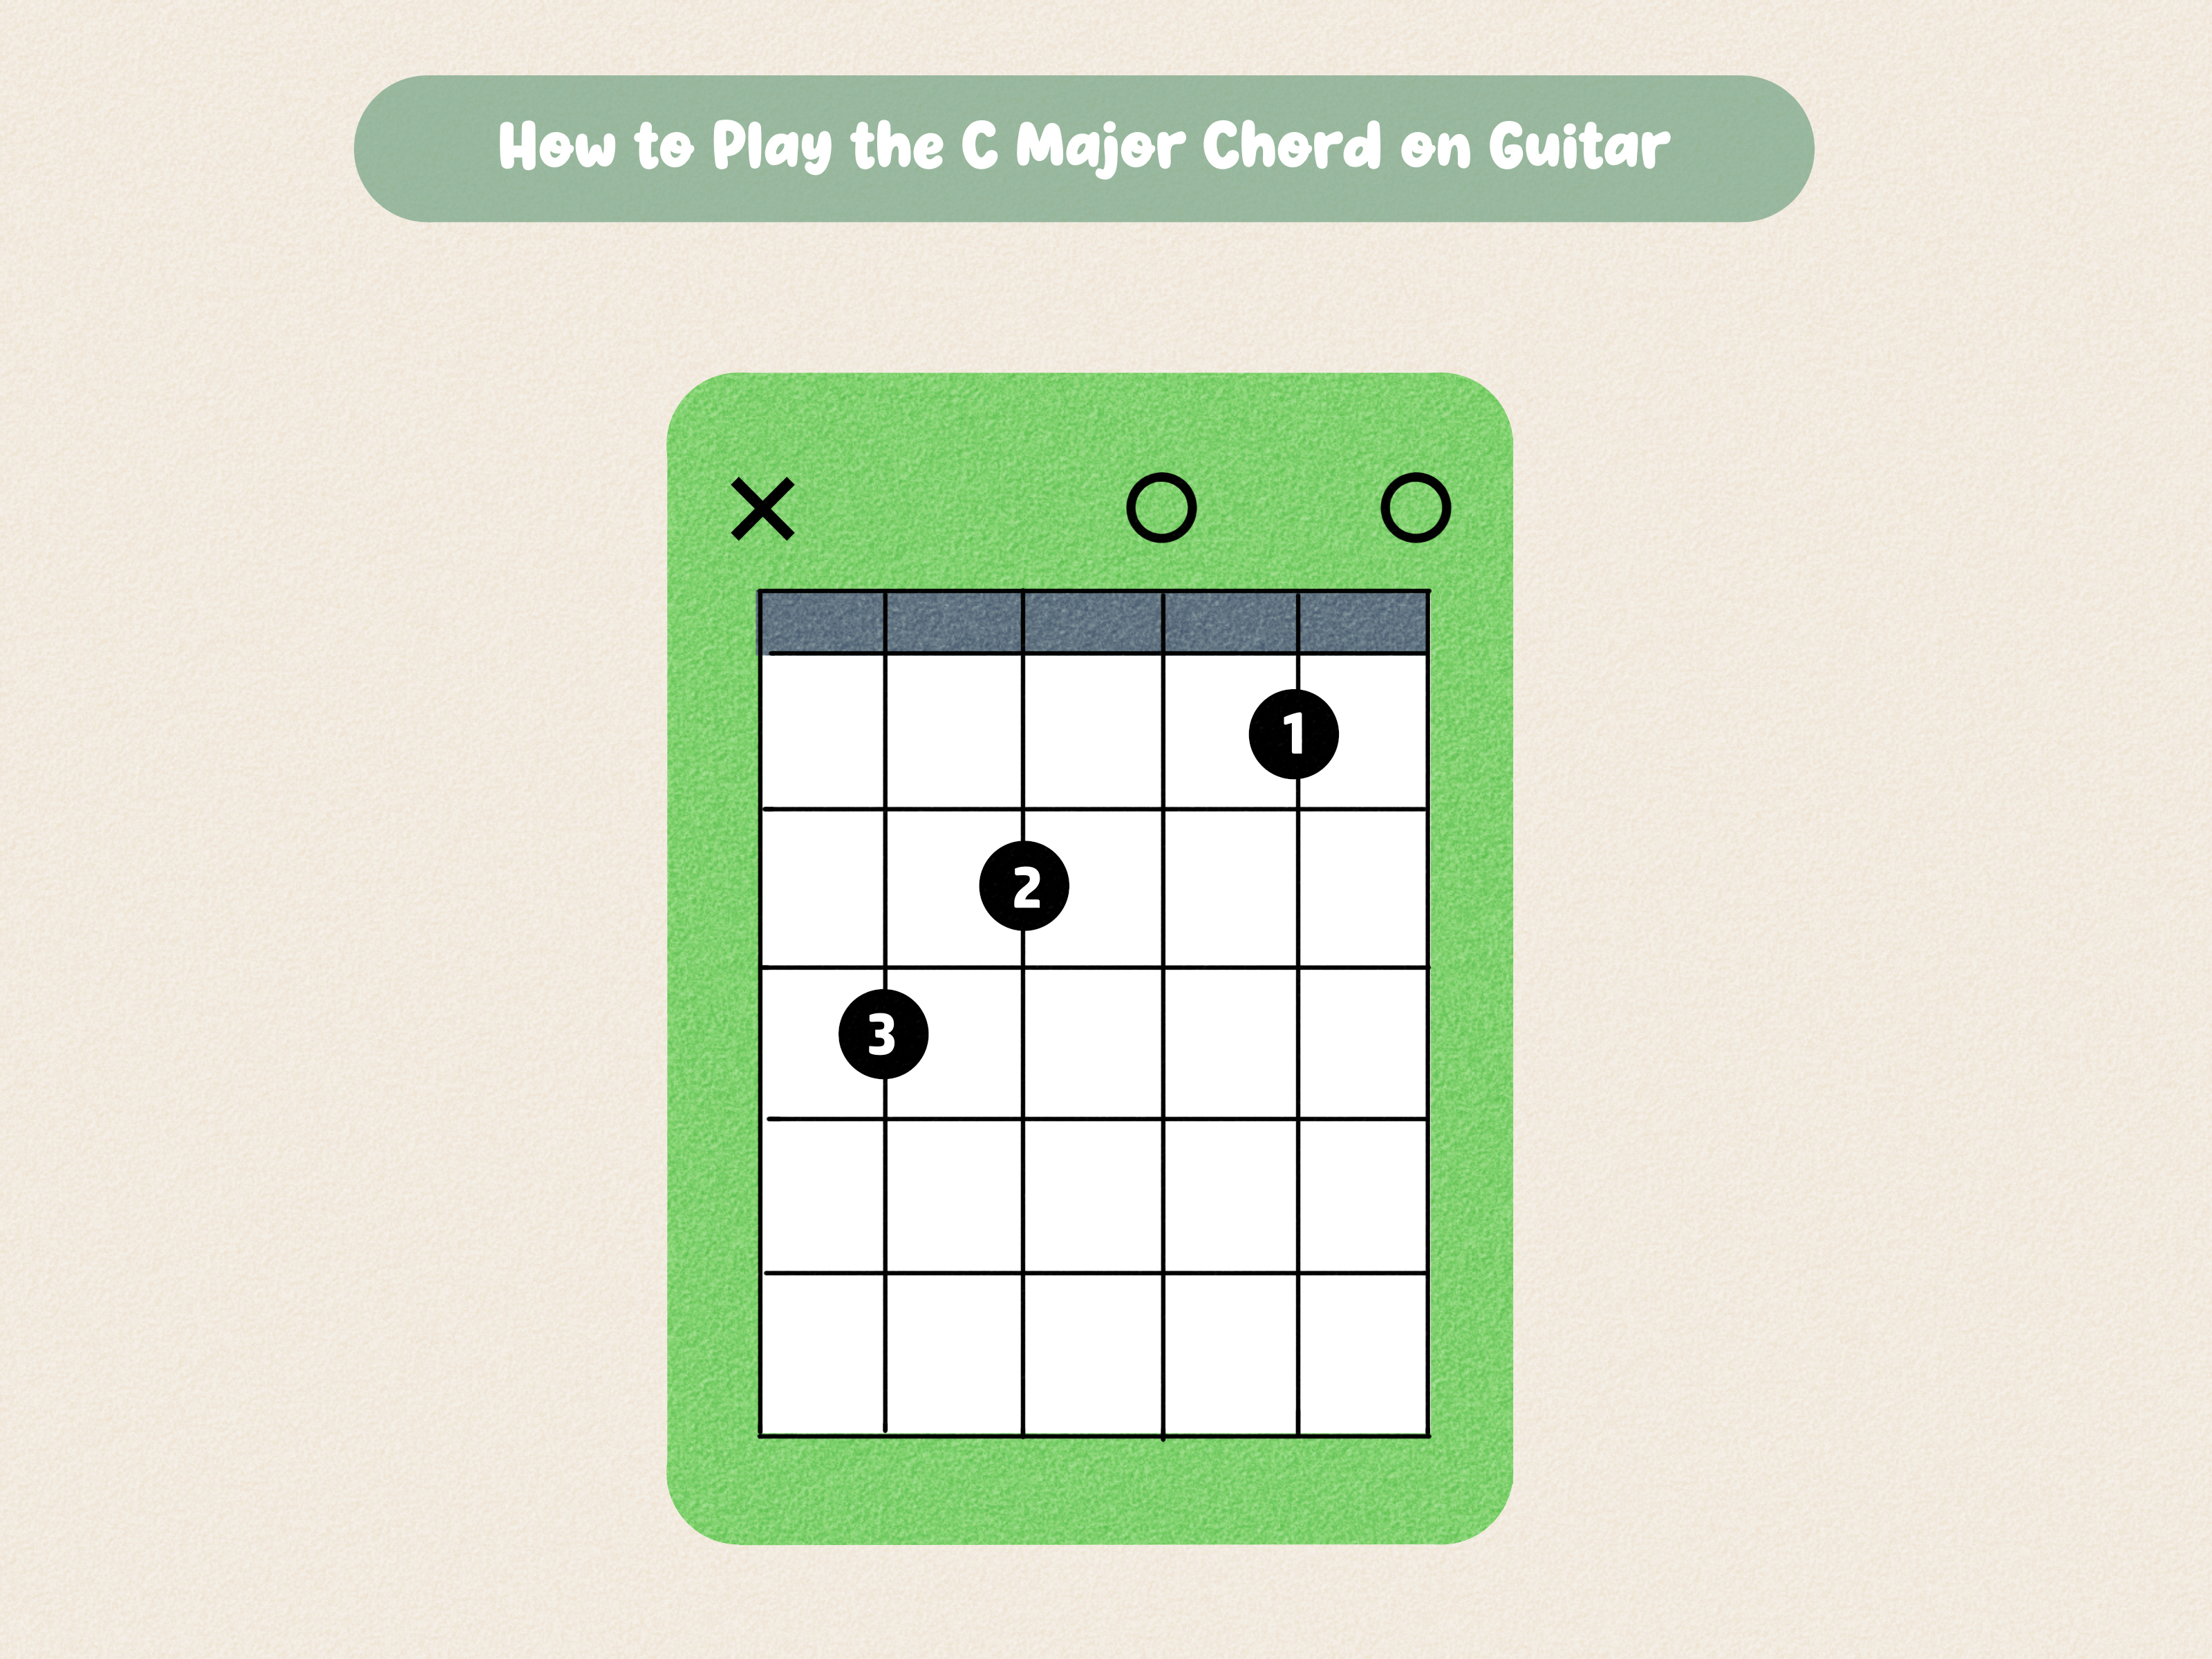
The C major chord is one of the first guitar chords beginners meetand often one of the first to make their fingers question every life decision that led them to buying a guitar. Its open-position shape looks simple on a chord chart, but forming it cleanly requires a controlled finger stretch, curved fingertips, accurate strumming, and a little patience.
The effort is worth it. C major appears throughout folk, pop, rock, country, worship music, blues, and singer-songwriter arrangements. Once you can play it comfortably, you can combine it with chords such as G major, F major, A minor, D minor, and E minor to create hundreds of useful chord progressions.
This guide explains how to play the C major chord on guitar in 10 practical steps. You will learn where every finger belongs, which strings to strum, how to eliminate buzzing, and how to practice chord changes without turning your practice session into an argument with six pieces of wire.
What Is a C Major Chord?
A basic major chord is built from three notes: a root, a major third, and a perfect fifth. The notes in C major are C, E, and G. Guitar chord shapes often repeat some of these notes in different octaves, which creates a fuller sound without changing the chord’s identity.
In the standard open C major guitar chord, you play five strings:
- Fifth string, third fret: C
- Fourth string, second fret: E
- Third string open: G
- Second string, first fret: C
- First string open: E
The sixth string is normally muted because its open note is E. Technically, E belongs to the chord, so accidentally sounding it does not create a completely different harmony. However, starting the chord with the low C on the fifth string gives the standard C major shape a clearer, stronger foundation.
C Major Guitar Chord Diagram
In the shorthand x32010, each character represents one guitar string, beginning with the thick sixth string. An “x” means mute or avoid the string, “0” means play it open, and a number tells you which fret to press.
How to Play the C Major Chord on Guitar in 10 Steps
Step 1: Tune Your Guitar
Before correcting your fingers, make sure the instrument itself is not the troublemaker. Standard guitar tuning, from the thickest string to the thinnest, is E-A-D-G-B-E.
Use a clip-on tuner, pedal tuner, or reliable tuning application. Pluck one string at a time and adjust its tuning key slowly. If the guitar is out of tune, even a perfectly formed C major chord will sound suspiciouslike a choir rehearsing in separate elevators.
Tuning before every practice session also trains your ear. Over time, you will begin recognizing when a string sounds flat or sharp before checking the tuner.
Step 2: Hold the Guitar in a Comfortable Position
Sit upright in a stable chair without arms. Rest the guitar against your torso and keep the neck angled slightly upward rather than parallel to the floor. Your fretting wrist should feel relaxed, not folded into an extreme bend.
Place the thumb behind the neck, roughly opposite your index or middle finger. Beginners sometimes hook the thumb far over the top because it feels secure, but that position can reduce finger reach. For the open C major chord, keeping the thumb behind the neck usually makes the stretch between the first and third frets easier.
Relax your shoulders, elbows, and hands. Good guitar technique relies more on accuracy and leverage than brute force. Yamaha’s teaching guidance similarly emphasizes building chords one finger at a time and using balanced pressure between the thumb and fretting fingers.
Step 3: Place Your Ring Finger on the Fifth String
Place your ring finger on the third fret of the fifth string, also known as the A string. This note is C, the root of the chord.
Position the fingertip just behind the third metal fret rather than directly on top of it. “Just behind” means on the side closer to the guitar’s headstock. This placement lets the fret stop the string cleanly with less pressure.
Your ring finger should arch high enough to avoid touching the open fourth string or neighboring strings. It may feel like an ambitious stretch at first. That is normal; the standard three-finger C shape is widely recognized as challenging for new players because it spans three frets.
Step 4: Place Your Middle Finger on the Fourth String
Put your middle finger on the second fret of the fourth string, the D string. This produces an E note.
Keep the middle finger curved and place it close to the second fret. Check that its underside is not leaning against the third string, which must remain open. Even slight contact can mute that string and make the chord sound thin.
The ring and middle fingers will often feel crowded. Instead of flattening them, rotate your fretting hand slightly so the fingertips approach the strings more vertically.
Step 5: Place Your Index Finger on the Second String
Place your index finger on the first fret of the second string, also called the B string. This creates another C note.
Use the very tip of the finger. The first string directly below it must ring open, so a flat index finger can accidentally mute that string. Keep the index knuckle rounded, as though you are holding a small marble beneath your palm.
The complete fingering should now be:
- Ring finger: fifth string, third fret
- Middle finger: fourth string, second fret
- Index finger: second string, first fret
This is the standard open-position fingering taught by Fender, Guitar World, JustinGuitar, MusicRadar, and other established guitar-learning resources.
Step 6: Curve Your Fingers and Check Your Thumb
Before strumming, inspect your hand. Each fretting finger should form a gentle arch. Your palm should not collapse against the bottom of the neck, and your thumb should provide light support from behind.
A useful test is to look for a small open space between your palm and the guitar neck. That gap gives your fingers room to curve. If the palm is glued to the neck, your fingertips may flatten and silence the open strings.
Do not squeeze harder than necessary. Excess pressure creates fatigue, slows chord changes, and makes your hand tense. Press only firmly enough for each fretted note to ring clearly. Your guitar is an instrument, not a stress ball with pickups.
Step 7: Strum From the Fifth String Down
Strum downward beginning with the fifth string. Avoid the thick sixth string by aiming carefully with your pick or thumb.
At first, exaggerate the motion. Pause, visually locate the fifth string, and then strum through the remaining five strings. With repetition, your strumming hand will learn the distance automatically.
You can also lightly touch the sixth string with the tip of your ring finger. This prevents the low E from ringing if your strumming hand brushes it accidentally. Do not press the sixth string; merely touch it enough to mute it.
Step 8: Test Every String Individually
Do not judge the chord only by strumming all five strings together. Instead, pluck the strings individually from the fifth string to the first.
Each note should sound clear and continue ringing. When you find a muted or buzzing string, stop and diagnose it:
- If a fretted string buzzes, move the finger closer to the fret or add slightly more pressure.
- If an open string sounds dead, check whether a neighboring finger is touching it.
- If the note sounds sharp, you may be pressing too hard or pulling the string sideways.
- If your fingertips hurt sharply, release the chord and rest.
This string-by-string inspection is often called chord-perfect practice. It is more productive than repeatedly strumming a muddy chord and hoping it becomes clearer through optimism alone. JustinGuitar and MusicRadar both emphasize identifying individual fingering problems when cleaning up open chords.
Step 9: Practice Forming and Releasing the Shape
Once every note rings clearly, remove your hand completely. Shake it gently, return to a relaxed position, and rebuild the chord.
Repeat this process slowly:
- Form the C major chord.
- Check each string.
- Strum once.
- Release the shape.
- Pause and repeat.
Aim for 10 accurate repetitions instead of 50 rushed ones. Your brain is learning a coordinated movement pattern. Practicing mistakes quickly only teaches your fingers to become extremely efficient at making mistakes.
After several repetitions, try placing all three fingers simultaneously. Beginners usually build the chord one finger at a time, but the long-term goal is for the entire shape to land as a single coordinated movement.
Step 10: Practice Changing Between C Major and Other Chords
A chord becomes musically useful when you can reach it from another chord without stopping the rhythm. Begin with slow transitions between C major and A minor. These shapes are closely related and require relatively small finger movements.
Set a metronome to 50 or 60 beats per minute. Strum once on the first beat of each measure and use the remaining beats to prepare the next chord. When that feels easy, strum on every beat.
C, G, A minor, and F form one of popular music’s most familiar progressions. Open C also appears naturally alongside G and D in many beginner arrangements.
Common C Major Chord Problems and Fixes
The First String Is Muted
Your index finger is probably leaning against it. Move the index fingertip closer to the first fret, curl the knuckle, and rotate your wrist slightly forward.
The Third String Will Not Ring
The middle finger is usually the culprit. Reposition it so the fingertip presses the fourth string vertically without touching the open third string.
The Chord Buzzes
Buzzing usually results from insufficient pressure, poor finger placement, or a finger sitting too far behind the fret. Move the problem finger closer to the metal fret and test the note again before squeezing harder.
The Stretch Feels Impossible
Bring your thumb lower behind the neck, angle the guitar neck upward, and make sure your palm is not pressed flat against the neck. Practice the shape for a few minutes at a time rather than forcing it through a long, tense session.
You Keep Hitting the Sixth String
Practice five-string downstrokes very slowly. You can also mute the sixth string with the edge of your ring finger. Accuracy develops through repetition; your pick does not need to behave like a lawn mower.
Easy C Major Variations for Beginners
Two-Finger C Major
For a simplified version, play the second string at the first fret with your index finger and the fourth string at the second fret with your middle finger. Strum only the fourth, third, second, and first strings.
This voicing still contains C, E, and G, so it functions as C major. It sounds lighter than the full open chord but can help beginners practice clean fingertips before adding the ring-finger stretch.
C Major 7
Form the regular C major shape and lift your index finger, allowing the second string to ring open.
The open B adds a dreamy, colorful quality. It is also a useful exercise because switching between C and Cmaj7 teaches your index finger to move independently. Yamaha notes that lifting the index finger from the standard C shape creates this major-seventh variation.
Cadd9
Cadd9 is another popular variation, especially in acoustic pop and rock. One common fingering is x32033. Its open, ringing quality works particularly well when moving between Cadd9, G, D, and E minor.
A Simple Daily C Major Practice Routine
You do not need an hour-long workout. A focused 10-minute routine can produce steady progress:
- Two minutes: Tune the guitar and stretch your fingers gently.
- Two minutes: Build C major slowly and test each string.
- Two minutes: Form, strum, release, and repeat the shape.
- Two minutes: Change between C and A minor.
- Two minutes: Practice a C-G-Am-F progression at a slow tempo.
Track clean repetitions rather than total repetitions. Five correct chord changes are more valuable than 25 changes filled with pauses, buzzing, and accidental percussion from dropped picks.
Experiences From Learning the C Major Chord
Learning the C major chord often begins with a surprising realization: a chord that looks harmless on paper can feel enormous under the fingers. The first fret, second fret, and third fret seem only a short distance apart until three different fingers must land on three different strings without touching anything else.
Many beginners initially believe they lack the hand size to play C major. Usually, hand size is not the real obstacle. The problem is positioning. A low guitar neck, a collapsed wrist, or a thumb wrapped tightly around the neck can shorten the effective reach of the fingers. Raising the neck and moving the thumb behind it can make the shape feel noticeably smaller within seconds.
Another common experience is successfully fretting the three pressed strings while accidentally muting both open strings. The player strums, hears something vaguely chord-like, and assumes more pressure is needed. More pressure rarely solves it. The breakthrough comes from curving the fingers and using the fingertips instead of squeezing the neck harder.
The C chord also teaches an important lesson about slow practice. A beginner may try to jump immediately between C and G at full song speed. The result is usually a long silence during the change, followed by a dramatic strum that arrives several business days late. Slowing the rhythm reveals the actual movement. The fingers can then travel along short, repeatable paths instead of flying randomly toward the fretboard.
Progress is rarely linear. The chord may sound clean one evening and strangely muted the next morning. That does not mean the skill has disappeared. Small differences in posture, fatigue, finger soreness, and attention can affect accuracy. Returning to individual string testing usually restores the shape quickly.
Fingertip discomfort is another memorable part of the experience. New steel-string players may feel tenderness after a brief session. Short, regular practice periods allow the fingertips to adapt gradually. Playing through sharp pain, numbness, or wrist strain is not productive. Rest is part of practice, even though it feels suspiciously like doing nothing.
The most rewarding moment is not necessarily the first clean C chord. It is the first smooth chord progression. Moving from C to A minor, then to F or G, suddenly turns an isolated hand shape into music. Even a simple four-chord loop can sound like the beginning of a recognizable song.
Recording practice sessions can make improvement easier to notice. A player who feels stuck may compare today’s recording with one from two weeks earlier and hear cleaner notes, faster changes, and steadier rhythm. Daily changes are subtle; accumulated changes are not.
It also helps to practice C major in a musical context. Instead of repeating the chord mechanically for 20 minutes, alternate technical exercises with a basic song, backing track, or original progression. Musical practice gives the hands a reason to learn the movement and keeps the mind engaged.
Eventually, the shape stops feeling like three separate finger instructions. The hand recognizes C major as a single gesture. You think “C,” and the fingers arrive together. That transformationfrom conscious assembly to automatic movementis one of the first clear signs that guitar practice is working.
Conclusion
To play the C major chord on guitar, place your ring finger on the third fret of the fifth string, your middle finger on the second fret of the fourth string, and your index finger on the first fret of the second string. Leave the third and first strings open, avoid the sixth string, and strum from the fifth string downward.
The shape may initially feel awkward, but clean C major chords come from careful positioning rather than excessive force. Curve your fingertips, keep the thumb behind the neck, test each string individually, and practice slow transitions. A few focused minutes every day will develop stronger muscle memory than one heroic weekly session that leaves your fingertips filing a formal complaint.
Once C major rings clearly, combine it with A minor, G major, F major, D minor, and E minor. Those relationships turn one beginner guitar chord into countless progressionsand turn practice into actual music.
Note: Mild fingertip tenderness can occur during early practice, but stop and rest if you experience sharp pain, numbness, or persistent wrist discomfort.











