
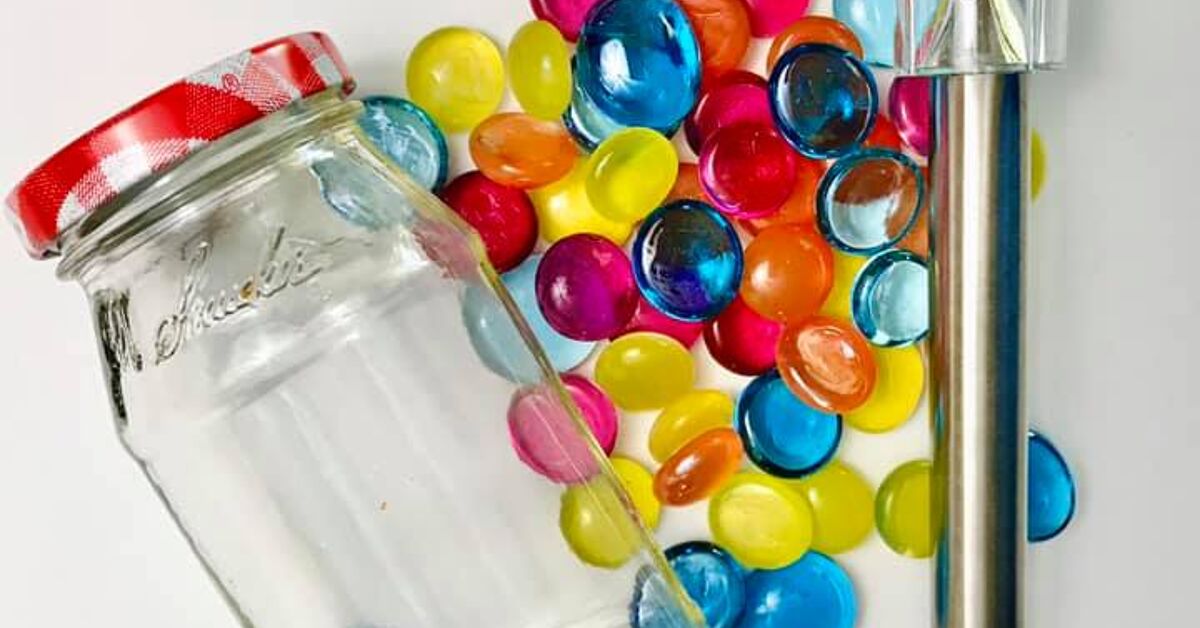
A plain glass jar is practical, dependable, and about as exciting as a tax form. Covsuddenly it becomes a sparkling outdoor lantern that looks surprisingly expensiveespecially after sunset, when nobody can see the tiny blob of adhesive you accidentally left near the bottom.
This DIY solar lantern project combines recycled glass, inexpensive decorative gems, an LED solar path light, and outdoor-rated clear adhesive. It requires no household wiring, produces no candle flame, and automatically charges during the day before glowing after dark. Solar panels work by converting sunlight into electrical energy, which the lantern stores in its rechargeable battery for nighttime use.
The finished luminary jar works beautifully on patio tables, porch steps, garden walls, balconies, and along walkways. You can make one as a weekend craft or create a coordinated set for a wedding, backyard dinner, holiday display, or summer party.
Important note: This tutorial is designed for an LED solar-light module. Do not place a burning candle inside a sealed or gem-covered jar, and do not use cracked, chipped, or structurally damaged glass.
Why This DIY Solar Lantern Works So Well
The idea is simple: a small solar path light provides the charging panel, rechargeable battery, light sensor, and LED. The glass jar acts as the lantern body, while the flat-backed glass gems scatter and soften the light. Similar solar Mason jar projects commonly repurpose the removable top of an inexpensive garden light rather than requiring the builder to assemble an electrical circuit from scratch.
During daylight, the panel charges the battery. When the built-in sensor detects darkness, the LED switches on automatically. Depending on the light module, battery condition, season, and amount of sunlight received, a fully charged decorative solar light may operate for several hours after dark. Some commercially available Mason jar solar lights advertise runtimes of up to eight hours under favorable charging conditions.
The decorative gems do more than add color. Their curved surfaces create highlights and reflections that make a small LED appear richer and more interesting. Clear gems produce an icy, elegant glow, while colored gems create a stained-glass effect without requiring actual stained-glass toolsor the patience of a medieval cathedral artist.
Materials and Tools
Essential materials
- One clean glass jar with a wide opening
- One inexpensive LED solar path light with a removable top
- Flat-backed glass gems, floral gems, or glass cabochons
- Clear outdoor-rated adhesive or waterproof clear silicone
- Isopropyl alcohol
- Lint-free cloth or paper towels
- Painter’s tape
- Cardboard, scrap paper, or a disposable work mat
Optional supplies
- Outdoor spray paint for the jar lid or solar-light housing
- Metal primer if the lid is bare or likely to rust
- Decorative wire, chain, or a purpose-built jar handle
- Twine, ribbon, charms, or waterproof beads
- Clear UV-resistant outdoor coating
- Modeling clay or rolled towels to prevent the jar from moving
- Disposable gloves
Expect to use roughly 50 to 100 gems for a medium jar, depending on the diameter of the gems, the jar’s shape, and whether you want full coverage. Buy more than your estimate. Running out with three square inches left creates a design style best described as “almost finished.”
Choosing the Right Jar, Gems, Solar Light, and Adhesive
Select a sturdy glass jar
A straight-sided jar is easiest for beginners because the gems can be arranged in even rows. Curved jelly jars and faceted jars also look attractive, but they require more adjustment as you work around the changing circumference.
Choose a jar without cracks, deep scratches, or chips around the rim. Test the solar-light top before decorating anything. It should sit securely over the opening or fit inside a modified lid. Many Mason jar crafts succeed because the jars are inexpensive, reusable, and available in multiple shapes and sizes.
Use flat-backed glass gems
Rounded decorative gems with one flat side are much easier to attach than completely spherical beads. Mix clear and colored gems for better light transmission. If every gem is extremely dark, the lantern may look fabulous in daylight but glow like it is reconsidering its career choices at night.
Before gluing, lay out several possible combinations on a table. Useful patterns include:
- Alternating rows of two colors
- A random mosaic of related shades
- A vertical ombré from dark to light
- Clear gems with occasional colored accents
- A floral, spiral, wave, or geometric pattern
Choose a removable solar-light module
Look for a compact solar path light whose top separates from the stake and whose LED points downward. Confirm that the on/off switch remains accessible and that the solar panel will face upward when attached to the jar.
Do not permanently glue the battery compartment shut. Rechargeable batteries eventually lose capacity, and some solar-light modules allow the battery to be replaced. Product manuals may specify a particular rechargeable battery type, voltage, and capacity, so replacement batteries should match the manufacturer’s instructions rather than whatever happens to be rolling around in the junk drawer.
Use adhesive made for glass and outdoor exposure
The best adhesive must bond glass, remain clear, tolerate moisture, and handle outdoor temperature changes. Clear waterproof contact adhesives and outdoor silicone products are commonly rated for glass and exterior use. Flexible adhesive is particularly useful because glass and decorative components can expand and contract slightly as temperatures change.
Avoid ordinary school glue. Hot glue may work for temporary indoor decorations, but outdoor heat, cold, and moisture can weaken many hot-glue bonds. Always follow the selected adhesive’s ventilation, application, clamping, cleanup, and curing instructions.
How to Make a DIY Solar Lantern With Glass Gems
Step 1: Wash and inspect the jar
Remove all labels and adhesive residue. Wash the jar with dish soap and warm water, rinse it thoroughly, and allow it to dry. Inspect it under bright light for cracks or chipped edges.
Immediately before gluing, wipe the exterior with isopropyl alcohol and a lint-free cloth. Do not touch the cleaned surface more than necessary. Oils from your hands can interfere with adhesion. Glass-adhesive manufacturers consistently recommend bonding surfaces that are clean, dry, and free from grease, wax, paint, soap residue, and other contaminants.
Step 2: Test the solar light
Switch on the solar-light module and cover the panel completely with your hand or a piece of dark cardboard. The LED should illuminate after a moment if the battery has some charge and the light sensor is functioning.
If it does not turn on, remove any protective film from the panel, check the switch, and place the module in direct sunlight for a full charging day before testing again. A surprisingly large number of “broken” solar lights are simply switched off, uncharged, or still wearing their nearly invisible factory film.
Step 3: Dry-fit the light and lid
Place the solar module over the jar opening. Some models rest directly on the rim. Others can be fitted through the metal jar band after the original flat lid insert is removed. You may also create a support disk from exterior-grade plastic or a spare metal lid, provided it does not cover the solar panel or block the sensor.
The module should remain level and removable. Painter’s tape can hold it temporarily while you determine the best orientation. Keep ventilation openings, the switch, screws, and battery door accessible.
Step 4: Paint the lid or housing, if desired
If the plastic or metal housing clashes with your design, remove it from the jar and mask the solar panel, LED, sensor, switch, and battery compartment. Apply an outdoor-rated paint that is compatible with the housing material.
Surface preparation matters. Paint manufacturers recommend cleaning the surface and following product-specific preparation instructions before spraying. Outdoor metallic paints can be used on materials such as metal and glass, while a rust-inhibiting primer can improve protection on suitable metal parts.
Spray outdoors or in a properly ventilated work area, following the paint label. Apply several light coats rather than one heroic coat that immediately develops drips. Let the finish cure fully before assembly.
Step 5: Plan the first row of glass gems
Set the jar on its side in a cradle made from two rolled towels or strips of modeling clay. This prevents it from rolling away while you work. Gem-covered solar lantern tutorials often decorate one section at a time, allow that section to set, and then rotate the jar.
Arrange a dry row of gems around the lower part of the jar. Adjust the spacing before applying adhesive. Small gaps are fine and can make the pattern look more like a mosaic. Perfectly tight spacing is not necessary unless you enjoy measuring curved glass with the emotional intensity of a structural engineer.
Step 6: Attach the gems in small sections
Apply a small amount of clear adhesive to the flat side of the first gem or directly to a small section of the jar, depending on the product instructions. Press the gem into place and hold it for the recommended time.
Continue with a manageable groupusually four to eight gems. Avoid coating the entire jar at once because the adhesive may skin over before the pieces are positioned. Small applications also reduce squeeze-out between the gems.
Complete one side of the jar and let it set enough that the gems will not slide. Rotate the jar and repeat. Check the pattern from several angles as you work. A slightly irregular mosaic often looks better than rigid rows, especially when the light is on.
Step 7: Allow the adhesive to cure completely
“Dry to the touch” and “fully cured” are not always the same thing. Follow the adhesive label and give the jar the full recommended curing period before handling it extensively or placing it outdoors.
Keep the jar horizontal or supported during the early curing stage if the gems are heavy. Remove excess uncured adhesive only with a cleanup method approved by the manufacturer. Once some adhesives cure, removal becomes considerably more difficult.
Step 8: Install and secure the solar top
After the gems and painted components have cured, attach the solar-light module. Use the jar’s threaded band, a removable support ring, or a few carefully placed dots of outdoor adhesive around a separate mounting component.
Do not seal the entire rim unless the solar module is designed to be permanently enclosed. The interior may occasionally need cleaning, and battery access is valuable. A removable top also allows you to bring the electronic portion indoors during severe weather.
Step 9: Charge the finished lantern
Place the lantern where its solar panel receives strong, unobstructed sunlight. Solar-light guidance commonly recommends approximately six to eight hours of bright or direct sunlight for dependable charging, although requirements vary by product, season, latitude, cloud cover, and battery condition.
Charge the lantern for at least one full sunny day before judging its performance. Some product instructions recommend a longer initial charge to help the rechargeable battery reach full capacity.
Where to Display Your Luminary Jar
Use the finished lantern as decorative accent lighting rather than primary safety lighting. Attractive locations include:
- A sunny patio table
- A porch railing with a wide, stable surface
- A garden bench or low wall
- Outdoor dining-table centerpieces
- Steps that already have code-compliant functional lighting
- A shepherd’s hook, if the jar has a strong purpose-built hanger
- A balcony ledge where the lantern cannot fall
Keep the panel away from roof overhangs, dense foliage, and other objects that create long periods of shade. Also avoid placing the lantern directly beneath bright nighttime lighting, which can confuse some dusk-to-dawn sensors and prevent the LED from switching on. Solar-light manuals frequently identify nearby artificial light and dirty panels as causes of poor nighttime operation.
Maintenance Tips for Longer-Lasting Solar Jar Lights
Clean the solar panel
Dust, pollen, bird droppings, and mineral deposits reduce the amount of light reaching the panel. Wipe it gently with a damp microfiber cloth. Avoid harsh abrasives that could scratch the protective surface. Solar-light manufacturers recommend keeping panels clean and free from debris to maintain charging performance.
Inspect the gems and adhesive
Every few weeks, check for loose gems, cracked adhesive, moisture intrusion, or sharp edges. Remove the lantern from use until damaged components are repaired. Do not leave loose glass pieces where children or pets can reach them.
Protect it from severe weather
“Outdoor-rated” does not mean “indestructible.” Bring the lantern inside during hail, hurricanes, severe freezes, flooding, or high winds. Water-resistant electronics can still fail if submerged, and a glass jar is not interested in negotiating with a falling tree branch.
Replace the rechargeable battery correctly
If the lantern charges in full sun but runs only briefly, the rechargeable battery may be aging. Open the compartment only if the product permits battery replacement. Match the original battery chemistry, voltage, size, and recommended capacity. Never substitute a standard disposable alkaline battery where the unit requires a rechargeable solar battery.
Troubleshooting Common Problems
The lantern does not turn on
- Confirm that the switch is in the “on” position.
- Remove any protective film from the solar panel.
- Charge the light in direct sunlight for a full day.
- Test it in a genuinely dark area.
- Move it away from porch lights or windows that stay illuminated.
- Check whether the rechargeable battery is installed correctly.
The light turns off too early
Short runtime usually points to insufficient sunlight, a dirty panel, cloudy weather, excessive shade, or an aging battery. Move the lantern to a sunnier location and clean the panel before replacing components.
The gems slide while curing
You may be applying too much adhesive or rotating the jar too quickly. Work in smaller sections, use less adhesive, and allow each section to set before turning the jar. Painter’s tape can temporarily support stubborn pieces, provided the tape does not disturb nearby gems.
The adhesive looks cloudy
Cloudiness can result from excess adhesive, trapped moisture, an incompatible product, or curing conditions outside the manufacturer’s recommended range. Test the adhesive on a spare jar and one gem before committing to the full project.
Condensation appears inside the jar
Remove the solar top and allow every component to dry completely. Check for gaps that direct rainwater into the jar. Avoid sealing moisture inside, and position the lantern so water does not pool around the lid.
Creative Design Variations
Coastal lantern
Use aqua, sea-glass green, pale blue, and clear gems. Add natural rope around the neck, but keep it away from the solar panel and light sensor.
Fire-and-ice lantern
Cover one side with amber and red gems and the other with clear and blue gems. When illuminated, the mixed reflections create a dramatic centerpiece.
Wedding luminary set
Choose clear, pearl-white, and pale blush gems. Paint the lid matte gold or silver and add a removable table-number tag. Mason jars and luminaries are widely used in handmade centerpieces because they can be customized to suit casual, rustic, and formal events.
Patriotic lantern
Arrange red, clear, and blue gems in loose bands. A random mosaic usually looks more sophisticated than perfectly rigid stripes.
Winter frost lantern
Combine clear gems with a few pale-blue pieces and a silver lid. Because the light comes from an LED rather than a flame, the lantern can provide a wintry glow without filling the jar with combustible decorations.
Experience-Based Lessons From Making a Glass-Gem Solar Lantern
The most surprising part of this project is how quickly the jar changes personality. At the beginning, it looks like recycling that missed collection day. After the first few rows of gems, it starts looking intentional. Once the solar light comes on, it becomes the kind of object visitors pick up, turn around, and ask, “Where did you buy this?” That is the correct moment to casually mention that it cost less than lunch.
A realistic first build usually takes longer than expectednot because the instructions are difficult, but because gem placement encourages overthinking. The first ten minutes are spent creating a perfect color sequence. The next ten are spent deciding perfection looks unnatural. Eventually, most builders discover that a loose mosaic is both easier and more attractive. Random placement also hides small differences in gem size and jar curvature.
The first major lesson is to test the light before gluing anything. It is deeply annoying to finish an elaborate jewel-covered jar and then discover that the solar module was defective, switched off, or fitted with a tired battery. A two-minute test at the beginning prevents an evening of staring accusingly at a very beautiful dark object.
The second lesson is that less adhesive usually looks better. Beginners often apply a generous mound because they want the gem to survive rain, wind, summer heat, winter cold, and possibly a minor meteor strike. The gem then presses the adhesive outward, creating a visible halo. A controlled amount of a properly selected outdoor adhesive forms a cleaner bond than an oversized blob.
The third lesson involves gravity, an opponent that remains undefeated. If the jar is upright while the adhesive is fresh, heavier gems may creep downward. Supporting the jar horizontally and completing one section at a time is slower, but it produces a neater pattern. A rolled towel makes an excellent cradle. Modeling clay works even better because it holds the jar at a precise angle without scratching the glass.
Lighting tests also reveal that gem color matters. Clear, pale-blue, amber, and light-green gems transmit plenty of light and create strong reflections. Deep purple, navy, and opaque black gems are dramatic during the day but can reduce visible nighttime brightness. A useful compromise is to use mostly clear or translucent gems, then add darker colors as accents.
Placement can completely change the result. A lantern displayed beneath a covered porch may receive enough indirect light to glow briefly, yet it will rarely perform as well as one charged in open sun. Moving the same lantern a few feet beyond the roofline can noticeably improve its nighttime runtime. This is why the display location should be chosen based on daytime sun first and nighttime appearance second.
Another practical discovery is that a single lantern looks charming, while three lanterns look designed. A small group with different jar heights creates a stronger visual effect and disguises minor inconsistencies between individual projects. Use the same lid finish and related gem colors to make the set feel coordinated without making every jar identical.
Finally, the best part of the project may be its adaptability. A chipped drinking jar should not be used, but an undamaged jelly jar, canning jar, or wide-mouth food jar can become a decorative light instead of entering the waste stream. The solar module can often be removed for maintenance, while the gem-covered jar can be refreshed with a new lid, ribbon, or color theme. The result is inexpensive, reusable outdoor décor with just enough sparkle to make the backyard feel ready for a partyeven when the “party” is one person, a lawn chair, and a suspiciously large bowl of snacks.
Conclusion
Making a DIY solar lantern with glass gems is an approachable project that delivers an impressive nighttime effect without complicated wiring. The basic formula is simple: choose sound glass, clean it carefully, use a clear outdoor-rated adhesive, attach the gems in small sections, install a working solar-light module, and give the panel enough unobstructed sunlight.
Take your time during curing, keep the electronic components accessible, and treat the finished lantern as decorative accent lighting rather than a permanent all-weather fixture. With those details handled, an ordinary jar can become a glowing patio centerpiece, garden ornament, handmade gift, or coordinated set of event luminaries.
Research note: This guide synthesizes established solar-light operating guidance, glass-bonding recommendations, outdoor finishing instructions, and practical Mason jar craft methods from U.S. government, manufacturer, home-improvement, and craft resources.











