
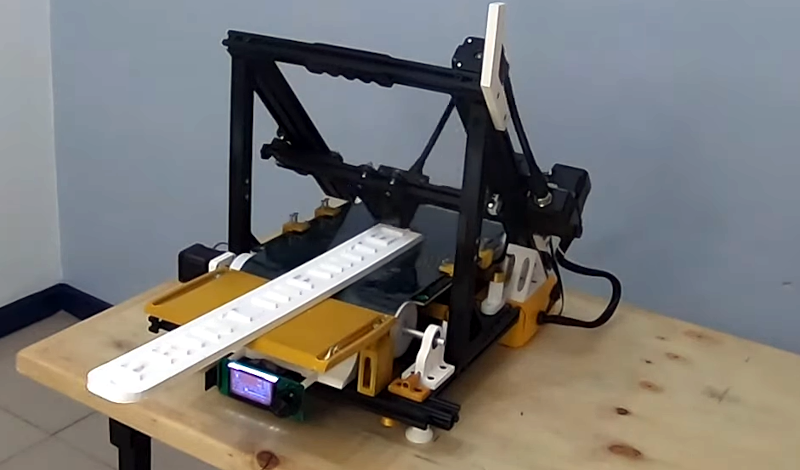
A conveyor belt printer mod sounds like something invented by a sleep-deprived maker at 2:17 a.m. while staring at a perfectly good 3D printer and thinking, “Nice, but what if it never stopped?” That is basically the charm of this nearly all printed conversion: it takes the familiar desktop FDM printer concept and stretches it, literally, into the world of continuous 3D printing.
The idea behind a conveyor belt 3D printer is simple enough to explain but delightfully weird in practice. Instead of printing on a fixed rectangular bed, the machine prints onto a moving belt. The part can travel away from the nozzle as printing continues, which opens the door to very long prints, automatic part ejection, and batch production without someone standing nearby with a scraper like a tiny factory goblin.
The project that inspired the phrase “Conveyor Belt Printer Mod Is Nearly All Printed” centers on a clever conversion of an Artillery Hornet-style desktop printer. The maker, known as Call Me Swal, designed a large number of 3D printed parts to transform the machine into an “infinite” conveyor belt printer. It is not truly infinite, of course; physics still has paperwork to file. But in one axis, the printer can keep moving material along the belt, allowing longer objects and repeated prints in a way a normal bed-slinger simply cannot.
What Makes This Conveyor Belt Printer Mod So Interesting?
The most exciting part is not only that it uses a conveyor belt. Belt printers already exist, from hobby experiments to commercial machines. The exciting part is that this mod leans hard into the maker spirit: print as many parts as possible, reuse an existing printer, and buy only what cannot realistically be printed. That last part is important. You cannot print the flexible conveyor belt itself with ordinary rigid filament and expect it to behave like a professional build surface. The belt remains the essential purchased component.
Still, the phrase “nearly all printed” matters. A typical printer upgrade may require machined plates, aluminum brackets, proprietary hardware, or a suspiciously expensive kit that arrives in a box large enough to make your wallet hide under the couch. This mod instead shows that many structural brackets, guides, mounts, supports, rollers, and adapters can be designed for desktop fabrication. That makes the project more accessible, more hackable, and much more satisfying for anyone who enjoys making a machine reproduce parts of its own upgrade.
How a Conveyor Belt 3D Printer Works
A standard FDM 3D printer builds parts layer by layer on a stationary bed. Once the print is finished, the user removes it, clears the surface, and starts again. A conveyor belt 3D printer changes the relationship between the print surface and the machine. The belt becomes the build plate, and it can move forward during or after printing.
Many belt printers use an angled gantry or angled nozzle setup, commonly around 45 degrees. This allows the printer to build layers diagonally relative to the moving belt. As the belt advances, completed sections of the part move away from the hot end. In batch printing, finished parts can reach the end of the belt, flex around the roller, and pop off into a bin. It is the 3D printing version of a snack dispenser, except the snack is a PLA bracket and you should absolutely not eat it.
Continuous Printing
The biggest practical benefit is continuous production. A belt printer can produce multiple copies of the same object without manual removal between jobs. For makers who sell small printed items, run educational labs, or need piles of brackets, clips, cable-chain links, cosplay connectors, or prototype parts, automatic ejection can be a serious time saver.
Long Part Printing
The second major benefit is long-part fabrication. On a traditional printer, the maximum length of a part is limited by the bed. On a belt printer, a long object can extend along the belt axis. This makes the design useful for items like trim pieces, rails, beams, decorative strips, cosplay blades, model aircraft components, and other parts that would normally need to be split, keyed, glued, sanded, and spiritually negotiated with.
The Beauty of Reusing an Existing Printer
One of the smartest choices in the nearly all printed conveyor belt printer mod is starting with an existing desktop FDM printer. Building a printer from scratch is possible, but it adds complexity fast. You need a frame, motion system, electronics, motors, power supply, firmware, wiring, bed heating, and enough patience to make a saint mutter into a toolbox.
By converting an existing printer, the project begins with a working motion platform. The controller board, steppers, hot end, heated bed, and frame already exist. The mod then focuses on changing the print surface and geometry. That is still a serious project, but it is a smaller mountain than designing everything from zero.
The Artillery Hornet is the reference machine for this particular conversion, but the broader concept can apply to many similar Cartesian or Prusa i3-style printers. The catch is that printable parts are not magically universal. Mounting holes, frame dimensions, belt paths, bed size, motor placement, and gantry clearance vary between printer models. If you use a different printer, expect CAD edits. In other words, this is not a “download, print, bolt, victory parade” mod for every machine. It is more like a recipe: delicious if followed carefully, questionable if you replace flour with motor oil.
Why the Belt Is the Star of the Show
The conveyor belt may look like a simple strip of material, but it carries most of the project’s success or failure. A good belt for 3D printing needs to do several jobs at once. It must stay flat, resist heat, grip the first layer, release the finished part, track straight over rollers, and survive repeated flexing.
That is a tall order. Too much adhesion, and parts refuse to release at the end. Too little adhesion, and the first layer gives up and becomes modern art. Too much heat distortion, and the belt ripples under the print. Too little stiffness, and long parts may warp or sag. The belt is not just a moving bed; it is a flexible build surface, mechanical axis, and part-removal system all in one.
Common belt experiments include textured polymer surfaces, coated fabric, Kapton-like surfaces, PET-style coverings, specialty composite belts, and even low-cost DIY materials for prototypes. Serious builders usually learn quickly that belt selection is not the place to be careless. The rest of the printer can be beautifully designed, but if the belt tracks poorly or curls under heat, the machine will behave like a raccoon in a lab coat.
Printed Parts: What Can Be Printed and What Should Not Be?
A nearly all printed printer mod does not mean every component should be plastic. The trick is knowing where printed parts make sense. Brackets, mounts, guides, covers, idler supports, sensor holders, and cable management pieces are great candidates. PETG, ASA, ABS, or other heat-resistant materials are often better than PLA for parts near warmth or mechanical load.
However, some parts are better left to metal, rubber, glass fiber, carbon fiber composite, or purchased hardware. Bearings, motors, electronics, belts, fasteners, linear rods, and high-wear surfaces should be chosen for reliability. A printed roller may work in a prototype, but surface smoothness, roundness, and long-term wear matter. A printed bracket may be perfect, but a printed screw in a high-tension location may become a tiny spiral of regret.
The best version of this project is not “print everything no matter what.” It is “print what is smart to print.” That mindset keeps the mod affordable without sacrificing the mechanical honesty needed for reliable results.
Firmware and Slicing Challenges
Hardware is only half the adventure. A conveyor belt printer also needs software that understands the unusual geometry. Traditional slicers assume the printer lays layers flat on a normal build plate. Belt printers often require angled slicing, post-processing, or dedicated profiles so the generated G-code matches the machine’s tilted coordinate system.
Some belt printer workflows use specialized slicers or modified slicer versions. Others rely on post-processing scripts that transform conventional G-code for the angled belt system. More modern belt printers and software profiles have made this easier, but it remains one of the key differences between a fun demonstration and a reliable daily-use machine.
Orientation Matters More Than Usual
Model orientation is critical on any 3D printer, but belt printers add another layer of strategy. A long flat edge at the start of the print can improve adhesion. Long bridges often work better when aligned with the belt axis. Overhang behavior becomes directional because the part is being built in relation to a moving, angled surface. The same model that prints beautifully on a normal bed may need to be rotated, tilted, or redesigned to work well on a conveyor belt system.
That is not a weakness. It is simply a different design language. Once you understand it, you can exploit it. Long parts become easier. Repeating parts become easier. Certain overhangs may need less support. But the printer expects you to meet it halfway.
Advantages of a Nearly All Printed Conveyor Belt Printer Mod
The main advantage is cost control. Instead of buying a dedicated belt printer, a maker can start with a printer they already own and fabricate many of the conversion pieces. This lowers the barrier to experimentation and makes the project especially attractive for people who enjoy learning by building.
The second advantage is customization. Because the conversion parts are printable and CAD-based, builders can modify dimensions, add stiffness, improve cable routing, change sensor locations, or adapt the design for another printer. That flexibility is exactly why open hardware projects spread so effectively. One person builds a version, another improves a mount, someone else solves a tracking problem, and suddenly the entire community gets smarter.
The third advantage is automation. If tuned well, a belt printer can keep producing parts after the first job finishes. For small batch manufacturing, that can reduce downtime. Imagine printing twenty identical clips overnight without waking up to remove each one. Your printer becomes less like a single-purpose appliance and more like a tiny production line that occasionally smells like warm plastic.
Limitations You Should Know Before Building
This mod is exciting, but it is not magic. First-layer tuning becomes even more important than usual. Belt tension and tracking must be adjusted carefully. The belt should run straight without drifting left or right. The surface must be clean, flat, and compatible with the filament being used.
Rigidity is another concern. Converting a printer changes its mechanical loads. Printed brackets must resist flex. The belt system must hold alignment. If the frame is loose, the rollers are crooked, or the belt tension is uneven, print quality will suffer. Belt printers can be wonderfully capable, but they are not forgiving of sloppy geometry.
There is also a learning curve in slicing. A beginner who has only used standard Cura or PrusaSlicer profiles may need time to understand angled layers, belt-axis orientation, and model placement. This is not necessarily difficult, but it is different enough to require attention.
Who Should Try This Mod?
This conveyor belt printer mod is best for makers who already know their way around 3D printer calibration. If you are comfortable adjusting belts, flashing firmware, editing slicer profiles, and fixing the occasional mysterious clicking sound, this project will feel like an adventure. If your current printer still scares you when it asks for bed leveling, start with smaller upgrades first.
It is also a good project for educators, hackerspaces, and engineering clubs. The mod teaches mechanical design, additive manufacturing, motion control, firmware logic, materials science, and manufacturing workflow in one package. It is a classroom lesson disguised as a machine that prints long plastic noodles with purpose.
Practical Examples for Real Use
A well-tuned conveyor belt printer can be useful for repetitive objects like brackets, clips, hooks, cable organizers, spacers, fixtures, and small product parts. It can also be useful for long decorative or functional components such as signs, rails, cosplay props, architectural models, and prototype beams.
For Etsy-style sellers or print farm operators, the appeal is obvious: automatic ejection means less manual labor. For prototypers, long-axis printing means fewer glued joints. For hobbyists, the appeal may be simpler: it is cool. Sometimes “because it is cool” is a perfectly respectable engineering requirement, provided you still tighten the screws.
Experience Notes: What Building a Conveyor Belt Printer Mod Teaches You
Working with a nearly all printed conveyor belt printer mod teaches patience faster than almost any ordinary upgrade. The first lesson is that “printed part” does not mean “finished part.” Printed brackets may need cleanup, inserts, careful torque, and sometimes reprinting with higher walls or denser infill. If a mount flexes by even a small amount, the belt may track poorly or the nozzle may lose consistency across the surface.
The second lesson is that belt tension is a personality test. Too loose, and the belt slips or wrinkles. Too tight, and the rollers bind, the motor strains, or the belt surface warps. The sweet spot is not always obvious. You adjust, test, mark the belt path, run it again, and slowly develop the calm expression of someone negotiating with a tiny treadmill.
The third lesson is that first layers are still king. On a normal printer, a mediocre first layer might survive. On a belt printer, the moving surface and angled geometry make poor adhesion much less forgiving. Cleaning the belt, setting the correct nozzle height, choosing the right bed temperature, and orienting the model with a stable starting edge can make the difference between a successful long print and a plastic tumbleweed.
The fourth lesson is that slicer previews are your friend. Before starting a long belt print, study the toolpath. Look at where the first material touches the belt. Check whether bridges are aligned sensibly. Watch for unsupported starts. A belt printer can produce shapes that feel impossible on a normal printer, but it can also fail in ways that look impossible until you remember the nozzle is printing at an angle.
The fifth lesson is that automation changes your expectations. Once parts begin ejecting themselves, manual print removal starts to feel primitive. You begin thinking in batches: ten clips, twenty cable guides, thirty spacers. You also start designing parts with ejection in mind. Sharp corners, excessive adhesion, or awkward geometry can make parts cling too long. Rounded edges, sensible orientation, and consistent contact surfaces help the printer behave like a production tool instead of a dramatic appliance.
Finally, the project teaches respect for hybrid making. The best results come from combining printed parts with the right purchased components. A good belt, decent bearings, reliable fasteners, and careful alignment matter. The beauty of the mod is not that it eliminates hardware. The beauty is that it lets printed parts do what they do best: adapt, connect, customize, and evolve.
Conclusion
The “Conveyor Belt Printer Mod Is Nearly All Printed” concept captures the best parts of desktop 3D printing culture: creativity, practicality, thrift, and a mild disregard for leaving machines alone. By converting an existing printer into a belt-driven system, makers can experiment with continuous printing, automatic part ejection, and long-format fabrication without buying a full commercial belt printer.
It is not a beginner plug-and-play upgrade. The belt surface, tracking, slicing workflow, model orientation, and mechanical stiffness all matter. But for experienced hobbyists, it is a fascinating project that turns a standard printer into a compact production line. Nearly all printed does not mean effortless. It means the printer helps build its own next chapter, which is exactly the kind of circular logic makers love.











