
An old dresser does not need a flawless pedigree to become the best-looking piece in the room. It may arrive with scratched varnish, orange-toned stain, chipped corners, stubborn drawers, and hardware that appears to have survived three decorating eras without learning anything. Underneath that cosmetic chaos, however, there may be solid construction, useful storage, and a shape worth saving.
This beautiful before and after dresser makeover combines a rich painted finish, a refinished wood top, updated brass hardware, and carefully repaired details. More importantly, it demonstrates the difference between simply covering old furniture with paint and completing a durable furniture refinishing project that looks intentional.
The Before: A Useful Dresser Trapped in the Past
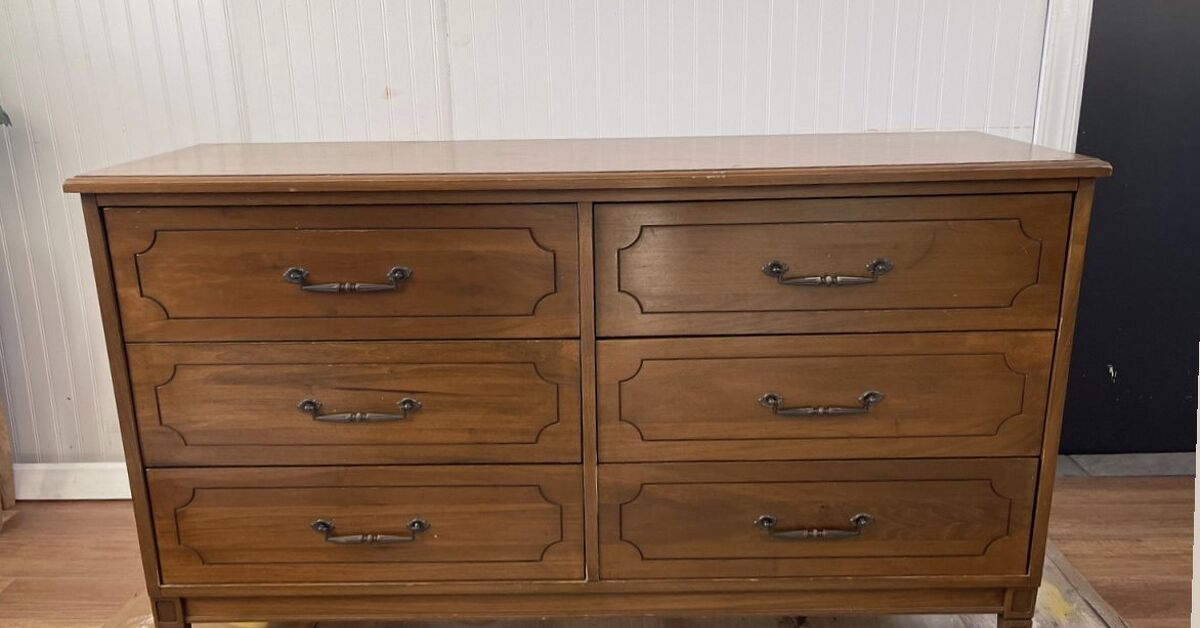
The starting piece was a wide six-drawer dresser with a sturdy frame, dovetailed drawer boxes, decorative feet, and a wood-veneer top. Structurally, it was in good condition. Visually, it was doing its best impression of a roadside motel from 1987.
The original finish had faded unevenly. The top contained water rings and shallow scratches, while the lower corners had small chips. Several drawer fronts sat slightly crooked, and the brass-plated pulls had become dull and blotchy. None of these problems required rebuilding the dresser, but together they made it look tired.
What Made the Dresser Worth Saving?
Before beginning any DIY dresser makeover, inspect the piece rather than falling in love with its price tag. Drawers should open without major twisting, the frame should sit squarely, and the dresser should not rock because of broken joints. Minor veneer chips, loose knobs, scratches, and worn finishes are usually manageable. Extensive mold, severe water swelling, active insect damage, or a collapsing frame may turn a bargain into a wooden hostage situation.
Solid wood is often easier to repair and refinish, but veneer, laminate, medium-density fiberboard, and particleboard can also be updated when the correct preparation and primer are used. Bonding primers are especially important on glossy or manufactured surfaces because ordinary paint may not grip them reliably.
The Design Plan: Modern, Warm, and Not Too Trendy
The makeover goal was to retain some natural wood while giving the dresser a cleaner, more modern personality. The body and drawer fronts would be painted a deep olive green, while the top would be stripped and refinished in a warm walnut tone. Simple aged-brass pulls would replace the ornate original hardware.
This combination works because each finish has a job. The dark paint disguises minor imperfections and emphasizes the dresser’s shape. The stained top preserves visible wood grain and adds warmth. Brass hardware provides a small amount of shine without making the dresser resemble a jewelry counter.
Other Attractive Before-and-After Combinations
- Soft white with natural wood: Bright, relaxed, and easy to coordinate with farmhouse or coastal rooms.
- Navy with brushed brass: Classic enough for a bedroom but dramatic enough for an entryway or dining room.
- Charcoal with black hardware: A clean monochromatic look for modern interiors.
- Muted blue with antique bronze: Ideal for vintage dressers with curved fronts or carved details.
- Two-tone drawers: A useful way to emphasize symmetry, graduated drawer sizes, or geometric shapes.
Dresser makeover galleries frequently use contrasting drawer fronts, ombré colors, wallpaper, painted patterns, new trim, and unexpected hardware to create a custom result. The strongest makeovers generally respond to the existing shape instead of piling every available trend onto one innocent chest of drawers.
Tools and Materials
- Screwdrivers and pliers
- Drop cloth or plastic sheeting
- Protective gloves, safety glasses, and an appropriate dust mask or respirator
- Mild cleaner or degreasing solution
- Clean lint-free cloths
- Wood glue and clamps
- Paintable or stainable wood filler
- 120-, 150-, and 220-grit sandpaper
- Sanding block or random-orbit sander
- Primer suited to the dresser’s surface
- Furniture, cabinet, or trim enamel
- Quality angled brush and small smooth-finish roller
- Wood stain for the top
- Clear protective finish
- Replacement drawer pulls
- Wall-anchoring hardware
How to Complete the Dresser Makeover
1. Check for Safety Concerns
Before sanding an old painted dresser, consider its age and history. Disturbing older coatings can produce hazardous dust if lead-based paint is present. The U.S. Environmental Protection Agency warns that sanding, scraping, drilling, and similar activities can release lead-contaminated dust, particularly in pre-1978 housing and painted components. Test questionable finishes and use lead-safe practices rather than attacking mystery paint with a power sander and heroic optimism.
2. Photograph and Disassemble the Dresser
Take several photographs before removing anything. These images will help you remember the original hardware placement and drawer order. Remove all drawers, knobs, pulls, decorative plates, and detachable feet.
Label each drawer in an inconspicuous location with painter’s tape. Older handmade or heavily used dressers may have drawers that fit only one opening comfortably. Labeling prevents the final reassembly stage from becoming an unwanted furniture-themed puzzle.
3. Clean Every Surface Thoroughly
Cleaning is not the glamorous part of a beautiful dresser makeover, but it is one of the most important. Furniture polish, skin oils, wax, dust, cooking residue, and cleaning sprays can interfere with primer and paint adhesion. Contaminated surfaces may produce peeling, craters, or small circular defects known as fisheyes.
Vacuum loose debris, wash the exterior with an appropriate cleaner, and wipe away all residue. Pay special attention to drawer pulls, corners, trim, and the areas around frequently touched edges. Let the dresser dry completely before moving forward. Professional painting guidance consistently emphasizes that surfaces should be clean, dry, smooth, and properly primed before the finish coat is applied.
4. Repair Loose Joints, Chips, and Scratches
Glue loose joints before filling cosmetic damage. Clamp repaired sections until the adhesive has cured according to its instructions. Fill deep scratches, old hardware holes, and chipped corners with a suitable wood filler. Allow it to dry, then sand it level with the surrounding surface.
Do not automatically fill every dent. A vintage dresser can retain a few honest signs of age without looking neglected. The goal is refreshed furniture, not witness protection for wood.
5. Sand or Strip the Existing Finish
The painted sections usually need a thorough scuff sanding rather than complete stripping. Sand the body and drawer fronts evenly to dull the existing sheen and create texture for the primer. Begin with approximately 120- or 150-grit paper where necessary, then smooth the surface with a finer grit.
For the natural wood top, remove the damaged finish carefully. Chemical stripper may be useful when thick coatings or detailed edges make sanding difficult. If the veneer is thin, use a light touch; aggressive sanding can pass through it surprisingly quickly and reveal the less attractive substrate beneath. Furniture-refinishing guidance recommends making repairs before refinishing and choosing stripping, sanding, or recoating based on the condition of the existing finish.
6. Remove All Sanding Dust
Vacuum the dresser, the drawers, the floor, and nearby work surfaces. Follow with a clean cloth suited to the coating system. Dust left behind can create rough patches that become increasingly obvious as more coats are applied.
7. Prime the Painted Sections
Apply a thin, even coat of primer to the dresser body and drawer fronts. Use a stain-blocking primer if the wood contains knots, tannins, water marks, or other discoloration likely to bleed through. Use a high-adhesion bonding primer on laminate, glossy varnish, or other slick surfaces.
Although some specialty furniture paints advertise reduced-preparation application, the product label should control the decision. Primer remains useful when changing from a dark finish to a light color, covering repairs, sealing raw wood, blocking stains, or improving adhesion. Manufacturers commonly recommend specialized primers for difficult surfaces and potential tannin bleed.
8. Apply Two Thin Coats of Paint
Once the primer is ready for recoating, sand lightly if the product instructions recommend it. Remove the dust, then apply the first coat of furniture or cabinet enamel.
Use an angled brush for corners, trim, and recessed details. Follow with a small smooth-surface roller on flat areas. Work in manageable sections and avoid repeatedly rolling paint after it begins to set. Thin coats level more evenly and are less likely to sag around drawer openings.
Allow the first coat to dry for the full recommended period before applying the second. Paint that feels dry on the surface may still be too soft for sanding, recoating, reassembly, or everyday use. Lowe’s furniture-painting guidance recommends following manufacturer drying times and using primer followed by multiple finish coats for a long-lasting result.
9. Stain and Protect the Wood Top
After the bare wood has been sanded evenly, test the stain on the back edge or another hidden area. Wood species, previous finishes, filler, and sanding consistency can all influence the final color.
Apply the stain in the direction of the grain and remove excess according to the manufacturer’s instructions. Once the stain has dried, protect it with a compatible clear finish. A topcoat helps defend the dresser from scratches, scuffs, water rings, and the mysterious sticky objects that appear on bedroom furniture without witnesses. Clear finishes are commonly recommended after staining to provide lasting protection.
10. Upgrade the Hardware
Measure the distance between the existing screw holes before shopping for new pulls. Choosing replacements with the same center-to-center measurement can eliminate drilling and filling. When the new hardware uses a different spacing, create a template so every pull is aligned consistently.
For this makeover, simple aged-brass pulls introduced warmth without competing with the dark olive paint. Matte black, polished nickel, leather loops, wood knobs, or vintage glass pulls can produce entirely different personalities from the same dresser.
11. Let the Finish Cure Before Reassembly
Dry paint and cured paint are not the same thing. Reinstalling hardware or sliding drawers into place too soon can leave dents, scratches, and stuck edges. Follow the coating manufacturer’s cure guidance, handle the components gently, and avoid placing heavy decorations on the top prematurely.
12. Reassemble and Anchor the Dresser
Return each labeled drawer to its original opening, tighten the hardware, and check that the dresser stands level. Finally, secure it to the wall with an appropriate anchoring system. The U.S. Consumer Product Safety Commission recommends anchoring dressers and other clothing-storage furniture to reduce tip-over hazards, especially where children may be present.
The After: From Forgotten Furniture to a Custom Statement Piece
The finished dresser looks dramatically different without losing the qualities that made it worth rescuing. Deep olive paint gives the broad frame visual weight, while the walnut-toned top adds warmth and reveals the original wood grain. Slim brass pulls create cleaner horizontal lines across the drawers.
The repaired corners are no longer obvious, the drawer fronts sit more evenly, and the sealed top reflects light with a soft satin sheen. The makeover feels polished but not factory-perfect. Small variations in the wood remain visible, giving the piece character that new mass-produced furniture often tries very hard to imitate.
Styling the Finished Dresser
A makeover looks strongest when the styling allows the furniture to remain the main attraction. Above the dresser, use one large mirror or a balanced arrangement of framed art. Add a lamp, a tray, and one decorative object or plant. Leave some open space instead of covering the newly refinished top with seventeen candles and a ceramic bird convention.
Common Dresser Makeover Mistakes
- Painting over grease or furniture polish: Even excellent paint can fail on a contaminated surface.
- Using the wrong primer: Laminate, glossy varnish, raw wood, and stained wood may require different products.
- Sanding veneer too aggressively: Veneer is a thin decorative layer, not an unlimited supply of hardwood.
- Applying thick coats: Heavy paint tends to drip, sag, remain soft, and emphasize brush marks.
- Ignoring drying and curing times: Rushing can damage an otherwise attractive finish.
- Painting moving hardware: Paint on drawer slides, hinges, or screw threads can interfere with operation.
- Forgetting furniture anchoring: A beautiful dresser should also be a safely installed dresser.
Real-World Makeover Experience: What the Process Actually Feels Like
Online before-and-after photographs can make a dresser makeover appear to involve three cheerful brushstrokes followed by a dramatic reveal. The real process is less magical and more satisfying. Most of the work happens before the attractive paint color appears.
The first surprise is usually how dirty old furniture can be. A dresser that looks reasonably clean may release years of gray residue when washed. Corners around drawer openings often contain dust, wax, hair, and unidentified crumbs with impressive long-term leases. Cleaning these areas is tedious, but it immediately makes the project feel more manageable.
The second lesson is that every repair affects the finish. A filled hardware hole that feels smooth under a fingertip may still become visible under satin paint. Shining a work light across the surface at a low angle reveals ridges, dents, and sanding scratches that ordinary overhead lighting hides. Correcting them before priming is much easier than discovering them after the final coat.
Color can also behave unexpectedly. A dark green sample may look almost black in a garage but become warmer and softer in a bedroom with afternoon sunlight. Testing the color directly on a primed drawer or sample board provides a more useful preview than trusting a tiny paper chip under store lighting.
The most frustrating stage is often waiting. Primer needs time. Paint needs time. Stain needs time. Clear finish needs even more time. The dresser may look ready while the coating is still vulnerable to fingerprints, hardware impressions, and drawer-edge scratches. Leaving the parts undisturbed can feel unproductive, but curing is part of the project rather than an inconvenient pause between the “real” steps.
Hardware installation brings another practical lesson: measure everything twice. Older dressers are not always perfectly symmetrical, and hand-drilled holes may vary slightly. A reusable template keeps new pulls aligned, but each drawer should still be checked before drilling. A beautiful finish does not distract anyone from a handle that appears to be slowly walking uphill.
There is also a moment during nearly every substantial furniture makeover when the project looks worse than it did at the beginning. The drawers are scattered across the room, patches of filler cover the corners, the top is half stripped, and the primer resembles a medical bandage. This awkward stage is normal. It means the cosmetic damage is being exposed and corrected rather than hidden.
The final assembly changes everything. Once the hardware is installed and the drawers return to the frame, the separate painted parts become furniture again. The contrast between the olive body, warm wood top, and brass pulls suddenly makes sense. Small imperfections become less noticeable, while the overall silhouette and finish take over.
Perhaps the most rewarding part is not saving money, although a thrifted makeover can cost far less than comparable custom furniture. It is learning to recognize potential. A dresser with an outdated color is not necessarily an outdated object. Strong proportions, functional drawers, and quality construction can outlast multiple decorating trends. Paint, stain, and hardware merely help those qualities become visible again.
Conclusion
A beautiful before and after dresser makeover succeeds because it combines creativity with disciplined preparation. Cleaning, repairing, sanding, priming, painting, staining, sealing, and curing may not create instant gratification, but they create a finish that can survive real use.
The transformation also proves that dated furniture does not always need to be replaced. With the right surface preparation, a coordinated color palette, attractive hardware, and a little patience, an overlooked dresser can become a practical statement piece with more character than something pulled directly from a showroom box.











