
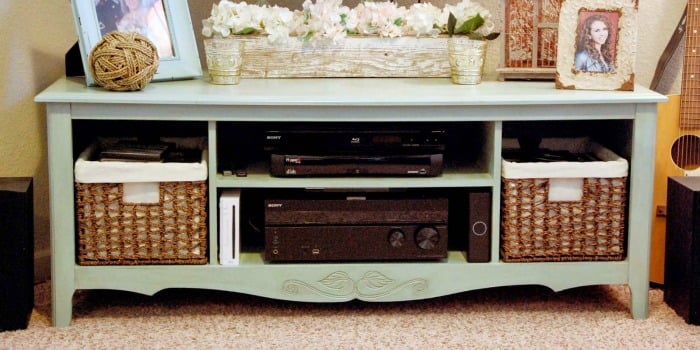
Old entertainment centers are the dinosaurs of living room furniture: once mighty, now mostly confused about where the giant tube TV went. But before you drag that bulky cabinet to the curb, take a second look. With smart cutting, sanding, painting, and styling, you can turn an entertainment center into a TV console table that looks custom, saves money, and gives your media gear a stylish place to live.
This DIY furniture makeover is especially useful if you have an older entertainment unit with a sturdy base, deep shelves, doors, drawers, or decorative trim. Instead of buying a brand-new TV stand, you can repurpose what you already own and create a console that fits your room, your storage needs, and your personality. Bonus: your wallet will not need a tiny emotional support blanket.
Why Turn an Entertainment Center into a TV Console Table?
Traditional entertainment centers were built for bulky televisions, VCRs, stereo systems, DVD towers, and possibly a secret collection of remote controls from 1998. Today, flat-screen TVs are thinner, lighter, and often wall-mounted. That leaves many large entertainment centers looking too tall, too deep, and too visually heavy for modern spaces.
Converting one into a TV console table solves several problems at once. You keep the most useful part of the furniture, remove the oversized upper section, and create a lower, cleaner piece that works under a wall-mounted TV or supports a flat-screen television directly. The result can look like a farmhouse media console, a cottage-style cabinet, a modern painted TV stand, or a rustic storage table depending on the finish you choose.
What Makes a Good Entertainment Center for This Project?
Not every entertainment center is worth saving. Some pieces are built like tanks; others wobble if you look at them with confidence. Before starting, inspect the unit carefully.
Look for a Solid Base
The best candidate has a strong lower cabinet with doors, drawers, or open shelving. If the base is level, sturdy, and wide enough for your TV area, it is probably worth transforming. Real wood and high-quality plywood are ideal, but MDF or laminate furniture can also work if it is structurally sound.
Check the Dimensions
A comfortable TV console table is usually lower and wider than an old entertainment center. Measure your wall, your TV, and the furniture base. If your TV will sit on top, make sure the top surface is wider than the TV stand feet and strong enough to support the weight. If your TV is wall-mounted, the console should still look balanced below it, not like a tiny bench hiding from responsibility.
Avoid Serious Damage
Minor scratches, dated stain, missing knobs, and ugly trim are fixable. Severe water damage, rotten wood, sagging shelves, and cracked structural panels are much bigger problems. If the piece smells musty, crumbles at the corners, or leans like it has given up on life, choose a better candidate.
Tools and Supplies You May Need
Your exact supply list depends on the furniture style, but most entertainment center to TV console makeovers use a similar set of basics.
- Screwdriver or drill
- Circular saw, jigsaw, or handsaw
- Measuring tape and pencil
- Wood glue
- Clamps
- Wood filler
- Sandpaper or sanding block
- Primer suitable for wood, laminate, or MDF
- Furniture paint, stain, or chalk-style paint
- Clear protective topcoat or wax
- New knobs, pulls, baskets, or shelf liners
- Cable grommets or cord management clips
- Anti-tip furniture straps or wall anchors
You do not need a professional workshop to complete this project, but you do need patience, ventilation, and the wisdom to measure twice before cutting once. Measuring once and cutting dramatically is how furniture becomes firewood.
Step-by-Step: How to Turn an Entertainment Center into a TV Console Table
Step 1: Remove the Top Section
Most older entertainment centers have a tall upper hutch attached to a lower cabinet. Start by removing shelves, doors, hardware, backing panels, and loose trim. Look for screws connecting the upper section to the base. Some units come apart easily; others are glued, stapled, or built with hidden fasteners that seem personally offended by your plans.
If the upper structure cannot be unscrewed cleanly, you may need to cut it down. Mark your cutting line carefully and keep the base intact. The goal is to preserve the lower cabinet and create a flat, usable top surface. Work slowly, support the furniture properly, and wear eye protection when cutting or sanding.
Step 2: Create or Repair the Top Surface
Once the tall portion is removed, the remaining base may have an uneven top. You can fix this by adding a new wood top, reusing part of the old cabinet, or attaching a piece of plywood cut to size. A slightly overhanging top can make the piece look more intentional and less like it survived a furniture haircut.
Use wood glue and screws where needed, then clamp the top until the adhesive cures. Fill screw holes, seams, dents, and gaps with wood filler. When dry, sand everything smooth so the top looks like it was always meant to be there.
Step 3: Strengthen the Console
A TV console table needs to be strong, especially if it will hold a television, gaming system, speakers, books, baskets, or decor. Check the corners, shelves, and back panel. Add support blocks inside weak corners, tighten screws, and reinforce shelves that sag.
If you removed a lot of the original structure, the base may need extra bracing. Simple wood cleats, pocket-hole joinery, or interior support strips can make the console much sturdier. This is not the glamorous part of the project, but it is the part that keeps your TV from taking a dramatic dive.
Step 4: Sand and Prep the Surface
Surface preparation is the difference between a furniture makeover that lasts and one that chips the first time someone sets down a coffee mug. Clean the entire piece first to remove dust, grease, wax, and old furniture polish. Then sand the surfaces to dull the finish and help primer bond.
For stained or painted wood, light sanding with medium to fine grit sandpaper is usually enough. For laminate, use a gentle scuff sanding and a bonding primer designed for slick surfaces. Do not sand laminate too aggressively, because once you burn through the surface, the project gets cranky.
Step 5: Prime Before Painting
Primer helps paint adhere, blocks stains, and creates a more even finish. Bare wood, patched areas, MDF edges, and laminate surfaces all benefit from the right primer. If your entertainment center has knots, dark stain, or mystery marks from its previous life, a stain-blocking primer is a smart choice.
Apply thin, even coats and let each coat dry according to the product directions. Lightly sanding between coats can create a smoother finish. This step may feel slow, but it saves you from future peeling, streaking, and saying things to furniture that your neighbors should not hear.
Step 6: Paint, Stain, or Refinish
Paint is the fastest way to modernize an old entertainment center. White, black, navy, sage green, charcoal, warm beige, and soft gray are popular choices for TV console tables because they work with many decor styles. Chalk-style paint can create a matte vintage look, while enamel or cabinet-grade paint gives a more durable finish.
If the wood grain is attractive, consider staining the top and painting the base for a two-tone look. A stained wood top with a painted body can make the console feel custom, especially in farmhouse, transitional, coastal, or rustic living rooms.
Use thin coats rather than one thick coat. Thick paint may look satisfying at first, but it can drip, stay tacky, or show brush marks. A foam roller works well on flat areas, while an angled brush helps with corners, trim, and grooves.
Step 7: Add Storage and Style
The best TV console tables are not just pretty; they also hide the chaos. Use baskets for DVDs, controllers, chargers, remotes, board games, blankets, or gaming accessories. If the console has doors, update the knobs or pulls to match your room style. Brushed brass, matte black, antique bronze, and simple wood knobs can completely change the mood.
If the back of the cabinet is visible through open shelves, consider adding beadboard, peel-and-stick wallpaper, thin plywood, or painted paneling. This small detail can make the makeover look polished instead of patched together during a caffeine-fueled Saturday.
Step 8: Manage Cords Like a Grown-Up
A beautiful TV console can quickly lose its charm if cords are dangling everywhere like electronic spaghetti. Drill discreet holes in the back panel or top surface for cable grommets. Use cord clips, raceways, hook-and-loop straps, or cable sleeves to group wires neatly.
Plan where your router, streaming device, soundbar, game console, and power strip will go before you paint the final coat. It is much easier to drill cable holes before the furniture is fully styled and covered in decorative objects with suspiciously fragile personalities.
Step 9: Protect the Finish
A TV console table gets regular use, so protect the paint or stain with a durable topcoat. Water-based polyurethane, furniture wax, polycrylic, or a clear furniture sealer can help resist scratches and everyday wear. Choose the finish based on the look you want: matte for a soft vintage feel, satin for a balanced modern finish, or semi-gloss for extra wipeability.
Let the finish cure before loading the console with electronics and decor. Paint may feel dry in a few hours, but curing can take longer. Treat the piece gently during the first couple of weeks so the surface hardens properly.
Step 10: Anchor the TV and Furniture
Safety matters. If your TV sits on the console, make sure the furniture is designed or reinforced to support it. Whether the TV is on the console or mounted above it, use appropriate anchors, straps, or brackets to secure the furniture and television according to manufacturer instructions. This is especially important in homes with children, pets, or enthusiastic adults who gesture wildly during football games.
Design Ideas for Your DIY TV Console Table
Farmhouse Console
Paint the base white or cream, add a stained wood top, and use woven baskets on open shelves. Replace old hardware with black cup pulls or simple knobs. A lightly distressed finish can work well, but do not overdo it unless you want the console to look like it fought a raccoon and lost.
Modern Black Media Console
Use matte or satin black paint, simple hardware, and clean-lined decor. Remove overly ornate trim if possible. Add wood legs or a natural wood top for warmth. This style works beautifully with wall-mounted TVs and minimalist living rooms.
Coastal Cottage Console
Try soft blue, sea glass green, warm white, or pale gray. Add light baskets, simple ceramic decor, and brushed nickel hardware. A beadboard backing can make the piece feel breezy and charming without turning your living room into a souvenir shop.
Rustic Industrial Console
Use dark stain, black metal pulls, exposed wood grain, and chunky legs. If the original entertainment center has thick trim or heavy panels, lean into that strength instead of fighting it. Add metal baskets or wire bins for storage.
Common Mistakes to Avoid
Skipping Prep Work
Cleaning, sanding, and priming are not optional if you want a lasting finish. Paint needs a clean, slightly rough surface to grip. Skipping prep is like asking a cat to follow instructions: technically possible, but do not build your day around it.
Ignoring Scale
A console should fit the TV and the wall. If the piece is too short, the TV area may look top-heavy. If it is too deep, it may crowd the room. Measure carefully and think about walking space, outlet placement, and viewing comfort.
Forgetting Ventilation
Sanding dust, primer, paint, stain, and topcoat all require proper ventilation. Work in a garage, outdoors, or in a well-ventilated room. Wear a respirator when sanding or using products with strong fumes.
Using Weak Shelves for Heavy Electronics
Game consoles, receivers, speakers, and books can be heavier than they look. Reinforce shelves if needed and avoid overloading thin particleboard. A sturdy console is a happy console.
Budget-Friendly Upgrade Ideas
You do not have to spend a fortune to make this project look high-end. New hardware, fresh paint, and attractive storage baskets can make a huge difference. Reusing leftover paint from another home project is also a smart way to save money while tying the room together.
If the original doors look dated, remove them and create open shelving. If the shelves look messy, add baskets. If the top looks plain, attach a stained wood board. If the back panel looks boring, add wallpaper or painted beadboard. Small changes stack up quickly, and suddenly your old entertainment center is acting like it came from a boutique furniture store with very confident pricing.
Experience Notes: What This Project Teaches You in Real Life
Turning an entertainment center into a TV console table is one of those DIY projects that looks simple online and then teaches you twelve new lessons in humility by lunchtime. The first experience most people have is discovering that old furniture was not always built logically. You may remove six obvious screws and still find the top section clinging to the base like it signed a lifetime contract. That is normal. Go slowly, check for hidden fasteners, and do not assume brute force is the answer. Brute force is how trim pieces become modern art.
The second lesson is that the “ugly” piece often has good bones. Many older entertainment centers were made with thicker materials than some budget furniture sold today. Once the oversized hutch is gone, the base may reveal beautiful proportions, useful storage, and decorative details worth keeping. A carved edge, raised-panel door, or chunky base can become a design feature after paint or stain. Sometimes the problem is not the furniture; it is the 1990s orange-brown finish yelling over everything else in the room.
Another useful experience is learning how much paint color changes in real light. A soft gray may look perfect in the can and strangely purple in your living room. A bright white may feel fresh in the garage and icy next to warm flooring. Test paint on a hidden area or scrap board before committing. View it in morning light, afternoon light, and evening lamp light. Furniture does not need drama, but paint undertones apparently enjoy writing plot twists.
Storage planning also matters more than beginners expect. Before adding shelves or baskets, gather the items you actually want to store: remotes, streaming devices, chargers, games, blankets, manuals, router, speakers, and that one cable nobody recognizes but everyone is afraid to throw away. Measure those items first. Then design the inside of the console around real life, not fantasy life where every cord coils itself neatly and no one owns seven remote controls.
The final experience is the satisfaction of making something useful from something outdated. A repurposed entertainment center carries a little history, saves money, and keeps a bulky piece out of the landfill. It also gives you a custom TV console table that fits your home better than many store-bought options. The finished piece may not be perfect, and that is fine. A tiny brush mark, a patched seam, or a slightly imperfect corner is part of the story. Besides, once the TV is on, the baskets are in place, and the cords are hidden, nobody will know the console used to be an entertainment center with big tube-TV energy.
Conclusion
Learning how to turn an entertainment center into a TV console table is a practical, creative, and budget-friendly way to update your living room. The process usually involves removing the bulky top, creating a sturdy surface, repairing and sanding the base, applying primer and paint, improving storage, managing cords, and anchoring the finished piece safely.
The best part is flexibility. You can make the console modern, rustic, farmhouse, coastal, vintage, or bold depending on your finish and hardware. Instead of throwing away a dated cabinet, you can give it a second life as a stylish media console that looks intentional, functions beautifully, and quietly brags about your DIY skills.
Note: This article is written as an original, web-ready synthesis of practical DIY furniture refinishing, upcycling, painting, storage, cord management, and furniture safety guidance.











