
Note: This web-ready article intentionally omits source links and extra code annotations for clean publishing.
Blank walls have a way of staring back at you like they pay rent and expect you to entertain them. That is exactly why a rustic wall decor DIY project is such a satisfying upgrade. It adds warmth, texture, personality, and that “I absolutely meant for my house to look this charming” energy without requiring a complete room makeover.
Rustic decor has stuck around for a reason. It is relaxed, welcoming, and forgiving. A nick in the wood? Character. A weathered finish? Charm. A slightly imperfect brushstroke? Congratulations, you just made it look more authentic. In a world full of sleek finishes and ultra-polished everything, rustic wall decor gives a room a heartbeat.
This guide walks through a rustic wall decor DIY project that is beautiful, beginner-friendly, budget-conscious, and easy to customize. We will cover what makes rustic style work, how to plan the project, the tools and materials you need, step-by-step instructions, styling ideas for different rooms, common mistakes to avoid, and real-life experience-based tips that make the final piece look intentional instead of “weekend panic craft.”
Why Rustic Wall Decor Still Works So Well
Rustic design survives trend cycles because it is rooted in materials people naturally respond to: wood, metal, linen, woven textures, and timeworn finishes. It feels comfortable instead of precious. A rustic wall piece can soften a modern room, ground a farmhouse-inspired space, or add contrast to clean white walls that otherwise feel a little too “new apartment brochure.”
The secret is balance. The best rustic wall decor does not scream cabin gift shop. It mixes natural texture with restraint. Think reclaimed or distressed wood, simple shapes, matte finishes, warm neutral colors, and maybe one contrasting element such as black hardware, a botanical accent, or an understated quote. Rustic style works best when it feels collected, not overloaded.
That is also why a DIY approach makes so much sense. Store-bought rustic decor can look mass-produced if everyone buys the same sign, the same faux-aged frame, and the same aggressively inspirational phrase. A handmade piece has subtle variation, and variation is what gives rustic decor its soul.
The Project: A Layered Rustic Wall Hanging With Reclaimed-Wood Style
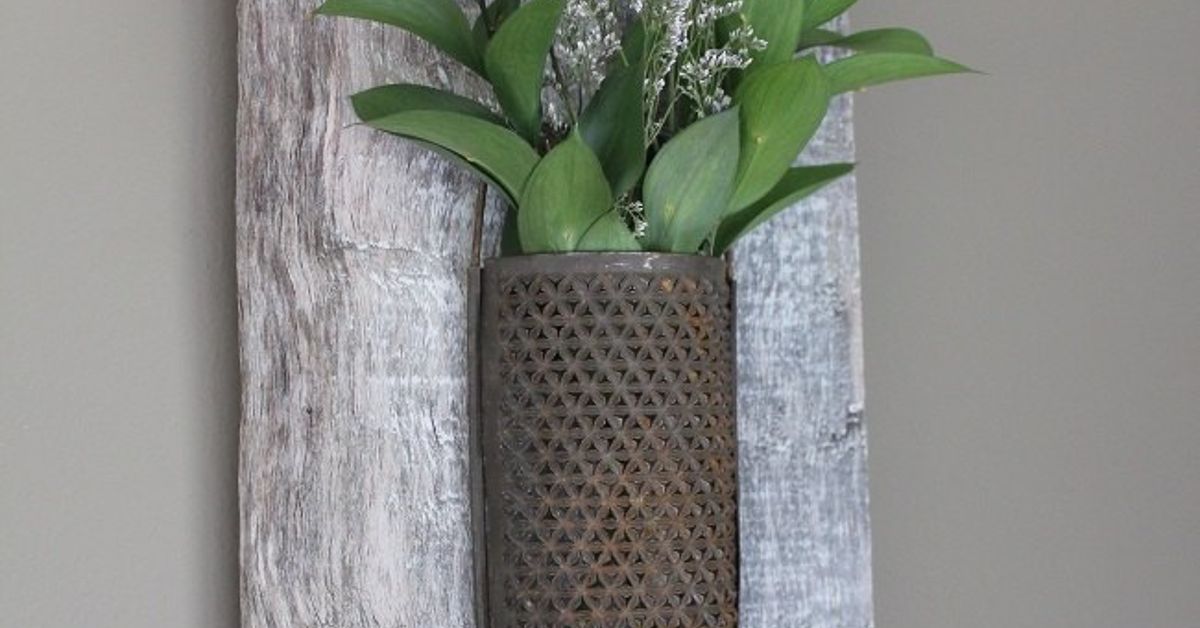
For this article, the featured rustic wall decor DIY project is a layered wood wall hanging. It combines a wood backboard, a framed center panel, a lightly distressed finish, and optional decorative details like a wreath ring, metal brackets, or a small dried greenery bundle. The finished look lands somewhere between farmhouse wall art, vintage salvage, and “I found this in a charming antique market, thanks for noticing.”
Why this project is a smart choice
This project is ideal because it checks the boxes most DIYers care about:
- It looks expensive but can be made on a budget.
- It works with new wood, reclaimed wood, or scrap lumber.
- It can be sized for an entryway, living room, bedroom, kitchen, or hallway.
- It is customizable enough to match modern rustic, farmhouse, cottage, or even industrial decor.
- It does not require advanced woodworking skills.
Before You Build: Design It Like You Mean It
Before touching sandpaper or paint, decide what role the piece will play in your space. Rustic wall decor is not just filler. It can become the visual anchor of a room. Start with three practical questions.
1. Where will it hang?
A large living room wall can handle a wider, more dramatic piece with layered elements and darker stain. A narrow hallway or entryway usually looks better with a taller, slimmer version. Above a console table, the artwork should feel proportional rather than floating awkwardly like it missed its appointment.
2. What mood do you want?
Soft rustic tends to use whitewashed wood, beige tones, woven accents, and gentle distressing. Bold rustic leans into deeper stains, darker metals, visible grain, and stronger contrast. If your room already has a lot going on, choose a calmer finish. If your room feels flat, go with stronger texture.
3. What should it say visually?
Not every piece needs a literal message. In fact, some of the best rustic wall decor projects skip words entirely. Wood texture, shape, and layering often do the heavy lifting better than a giant scripted phrase telling you to gather, breathe, or wash something farm-fresh.
Materials and Tools
Basic materials
- One wood backboard or several boards joined together
- Wood trim or narrow boards for the frame layer
- Wood glue
- Finishing nails or a nail gun
- Sandpaper in medium and fine grit
- Paint, stain, or wax finish
- Matte clear sealer
- D-ring hangers or sawtooth hanger
Optional decorative materials
- Black metal corner brackets
- Wire wreath ring
- Dried eucalyptus or faux stems
- Jute rope
- Stencil or vinyl lettering if you want a message
- Chicken wire, cane webbing, or burlap for extra texture
Helpful tools
- Measuring tape
- Pencil
- Miter saw or hand saw
- Clamps
- Paintbrushes or lint-free rags
- Drill or screwdriver
- Safety goggles and work gloves
If you are using reclaimed wood, inspect every board carefully before cutting. Old lumber can hide nails, rough edges, and surprises that are less “vintage charm” and more “trip to the hardware store again.”
Step-by-Step: How to Make the Rustic Wall Decor DIY Project
Step 1: Measure and cut your base
A beginner-friendly size is around 24 by 36 inches, but you can scale up or down. Cut the backboard first. If you are joining several boards side by side, line them up, glue them, clamp them, and reinforce them from behind with support strips.
Step 2: Build the frame layer
Cut trim pieces or narrow boards to fit around the center area of the backboard. This creates depth and makes the piece feel more finished. Dry-fit everything before attaching. That tiny gap you think nobody will notice? You will notice it forever.
Step 3: Sand, but do not erase all the character
Rustic does not mean splinter festival. Sand enough to smooth rough edges and make the surface workable, but keep some grain, dents, and variation. You want texture, not injury.
Step 4: Paint or stain in layers
This is where the rustic magic happens. For a weathered finish, apply a base coat in a soft neutral such as off-white, taupe, clay, or muted gray. Let it dry, then lightly sand the edges. Add stain over sections if you want depth. For a more natural look, use a medium wood stain and dry brush a bit of white or gray over the top.
The goal is not to make the piece look old in a fake theatrical way. You are aiming for subtle age, not haunted barn prop.
Step 5: Assemble the design
Attach the frame layer to the backboard with glue and nails. If you are adding a wreath ring, center it inside the framed area. If you are using chicken wire or burlap behind the frame for texture, staple it in place before final assembly. Add metal corner accents if you want a slightly industrial twist.
Step 6: Add a focal detail
This is the detail that keeps the project from looking unfinished. You might hang a small greenery bundle from the ring, mount a narrow shelf ledge for a tiny vase, attach a simple wood medallion, or stencil a single understated word. Keep it restrained. Rustic decor gets stronger when it resists the urge to accessorize like it is auditioning for five different styles at once.
Step 7: Seal and hang
Use a matte clear sealer to protect the finish without making the surface glossy. Attach sturdy hangers on the back. If the piece is heavy, use appropriate wall anchors or secure it into studs. The dream is a cozy feature wall, not a dramatic crash in the middle of dinner.
How to Make It Look Designer-Level, Not Homemade in the Wrong Way
Good DIY decor does not just depend on construction. Styling matters. A few design choices can instantly elevate the final result.
Use a limited palette
Stick with two or three core tones: warm wood, soft white, black metal, faded green, muted charcoal, or natural linen. Too many colors weaken the rustic effect and make the piece feel busy.
Mix textures, not chaos
Rustic design thrives on texture: rough wood, soft greenery, matte paint, woven fibers, aged metal. Layering these elements creates depth. Piling on unrelated objects creates confusion. There is a difference.
Leave breathing room
Not every inch needs decoration. Negative space lets the material shine. A large wood panel with one striking center detail often looks more expensive than a crowded arrangement of mini accents.
Match the room without cloning it
If your room already has wood furniture, choose a finish that complements it without matching exactly. Slight contrast keeps the space from looking flat. Rustic rooms feel best when they look collected over time.
Room-by-Room Rustic Wall Decor Ideas
Living room
Go larger here. A wide rustic wall hanging above a sofa or console creates instant warmth. Try darker wood tones with black metal details for contrast.
Entryway
Use a slimmer vertical version with hooks or a tiny ledge. This adds function while keeping the space stylish. Entry walls love a project that looks welcoming but does not block traffic.
Kitchen
Think lighter finishes, simple frames, and practical charm. A rustic wall decor DIY project in the kitchen can feature small herb-themed art, vintage utensils, or a simple shelf accent.
Bedroom
Go softer. Whitewashed wood, subtle greenery, and woven textures feel calm and cozy. This is not the place for giant aggressive lettering or anything that looks like it is trying to host brunch while you sleep.
Bathroom
Keep materials moisture-conscious and do not overcrowd the wall. Smaller rustic pieces with a clean silhouette work well in bathrooms, especially when paired with black fixtures or natural baskets.
Common Mistakes to Avoid
- Over-distressing the wood: A little age looks authentic. Too much looks like the project survived a cartoon tornado.
- Choosing the wrong scale: Tiny art on a huge wall gets swallowed instantly. Always measure your wall first.
- Using too many “rustic” symbols at once: Wood, rope, greenery, galvanized metal, quotes, antlers, and stars do not all need to attend the same meeting.
- Ignoring surrounding decor: Your piece should connect with the room’s colors, finishes, and furniture.
- Skipping the hanger plan: A beautiful project is only successful if it hangs securely and straight.
Budget Tips for a Rustic Look
One of the best things about rustic wall decor is that perfection is not the goal, which makes budget-friendly materials totally fair game. Check salvage shops, leftover lumber piles, old frames, yard sales, thrift stores, and hardware store off-cut bins. Paint samples can handle small decorative sections. Scrap trim can become a frame. Even plain pine can look high-end with the right layering and finish.
If you are decorating on a tight budget, spend your money where it shows most: hanging hardware, a good stain or paint, and one well-chosen detail such as a metal wreath ring or a quality faux stem bundle. Save on the rest. Rustic style is forgiving, and sometimes the “imperfect” materials are exactly what make the final piece feel real.
Why This Kind of DIY Project Feels So Rewarding
A rustic wall decor DIY project is more than decoration. It changes how a room feels. Texture softens blank walls. Wood brings warmth where drywall feels cold. Handmade details tell a story that mass-produced decor cannot. Even better, the project becomes personal. It reflects your taste, your space, and your choices instead of a showroom formula.
That is what makes rustic DIY so satisfying. It is not about making something flawless. It is about creating something with presence. Something that looks grounded, welcoming, and just a little bit storied. The best version of rustic style does not beg for attention. It quietly earns it.
Experience: What I Learned From Doing a Rustic Wall Decor DIY Project
The first time I made a rustic wall piece, I assumed the project would be simple because the finished style looked relaxed. That was my first adorable mistake. Rustic may look effortless, but the best results usually come from making a series of careful choices that allow the piece to feel easy rather than accidental.
I started with reclaimed-looking boards and instantly discovered that not all “weathered” wood is created equal. Some boards had beautiful grain and soft variation. Others looked like they had been through a dramatic breakup and wanted everyone to know it. I learned quickly that choosing boards is less about finding the roughest material and more about finding wood with believable texture. Too smooth and the project feels generic. Too damaged and it becomes a rescue mission.
The second lesson was about color. I originally thought darker stain would automatically look richer, but once I held the wood against a white wall, it looked heavier than I wanted. So I lightened the finish with a dry-brushed layer of off-white and suddenly the whole project made sense. That small adjustment made the piece feel rustic without making the room feel gloomy. Since then, I always test finishes on scrap wood first. It saves time, money, and at least one unnecessary identity crisis in the paint aisle.
I also learned that spacing matters more than people think. On my first attempt, I added too many decorative elements because I was worried the piece would look unfinished. It had greenery, a metal accent, a mini quote plaque, and enough personality to host its own variety show. Once I removed half of it, the design finally breathed. That experience taught me that restraint is one of the most useful DIY skills you can develop. Just because you can glue on another charming little detail does not mean you should.
Hanging the project taught me another truth: scale changes everything. When the piece was leaning on the floor, it looked substantial. Once it went up on the wall, it suddenly looked smaller. Ever since, I mock up the size with painter’s tape before I build. It is such a simple trick, but it completely changes how confidently you can design the project.
Most of all, the experience showed me why people love rustic decor in the first place. It is not precious. A tiny knot in the wood, a slightly uneven edge, a brushed finish that settles into the grain differently from one side to the other, those things do not ruin the piece. They make it feel human. In a room full of smooth manufactured surfaces, that kind of texture creates comfort almost instantly.
Now, whenever I work on a rustic wall decor DIY project, I focus less on trying to make it look store-bought and more on making it look intentional. That shift makes the project more enjoyable and the result more believable. And honestly, there is something deeply satisfying about stepping back, looking at a blank wall that used to feel forgettable, and seeing a finished piece that gives the whole room a little more soul.












