
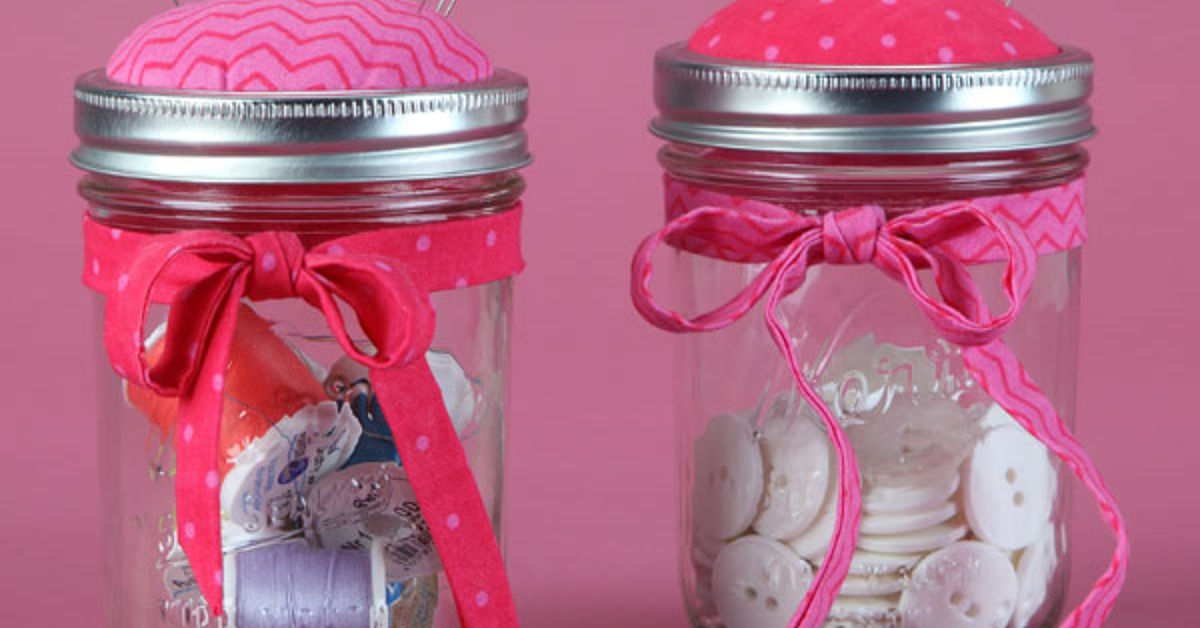
A pin cushion Mason jar craft turns an ordinary canning jar into two useful sewing tools at once: a soft place for pins and needles on top, plus a clear storage container underneath. It is compact, customizable, inexpensive, and considerably more attractive than the mysterious plastic tub where loose buttons usually go to disappear.
This beginner-friendly project requires only a Mason jar with a two-piece lid, a fabric scrap, stuffing, felt, thread, and adhesive. The finished jar can organize a sewing table, travel inside a craft bag, or become a thoughtful handmade gift for a quilter, teacher, costume designer, or anyone who has ever found a straight pin with the bottom of a bare foot.
Why Make a Pin Cushion Mason Jar?
Mason jars have moved far beyond the pantry. Their sturdy glass bodies, interchangeable lids, and simple shapes make them useful for organizing craft supplies, displaying decorations, and creating personalized gifts. Craft publications frequently recommend jars for repurposing projects because they are affordable, easy to decorate, and practical enough to keep using after the glue has dried.
The pin cushion version is especially clever because the removable center of a two-piece canning lid provides a ready-made base for the padded top. The screw band holds that cushion in place while still allowing the jar to open. Underneath, the glass container can store buttons, clips, bobbins, thread, safety pins, thimbles, measuring tapes, or other small sewing notions. Ball offers Mason jars in regular-mouth and wide-mouth configurations, so the project can be scaled for a tiny emergency sewing kit or a larger desktop organizer.
A Small Project With Several Benefits
This DIY Mason jar pincushion is appealing because it combines organization, upcycling, and creative expression. It also uses very little fabric. A single leftover quilting square may be enough, which makes the project ideal for using scraps that are too pretty to throw away but too small to become anything resembling a respectable pillow.
The basic design can be completed with hand sewing, and several versions require only a simple running stitch. No sewing machine is necessary. Depending on the adhesive and finishing method, an uncomplicated jar can be assembled in roughly half an hour.
Materials and Tools
Gather everything before beginning so you do not have to hold a half-stuffed fabric circle in one hand while searching for the scissors with the other.
- One clean Mason jar with a two-piece lid and screw band
- One cotton fabric scrap, approximately 6 by 6 inches
- Polyester fiberfill, quilt batting, or wool batting
- One small piece of felt or lightweight cardboard
- Hand-sewing needle
- Strong all-purpose thread or embroidery thread
- Fabric marker, tailor’s chalk, or washable marking pen
- Sharp fabric scissors
- Hot glue, tacky craft glue, or another suitable adhesive
- Optional ribbon, lace, twine, buttons, labels, or charms
Choosing the Right Jar
Any jar size can work as long as the lid has a separate flat insert and screw band. An 8-ounce jelly jar makes a compact travel sewing kit, while a pint jar provides more room for thread and tools. A quart jar offers generous storage but can look slightly top-heavy unless the cushion is made full and proportionate.
Inspect the glass before using it. Avoid jars with chips, cracks, or sharp edges. Wash the jar and lid, remove labels and residue, and allow every component to dry completely. The jar will not be used for food preservation after it becomes a craft organizer, so keep it permanently assigned to sewing supplies.
Choosing Fabric
Medium-weight woven cotton is the easiest material for beginners. It gathers neatly, holds its shape, and allows pins to slide in without excessive resistance. Quilting cotton, gingham, calico, chambray, and lightweight denim are all good candidates.
Avoid fabric that is extremely loose, slippery, stretchy, or heavily textured. Loose weaves may allow stuffing to work through the surface, while thick upholstery fabric can create bulky folds underneath the lid. If you fall in love with a delicate fabric, reinforce its wrong side with a layer of plain cotton before gathering it.
Choosing the Filling
Polyester fiberfill is inexpensive and creates a rounded, lightweight cushion. Quilt batting can be layered to form a controlled dome. Wool batting is another popular option because it compresses well and gives the cushion a firm but penetrable surface. Several sewing tutorials specifically recommend placing the filling over the lid rather than around its edges, which helps the padded insert fit inside the metal band.
How to Make a Pin Cushion Mason Jar Craft
Step 1: Trace and Cut the Fabric
Remove the flat lid insert from the screw band. Place the insert on the wrong side of the fabric and trace around it. Draw a second circle approximately one inch beyond the first line. This extra fabric will wrap around the filling and gather beneath the lid.
Cut along the larger circle. The shape does not have to be mathematically perfect. Once gathered, minor wobbles will vanish inside the band, where they can quietly reconsider their life choices. Tutorials for Mason jar pincushions commonly use fabric cut about one inch larger than the lid or a roughly 6-inch square trimmed into a circle.
Step 2: Sew a Running Stitch
Thread the needle and knot the end. Sew a loose running stitch around the fabric circle, approximately one-quarter inch from the raw edge. Use stitches about one-quarter to one-half inch long. Continue around the entire circumference, but do not knot or cut the thread when you return to the starting point.
Gently pull the thread to begin gathering the edge. Leave the center open enough to add filling and position the metal lid. This hand-sewn gathering method gives more control than gluing the raw fabric directly to the lid and makes it easier to distribute folds evenly.
Step 3: Add the Stuffing
Place a small mound of fiberfill or several circles of batting in the center of the fabric’s wrong side. Set the flat lid insert on top with its underside facing upward. The filling should remain between the fabric and the top surface of the lid.
Pull the gathering thread until the fabric closes around the underside. Adjust the stuffing as you tighten it, keeping most of the volume in the center rather than along the rim. Add filling if the cushion looks flat, or remove some if the lid refuses to fit inside its band. Aim for a smooth dome that feels firm enough to support pins but soft enough to accept them easily.
Step 4: Secure the Gathered Fabric
Distribute the gathers evenly around the lid and pull the thread firmly. Make several secure knots. For extra stability, stitch across the gathered fabric a few times before knotting again.
Add a narrow line of adhesive around the underside of the lid to hold the folds in place. Hot glue sets quickly but can create hard ridges if applied too heavily. Tacky glue takes longer to dry but may create a flatter, more flexible bond on non-washable fabric projects. Whichever adhesive you choose, follow its label instructions and apply only a thin amount.
Step 5: Cover the Raw Edges
Trace the lid on felt and cut a circle slightly smaller than the metal insert. Glue the felt over the gathered fabric on the underside. This hides the stitching, keeps loose threads contained, and gives the inside of the lid a finished appearance.
Lightweight cardboard can be substituted for felt, although felt is more forgiving and does not show creases as easily. Press the backing into place and let the adhesive dry. Do not rush this stage by immediately screwing the lid onto the jar; impatient glue has a remarkable talent for attaching itself to the wrong object.
Step 6: Assemble the Lid
Push the completed cushion upward through the bottom of the screw band. The padded fabric should project through the circular opening while the covered underside rests securely inside the ring.
Test the fit on the jar. If the band does not screw on smoothly, remove the insert and reduce bulk around the lid’s edge. Do not force the threads, because a crooked metal band can become difficult to remove.
Step 7: Fill and Decorate the Jar
Place sewing supplies inside the jar. Keep frequently used objects visible and avoid packing it so tightly that opening the lid launches a bobbin across the room.
Finish the outside with ribbon, twine, lace, a vinyl label, or a small gift tag. Decorations can be tied around the neck instead of permanently glued to the glass, making them easy to change later. When bonding embellishments directly to glass or metal, use an adhesive formulated for those nonporous materials and follow its curing instructions. General-purpose craft glue is not always the strongest choice for smooth glass surfaces.
Customization Ideas
Vintage Sewing Jar
Use floral calico, cream lace, tea-colored ribbon, and an antique-style label. Fill the jar with wooden spools, mother-of-pearl-style buttons, and embroidery floss. A reproduction fabric print can create a nostalgic appearance without requiring you to cut into an actual vintage textile.
Modern Minimalist Version
Choose solid linen-look cotton in charcoal, white, navy, or sage. Use a plain black or silver band and add a small adhesive label in a clean typeface. Store matching notions inside to keep the uncluttered appearance going strong.
Quilter’s Scrap Jar
Piece together several small fabric scraps before cutting the cushion circle. A tiny patchwork top makes the jar feel like a miniature quilt. Use the container for binding clips, spare rotary-cutter blades in protective packaging, marking tools, and small thread spools.
Holiday Gift Jar
Select seasonal fabric and coordinate the jar contents with the recipient. A Christmas version might include red thread, jingle-bell charms, and ornament-making supplies. A spring version could feature floral fabric, pastel buttons, and embroidery floss. Homemade jar gifts are popular because the packaging remains useful instead of becoming immediate recycling-bin material.
Beginner Sewing Kit
Fill a small jar with needles in a case, a needle threader, safety pins, neutral thread, spare buttons, a thimble, and a flexible measuring tape. Small scissors may be included if they fit completely inside and the jar is intended for an adult. Singer’s introductory sewing kits similarly group essentials such as pins, needles, a thimble, threader, measuring tools, and scissors in one portable container.
Troubleshooting Common Problems
The Cushion Looks Lumpy
Remove the lid insert and redistribute the filling. Small pieces of fiberfill often create bumps, so use one larger, well-fluffed piece when possible. Smooth the fabric from the center outward before tightening the gathers again.
The Lid Will Not Fit in the Band
Too much fabric or stuffing may be trapped around the metal edge. Trim bulky seam allowances, push the filling toward the center, and flatten the gathered folds. Keeping the fabric circle only about one inch larger than the lid helps prevent unnecessary bulk.
The Fabric Pulls Loose
Reinforce the gathering stitches with stronger thread and several knots. Add a modest amount of suitable glue beneath the folds. Let the adhesive cure fully before testing the cushion.
The Pins Sink Too Deeply
The cushion may be underfilled. Add more batting or fiberfill until the surface is firm. Pins should enter securely while leaving enough of their heads exposed for easy removal.
Glue Is Visible Through the Fabric
Hot glue can form raised lines and hard patches, especially under thin cotton. Use less adhesive, apply it only underneath the lid, or switch to a tacky or fabric-compatible glue that dries flatter.
Safety and Care Tips
- Store the finished jar away from young children and pets.
- Count pins after a sewing session, particularly if the jar has been moved or dropped.
- Do not carry the jar by its padded top; support the glass body.
- Replace bent, rusty, or damaged pins rather than returning them to the cushion.
- Keep scissors and rotary blades inside protective covers.
- Use caution with hot glue and allow an adult to handle the glue gun during children’s craft activities.
- Wipe the glass with a slightly damp cloth rather than soaking the completed lid.
If dried adhesive reaches the visible glass, removal methods vary by product. Warm soapy water may loosen some glue, while alcohol or acetone may work on others; always test a small area and keep solvents away from decorated fabric.
Maker Experience: Lessons From Building a Better Jar Pincushion
The first version of this project often looks deceptively easy. The jar is ready, the fabric is adorable, and the stuffing appears harmless. Then assembly begins, and the cushion develops one tall side, one flat side, and a general resemblance to a dinner roll that has experienced disappointment.
The most useful lesson is to work slowly while shaping the filling. Many beginners place a tight ball of fiberfill in the center and immediately pull the thread. That creates a hard lump. Fluffing the stuffing first and arranging it in a broad, shallow mound produces a smoother dome. Layered batting is even easier to control because circles can be added one at a time until the desired height is reached.
Another common experience involves fabric selection. Bold patterns look wonderful on the cutting table but may lose their most attractive details when gathered into a small circle. A large sunflower, for example, can become three yellow petals and an unexplained patch of brown. Small florals, dots, checks, tiny geometric prints, and centered motifs generally show better on a jar lid. When using a directional design, mark the visible center before cutting so the pattern does not end up leaning sideways.
The gathering stitches also teach a valuable lesson in thread strength. Thin, old thread may snap just as the fabric finally looks perfect. Using a doubled strand or embroidery thread saves considerable frustration. Leaving a generous thread tail makes knotting easier, especially when the underside is crowded with gathered fabric.
Adhesive restraint is another skill learned quickly. More glue does not automatically mean more security. A thick ring of hot glue can prevent the lid from fitting inside the band, create a visible ridge, and harden into a tiny plastic mountain range. A narrow bead placed only where the folds need support is usually enough. The felt backing then adds a second layer of stability while improving the finish.
Jar size changes the personality of the project. A short jelly jar feels charming and giftable, but it holds only the essentials. A pint jar is a practical everyday choice because it accommodates several spools, clips, buttons, and a measuring tape without dominating the worktable. A quart jar offers more storage, although small supplies tend to collect at the bottom. Filling the lower portion with larger items, such as ribbon rolls or bundled embroidery floss, keeps tiny notions accessible.
The clear glass encourages better organization because the contents are visible. It becomes obvious when black thread is running low or when the button collection has somehow grown into a small civilization. Sorting supplies by purpose can make several jars even more useful: one for hand sewing, one for embroidery, one for quilting clips, and one for frequently used repair items.
Gift versions benefit from thoughtful contents rather than sheer quantity. A jar for a new sewist might include neutral thread, quality hand needles, a thimble, safety pins, and spare shirt buttons. A jar for an experienced quilter could hold binding clips, decorative pins, bobbins, labels, and a small seam ripper. Adding a handwritten tag explaining the contents makes the gift more personal.
The final lesson is that perfection is unnecessary. Slightly uneven gathers, a crooked bow, or a cushion that is more “cozy hill” than “elegant dome” will not stop the jar from working. Handmade objects earn their charm from small variations. The goal is to create a safe, convenient home for pins while turning leftover materials into something usefuland perhaps preventing at least one dramatic encounter between a needle and a sock-covered foot.
Conclusion
A pin cushion Mason jar craft is a simple project with a surprisingly useful result. The padded lid keeps pins within reach, the transparent jar organizes small sewing supplies, and the fabric can be customized for nearly any style or occasion. It is approachable for beginners, economical for group craft sessions, and polished enough to give as a handmade present.
Begin with a clean two-piece jar, choose a manageable cotton fabric, shape the stuffing gradually, and keep glue away from the lid’s threaded edge. Once the basic method is familiar, experiment with patchwork, seasonal prints, personalized labels, and themed sewing-kit contents. Your collection of loose buttons may still be unruly, but at least it will now live in attractive glass housing.
SEO Tags
Editorial note: This original article synthesizes practical guidance from established American craft, sewing, home, Mason jar, and adhesive resources, including Better Homes & Gardens, Martha Stewart, HGTV, The Spruce Crafts, Ball Mason Jars, Missouri Star Quilt Company, Singer, Aleene’s, Loctite, and independent sewing educators.












