
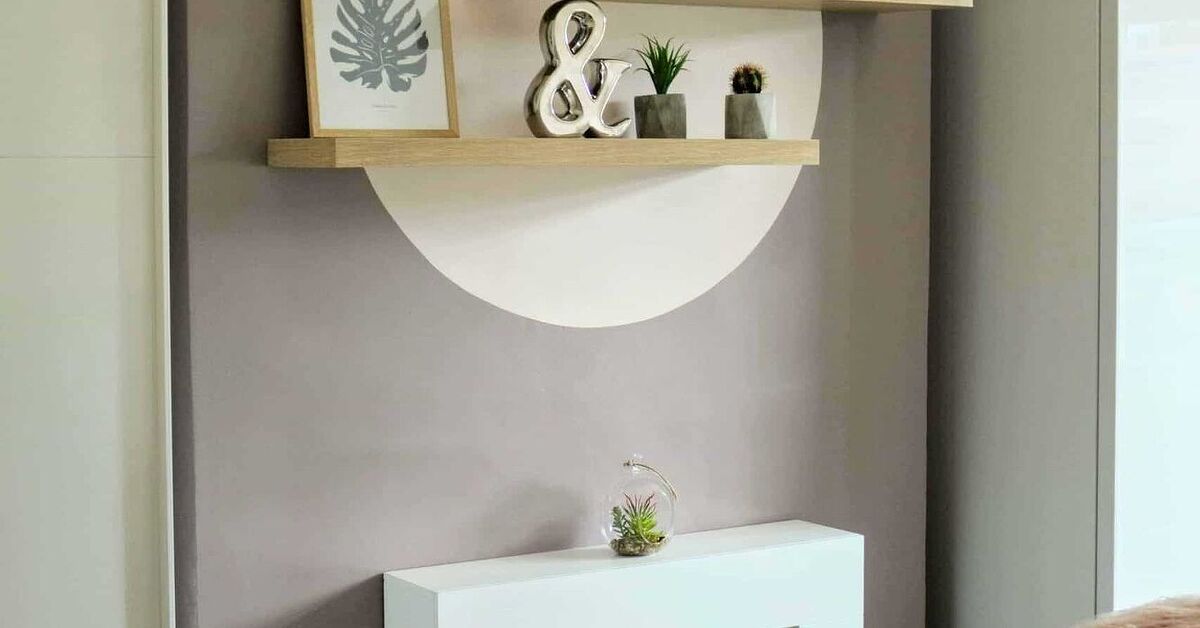
A painted wall circle feature is one of those home projects that looks far more expensive than it is. With a little paint, a string, and enough patience not to turn the wall into a giant abstract potato, you can create a focal point that makes a bedroom, home office, nursery, hallway, or living room feel intentional and stylish.
Unlike a full accent wall, a circle adds color without swallowing the room. It can frame a bed, spotlight a reading chair, give a desk some personality, or make a blank wall look like it finally received its invitation to the design party. Best of all, painting a wall circle feature is friendly to beginners. You do not need mural-level talent. You just need a plan, the right paint tools, and a steady hand during the final edge work.
Why a Painted Circle Feature Works So Well
Walls are usually made of straight lines: corners, doors, windows, shelves, trim, and furniture edges. A circle interrupts all that seriousness. It softens the room, adds movement, and creates a visual destination without requiring wallpaper, wood paneling, or an entire weekend of arguing with a level.
A wall circle also works because it is flexible. A soft beige circle behind a bed can feel calm and cozy. A mustard yellow circle behind a desk can feel cheerful and energetic. A deep navy circle behind a console table can create a dramatic gallery-style backdrop. The same basic shape can suit modern, Scandinavian, boho, coastal, minimalist, eclectic, and playful interiors.
Another advantage is scale. You can paint one oversized circle that nearly fills a wall, a medium-size feature above a piece of furniture, or several smaller circles for a more graphic look. The design can be subtle enough for a quiet bedroom or bold enough to make guests ask whether you hired an interior designer. You may smile modestly and avoid mentioning the string-and-pencil situation.
Plan Your Wall Circle Before Opening the Paint Can
Choose the Right Wall
The best wall for a painted circle feature is usually one that already has a purpose. Look for the wall behind a bed, sofa, desk, reading chair, bench, crib, console table, or dining nook. The circle should support the furniture rather than float around the room like it lost its map.
For example, a circle behind a headboard can act like a painted halo and make a basic bed setup feel more polished. Behind a desk, it can define a work zone in a small room. In a hallway, a circle can create a simple focal point where there is not enough space for furniture or a large piece of art.
Decide on the Size
Before painting, measure the wall and the furniture below it. A circle that is too small can look accidental, while one that is too large can make the room feel crowded. As a starting point, choose a circle that is wider than the furniture feature it highlights but not so wide that it touches nearby doors, windows, or trim.
For a queen-size bed, a circle between 60 and 72 inches in diameter often creates a strong visual effect. For a desk or small console table, a 36- to 48-inch circle may be enough. In a narrow hallway, a circle around 30 to 42 inches can add interest without making the area feel busy.
Remember the basic geometry: the diameter is the full width of the circle, while the radius is half that measurement. A 60-inch circle has a 30-inch radius. That radius is the exact length you will use when making your string compass.
Mock It Up First
Do not trust your imagination alone. Walls can be sneaky. A circle that looks perfect in your head may look oddly tiny or comically huge once it is on the wall. Use painter’s tape to outline a square around the proposed circle, tape up newspaper sheets, or cut a rough circle from inexpensive kraft paper. Step back, sit down, and look at it from the doorway.
Check the design during daylight and again with the room lights on. Paint colors can look warmer, cooler, darker, or lighter depending on sunlight, bulbs, shadows, and nearby furniture. A sample painted on poster board is useful because you can move it around the room before committing.
Choose a Paint Color and Finish for Your Circle Accent Wall
A wall circle feature does not need to scream to be noticed. The most successful choices usually relate to colors already in the room, such as bedding, curtains, rugs, artwork, cabinets, or throw pillows.
- Tone-on-tone: Choose a color a few shades darker or lighter than the existing wall color for a refined, understated look.
- Warm contrast: Try terracotta, clay, rust, ochre, muted peach, or caramel against white, cream, gray, or pale beige walls.
- Cool contrast: Use dusty blue, forest green, slate, teal, or deep navy for a calm but noticeable accent.
- Soft playful shades: Blush pink, pale lavender, butter yellow, mint, and sky blue work well in creative spaces and children’s rooms.
- Bold graphic color: Charcoal, black, cobalt, burgundy, or emerald can create drama when balanced with lighter furniture and accessories.
For most interior walls, a matte or eggshell finish is a practical choice. Matte paint helps hide small wall imperfections, while eggshell usually offers a little more durability and wipeability. Satin can work in busy spaces, but it reflects more light and may reveal roller texture, dents, or patchy drywall repairs. The smoother the wall, the more forgiving a subtle sheen becomes.
Tools and Materials for Painting a Wall Circle Feature
- Interior wall paint in your chosen color
- Paint sample or test board
- Painter’s tape or flexible fine-line tape for curved edges
- Tape measure
- Pencil with a sharp point
- String, twine, or non-stretch cord
- Small pushpin, removable wall tack, or a helper to hold the center point
- Angled sash brush, usually 1.5 to 2 inches wide
- Mini roller and roller tray
- Drop cloth or old sheet
- Wall filler, putty knife, and fine-grit sandpaper
- Clean cloth, mild cleaner, and a small artist brush for touch-ups
How to Paint a Wall Circle Feature Step by Step
1. Prepare the Wall Surface
Good paint jobs begin before the paint appears. Move furniture away from the wall, cover the floor, and remove or protect nearby outlet covers, frames, and décor. Wipe the wall with a slightly damp cloth or mild cleaner to remove dust, fingerprints, and mystery smudges that have apparently been living there rent-free.
Fill nail holes, shallow dents, and small cracks with wall filler. Once dry, sand the repaired spots smooth and remove the dust. If the wall has heavy stains, bare patches, or a major color change, use primer where needed. A smooth, clean surface gives the circle a sharper edge and a more even finish.
2. Find and Mark the Center Point
Measure where the center of the circle should sit. Do not automatically place it in the exact center of the wall. A circle behind a bed or desk should relate to the furniture, not necessarily the architecture. Mark the center lightly with pencil.
For a circle behind a bed, the center often looks best slightly above the top of the headboard. For a desk setup, center the circle over the desk rather than the entire wall. For a reading chair, shift the circle a little toward the chair so the arrangement feels connected.
3. Make a Simple String Compass
Cut a piece of string that matches the radius of your circle. For a 60-inch circle, cut the string so that the distance from the center anchor to the pencil tip is 30 inches. Tie one end around a pencil or tape it securely near the pencil tip.
Hold the other end at the center point with a small pushpin, removable tack, or a helper’s finger. Keep the string taut and slowly rotate the pencil around the center point. The pencil should create a light, even circle outline. Move carefully. This is not the moment to discover that your string has decided to become elastic.
Step back after drawing the circle. Check whether it looks level in relation to the furniture and wall features. It is much easier to adjust a pencil line than repaint a large shape after realizing it is leaning toward the ceiling like a confused moon.
4. Decide Whether to Tape the Curve
For a large wall circle, standard wide painter’s tape can be difficult to bend smoothly. Forcing it around the curve may create tiny flat sections instead of a true circle. Flexible fine-line painter’s tape can help when it is designed to conform to curves, but always test it first on a small area.
Many DIY painters get the cleanest result by using the pencil outline as a guide and cutting the edge freehand with an angled brush. This may sound intimidating, but it is manageable when you work slowly in short sections. The roller will fill the middle; the brush only needs to handle the outer edge.
5. Paint the Outer Edge First
Pour a small amount of paint into a tray. Load your angled brush lightly, wiping excess paint against the tray edge. Too much paint creates drips and makes a crisp curve harder to control.
Starting at the top of the circle, paint a narrow band just inside the pencil line. Hold the brush so the angled tip follows the curve. Work in sections of 6 to 10 inches, then pause and step back occasionally. Keeping the edge slightly inside the line at first is safer than painting beyond it. You can always nudge the line outward with a tiny touch-up later.
6. Fill the Circle With a Mini Roller
Once you have painted the edge band, use a mini roller to fill the center. A mini roller is easier to control than a full-size roller when working inside a circle. Roll in overlapping strokes and maintain a wet edge so the finish blends evenly.
Do not overload the roller. A roller that is dripping with paint tends to splatter, leave ridges, and behave like it has personal grievances against your floor. Use enough paint for coverage, but roll off excess paint in the tray before bringing it to the wall.
7. Apply a Second Coat
Most painted wall circle features look richer and more polished with two coats. Let the first coat dry according to the product label, then inspect the circle in natural light. Dark or vibrant colors may need a second coat for even coverage, especially when painted over a pale wall.
Use the angled brush again around the edge before rolling the center. The second coat is usually where the color starts looking intentional rather than like a brave experiment carried out during a free Saturday afternoon.
8. Remove Tape Carefully, If You Used It
If you used flexible tape, remove it slowly according to the tape manufacturer’s guidance. In many cases, tape comes away most cleanly when the paint is still slightly tacky rather than fully hardened. Pull the tape back over itself at a low angle instead of pulling it straight away from the wall.
Do not panic if there is a tiny paint bleed or an imperfect area. Let the paint dry, then use a small artist brush to correct the edge. Small touch-ups are normal. Even professional-looking features usually include a few quiet rescue missions.
9. Finish the Center Point and Clean Up
Remove the pushpin or tack from the center point. Fill the tiny hole with a small dab of wall filler, let it dry, and touch it up with the base wall color or circle color, depending on the location. Clean your brushes and rollers promptly, especially when using water-based latex paint.
Creative Ways to Style a Painted Circle Wall Feature
Create a Headboard Halo
Paint a large circle behind the bed so that the upper half rises above the headboard. This creates a soft focal point without adding a bulky piece of furniture. A warm clay, dusty olive, muted blue, or deep charcoal circle can make a plain bedroom feel finished.
Build a Home Office Focus Zone
A circle behind a desk can visually separate work space from the rest of a bedroom or living room. Use a calm color such as sage, dusty blue, mushroom brown, or soft terracotta. Add a floating shelf, a framed print, or a small wall lamp within the circle for an organized, layered look.
Frame a Reading Corner
Place a circle behind a chair, side table, and floor lamp to create a cozy reading nook. The painted shape works like a backdrop for the furniture and makes even a small corner feel purposeful. Try pairing a dark circle with a pale chair or a pale circle with a richly colored chair for contrast.
Use a Circle as a Gallery Backdrop
Hang a framed print, round mirror, wall clock, or small shelf over the painted circle. The layering adds depth and makes the wall feel more curated. Keep the artwork smaller than the circle so the painted shape remains visible around it like a frame.
Common Mistakes to Avoid
Choosing a circle that is too small: A tiny circle can look more like an unfinished sample than a feature wall. Use a paper mock-up before painting.
Ignoring the furniture below it: A circle should feel connected to the bed, desk, chair, or console table beneath it. If it floats too high or too far to one side, the room may feel visually off balance.
Using too much paint on the edge brush: Heavy brush loading causes drips and wobbly lines. Use less paint and build coverage with two coats.
Skipping surface repairs: Matte paint can forgive a lot, but not everything. Cracks, dents, and raised patches become more noticeable when a bold color highlights them.
Forcing regular tape around a curve: Wide tape is excellent for straight trim lines, but it may fight you on a large circle. Use flexible tape or paint carefully along a pencil guideline.
Forgetting to test the color: A paint chip under store lighting is not the same thing as a color on your wall at 8:00 p.m. beside a warm lamp. Test first and save yourself from an accidental fluorescent pumpkin situation.
Experience Notes: What Painting a Wall Circle Feature Teaches You
The first thing most people learn from painting a wall circle feature is that measuring feels boring right up until it saves the project. The exciting part is choosing a color. The satisfying part is rolling on the second coat. But the decision that has the biggest impact is usually the least glamorous: where the center point goes.
In a typical bedroom project, a large circle may look perfectly centered on the wall but strangely disconnected from the bed. Moving the center point a few inches higher or lower can change the entire result. That is why a paper mock-up, a pencil outline, or even a long piece of string held against the wall can be more useful than rushing straight to paint. A wall circle is simple geometry, but it is also visual storytelling. It tells the eye where to look.
Another common experience is realizing that the circle edge matters more than the middle. Most people can roll paint inside a shape without much trouble. The outer curve is where patience earns its paycheck. The best results usually come from slow, steady brushwork rather than trying to finish the whole outline in one heroic sweep. Painting short sections gives you a chance to adjust the brush angle, reload lightly, and stop before a small wobble becomes a major personality trait.
Color is also more surprising in real rooms than it appears online. A muted terracotta may look warm and sophisticated in afternoon sunlight, then turn deeper and moodier under warm evening bulbs. A sage green may look almost gray beside white bedding but appear much greener near natural wood. This is not a paint failure. It is simply how light, undertones, furniture, and surrounding colors interact. Testing a sample on a movable board lets you see those changes before you commit to a full circle.
Many DIY decorators also discover that a painted circle does not need to be flawless to look beautiful. A wall is not a printed poster. It has texture, changing light, furniture in front of it, and people who are usually more impressed by the overall effect than by a tiny brush correction near the bottom edge. Once the room is styled with lamps, pillows, artwork, plants, or bedding, the circle becomes part of a larger composition.
The most rewarding part of painting a wall circle feature is how quickly it changes the mood of a room. A plain wall can feel unfinished for years, yet a simple painted shape can make the space look intentional in one afternoon. It gives a room a focal point without the expense of wallpaper or custom millwork. More importantly, it proves that a small design risk can have a big payoff. The wall may start as drywall and paint, but by the end, it feels like a decision.
Final Thoughts
Painting a wall circle feature is a simple way to add personality, color, and structure to a room without committing to a full accent wall. Plan the placement, test the color, prep the surface, draw the circle carefully, and paint the edge with patience. Whether you use a soft neutral, a cheerful sun-inspired shade, or a dramatic dark tone, the finished circle can make an ordinary wall feel thoughtfully designed.












