
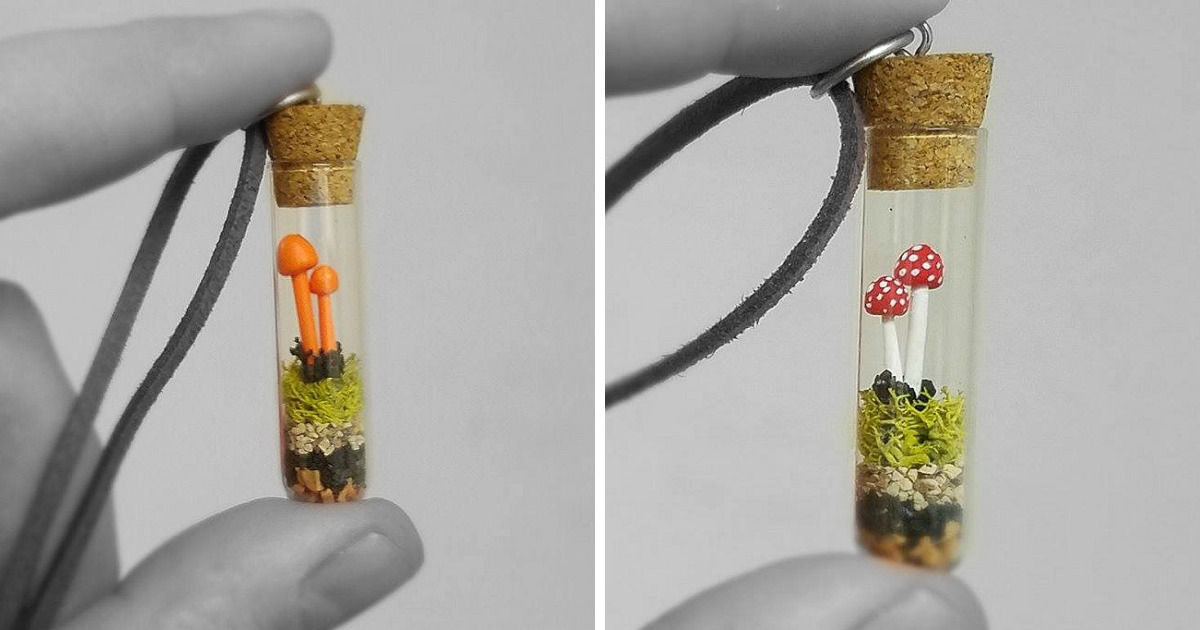
Some craft projects politely enter your life. Others kick down the door wearing a tiny red cap with white dots and demand to become jewelry. That is exactly what happened when I made these cute mini mushroom pendants. One minute I was sorting clay, jump rings, and necklace chains like a responsible adult. The next minute, my desk looked like a fairy moved in, opened a boutique, and forgot to clean up after launch day.
Mini mushroom pendants are small handmade charms shaped like mushrooms, usually made from polymer clay, resin, beads, wire, or a combination of mixed-media materials. They can be worn as necklaces, earrings, bracelet charms, keychain decorations, or tiny gifts for people who believe accessories should have personality. And honestly, why wear a plain pendant when you can wear a tiny forest snack with a suspiciously cheerful hat?
This project blends several trends that continue to thrive in handmade jewelry: cottagecore style, nature-inspired accessories, DIY clay jewelry, whimsical charms, and miniature art. Mushrooms are especially lovable because they are simple enough for beginners to sculpt, but detailed enough for experienced makers to customize with color, texture, shine, and tiny character. A mushroom pendant can look sweet, magical, earthy, spooky, vintage, kawaii, or woodland-chic depending on how you shape and finish it.
Why Mini Mushroom Pendants Are So Irresistible
The charm of a mini mushroom pendant comes from its scale. A full-size mushroom in the woods is interesting. A mushroom smaller than your thumbnail dangling from a necklace? That is pure emotional manipulation, and it works beautifully.
Mushrooms are also naturally jewelry-friendly. Their shape is easy to recognize: a rounded cap, a short stem, and maybe a few dots or gills. You do not need advanced sculpting skills to make the first version look adorable. Even slightly lopsided mushrooms still look intentional, which is generous of them. A crooked cap says “handmade character,” not “I lost a fight with gravity.”
Another reason mushroom charms are popular is their connection to nature aesthetics. Cottagecore, fairycore, goblincore, forestcore, and botanical-inspired fashion all welcome mushroom motifs with open arms. These pendants fit perfectly with linen dresses, oversized sweaters, denim jackets, tote bags, layered chains, and cozy fall outfits. They also make thoughtful handmade gifts because they feel personal without being overly serious.
Materials I Used for My Cute Mini Mushroom Pendants
For this project, I focused on polymer clay because it is beginner-friendly, easy to shape, and sturdy after baking when used correctly. Polymer clay remains soft until cured in an oven, which gives plenty of time to adjust the shape, smooth fingerprints, add texture, or dramatically stare at one mushroom and decide whether it has “main character energy.”
Basic Supplies
- Polymer clay in red, white, brown, tan, cream, green, and accent colors
- A clean tile, silicone mat, or smooth work surface
- Clay blade or craft knife
- Needle tool, toothpick, or dotting tool
- Small eye pins or screw eye pins
- Jump rings and necklace chains
- Jewelry pliers
- Fine sandpaper or nail buffer
- Acrylic paint for tiny details
- Gloss, satin, or matte varnish suitable for polymer clay
You can also use UV resin or epoxy resin as a clear protective coat, but resin requires extra safety care. Work in a well-ventilated area, wear appropriate gloves, protect your eyes from splashes, and follow the product instructions closely. Resin can give a beautiful glassy finish, but it is not the moment to freestyle like a kitchen wizard. Chemistry appreciates boundaries.
Choosing a Style Before Sculpting
Before making the pendants, I chose a few mushroom styles instead of making every charm identical. This kept the batch interesting and helped each pendant feel handmade rather than factory-stamped.
Classic Red Toadstool
The red mushroom with white spots is the celebrity of mushroom jewelry. It looks playful, nostalgic, and instantly recognizable. For these pendants, I used a rounded red cap, a cream-colored stem, and tiny white dots placed unevenly for a more organic look.
Earthy Woodland Mushroom
For a softer natural style, I used brown, beige, caramel, and ivory clay. These pendants looked less cartoon-like and more like something a tiny forest librarian would wear to work. I added subtle lines under the cap to suggest gills and brushed the edges with a little darker pigment for depth.
Pastel Fantasy Mushroom
Pastel mushrooms are perfect for fairycore or kawaii jewelry. Lavender caps, blush pink stems, mint leaves, and pearl-like dots make the pendant feel sweet and dreamy. These are the mushrooms that look like they would offer you tea and gossip about moonlight.
Glow-in-the-Dark or Glitter Mushroom
For extra fun, glow-in-the-dark clay or glitter accents can turn a simple pendant into a conversation piece. Use these details lightly so the pendant still looks polished. A tiny sparkle is charming. A glitter explosion may look like the mushroom joined a disco and never came home.
How I Made the Mini Mushroom Pendants
The process is simple, but the details matter. Miniature jewelry does not forgive every shortcut. A pendant may be small, but it still needs balance, strength, clean finishing, and secure hardware.
Step 1: Condition the Clay
I started by conditioning the polymer clay until it became soft and flexible. Conditioning helps prevent cracks and makes shaping easier. I rolled each color between my hands, folded it, pressed it, and repeated the process until the clay felt smooth. This is also the part where the clay somehow collects one mysterious dust speck from another dimension, so keeping the workspace clean is important.
Step 2: Shape the Stem
For the stem, I rolled a tiny piece of cream or tan clay into a short cylinder. Then I narrowed the top slightly and widened the bottom so the mushroom could stand visually. A mushroom stem does not need to be perfectly straight. In fact, a slight curve makes it look more natural and whimsical.
Step 3: Create the Cap
Next, I rolled a small ball of colored clay and pressed it into a dome shape. The cap should be slightly wider than the stem. I gently pressed the underside with a rounded tool to create a shallow hollow where it would sit on top of the stem. This small detail made the cap fit better and gave the pendant a more finished look.
Step 4: Attach Cap and Stem
I joined the cap and stem with light pressure, then blended the connection with a small tool. Because pendants are handled, worn, and occasionally dropped into the mysterious handbag abyss, the attachment point needs to be secure. For extra strength, some makers insert a short piece of wire through the stem and cap before baking.
Step 5: Add Spots, Gills, and Texture
For classic mushroom spots, I used tiny balls of white clay and pressed them gently onto the cap. Random placement looks better than perfect rows. Nature rarely uses a spreadsheet, and neither should mushroom spots.
To add gills, I used a needle tool to draw short lines under the cap. I kept the pressure light so the shape did not flatten. For woodland mushrooms, I added tiny dents and soft texture to make the surface feel more organic. On a few pendants, I placed small green leaves near the base for a miniature forest-floor effect.
Step 6: Insert the Eye Pin
Before baking, I inserted a small eye pin into the top of each mushroom. The loop must stay visible above the cap so a jump ring can connect the pendant to a chain. I gently twisted the pin into the clay instead of pushing straight down, which helped it grip better. For heavier pendants, adding a little liquid clay before baking can improve the bond.
Step 7: Bake According to Clay Instructions
Polymer clay must be baked according to the specific brand’s directions. Many common oven-bake polymer clays cure at relatively low temperatures, but times and temperatures vary by product. I used an oven thermometer because home ovens can run hotter or cooler than the dial says. Mini pendants are small, but underbaking can make them weak, while overheating can discolor them. In other words, the oven is not the place for guesswork unless you enjoy suspense with consequences.
Step 8: Cool, Sand, and Finish
After baking, I let the pendants cool completely before touching the details. Warm polymer clay can still feel slightly flexible, so patience helps avoid accidental bending. Once cooled, I lightly sanded any rough edges with fine sandpaper and wiped away dust.
Then I added tiny painted highlights: a soft blush on the cap, darker shading under the gills, and a few delicate dots where the clay spots needed more contrast. Finally, I sealed selected pendants with a compatible varnish. Gloss made the red mushrooms look candy-like, while matte varnish gave the woodland pendants a softer handmade feel.
How to Turn Mushroom Charms Into Wearable Jewelry
Once the mushrooms were sculpted, baked, and finished, they needed proper jewelry findings. A beautiful charm can still fail if the jump ring opens, the chain feels flimsy, or the hardware color clashes with the design.
Choosing Jump Rings
Jump rings connect the pendant loop to the chain. To open a jump ring properly, twist the ends away from each other using two pairs of pliers instead of pulling the ring apart sideways. Pulling it open can distort the circle and weaken the closure. Twist open, add the pendant, then twist closed until the ends meet neatly.
Picking the Right Chain
For tiny mushroom pendants, lightweight cable chains, curb chains, or delicate ball chains work well. A chunky chain can overwhelm the charm unless you are intentionally going for a bold statement look. Antique bronze hardware pairs nicely with woodland colors, silver looks clean and modern, and gold adds warmth to red, cream, and caramel mushroom designs.
Making Earrings or Keychains
These mini mushroom pendants can also become earrings by adding ear wires, or keychains by attaching them to split rings. For earrings, keep the mushrooms light and similar in size so they hang comfortably. For keychains, consider making the charm thicker and using stronger hardware because keys live a rough life. They get tossed, scratched, and blamed for disappearing when they are clearly just hiding under receipts.
Design Ideas for Cute Mini Mushroom Pendants
One of the best parts of making mushroom jewelry is how easy it is to personalize. A few small design choices can completely change the mood of the pendant.
Color Combinations That Work
- Red cap, white spots, cream stem for a classic fairy-tale look
- Brown cap, ivory stem, moss green leaves for a woodland style
- Lavender cap, pearl dots, pale pink stem for a dreamy pastel pendant
- Black cap, silver dots, gray stem for a witchy mushroom charm
- Orange cap, tan stem, golden hardware for cozy autumn jewelry
Tiny Add-On Details
Small additions make the pendants feel more special. Try adding miniature leaves, flowers, crystals, stars, moons, snails, ladybugs, or mossy bases. A tiny ladybug on a mushroom cap is almost unfairly cute. It may cause people to say “aww” out loud in public, which is a risk you must accept.
Personalized Gift Versions
For gifts, match the mushroom style to the recipient. A nature lover may prefer earthy brown and green tones. Someone who loves magical aesthetics may enjoy purple, silver, and moon details. A playful friend might love a red-and-white toadstool with a goofy little face. You can even create birth-month color themes or matching friendship pendants.
Common Mistakes to Avoid
Mini pendants are beginner-friendly, but a few mistakes can affect durability and appearance.
Making the Pendant Too Thin
Thin stems can snap, especially near the cap. Keep the stem sturdy enough to support the charm, even if you want a delicate look. You can still make it elegant without making it fragile.
Using the Wrong Sealant
Not every varnish works well with polymer clay. Some products stay sticky, peel, or react over time. Use sealers that are known to be compatible with polymer clay, and test them on a sample piece first. Your future self will thank you with fewer dramatic sighs.
Skipping Hardware Strength
A pendant is only as secure as its weakest connection. Make sure eye pins, jump rings, and chains are properly attached. If the charm is a gift or shop item, gently tug-test the connection before packaging it.
Overloading the Design
Miniature art benefits from restraint. A mushroom pendant can have dots, leaves, glitter, crystals, and a facebut not always all at once. Choose one focal detail and let the rest support it. A tiny pendant should feel charming, not like it is carrying the entire craft aisle on its back.
How to Style Mini Mushroom Pendants
Mini mushroom pendants are surprisingly versatile. They look adorable with casual outfits, cozy layers, and playful accessories. A simple mushroom necklace can soften a basic T-shirt and jeans. A pastel mushroom charm can add sweetness to a cardigan or sundress. A dark mushroom pendant with antique hardware can lean into witchy, moody, or fantasy-inspired fashion.
Layering also works beautifully. Wear a mini mushroom pendant with a shorter chain, then add a longer necklace with a moon, leaf, crystal, or simple bar pendant. The result feels curated without being too matchy. For earrings, mushroom charms pair well with tiny hoops, pearl studs, or asymmetrical nature-themed pieces.
Selling Handmade Mini Mushroom Pendants
If you plan to sell these pendants, presentation matters. Handmade jewelry shoppers often want to know the story behind the piece. Describe the materials, size, finish, chain length, and care instructions clearly. Use photos in natural light, include a scale reference, and show the pendant worn or held in the hand so buyers understand its size.
Strong product titles can include phrases like “mini mushroom pendant,” “handmade polymer clay mushroom necklace,” “cottagecore mushroom charm,” “woodland jewelry,” or “cute fairycore necklace.” These keywords help search engines and marketplace shoppers understand exactly what the item is without stuffing the title into a word salad.
Packaging can also elevate the experience. A small kraft jewelry card, soft pouch, care note, and thank-you message make the pendant feel gift-ready. Since mushroom pendants naturally suit whimsical branding, you can lean into forest-inspired packaging with moss-green accents, botanical stamps, or tiny illustrated mushrooms.
Care Tips for Mini Mushroom Pendants
Handmade pendants should be treated with care. Polymer clay is durable when properly cured, but it is not indestructible. Avoid bending thin parts, dropping the pendant on hard floors, soaking it in water, or exposing it to harsh chemicals. Remove the necklace before swimming, showering, exercising, or applying perfume directly over it.
To clean a pendant, use a soft dry cloth or a slightly damp cloth if needed. Store it separately from sharp metal jewelry to prevent scratches. If the pendant has painted or varnished details, gentle care will help preserve the finish longer.
My Personal Experience Making These Cute Mini Mushroom Pendants
Making these mini mushroom pendants reminded me why small crafts can be so satisfying. They do not require a huge studio, expensive equipment, or a heroic amount of storage space. I made them at a desk with a handful of clay colors, a few tools, and the kind of optimism that usually appears right before glitter gets involved.
The first pendant I made was a classic red mushroom, and I immediately understood why this design is everywhere. It looked cheerful before I even added the white spots. Once the dots went on, it had personality. Not necessarily a calm personality, but definitely personality. It looked like it belonged in a storybook where the forest animals pay rent in acorns.
The hardest part was controlling the size. Miniature work has a sneaky way of becoming less miniature. I would start with “just a tiny cap,” then somehow create a mushroom large enough to be a pendant for a squirrel with excellent taste. After a few attempts, I learned to make the clay pieces smaller than I thought I needed. The cap grows visually once the stem, spots, and hardware are added.
Another lesson was that fingerprints are tiny villains. Polymer clay records every touch like a dramatic diary. I kept smoothing the surface with my fingertips, only to create more fingerprints while removing the old ones. The solution was to use a soft tool, a little patience, and light rolling instead of endless poking. When in doubt, stop touching the mushroom. This is also good general life advice.
I experimented with several finishes, and each one changed the mood completely. Glossy varnish made the red mushrooms look bright, polished, and almost candy-like. Matte varnish made the brown woodland mushrooms feel softer and more natural. Satin finish landed somewhere in the middle, which made it my favorite for pendants that needed a subtle handmade glow without looking too shiny.
The tiny details were the most fun. I added leaves to a few stems and instantly wanted to make an entire forest collection. Then I added a little blush of brown near the base and realized shading makes a huge difference. Even a simple mushroom looks more dimensional with gentle color variation. The trick is to keep the shading soft. Too much paint on a tiny charm can make it look muddy instead of magical.
The hardware stage made the pieces feel real. Before adding jump rings and chains, they were cute objects. After adding jewelry findings, they became wearable art. I tested different chain colors and found that antique bronze made the earthy mushrooms look cozy, while silver gave the red mushrooms a crisp, playful look. Gold worked beautifully with cream, peach, and caramel colors.
I also learned that making several pendants at once is more efficient than making one from start to finish. Creating all the stems, then all the caps, then all the spots helped keep the workflow smooth. It also made the batch look cohesive while still allowing small differences. Handmade pieces should not look like clones. A little variation gives them warmth.
There was one pendant that came out slightly crooked, and I almost rejected it. But after adding a tiny leaf and a little shading, it became one of my favorites. The curve made it look like it had grown that way on purpose. That is one of the joys of mushroom designs: imperfections often improve them. Real mushrooms are weird, bendy, bumpy, and charming. The handmade version gets to be the same.
By the end of the project, my workspace was covered in clay crumbs, tiny tools, and finished pendants lined up like a miniature mushroom parade. It was messy, peaceful, and weirdly addictive. These pendants are small enough to finish in a reasonable time, but detailed enough to feel rewarding. They are also excellent gifts because they carry that unmistakable handmade energy: “I made this for you, and yes, I did spend ten minutes deciding where the smallest dot should go.”
If you enjoy DIY jewelry, polymer clay charms, cottagecore accessories, or miniature crafts, mini mushroom pendants are a delightful project to try. They are beginner-friendly, customizable, giftable, and charming enough to make even a plain necklace chain feel like it wandered out of an enchanted forest.
Conclusion
I made these cute mini mushroom pendants because I wanted a small, joyful craft projectand they turned out to be even more fun than expected. With simple polymer clay techniques, secure jewelry findings, thoughtful colors, and a little patience, anyone can create mushroom charms that feel personal, whimsical, and wearable. Whether you love cottagecore fashion, handmade jewelry, fairycore accessories, or tiny nature-inspired art, these pendants are a wonderful way to turn a bit of clay into something magical.
The best part is that no two mushrooms need to look the same. One can be bright and playful, another earthy and mysterious, and another pastel enough to look like it grew beside a cupcake. That creative freedom is what makes this project so satisfying. Mini mushroom pendants are proof that small handmade things can carry a lot of charmsometimes more charm than should legally fit inside one tiny cap.
Note: This article was created from researched craft knowledge, polymer clay handling practices, jewelry-making techniques, resin safety guidance, and real handmade accessory trends, then rewritten in original language for web publication.











