
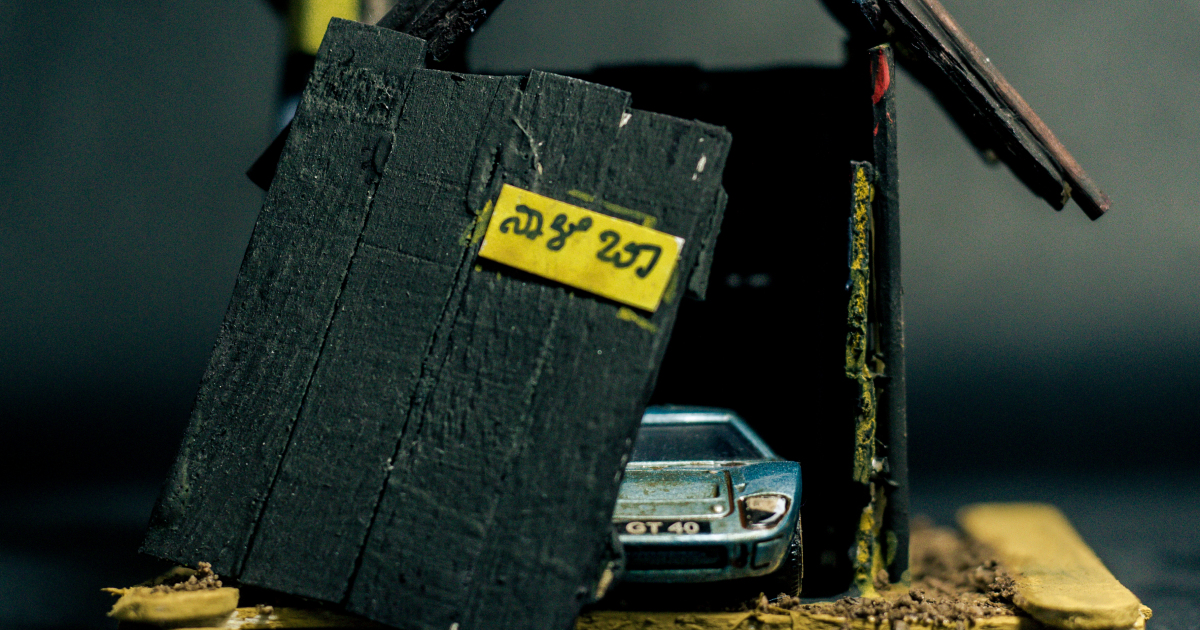
There is something wonderfully suspicious about a tiny abandoned garage. A clean showroom says, “Please admire my polished chrome.” An abandoned garage says, “Something happened here, probably involving a leaky roof, three missing hubcaps, and a raccoon with opinions.” That is exactly the mood I wanted when I built an abandoned garage diorama for my Matchbox scale model.
This project started with one little die-cast car and a dangerous sentence: “I’ll just make a quick display base.” Anyone who builds miniatures knows this sentence is the hobby equivalent of opening one potato chip bag and expecting restraint. A display base became a cracked concrete floor. The floor demanded walls. The walls needed peeling paint. The peeling paint requested rust, weeds, oil stains, broken signage, dusty shelves, and a garage door that looked like it had given up sometime during the Carter administration.
The result was a compact, story-rich Matchbox scale diorama: part model car display, part miniature urban decay, part therapy session with glue fumes. This guide walks through the planning, materials, construction, weathering, detailing, and creative choices behind the build, with practical tips for anyone who wants to create a realistic abandoned garage diorama at 1:64 scale.
Why Build an Abandoned Garage Diorama?
A Matchbox car already has personality. Most are built around the familiar 1:64 scale range, making them small enough to display easily but large enough to reward close-up details. The challenge is that a die-cast car sitting alone on a shelf can feel like a sentence without punctuation. Put the same car inside a weathered garage with cracked concrete, rusty tools, faded posters, and weeds growing through the floor, and suddenly it has a backstory.
An abandoned garage diorama works especially well because garages are naturally packed with visual storytelling. They hold vehicles, spare parts, tools, boxes, tires, oil drums, signs, dust, and the occasional mystery stain no one should investigate too closely. That makes the scene more interesting than a plain parking lot and more flexible than a perfect showroom.
Better still, abandonment hides mistakes. A slightly crooked wall becomes “structural damage.” A paint smudge becomes “water staining.” A bad cut becomes “decades of neglect.” This is why abandoned dioramas are secretly beginner-friendly. Perfection is not the goal. Believable imperfection is.
Planning the Matchbox Scale Garage Scene
Before cutting foam board or opening paint, I sketched a simple plan. At 1:64 scale, every inch matters. A typical Matchbox car is only a few inches long, so the garage needed to feel roomy without becoming a giant display case. I chose a small rectangular base large enough for one car, a partial garage wall, a back corner, and a little outside ground where weeds and debris could spill into the scene.
The Story Came First
The best dioramas do not just show objects; they imply events. My story was simple: this garage had once served neighborhood cars and delivery vans, then slowly declined. Maybe the owner retired. Maybe a storm damaged the roof. Maybe the last invoice was never paid. Whatever happened, the building sat untouched long enough for nature to begin repossessing it.
That story shaped every design choice. I wanted a cracked concrete floor, faded wall paint, rusted metal trim, an old workbench, scattered tires, dusty tools, and signs that looked sun-bleached and forgotten. The car would sit inside like it had been parked “just for the weekend” twenty years ago.
Keeping the Layout Readable
Small-scale dioramas can become cluttered quickly. A Matchbox scale model does not need fifty accessories to feel detailed. It needs the right details in the right places. I kept the center open for the vehicle, placed larger objects along the walls, and used small debris to guide the eye toward the car. The goal was visual balance: messy, but not unreadable; abandoned, but not attacked by a craft-store tornado.
Materials I Used for the Abandoned Garage Diorama
One of the joys of building a 1:64 scale garage diorama is that the materials are affordable and easy to find. You do not need a professional workshop. You need patience, a sharp blade, and the humility to accept that your first tiny oil drum may look like a sad marshmallow.
Basic Structure Materials
For the base and walls, I used foam board and thin cardboard. Foam board is light, easy to cut, and strong enough for small structures. Cardboard helped create layered wall panels, broken trim, and roof fragments. For cleaner edges and structural details, styrene sheet or strip is excellent, especially for door frames, window frames, gutters, and metal siding effects.
The floor was made from a thin board panel covered with textured acrylic paste. You can also use fine sand mixed with paint and glue to create concrete texture. At this scale, subtle texture is better than chunky texture. A pebble that looks tiny on your desk may look like a meteorite next to a Matchbox car.
Paints, Adhesives, and Weathering Supplies
Acrylic craft paint handled most of the base colors: gray for concrete, off-white and faded green for walls, dark brown and orange for rust, and black-brown mixes for grime. PVA glue worked for paper, dust, and scenic ground cover. Super glue was useful for small hard details. Weathering powders, chalk pastels, washes, and dry brushing created the aged, grimy finish.
Commercial hobby products can speed up the process. Rust streaking effects, dust pigments, mud effects, turf, foliage, and ground cover products are designed specifically for realistic scale scenery. Still, the secret is not buying every bottle on the shelf. The secret is layering small effects until the model looks naturally aged.
Building the Garage Structure
I began with the base because everything depends on the footprint. After marking the position of the car, I traced the walls and door opening. The structure used two main walls: one back wall and one side wall. This corner-style layout keeps the scene open for viewing and photography while still giving the impression of a complete building.
Cutting and Assembling the Walls
The wall panels were cut from foam board with a sharp hobby knife. I made several light passes instead of forcing one deep cut, which prevents ragged edges and reduces the chance of accidentally carving a dramatic canyon through the wall. The wall pieces were glued at a right angle and reinforced with small strips behind the joint.
To add character, I cut an uneven garage-door opening and a small broken window. The abandoned look benefits from asymmetry. A perfectly square ruined building can look too polite. I added missing corners, small cracks, and chipped wall sections with a blade and sanding stick. The trick is to damage the model intentionally, not randomly. Real decay follows gravity, water flow, impact points, and weak materials.
Creating a Worn Garage Door
The garage door was made from layered cardstock with thin strips to represent panels. I painted it a faded, dirty off-white, then added rust around the bottom and edges. The lower portion received more grime because moisture, mud, and road dirt collect near the ground. A few bent panels helped sell the idea that the door had been shoved, dented, or simply exhausted by life.
Making the Concrete Floor Look Old
The floor is the emotional foundation of an abandoned garage diorama. Clean concrete looks new. Old concrete tells stories. I started with a medium gray base coat, then added lighter and darker gray patches using a sponge. This broke up the flat color and created natural variation.
Cracks, Stains, and Dust
Cracks were drawn lightly with a fine pencil and deepened with thin dark paint. I kept them irregular, branching like tiny lightning bolts. Then I added oil stains under where an engine might drip, dark smudges near the workbench, and dusty corners where no broom had visited in a very long time.
For oil stains, I used a glossy dark brown-black mix, applied thinly in layers. A stain should not look like a perfect circle unless the garage was haunted by a very organized ghost. Real stains spread unevenly, gather in cracks, and fade at the edges.
Adding Weeds Through the Cracks
Nothing says “abandoned” faster than weeds growing where humans once insisted there should be no weeds. I used tiny fibers, fine turf, and small clumps of foliage along cracks and wall edges. At 1:64 scale, less is usually more. A huge tuft can look like a prehistoric jungle. The weeds should look stubborn, not professionally landscaped.
Weathering the Walls Like a Tiny Disaster Artist
The walls started with a faded paint color, but the real magic came from weathering. I used three main techniques: washes, dry brushing, and pigments. Each one does a different job.
Washes for Grime and Depth
A wash is thinned paint that flows into cracks and low areas. I used dark brown and black washes around corners, window frames, floor joints, and the bottom of the walls. This instantly added depth. The key is to build washes gradually. One heavy wash can make the building look like it was dipped in coffee during an earthquake.
Dry Brushing for Edges and Texture
Dry brushing uses very little paint on the brush. After wiping most of it away, I lightly dragged the brush across raised textures. This highlighted chipped edges, concrete texture, and warped wall panels. Light gray and beige worked well for dust and worn paint. A tiny bit of silver on metal edges suggested exposed bare metal.
Rust and Water Streaks
Rust belongs under metal objects, around hinges, beneath roof edges, and near fasteners. I used dark brown first, then added orange-brown sparingly. Rust is more believable when it has layers: old dark rust at the center, newer orange rust at the edges, and faint streaks pulled downward by rain.
Water streaks were added under the window and roofline. Thin vertical lines of gray-brown paint made the walls look like they had endured years of leaks. This is where an abandoned garage diorama becomes fun: you are not just painting walls, you are painting time.
Adding Miniature Garage Details
Details are where a Matchbox scale garage comes alive. Because the scale is small, every accessory must earn its spot. I added a workbench, tires, shelves, a barrel, cardboard boxes, loose boards, signs, and a few mystery parts that may or may not belong to the car.
Scratch-Built Workbench
The workbench was made from scrap wood strips and cardstock. I painted it dark brown, dry brushed lighter tan along the edges, and added black stains on top. A bench in an abandoned garage should look like it has witnessed bad repairs, worse coffee, and at least one wrench thrown in frustration.
Tires, Barrels, and Boxes
Small tires can come from toy parts, 3D prints, or sliced tubing. I stacked a few along the wall and dusted them with gray pigment. The barrel was made from a small plastic tube with cardstock rings. Cardboard boxes were folded from brown paper and lightly crushed before painting. Crushing them makes a huge difference; perfect boxes look delivered, not abandoned.
Signs and Wall Graphics
Faded signs add instant history. I printed tiny garage signs, warning labels, and old service posters, then sanded them lightly after gluing. A little tan wash aged the paper. One sign was deliberately crooked because no abandoned garage should have better wall decor than my actual apartment.
Choosing and Positioning the Matchbox Car
The vehicle is the star, so it needs to match the mood. A shiny new sports car can create an interesting contrast, but I chose a model that looked like it belonged in a forgotten repair shop. A pickup, sedan, van, tow truck, or classic car works beautifully in this kind of scene.
I placed the Matchbox model slightly off-center, angled toward the garage opening. This gives the scene movement. The viewer can imagine the car was pushed in, parked in a hurry, or discovered years later. A centered car can look formal. An angled car looks like something happened.
Should You Weather the Matchbox Car?
You can, but carefully. Die-cast cars often have collectible value, so permanent weathering may not be ideal unless the car is common or already damaged. For a reversible effect, dust the car lightly with removable pigment and avoid sealing it. For a permanent custom, add subtle dirt around the wheels, lower panels, grille, and trunk seams.
I kept the car mostly intact but added dust to the tires and lower body. This made it belong in the scene without turning it into a rust bucket. The garage was the abandoned character; the car was the mystery guest.
Lighting and Photography Tips
A diorama is not truly finished until it survives the camera. Photography reveals everything: good texture, bad glue marks, weird scale issues, and that one fiber that suddenly looks like a fallen telephone pole.
I used low side lighting to create shadows inside the garage. Warm light made the scene feel late-afternoon and dusty. A phone camera works fine if you lower the angle to car height. Shooting from above makes the scene look like a toy. Shooting from the car’s eye level makes it feel like a real place.
Background Matters
A neutral background keeps attention on the diorama. For extra realism, place the garage near a printed or blurred outdoor backdrop. The trick is not to overcomplicate it. The abandoned garage already has plenty to say, and most of it sounds like a squeaky hinge.
Common Mistakes to Avoid
The first common mistake is over-weathering. Rust, grime, dust, and moss are exciting, but if everything has the same level of decay, the scene becomes visual oatmeal. Vary the effects. Put heavy rust where water would collect, dust in corners, and cleaner patches where objects might have protected surfaces.
The second mistake is using oversized materials. Sand grains, wood splinters, and foliage can easily look too large at Matchbox scale. Test everything beside the car before gluing. If a leaf looks bigger than the windshield, it is no longer a leaf. It is a botanical emergency.
The third mistake is forgetting negative space. Empty floor areas make details more powerful. A cluttered garage should still have paths, zones, and focal points. Think like a set designer, not a person emptying a junk drawer into a shoebox.
What I Learned While Building This Abandoned Garage Diorama
The biggest lesson was that realism comes from observation, not expensive materials. Look at real abandoned buildings, old service stations, cracked sidewalks, dusty shelves, rusty gates, and neglected corners. Real decay has patterns. Paint fades on sun-facing surfaces. Rust collects around exposed metal. Dirt gathers where wind and water push it. Weeds grow from cracks, seams, and edges.
The second lesson was that storytelling beats precision. Yes, scale accuracy matters, especially in a Matchbox scale diorama, but emotional believability matters more. A slightly simplified workbench that supports the story is better than a perfect tiny socket wrench no one notices.
The third lesson was that restraint is a skill. Every time I wanted to add “just one more” object, I asked whether it improved the scene. Sometimes the answer was yes. Sometimes the answer was, “No, you are trying to avoid cleaning your desk.”
Extra Build Experience: The Joy, Chaos, and Tiny Drama of Making the Garage
Building this abandoned garage diorama became more personal than I expected. At first, I thought I was simply making a display for a Matchbox scale model. But after a few evenings of cutting, painting, sanding, repainting, and staring at a wall panel like it had personally insulted me, the project started to feel like building a memory. Not a specific real garage, exactly, but the kind of place many people have seen: a closed repair shop at the edge of town, a dusty shed behind a house, a forgotten service bay with a faded sign and a door that groans in the wind.
One of my favorite moments was creating the cracked concrete floor. It looked boring at first, just a gray rectangle pretending to be important. Then I added stains, hairline cracks, lighter dry-brushed edges, and tiny weeds. Suddenly the floor had age. It felt walked on. It felt parked on. It felt like someone had dropped bolts there in 1987 and never found them again. That transformation reminded me that miniature building is often about patience. The early stages look unimpressive. You have to trust the layers.
The garage door gave me the most trouble. My first version looked too clean, like it belonged to a suburban storage unit where someone keeps holiday decorations and mild regrets. I roughed it up by bending a panel, darkening the bottom edge, and adding rust streaks near the hardware. That changed everything. The door stopped looking like a craft object and started looking like part of the story. In diorama work, damage is not random decoration; it is character development.
I also learned that small accessories can steal the scene if you let them. The tiny workbench was supposed to be background detail, but once I added stains, boxes, and a few scattered parts, it became one of the most interesting corners of the garage. The same happened with the tire stack. Three small tires, a little dust, and a crooked position made the corner feel neglected but believable. That is the beauty of 1:64 scale modeling: small choices have huge visual impact.
There were mistakes, of course. I glued one wall slightly out of square, spilled a wash where I did not want it, and made one cardboard box so large it looked like it could contain the entire car. But the abandoned theme was forgiving. I turned the glue mark into a water stain. I disguised the crooked wall with debris. I resized the box and pretended the first one never happened, which is a time-honored artistic tradition.
The final experience was surprisingly satisfying because the diorama changed how the Matchbox car felt. On its own, the car was a toy-sized collectible. Inside the abandoned garage, it became evidence. Was it waiting for restoration? Was it forgotten? Was it the last customer’s car? That unanswered question made the scene more engaging. A good diorama does not explain everything. It leaves enough silence for the viewer’s imagination to pull up a chair, wipe dust off the hood, and start guessing.
Conclusion
Building an abandoned garage diorama for a Matchbox scale model is a perfect project for hobbyists who love storytelling, weathering, and miniature detail. It does not require expensive tools or a massive workspace. With foam board, cardboard, acrylic paint, patience, and a willingness to make things look delightfully neglected, you can create a realistic 1:64 scale garage that turns a small die-cast car into the centerpiece of a complete scene.
The most important advice is simple: build the story first. Decide what happened to the garage, then let every crack, stain, rust streak, weed, and dusty box support that idea. When the details work together, the diorama becomes more than a model. It becomes a tiny abandoned world with a car parked inside and a mystery waiting under the dust.











