de>
Why Chalk Paint and Contact Paper Work So Well Together
Chalk-style paint is popular for furniture makeovers because it produces a velvety, low-sheen surface and generally requires less preparation than conventional enamel. Many formulas adhere to wood, previously painted furniture, and other properly cleaned surfaces without aggressive sanding. However, “less preparation” does not mean “paint directly over dust, grease, furniture polish, and decades of questionable decisions.” Manufacturers still recommend cleaning the surface, testing adhesion, and lightly scuffing slick finishes when necessary.
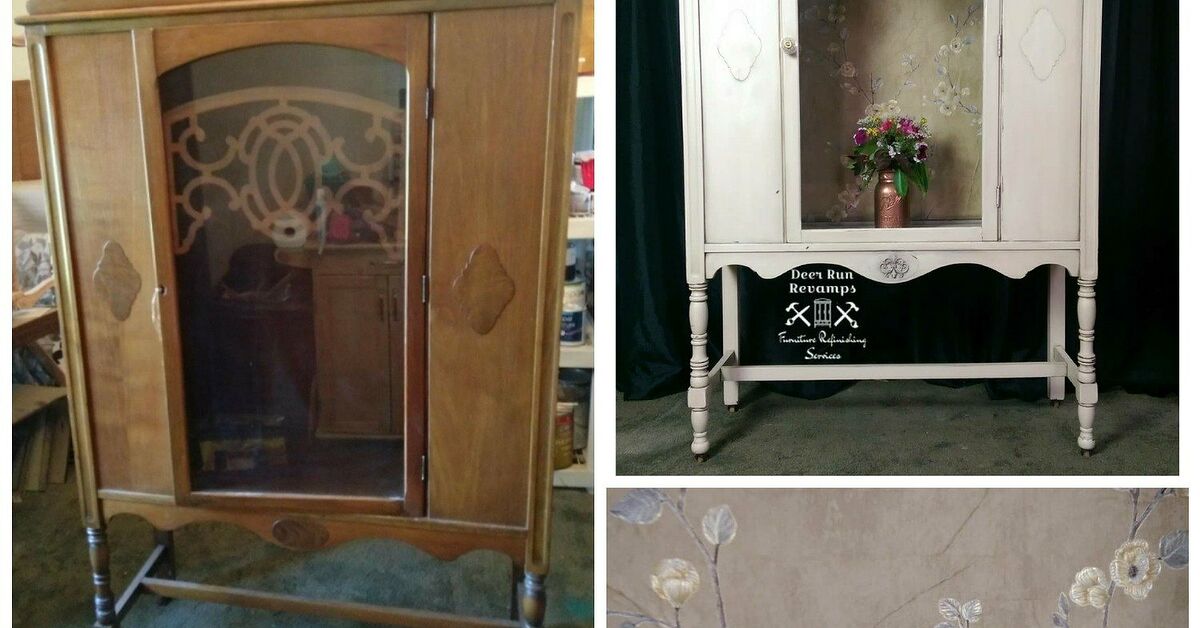
Contact paper provides the visual surprise. Open an understated sage-green cabinet and reveal a floral print. Pair a charcoal exterior with faux linen shelves. Add marble-patterned paper to a small bar cabinet, or use a geometric design to give an old hutch a playful midcentury mood.
Self-adhesive liner is also practical. It can protect shelves from minor spills and disguise stained or mismatched interior surfaces. Many products include a printed measuring grid, and some removable varieties can be repositioned during installation. A smoothing tool or squeegee helps push air toward the edges before bubbles become permanent little monuments to impatience.
Determine Whether Your Cabinet Is a Good DIY Candidate
Look for signs of significant value
A cabinet is usually a reasonable makeover candidate when it is structurally sound but cosmetically worn, mass-produced, previously painted, missing its original finish, or inexpensive enough that you are comfortable changing it. Pause the project when you notice a respected maker’s mark, handcrafted dovetail joints, rare hardware, unusual marquetry, hand-painted decoration, an exceptionally intact original finish, or reliable documentation connecting the piece to a notable period or owner.
Age alone does not guarantee value, and “antique” is often used casually in resale listings. Still, once original material is covered, sanded, or removed, it may be impossible to restore completely. A professional assessment is far cheaper than discovering that your charming thrift-store cupboard was the furniture equivalent of a winning lottery ticket.
Check for lead-painted surfaces
Older painted furniture may contain lead-based paint. Do not dry-sand, scrape, drill, or otherwise disturb an unknown old coating until you understand the risk. Home lead-test kits can provide preliminary information, but professional testing is more reliable when the stakes are high.
The U.S. Environmental Protection Agency recommends containing the work area, keeping children and pregnant people away, minimizing dust with wet methods or HEPA-equipped tools, and cleaning with HEPA vacuuming and wet wiping when lead may be present. If the finish is deteriorating or testing confirms lead, consult a lead-safe professional rather than treating the cabinet like an ordinary weekend craft.
Inspect the structure
Open every door and drawer. Check for loose joints, sagging shelves, lifted veneer, active insect damage, mold, broken hinges, and missing supports. Chalk paint can improve an ugly surface, but it cannot negotiate peace between two pieces of wood that have already separated.
Repair loose joints, replace missing shelf pins, tighten hardware, and stabilize veneer before painting. If the cabinet smells musty, allow it to dry in a ventilated area and identify the moisture source before covering the interior.
Tools and Materials
Chalk-style furniture paint
Clear furniture wax or a compatible water-based topcoat
Self-adhesive contact paper or removable shelf liner
Degreasing cleaner suitable for furniture
Clean lint-free cloths and sponges
Fine-grit sanding sponge, approximately 180 to 220 grit
Paintbrush, small foam roller, or both
Paint can opener and stirring stick
Screwdriver and labeled storage bags
Tape measure, straightedge, pencil, and scissors
Sharp craft knife and a protected cutting surface
Plastic squeegee, wallpaper smoother, or an old gift card
Wood filler and wood glue, if repairs are needed
Drop cloth, gloves, eye protection, and appropriate respiratory protection
How to Update an Antique Cabinet Step by Step
1. Photograph and disassemble the cabinet
Take photos before removing anything. Photograph hinge positions, door alignment, shelf orientation, and unusual hardware. These images become surprisingly valuable when three nearly identical screws are staring at you from the floor.
Remove knobs, pulls, doors, drawers, adjustable shelves, and decorative pieces that can be detached safely. Label each item and place its hardware in a separate bag. Do not force old screws; penetrating lubricant and patience are less expensive than repairing split wood.
2. Clean every paintable surface
Vacuum loose dust from corners and carvings. Wash the exterior with a cleaner that removes grease, wax, smoke residue, and furniture polish without saturating the wood. Use a dampnot drippingcloth, then wipe away cleaner residue and allow the cabinet to dry completely.
Pay special attention to areas around handles. Those dark patches are not necessarily “beautiful patina.” Sometimes they are simply a long-running archive of hand lotion.
3. Make repairs and sand selectively
Fill unwanted holes, stabilize lifting veneer, and sand repaired areas smooth. Chalk paint often requires only limited sanding, but glossy, peeling, rough, or damaged surfaces need additional attention. Lightly scuffing a slick finish improves mechanical adhesion, while loose paint must be removed safely before coating. Traditional furniture-painting guidance also recommends removing dust thoroughly after sanding.
Do not aggressively sand crisp edges, carved details, or attractive age marks unless damage makes it necessary. The objective is not to erase the cabinet’s entire biography. You are giving it a new chapter, not placing it in witness protection.
4. Test the paint and contact paper
Apply a small paint sample to an inconspicuous area and let it dry. Check for adhesion, discoloration, bleed-through, or an unwanted reaction with the old finish. Certain woods, stains, and aged coatings can release tannins or colors through pale paint. If bleeding occurs, apply a compatible stain-blocking primer before continuing.
Test the contact paper inside the cabinet as well. Make sure it bonds without damaging unstable veneer or pulling away an existing finish. Removable does not always mean harmless on every old surface, especially after months or years of contact.
5. Apply the first coat of chalk paint
Stir the paint thoroughly. Apply a thin, even coat with a quality brush. Work in manageable sections and watch for drips along edges, moldings, and the underside of rails.
For an intentionally rustic finish, vary your brush direction slightly. For a smoother contemporary look, use light brush pressure or finish broad, flat areas with a small foam roller. Avoid repeatedly brushing paint as it begins to dry; that usually creates drag marks and frustration in equal quantities.
6. Add a second coat and refine the finish
Let the first coat dry according to the manufacturer’s instructions. Apply a second thin coat where needed. Coverage varies with the paint color, old finish, surface porosity, and application method, so follow the product label rather than assuming every cabinet will be finished in one coat. Rust-Oleum, for example, notes that additional coats may be applied to achieve the desired appearance.
Once dry, lightly sand between coats if you want a softer, smoother texture. For a distressed look, gently sand corners, door edges, raised trim, and areas around handlesplaces where wear would occur naturally. Randomly attacking the middle of a door tends to look less “authentically aged” and more “brief encounter with an angry house cat.” Natural-looking distressing is usually concentrated along edges and frequently handled areas.
7. Seal the painted exterior
Chalk-style paint is porous and generally benefits from a protective finish. Furniture wax creates a traditional soft sheen, while a compatible water-based topcoat may provide easier maintenance on heavily used cabinets. Always use the sealer recommended for your paint system and test it first because some clear finishes can alter the color.
When waxing, apply a thin layer with a wax brush or lint-free cloth, work it into the paint, remove the excess, and buff after the recommended waiting period. More wax is not more protection. Museum conservation guidance warns that excessive wax can leave a sticky surface that attracts dirt, while furniture-paint manufacturers likewise recommend controlled, even application.
8. Prepare the interior for contact paper
Contact paper adheres best to a smooth, clean, dry surface. Vacuum shelves and wipe them with a residue-free cleaner. Remove sticky deposits, splinters, and raised paint. Let the interior dry fully before installation.
If you painted the shelf surfaces, allow the paint and topcoat to curenot merely feel drybefore applying adhesive liner. Premature installation can trap moisture, mark the finish, or cause the liner to bond unevenly. Follow the paint manufacturer’s curing instructions.
9. Measure and cut the liner
Measure each shelf individually. Old cabinets are rarely perfect rectangles, even when they look innocent from across the room. Measure the width at the front, middle, and back, then use the smallest measurement as your starting point.
Transfer the measurements to the backing grid and cut the liner slightly oversized when precise trimming will be possible after installation. For a removable shelf panel, cut it to the exact dimensions before peeling the backing. Mark the direction of the pattern so that flowers, stripes, wood grain, or tiles face consistently.
10. Apply the contact paper gradually
Peel back only one or two inches of backing paper. Align the exposed adhesive with the rear or side edge of the shelf, press it lightly into place, and confirm that the pattern is straight.
Continue pulling away the backing a few inches at a time while smoothing the paper from the center toward the edges. Use overlapping strokes with a squeegee or plastic card. Manufacturer instructions commonly emphasize gradual application and smoothing rather than removing the entire backing at once.
If a wrinkle forms, lift the nearest section gently and reapply it. Do not stretch the vinyl because stretched material may shrink or pull away later. A tiny trapped bubble can sometimes be released with a very small pinprick and pressed flat, but careful installation is better than performing bubble surgery across an entire shelf.
11. Trim, cure, and reassemble
Use a sharp craft knife and straightedge to trim excess paper. Replace the blade frequently; a dull blade can tear decorative vinyl and make clean corners nearly impossible.
Allow the paint and protective finish to cure as directed before reinstalling hardware, closing doors tightly, or loading shelves. Attach knobs and hinges carefully to avoid twisting or chipping the new finish. If the original hardware suits the design, clean and reuse it. Otherwise, save it in a labeled bag so the makeover remains more reversible.
Design Combinations That Suit an Old Cabinet
Soft farmhouse
Use warm white, muted cream, sage, or pale blue chalk paint with a small botanical contact-paper print. Retain dark antique brass hardware for contrast.
Moody traditional
Paint the exterior charcoal, deep green, navy, or burgundy. Add faux linen, subtle plaid, or warm marble paper inside. This combination feels sophisticated without pretending the cabinet lives in a castle.
Playful vintage
Choose mustard, dusty coral, or turquoise paint with a cheerful floral or geometric liner. Use this approach on a small cabinet, nightstand, or bar cupboard where a bold interior becomes a pleasant surprise.
Modern contrast
Pair a black or greige exterior with light wood-grain contact paper. Simple knobs and minimal distressing keep the finished piece clean rather than overly rustic.
Common Cabinet-Makeover Mistakes
Skipping the value check: Altering a collectible cabinet can reduce its historical and financial value.Painting over polish or grease: Even highly adhesive paint struggles on a contaminated surface.Dry-sanding unknown old paint: This may create hazardous lead-contaminated dust.Applying thick paint coats: Thick coats dry slowly and collect around carvings, corners, and hinges.Sealing before the paint dries: Trapped moisture can produce cloudiness, softness, or an uneven finish.Installing contact paper over dust: Every speck may become a visible bump.Peeling off the full backing immediately: This encourages wrinkles, misalignment, and colorful new vocabulary.Using contact paper on rough surfaces: Adhesive vinyl needs consistent contact with a smooth substrate.Loading the cabinet too soon: Dry paint can still be vulnerable before it fully cures.
How to Care for the Updated Cabinet
Dust the painted exterior with a soft cloth. Clean spills promptly with a barely damp cloth and avoid abrasive scrubbers, silicone furniture sprays, harsh degreasers, and prolonged moisture. Reapply wax only when the existing surface no longer buffs back to an even sheen, following the paint manufacturer’s care instructions.
Wipe the contact-paper lining with a soft damp cloth and mild soap when necessary. Do not allow standing water to remain along seams or shelf edges. Use coasters or trays beneath wet containers, oils, cosmetics, and cleaning products.
To remove a peel-and-stick liner, warm a corner gently with a hair dryer on a low setting, then pull it back slowly at a low angle. Test this method first because heat and adhesive removal can affect delicate old finishes.
Lessons From Real-World Chalk Paint and Contact Paper Makeovers
The most important lesson from practical cabinet projects is that preparation takes longer than paintingand that is completely normal. A beginner often imagines spending ten minutes cleaning, thirty minutes painting, and the remainder of the afternoon arranging decorative baskets. In reality, the cabinet may contain loose screws, old adhesive, waxy polish, shelf stains, and one drawer that refuses to come out unless held at precisely the angle of the moon.
A typical first surprise occurs during cleaning. The cabinet may initially appear to have a medium-brown finish, but after grease and polish residue are removed, the true surface can be several shades lighter. This is why cleaning must happen before choosing whether to sand, prime, or paint. Otherwise, you are testing adhesion on grime rather than on the cabinet.
Another common experience is uneven coverage during the first coat. Pale chalk paint over dark wood can look streaky and alarming. That does not automatically mean the project has failed. Thin coats frequently look imperfect before the second coat, especially on carved areas and porous wood. Applying more paint while the first layer is becoming tacky usually makes the texture worse. The better response is to step away, clean the brush, and let the coat dry fully.
Contact paper creates a different kind of challenge. The first shelf often takes as long as the remaining shelves combined. It teaches the installer how much backing to remove, how firmly to use the squeegee, and how quickly the adhesive grabs. Starting with a small removable shelf is far wiser than beginning with the cabinet’s largest, most visible panel.
Pattern selection also changes once the roll is opened. A dramatic marble or oversized floral may look wonderful online but overwhelming inside a narrow cabinet. Before cutting, unroll a section and place it inside the cabinet with painter’s tape. Step back, close the doors, reopen them, and observe the effect from normal viewing distance. Small-scale patterns are generally forgiving because seams and alignment errors are less obvious.
One of the most useful practical habits is cutting each shelf separately. In old furniture, two shelves that appear identical may differ by a quarter inch. Using the first piece as a template for every shelf can produce gaps, folded edges, or an emergency patch disguised beneath a decorative tray.
Hardware frequently becomes the finishing decision that changes the entire cabinet. Original brass knobs can look dull before painting but suddenly appear elegant against a dark green or cream exterior. Cleaning them first may eliminate the need for replacements. When new hardware is used, preserving the originals in a labeled bag protects the cabinet’s history and gives a future owner the option to reverse the change.
Patience during curing is another lesson learned the hard way. A newly painted surface may feel dry within hours but remain soft underneath. Closing doors too soon can cause painted edges to stick together. Installing knobs aggressively can compress the finish around screw holes. Placing heavy dishes on freshly lined shelves can also trap adhesive ridges before the liner settles. Following the full curing guidance on the paint and sealer label prevents these small but maddening defects.
Finally, successful makeovers usually preserve at least one element that reminds viewers the cabinet is old. It might be the original keyhole, aged brass hinges, worn interior edge, carved feet, or a small area of natural wood. When every mark is filled, sanded, painted, replaced, and polished into submission, the piece can lose the personality that made it worth rescuing. The strongest transformations balance improvement with restraint.
Conclusion
Updating an antique cabinet with contact paper and chalk paint is an accessible way to combine old craftsmanship with a fresh, useful design. The best results come from evaluating the cabinet before altering it, addressing safety concerns, cleaning thoroughly, applying thin paint coats, sealing the finish correctly, and installing the liner in small controlled sections.
The project does not need to look factory-new. Slight age, visible brush texture, reused hardware, and a few honest imperfections can help the cabinet retain its history. Aim for renewed rather than erased. When the doors open to reveal a beautifully patterned interior, no one needs to know how long you spent arguing with the second shelf.
Research note: This guide synthesizes established recommendations from U.S. furniture-paint manufacturers, home-improvement publications, adhesive-liner manufacturers, the Environmental Protection Agency, the Smithsonian Museum Conservation Institute, and the National Park Service. Product instructions vary, so always follow the preparation, drying, curing, ventilation, and disposal directions printed on the specific materials you use.