
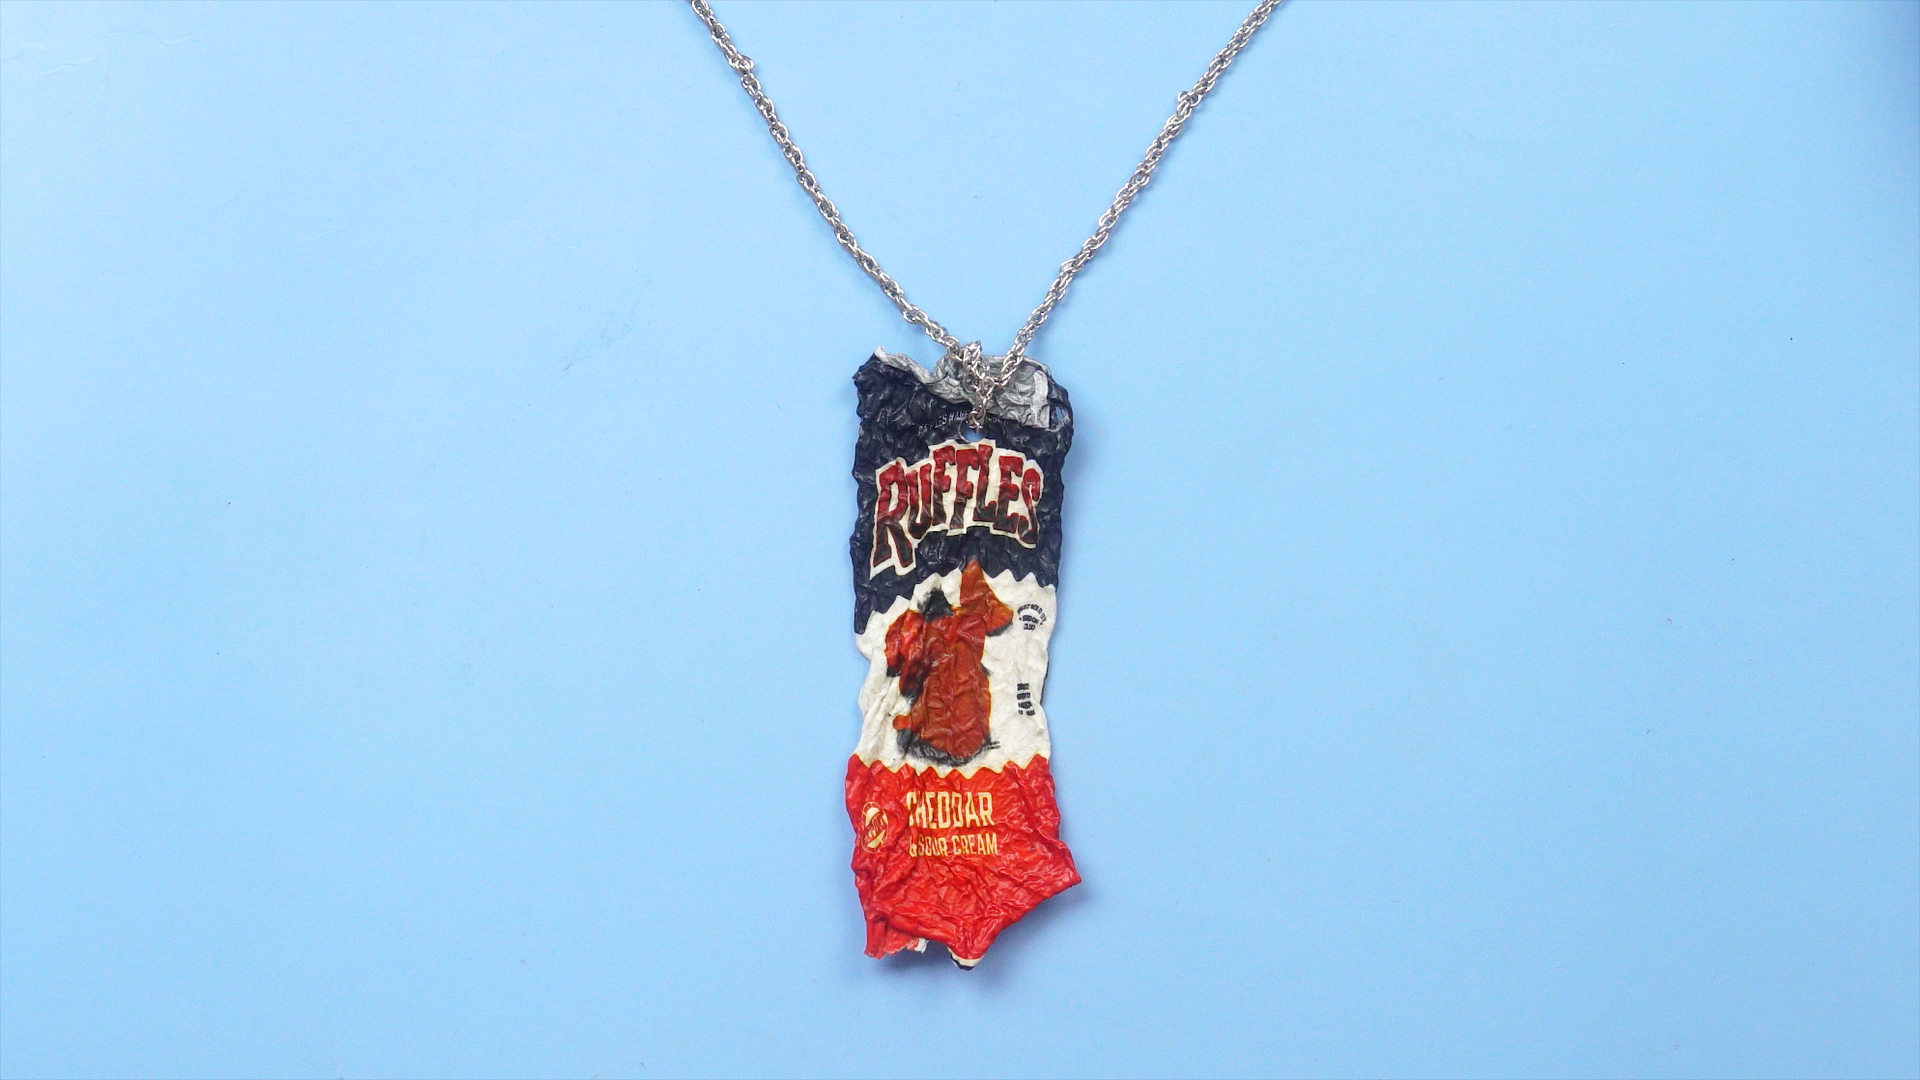
So you finished a bag of chips. Congratulations: you have completed phase one of an extremely crunchy science project. Phase two is where things get interesting. With careful heat, ventilation, and adult supervision, some snack bags can shrink into tiny, glossy versions of themselves, perfect for a keychain, charm, bookmark, scrapbook decoration, or the world’s tiniest monument to barbecue-flavored decision-making.
Learning how to shrink a bag of chips is part craft, part kitchen science, and part “please do not put that in the microwave.” Chip bags are usually made from layered flexible packaging, often combining plastic films and a shiny metallized layer that helps block light, oxygen, and moisture. That same engineered packaging can react dramatically when heated, shrinking, curling, stiffening, and sometimes refusing to behave because apparently even garbage has opinions.
This guide explains the safest practical method, the science behind the shrink, common mistakes, troubleshooting tips, and creative ways to use your mini chip bag after it cools. The most important rule: treat this as a supervised craft, not a casual snack-time dare.
What Does It Mean to Shrink a Bag of Chips?
To shrink a bag of chips means to heat an empty, clean snack bag until the plastic layers contract and become smaller, thicker, and firmer. The result often looks like a miniature version of the original bag, complete with the same logo, colors, and chaotic snack energy.
This is similar in spirit to shrink plastic crafts, sometimes called “shrinky dink” crafts, but chip bags are not the same as store-bought shrink plastic sheets. A commercial shrink sheet is designed for crafting. A chip bag is designed to keep snacks crisp, survive shipping, and tempt you from across the grocery aisle. That means the results are less predictable. Some bags shrink beautifully. Others curl like a frightened armadillo.
Safety First: Read This Before You Heat Anything
Before we get to the fun part, let’s be serious for a moment. Heating plastic can release odors or fumes, and hot plastic can burn skin. Craft safety guidance recommends avoiding inhalation of plastic vapors and decomposition fumes and using appropriate ventilation when working with plastic. Fire safety guidance also emphasizes watching anything being baked or heated and keeping flammable materials away from heat sources. Translation: open a window, turn on the vent fan, stay nearby, and do not wander off to “check one thing” on your phone for 37 minutes.
Do Not Use a Microwave
Most chip bags have a shiny metallized layer. Microwaves and metal-like packaging are not a friendly team. The bag may spark, overheat, melt, or damage the appliance. A microwave is for reheating soup, not for creating a tiny potato chip souvenir with electrical drama.
Use Adult Supervision
This project is not ideal for young children to do alone. Kids can help wash the bag, punch a hole, choose the design, or admire the final masterpiece, but an adult should handle the oven, hot pans, and hot plastic.
Ventilate the Room
Open a window, use a range hood, or work in a well-ventilated kitchen. If the bag smokes, smells harsh, darkens, bubbles aggressively, or looks like it is melting instead of shrinking, turn off the oven and stop the project.
Supplies You Need
Basic Materials
- One empty chip bag, preferably a small single-serving bag
- Dish soap and warm water
- Paper towels or a clean cloth
- Parchment paper
- Two flat baking sheets
- Oven mitts
- Hole punch, if making a keychain or ornament
- Key ring, jump ring, ribbon, magnet, or cord
Optional Extras
- Heavy book for flattening after cooling
- Small pliers for attaching jewelry hardware
- Clear sealant for non-food decorative use
- Scissors for trimming edges before shrinking
Best Type of Chip Bag to Shrink
Small snack-size bags usually work better than large family-size bags. They fit between baking sheets more easily, shrink more evenly, and turn into a charm-sized craft without needing major trimming. Regular potato chip, corn chip, and tortilla chip bags often perform better than thick, heavily textured, paper-lined, compostable, or unusual packaging.
Not every snack bag will shrink the same way because flexible food packaging varies by brand, material, coating, and layer structure. Some bags are made with multilayer laminated films. Others include metallized plastic films, polyethylene, polypropylene, PET, or other barrier layers. If your first attempt comes out wrinkly, dramatic, and slightly villainous, the technique may not be the problem. The bag may simply be built differently.
How to Shrink a Bag of Chips in the Oven
Step 1: Empty and Clean the Bag
First, eat the chips. This step is technically required by morale, if not by science. Once the bag is empty, shake out crumbs, then wash the inside with warm water and a tiny drop of dish soap. Grease can smoke, smell bad, and interfere with even shrinking. Rinse well and dry completely.
Do not skip drying. Water trapped inside the bag can steam, wrinkle the plastic, and make the final shape lumpy. A clean, dry bag is the difference between “cute keychain” and “tiny haunted snack envelope.”
Step 2: Preheat the Oven Low
Preheat a conventional oven or toaster oven to about 200°F. Some crafters use higher temperatures for faster shrinkage, but a lower temperature gives you more control and reduces the chance of sudden curling, scorching, or melting. The project is already weird enough. No need to add panic.
Step 3: Sandwich the Bag Between Parchment and Baking Sheets
Lay a sheet of parchment paper on a baking sheet. Place the chip bag flat on top, design side up if you want to watch the logo shrink into cuteness. Cover it with another piece of parchment paper. Then place the second baking sheet on top to press the bag flat.
This “pan sandwich” method helps reduce curling. Without pressure, the bag may roll itself into a crunchy plastic taco. The parchment also keeps the bag from sticking to the pans.
Step 4: Bake and Check Often
Bake for about 10 to 20 minutes, checking regularly with oven mitts. Smaller bags may shrink faster. Thicker or less cooperative bags may need more time. The bag may first curl, twist, or wrinkle, then settle flatter as it contracts. If it smells strong, smokes, or darkens, stop heating immediately.
When the bag looks significantly smaller and firmer, remove the pans from the oven. Keep your face away from the hot plastic when opening the parchment. Steam, heat, and snack-bag attitude may escape.
Step 5: Flatten While Warm
If the bag is still slightly flexible, you can place it under a heavy book for a few minutes while it cools. Put parchment or plain paper between the bag and the book to protect the surface. Do not touch the hot plastic with bare fingers.
Step 6: Add a Hole or Hardware
Once the tiny chip bag is completely cool, punch a hole near one corner if you want to make a keychain, ornament, zipper pull, necklace charm, or backpack tag. Attach a key ring, ribbon, or jump ring. Now you have transformed snack trash into a tiny piece of pop-art evidence.
Alternative Fast Method: Higher Heat, Shorter Time
Some makers use a hotter oven, around 300°F to 325°F, for only a few minutes. This can work, but it is less forgiving. The bag can shrink quickly, curl sharply, or overheat before you can say, “Wait, is that supposed to happen?” If you are new to shrinking chip bags, start with the lower-temperature method first.
If you do experiment with higher heat, watch constantly, use parchment and baking sheets, and stop as soon as the bag has shrunk. Never leave the oven unattended. This is a craft, not a slow-cooker recipe.
Why Does a Chip Bag Shrink?
The short answer: heat allows stressed or oriented plastic layers to relax. Many plastic films are stretched during manufacturing to make them stronger, thinner, glossier, or better suited for packaging. When heated, some of that built-in orientation can pull back, causing the material to contract.
Think of it like a rubber band that has been held stretched for a long time. Add heat, and the material gets enough energy to move toward a more relaxed shape. Of course, a chip bag is more complicated than a rubber band because it may contain several laminated layers. Each layer can respond differently to heat, which is why shrinking is often uneven.
Common Problems and How to Fix Them
The Bag Curled Into a Tube
This is the classic chip bag rebellion. Next time, use two baking sheets to press it flat. Make sure the bag is centered and fully covered with parchment. A heavy top pan helps prevent curling while still allowing heat to reach the bag.
The Bag Did Not Shrink Much
Some packaging simply does not shrink dramatically. Try a different brand or a smaller bag. You can also extend the baking time at low heat, checking every few minutes. Do not keep increasing the temperature endlessly; melted plastic is not a craft supply, it is a warning sign.
The Bag Smelled Bad
A mild warm-plastic odor can happen, but a harsh, smoky, or chemical smell means stop. Turn off the oven, ventilate the room, and let everything cool. Next time, clean the bag more thoroughly, use lower heat, and avoid bags with heavy grease residue or unusual coatings.
The Design Became Too Dark
Some printed inks darken or intensify as the bag shrinks. Try reducing the temperature, shortening the time, or choosing a lighter-colored bag. Bright designs often look great after shrinking because the colors become more concentrated.
The Bag Came Out Wavy
Waviness happens when different layers shrink at different rates. Pressing it under a heavy book while warm can help. You can also embrace the texture. Not every craft has to be flat enough to pass a building inspection.
Creative Uses for a Shrunk Chip Bag
Chip Bag Keychain
The most popular use is a chip bag keychain. Punch a small hole in one corner, add a jump ring, and attach it to your keys. It is colorful, lightweight, and far more memorable than the plain metal tag you keep losing.
Backpack Charm
Mini snack bags make funny backpack charms for students, teachers, campers, and anyone whose personality can be summarized as “crunchy but charming.”
DIY Bookmark
If the bag shrinks relatively flat, use it as a bookmark. It works especially well for cookbooks, science notebooks, or that novel you keep starting and abandoning on page 43.
Holiday Ornament
Add a ribbon and hang the mini bag on a Christmas tree, party garland, or snack-themed decoration. A tiny sour cream and onion ornament may not be traditional, but neither is half the stuff in modern holiday decor.
Scrapbook Accent
Use shrunk bags in scrapbooks, junk journals, memory boards, or travel collages. A mini chip bag from a road trip can become a funny keepsake, especially if the snack was purchased at a gas station at 11:48 p.m. during questionable life choices.
Can You Shrink Other Snack Bags?
Yes, sometimes. Small candy wrappers, popcorn bags, granola bar wrappers, and other flexible packaging may shrink, but results vary widely. Avoid anything with paper lining, heavy residue, unknown coatings, or packaging that seems likely to scorch. Always clean it, use low heat, ventilate, and test one piece at a time.
Do not shrink packaging that held raw meat, oily leftovers, chemicals, medicine, or anything unsafe to heat. Crafting is fun. Accidentally creating a mystery-fume laboratory is not.
Is Shrinking Chip Bags Eco-Friendly?
Shrinking a bag of chips is a form of creative reuse, not a complete recycling solution. It keeps one bag out of the trash temporarily and turns it into something fun, but it does not solve the larger challenge of flexible snack packaging. Many chip bags are difficult to recycle through curbside programs because they are made from layered films that recycling facilities may not be able to separate.
The better environmental hierarchy is simple: reduce what you can, reuse where practical, recycle correctly when local programs accept the material, and avoid “wishcycling,” which means tossing questionable items into the recycling bin and hoping the recycling fairy handles the rest.
Expert Tips for Better Results
Start With a Small Bag
A single-serving bag is easier to control, easier to flatten, and more likely to become a usable charm. Large bags can shrink unevenly and may not fit neatly between pans.
Trim Before Heating
If the edges are torn or messy, trim them before baking. After shrinking, the plastic becomes thicker and harder to cut cleanly.
Punch the Hole Early or Late Depending on Thickness
If your finished bags become too thick for a hole punch, punch the hole before shrinking. The hole will shrink too, so make it larger than you think you need. If your bags remain thin enough, punch after cooling for better placement.
Keep a Test Log
If you plan to make several chip bag crafts, write down the brand, oven temperature, time, and result. This sounds extremely nerdy, which is how you know it works. After a few tests, you will know which bags shrink flat, which curl, and which turn into abstract modern art.
Frequently Asked Questions
Can I Shrink a Bag of Chips Without an Oven?
An oven or toaster oven is the most common method because it provides steady, controlled heat. A heat gun may work for experienced crafters, but it can cause uneven shrinking and increases the risk of overheating. A microwave is not recommended.
How Small Will the Bag Get?
It depends on the bag. Many shrink to a fraction of their original size, but there is no universal measurement because packaging materials vary. Expect experimentation.
Is the Finished Mini Bag Safe to Eat From?
No. Once heated and crafted, the bag should be treated as a decorative object only. Do not use it for food storage, cooking, serving, or anything involving actual snacks.
Can Kids Do This Craft?
Kids can participate with preparation and decorating ideas, but adults should handle the oven, hot pans, and hot plastic. Older kids may enjoy the science lesson, especially when the bag shrinks and everyone pretends not to be impressed.
Why Did My Bag Melt Instead of Shrink?
The oven may have been too hot, the bag material may not be suitable, or the bag may have stayed in too long. Use lower heat, check often, and try a different bag.
500-Word Experience Section: What It Is Like to Shrink a Bag of Chips
The first time you shrink a bag of chips, you may feel a strange mix of curiosity, suspicion, and snack-based pride. You clean the bag, flatten it carefully, slide it between parchment paper, and suddenly your kitchen feels like a tiny science museum with better access to salsa. There is something deeply satisfying about taking an object most people would throw away and giving it a second life as a miniature version of itself.
The best experience usually starts with a small bag. Big bags are tempting because they look dramatic, but small bags behave better. After washing and drying the bag, you may notice how sturdy it feels. That is the first clue that snack packaging is more engineered than it looks. It is not just a wrapper; it is a tiny flexible fortress built to defend chips from air, moisture, light, and your unrealistic promise to “save some for later.”
Once the bag goes into the oven, patience becomes the main ingredient. At first, nothing may happen. Then the bag may curl at the edges or puff slightly. This is the moment when beginners panic and experts calmly say, “Ah yes, the snack goblin awakens.” If the bag is pressed between baking sheets, it usually cannot curl too wildly. After several minutes, it begins to contract. The colors become denser. The logo gets smaller. The whole thing starts looking like a souvenir from a dollhouse convenience store.
The cooling stage is surprisingly important. If you remove the bag and immediately poke at it, you may burn your finger or bend the shape. Letting it rest under light pressure helps it become flatter and more polished. When it finally cools, the texture is firmer and thicker than before. The finished piece feels less like a wrapper and more like a glossy plastic charm.
One of the most enjoyable parts is comparing results from different brands. Some bags shrink neatly and look professionally cute. Others wrinkle, twist, or darken. A few emerge from the parchment looking like they fought a dragon and technically won. That unpredictability is part of the charm. Each attempt teaches you something about temperature, timing, materials, and humility.
Making a keychain from the finished bag is the classic victory lap. Punching the hole, adding the ring, and clipping it onto a backpack or set of keys turns the project from “weird thing I baked” into “conversation starter.” People will ask where you got it. You will say, with the calm confidence of a person who has heated garbage responsibly, “I made it.” Then they will either be impressed or quietly concerned. Both reactions are acceptable.
The biggest lesson from shrinking chip bags is that everyday objects hide interesting science. A snack bag is not just trash. It is packaging design, polymer behavior, branding, heat response, and creativity packed into one shiny rectangle. Shrinking it will not save the planet by itself, but it can make people look twice at what they throw away. And sometimes, that tiny moment of curiosity is the real craft.
Conclusion
Learning how to shrink a bag of chips is a fun, hands-on way to explore shrink plastic science, recycled crafts, and snack-powered creativity. The basic process is simple: clean the bag, dry it, sandwich it between parchment and baking sheets, heat it gently, check often, and let it cool before turning it into a keychain, bookmark, ornament, or charm.
The key is safety. Use low heat, never use a microwave, ventilate the space, supervise children, and stop immediately if the bag smokes or smells harsh. Results will vary because chip bags are made from different layered materials, but that is part of the fun. Every mini bag is a tiny experiment with a crunchy backstory.
Note: This article is based on real craft practices, polymer science, flexible packaging information, recycling guidance, and home safety recommendations. Always follow common-sense safety precautions when heating plastic materials.













