
Removing a toilet is not glamorous, but it is surprisingly manageable when you follow the correct order. Shen drain. Skip one of those steps and your simple bathroom project may become an unscheduled indoor water feature.
Whether you are replacing an outdated toilet, repairing a damaged flange, installing new flooring, or tracking down a mysterious leak, this guide explains how to remove a toilet safely and cleanly. It also covers stubborn bolts, hidden water, wax-ring cleanup, flange inspection, disposal, and the practical lessons that experienced DIYers learn after making at least one avoidable mess.
Can You Remove a Toilet Yourself?
Most homeowners with basic hand tools can remove a standard residential toilet. The plumbing is not especially complicated, and the work usually takes less than two hours when the shutoff valve and mounting bolts cooperate.
The main challenge is weight. A toilet is heavy, awkwardly shaped, and not equipped with convenient carrying handles. A two-piece toilet is easier to manage because you can remove the tank before lifting the bowl. A one-piece model must be moved as a single, considerably heavier unit.
Get a helper when possible, especially if you have back problems, limited lifting experience, narrow bathroom doorways, or an expensive floor that you would prefer not to introduce to falling porcelain.
Call a plumber instead when:
- The toilet shutoff valve does not stop the water.
- The supply pipe is corroded, damaged, or leaking inside the wall.
- The toilet is severely cracked and may break while being lifted.
- The floor around the toilet feels soft or structurally damaged.
- The flange is badly broken, loose, or connected to deteriorated plumbing.
- The fixture is wall-mounted, pressure-assisted, or unusually complex.
Tools and Supplies You Will Need
Gather everything before turning off the water. Searching the garage for a wrench while holding a dripping supply line is an excellent way to discover new and creative vocabulary.
- Rubber or disposable work gloves
- Safety glasses
- Adjustable wrench or channel-lock pliers
- Ratchet and socket set
- Flat-head screwdriver
- Utility knife
- Small hacksaw or oscillating tool for rusted bolts
- Penetrating oil
- Bucket
- Large sponge or disposable cup
- Wet/dry vacuum, if available
- Old towels, rags, or absorbent pads
- Plastic putty knife or scraper
- Cardboard, drop cloth, or heavy plastic sheeting
- Drain plug or a large rag in a plastic bag
- Disinfecting cleaner
If the toilet will be reinstalled, also purchase a new toilet seal, new closet bolts, and possibly a new water supply connector. A compressed wax ring should never be reused.
Preparation Before Removing the Toilet
Clean the fixture first
Give the toilet a thorough cleaning before beginning. Removing a clean toilet is still bathroom work, but it is far more pleasant than wrestling with a fixture that has been treated as an archaeological site.
Clear everything from the surrounding area, including rugs, trash cans, toilet brushes, shelving, and decorative items. You need room to kneel, use tools, and carry the fixture toward the door without performing an obstacle course.
Protect the floor
Place towels or absorbent pads around the base. Lay cardboard or a folded drop cloth nearby as a temporary landing area for the toilet. Porcelain can scratch tile, dent softer flooring, and damage itself if placed directly on a hard surface.
Plan the exit route
Measure tight doorways and decide where the toilet will go after removal. If it is headed outside, clear the route in advance. Moving a toilet while asking someone to relocate a laundry basket is not efficient project management.
How To Remove a Toilet Step by Step
Step 1: Turn off the water supply
Locate the shutoff valve behind or beside the toilet. Turn it clockwise until it stops. Do not use extreme force on an old valve; corroded plumbing can snap or begin leaking when handled aggressively.
Remove the tank lid and set it safely on a towel. Flush the toilet and watch the tank. If it does not refill, the valve is working. If water continues entering the tank, try closing the valve more firmly. When the valve will not shut off completely, close the home’s main water supply before continuing.
Step 2: Drain the tank and bowl
Hold the flush lever down to remove as much water as possible from the tank. A second flush may help. Use a sponge, cup, or wet/dry vacuum to remove the remaining water from the tank.
Next, remove the water from the bowl. You can push much of it through the trap with a plunger, scoop it into a bucket, absorb it with a sponge, or use a wet/dry vacuum. Never use an ordinary household vacuum for this job.
Take your time with this step. Water remains inside the toilet’s internal trap even when the bowl appears empty. Tilting the toilet later may release it, generally toward the cleanest towel you own.
Step 3: Disconnect the water supply line
Place a towel and bucket beneath the connection. Unscrew the supply line from the threaded fill-valve shank underneath the tank. Many connectors can be loosened by hand, although an adjustable wrench may be necessary.
Support the fill-valve shank while loosening the nut so the internal valve does not rotate. Expect a small amount of residual water. If you are replacing an old, kinked, corroded, or stiff connector, disconnect its other end from the shutoff valve and install a new line later.
Step 4: Remove the tank on a two-piece toilet
Separating the tank reduces weight and makes the toilet easier to carry. Skip this step for a one-piece fixture.
Find the two or three bolts connecting the tank to the bowl. Hold the bolt heads inside the tank with a screwdriver while loosening the nuts underneath with a wrench or socket. If the hardware is badly rusted, apply penetrating oil and give it time to work.
Lift the tank straight up and place it on a padded surface. Do not use the tank lid as a handle, and do not set the tank where someone can accidentally kick it. Porcelain is durable during ordinary use but remarkably unforgiving when dropped.
Step 5: Cut the caulk around the base
Many toilets are sealed to the floor with caulk. Use a utility knife to score carefully around the base. Keep the blade shallow to avoid scratching the finished floor.
Cutting the caulk before removing the floor bolts helps prevent damaged flooring and reduces the amount of force needed to break the toilet free. If the toilet has no visible caulk, you can move to the next step.
Step 6: Remove the closet bolt caps and nuts
Pry off the decorative caps on both sides of the toilet base. Under each cap, you should find a nut and washer attached to a closet bolt rising from the flange.
Loosen the nuts evenly with an adjustable wrench or socket. If a bolt spins, grip it with locking pliers while turning the nut. For corroded hardware, apply penetrating oil and wait several minutes.
If the nuts still refuse to move, cut through the bolts with a mini hacksaw or oscillating tool. Wear safety glasses and work carefully around the porcelain. Do not strike a stuck nut with a hammer; the nut may survive while the toilet does not.
Step 7: Break the old toilet seal
With the bolts removed, hold the bowl by its sturdy sides. Gently rock the toilet from side to side to break the seal created by the wax ring. The movement should be controlled and minimal.
Avoid forceful twisting because the closet flange may be old, brittle, or partially corroded. If the toilet does not move, check for hidden caulk or a missed fastener rather than attempting to win an arm-wrestling contest with it.
Step 8: Lift the toilet straight up
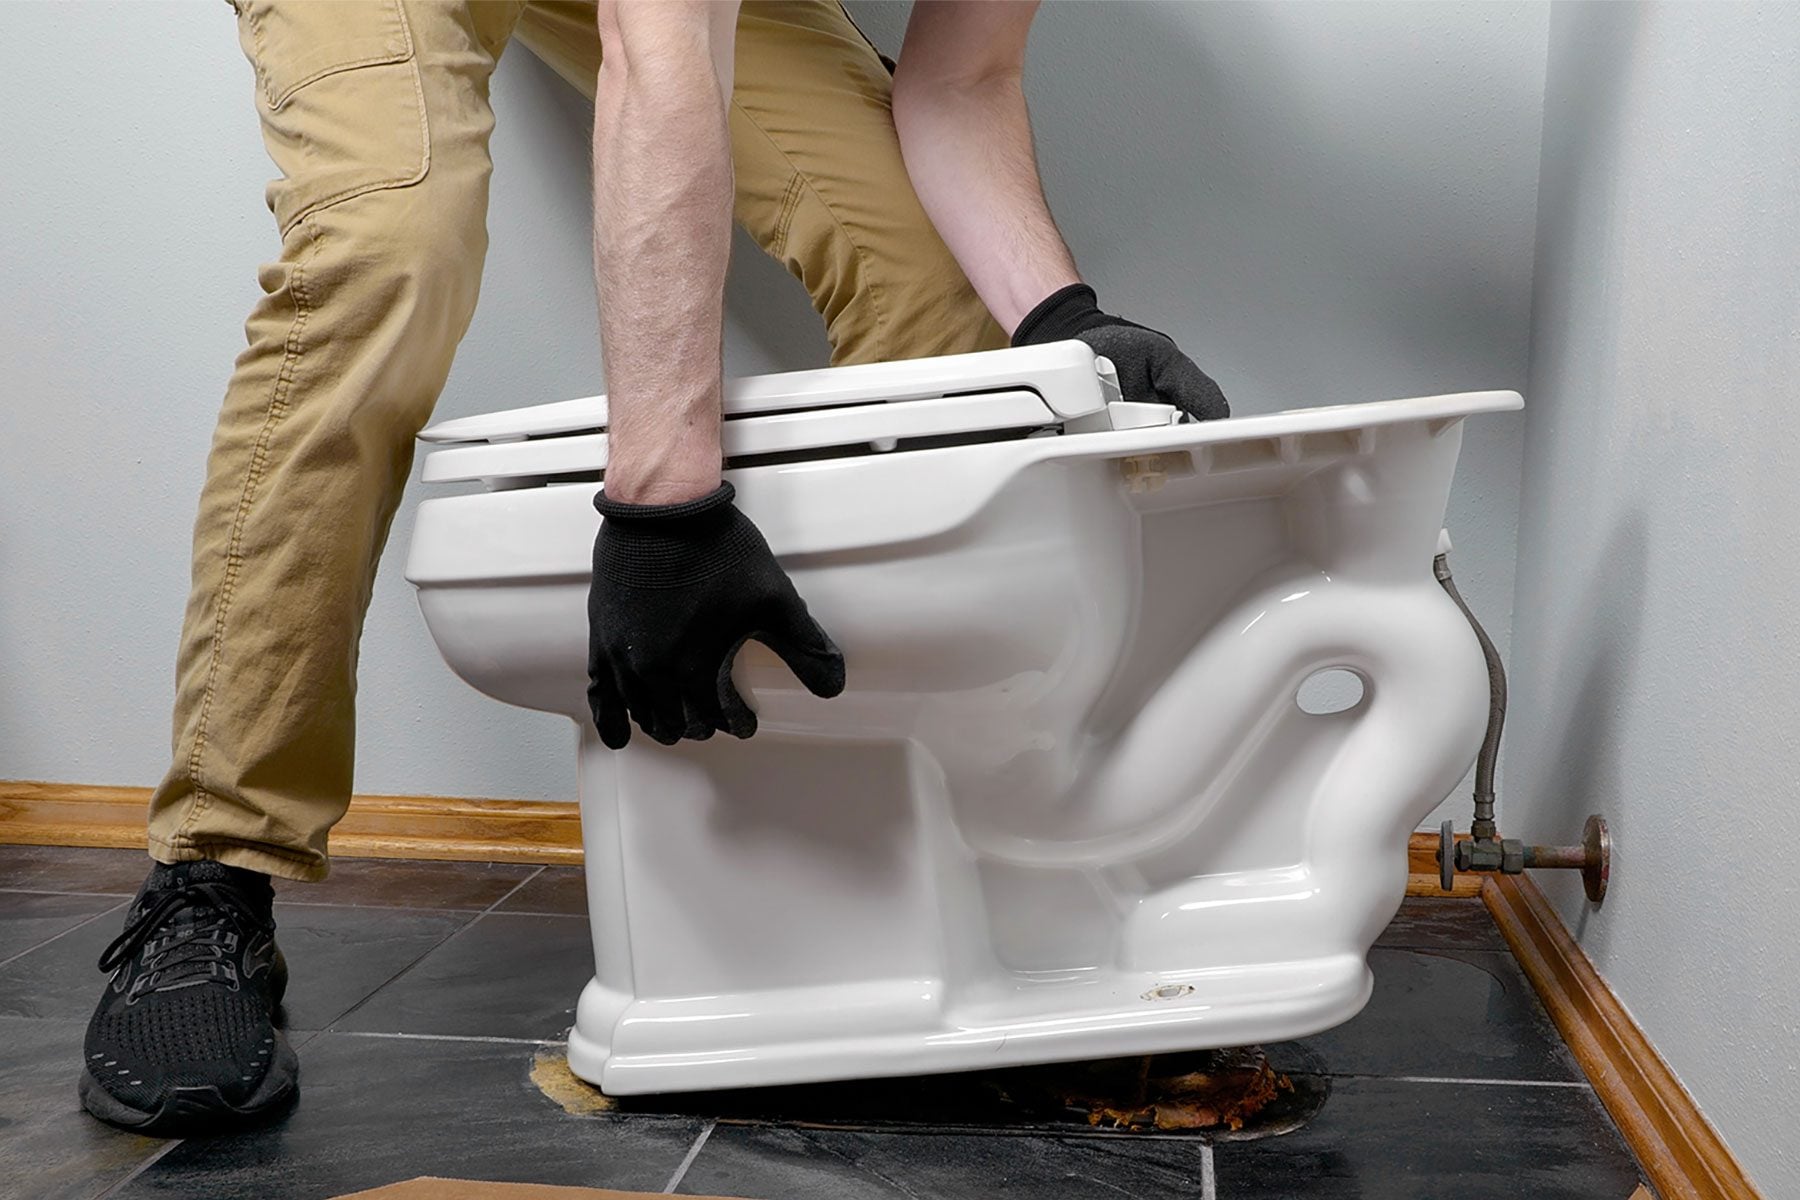
Squat close to the fixture, keep your back straight, and lift with your legs. Raise the toilet high enough to clear the closet bolts, then move it directly onto the prepared cardboard or drop cloth.
Keep the bowl reasonably level while carrying it. Tilting can release water trapped inside the internal passage. With a one-piece toilet, use two people and coordinate the lift before either person starts moving.
If the toilet will be discarded, you may remove the seat to make carrying easier. If it will be reused, protect all porcelain surfaces and avoid resting the full weight of the fixture on a fragile edge.
Step 9: Plug the open drain
Once the toilet is removed, the drain opening can allow sewer gas into the room. Cover it immediately with a properly sized test plug or drain plug.
For a temporary solution, place a large rag inside a durable plastic bag and position it loosely in the opening. Do not push it deep into the pipe. Leave enough material visible to make removal obvious, and place a note nearby so nobody installs a toilet over your improvised plug.
Do not leave the drain open longer than necessary. Ventilate the room while you work.
Step 10: Remove the old wax ring
Wear gloves and scrape the old wax from the toilet flange and the outlet on the bottom of the bowl. A plastic putty knife is easier to discard and less likely to damage plastic flange components.
Place the wax and contaminated debris directly into a disposable bag. Do not wash wax down a sink or drain. Clean the surrounding floor so you can inspect the flange and subfloor clearly.
Inspect the Toilet Flange and Floor
The closet flange connects the toilet to the drainpipe and anchors it to the floor. Removing the toilet creates an ideal opportunity to inspect this important component instead of immediately hiding it beneath another fixture.
Look for flange damage
Check for cracks, missing sections, rust, loose screws, warped plastic, or broken bolt slots. The flange should be securely attached and should not move when gently tested.
A minor defect may be repairable with an approved flange repair ring. Extensive corrosion, a loose drain connection, or a severely broken flange may require professional replacement.
Check the flange height
Ideally, the flange rests on top of the finished floor. Problems often occur after new tile or other flooring is installed around an existing flange, leaving the flange too low. A recessed flange may require an extender, spacer, or seal designed for the increased gap.
Inspect the subfloor
Dark staining, swelling, softness, mold, or crumbling material may indicate a long-term leak. Press gently around the flange with a screwdriver rather than stabbing the floor like you are testing a baked potato.
Do not reinstall a toilet over structurally damaged flooring. Repair the subfloor and correct the cause of the leak first.
What To Do With the Removed Toilet
If the toilet is being temporarily removed, place it upright on cardboard or a padded drop cloth. Clean the underside and store the tank lid separately. Before reinstalling it, use a new wax ring or compatible wax-free seal and new closet bolts.
If the fixture still works but is being replaced for cosmetic reasons, consider donating it to a local building-material reuse organization. Donation rules vary, and some organizations do not accept used toilets for hygiene or efficiency reasons.
For disposal, contact your municipal waste department, recycling center, landfill, or private hauling company. Porcelain fixtures are sometimes accepted as construction debris or processed with concrete and ceramic material. Other communities require the fixture to be broken down, wrapped, or scheduled for bulk pickup.
Never leave a toilet at the curb without checking local rules. Remove non-porcelain parts when required, and handle broken porcelain with heavy gloves because its edges can be extremely sharp.
Common Toilet Removal Mistakes
Forgetting to verify the shutoff valve
Turning the handle is not enough. Flush and confirm that the tank remains empty before disconnecting anything.
Leaving water in the trap
An apparently empty bowl can still contain hidden water. Use a sponge or wet/dry vacuum and keep towels ready during the lift.
Pulling before cutting the caulk
Old caulk can hold surprisingly well. Pulling against it may damage vinyl flooring or tear the finished surface around the toilet.
Overtightening or striking hardware
Porcelain can crack suddenly. Use penetrating oil, careful cutting, and patience instead of brute force.
Trying to lift alone
A helper costs less than a back injury, a broken toilet, or a dented bathtub.
Leaving the drain uncovered
An open toilet drain can release unpleasant sewer gas. Plug it as soon as the fixture is lifted away.
Reusing the old wax ring
Once compressed, a wax ring cannot reliably reseal. Install a new seal every time the toilet is removed.
Ignoring flange or floor damage
A new toilet cannot compensate for a broken flange or rotted subfloor. Correct the foundation of the installation before resetting the fixture.
Practical Experience: Lessons From Real Toilet Removal Projects
The written steps make toilet removal sound almost ceremonial: turn valve, remove bolts, lift toilet, receive applause. Real bathrooms add rust, cramped spaces, ancient caulk, uneven flooring, and at least one tool that disappears when you need it most. The following field-tested lessons can make the difference between a clean afternoon project and an emergency call to a plumber.
Lesson 1: Draining takes longer than disconnecting
Beginners often concentrate on the bolts, but water control is the part that determines how clean the project will be. In one typical removal, the tank looked empty after flushing, yet a sponge collected several additional cups of water. The bowl held even more inside its trap. Spending ten extra minutes removing that water prevented it from spilling across a newly installed bathroom floor.
A wet/dry vacuum is especially useful, but a sponge and bucket work perfectly well. The important part is patience. When no more water is visible, tilt the bowl slightly while it is still in position and absorb anything that returns.
Lesson 2: Rusted bolts need strategy, not strength
Older closet bolts may resemble small geological formations. A wrench can round the nut or make the entire bolt spin inside the flange. Start with penetrating oil and allow it time to work. If the hardware remains frozen, cutting the bolt is usually safer than applying more force near the porcelain.
A compact hacksaw is slow but controlled. An oscillating tool is faster, although it requires steady hands and eye protection. Slip a thin piece of metal or rigid plastic between the blade and the toilet whenever possible to protect the porcelain.
Lesson 3: The toilet is heavier after you get tired
A two-piece toilet becomes much easier to move after the tank is removed. This also reduces the chance of twisting the bowl while clearing the floor bolts. Even then, the bowl is bulky and its center of gravity is not obvious.
Before lifting, rehearse the route and agree on simple commands with your helper: lift, stop, turn, and lower. Carrying a toilet is not the right moment for interpretive communication. Keep it upright, move slowly, and place it on thick cardboard rather than directly on tile.
Lesson 4: The flange tells the real story
A leaking toilet is frequently blamed on the wax ring, but removal sometimes reveals the deeper cause. A cracked flange, loose fasteners, improper height, or damaged subfloor can prevent a new seal from lasting.
For example, a toilet may have been installed after thick tile was added, leaving the original flange below the new finished floor. An extra-thick ring may have hidden the problem temporarily, but a properly selected flange extender provides a more dependable foundation. Treat removal as an inspection opportunity, not merely an obstacle before installing the shiny new fixture.
Lesson 5: Photograph everything before cleaning
Take pictures of the supply-line connection, bolt locations, flange condition, old seal, and any floor damage. These images help when buying replacement parts or explaining the problem to a plumber. They also provide evidence of preexisting damage during rental-property or renovation work.
After photographing the area, scrape away the old wax and clean the flange thoroughly. Wax can conceal hairline cracks and loose screws. A clean surface makes diagnosis easier and prevents old debris from interfering with the replacement seal.
Lesson 6: Have replacement parts ready
Do not assume the old supply connector, closet bolts, or seal should go back into service. Flexible supply lines age, bolts corrode, and wax rings are single-use components. Having inexpensive replacements nearby avoids an inconvenient mid-project hardware-store trip while the bathroom drain is open.
It is also wise to keep toilet shims, a flange repair ring, and more than one seal option available. You may return unopened items later, but you cannot install a missing part through optimism alone.
Lesson 7: Know when the DIY job has changed
Removing a toilet is a straightforward project. Rebuilding a rotted subfloor, cutting out a glued flange, or repairing a damaged drainpipe is a different project. When removal exposes structural decay or uncertain plumbing, pause and reassess.
A professional repair may cost more than the original DIY plan, but it is far less expensive than allowing wastewater to leak into the floor or ceiling below. Good DIY judgment includes knowing when to put down the wrench and pick up the phone.
Final Thoughts
Learning how to remove a toilet the right way is mostly about preparation and sequence. Shut off and verify the water supply, drain every reachable pocket of water, disconnect the line, remove the tank when possible, cut the caulk, deal patiently with the bolts, and lift the fixture safely.
Once the toilet is out, plug the drain immediately, discard the old seal, and inspect the flange and floor carefully. That inspection is often the most valuable part of the project because it reveals the conditions that caused leaks, odors, rocking, or repeated seal failures.
Move slowly, protect the porcelain and flooring, and recruit a helper before lifting. Toilets may not be complicated machines, but they are heavy enough to punish overconfidence. Follow the process, and the fixture should leave the bathroom without flooding the floor, injuring your back, or becoming an expensive pile of ceramic confetti.













