
You know that moment: you’re halfway into a recipe, feeling unstoppable… and then you read the words
“softened butter” or “room-temperature cream cheese”. Meanwhile, your butter is basically a cold bar of soap
and your cream cheese is a brick with feelings.
Good news: you don’t need to cancel dessert, invent time travel, or warm dairy on top of your laptop fan.
Below are fast, reliable ways to quickly soften butter and soften cream cheese without turning them into sad puddles.
We’ll also cover what “softened” actually means (spoiler: it’s not “melted-ish”), plus the best method for what you’re making.
First, What Does “Softened” Mean (And Why It Matters)?
Softened butter should be pliable and smooth, not greasy and not melted. If you press it with a fingertip,
it should leave a small indentation while still holding its shape. For bakers who like receipts (and thermometers),
butter is typically “room temp” around 65–67°F. That range helps butter cream properly with sugar, trapping air for lighter cakes and cookies.
Cream cheese is similar: you want it smooth and mixable so it blends without lumps. Overheat it and it can get
oily, loose, or strangely grainylike it’s protesting your life choices.
Quick-Decision Cheat Sheet (Pick Your Fastest Win)
| What you need | Best fast method | How long it takes | Why it works |
|---|---|---|---|
| Butter for baking (creaming) | Rolling pin “flatten” method | 10–15 minutes | Softens evenly without melting |
| Butter “right now” | Microwave on low power in tiny bursts | 20–60 seconds total | Fast, but requires babysitting |
| Cream cheese for cheesecake/frosting | Cube + aluminum sheet method | 25–30 minutes | More surface area + better heat transfer |
| Cream cheese in a hurry (safer than nuking) | Warm-water bath (sealed) | ~10 minutes | Gentle warmth, less risk of hot spots |
7 Fast Ways to Soften Butter (Without Melting It Into Chaos)
1) Slice or cube it (the simplest speed boost)
If your recipe calls for a stick, you don’t have to keep it stick-shaped. Cutting butter into smaller pieces increases surface area,
which helps it warm faster and more evenly.
- How: Cut into 1/2-inch cubes or thin slices and spread out on a plate.
- Time: Often 10–20 minutes depending on your kitchen temperature.
- Best for: Baking, frosting, general mixing.
2) Grate it (yes, like cheesebecause butter is living its best life)
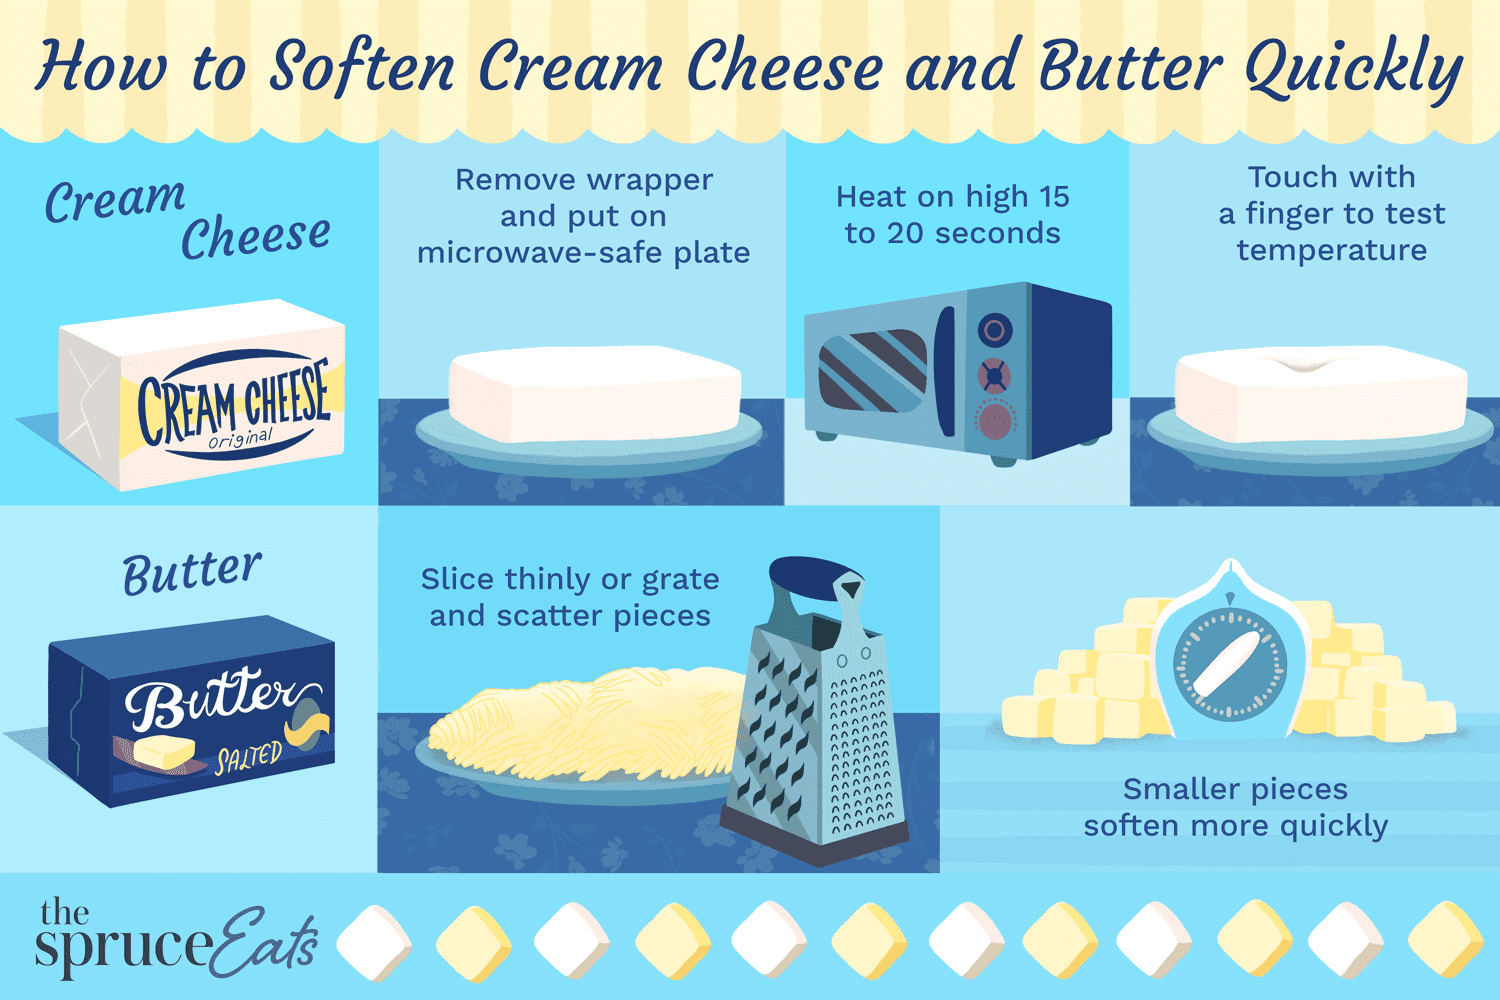
Grating cold (or even frozen) butter makes thin shreds that soften in minutes. It’s especially handy when you’re in a legit rush.
Bonus: it mixes quickly because you’ve already broken it up.
- How: Use the large holes of a box grater over parchment or a plate. Let the shreds sit briefly.
- Time: Just a few minutes to soften (grating takes a minute or two).
- Best for: Cookies, quick batters, mixing into dough, “I forgot butter exists until now” emergencies.
3) The rolling pin method (the fastest, most foolproof “even soft”)
If you need evenly softened butter for baking, this is a top-tier move. Flattening physically warms and softens the butter without creating microwave hot spots.
It’s quick, surprisingly even, and mildly therapeutic (cheaper than a rage room).
- How: Keep butter in its wrapper. Place parchment over it. Pound/roll until it’s about 1/2-inch thick.
- Time: Roughly 10–15 minutes.
- Best for: Baking where texture matters (creaming butter and sugar, buttercream, cookie dough).
4) The warm-glass “mini sauna” (gentle heat, low drama)
This method warms butter through trapped heatwithout direct contact from a heat source. It’s a classic for a reason.
It works best if you cube the butter first so the warmth reaches more surfaces.
- How: Fill a heat-safe glass or bowl with hot water for a couple minutes, dump the water, dry it, then invert it over cubed butter.
- Time: About 10–15 minutes (sometimes closer to 20 in a cold kitchen).
- Best for: Baking, spreading, most uses.
Safety note: Use heat-safe glassware to avoid cracking from temperature shock.
5) The “warm microwave” trick (soften butter without microwaving the butter)
If you own a microwave, you can borrow its cozy warmth without blasting butter directly. The idea is to warm the air inside the microwave,
then let butter soften gently in that warm environment (door closed, power off).
- How: Microwave a cup of water until very hot. Remove the water. Put sliced butter in the turned-off microwave and close the door.
- Time: Around 10 minutes of resting time (plus heating the water).
- Best for: Butter for baking when you have a little time but not a full hour.
6) Stand mixer shortcut (when you’re using the mixer anyway)
If the recipe already calls for a stand mixer, you can soften butter by cutting it into pieces and beating briefly with the paddle.
It’s fast and effectivebut it can also incorporate extra air, which is great for cakes and buttercream, but not ideal for every cookie.
- How: Cut into pieces, beat on medium, scrape down, repeat until pliable and creamy.
- Time: A few minutes of mixing.
- Best for: Cakes, buttercream, anything where creaming is the goal.
7) Microwave on low power (the “tiny bursts” method, aka butter babysitting)
Sometimes you truly have no time. If you microwave butter on high, you’ll get a melted moat with a frozen center.
If you microwave on low power in 5-second bursts, rotating each time, you can soften it without fully melting it.
The defrost setting is often in the 30–50% power range, which helps reduce the risk of overheating.
- How: Put unwrapped butter on a cool plate. Use 30% power (or defrost). Heat 5 seconds, rotate, repeat.
- Time: Often 20–60 seconds total, depending on microwave and amount.
- Best for: Spreading, quick mixing, last-minute baking… if you stop early.
Rule of thumb: Stop when it’s pliable. If it looks glossy or starts slumping, you’re already flirting with melted territory.
6 Fast Ways to Soften Cream Cheese (Smooth, Not Oily)
1) The best overall: cube it + aluminum sheet method
If you want evenly softened cream cheese with minimal risk, this is a standout approach.
Cutting it into small cubes speeds things up, and aluminum conducts heat efficiently, helping it soften faster and more uniformly.
- How: Cut into roughly 1-ounce cubes. Place on an aluminum baking sheet. Leave at room temperature.
- Time: About 25–30 minutes.
- Best for: Cheesecake batter, cream cheese frosting, dipsanything where smooth texture matters.
2) Smaller pieces on a plate (easy, no special equipment)
Same principle, different material. Cut it up, spread it out, and let the air do its thing.
It’s not as fast as aluminum, but it’s reliable and low-stress.
- How: Cut into cubes or slices; spread on a plate.
- Time: Often 20–40 minutes depending on room temperature.
- Best for: Most recipes when you can spare a little time.
3) Warm-water bath (sealed): fast and gentle
This is the best “hurry up without overheating” option. The warm water transfers heat evenly and avoids microwave hot spots.
Keep it sealed so water doesn’t sneak in and ruin your texture.
- How: Put the unopened foil-wrapped cream cheese in a zip-top bag, press out air, seal. Submerge in warm (not hot) water.
- Time: About 10 minutes.
- Best for: Frosting and cheesecake when you need smooth, not partially melted edges.
4) Microwave (fastest, riskiest): the 15-second approach
If you microwave cream cheese, it can go from “soft” to “cream cheese soup” in seconds.
But when done carefully, it works.
- How: Completely unwrap an 8-ounce block, place on a microwave-safe plate, microwave about 15 seconds.
- Adjust: Add short bursts (often around 10 seconds per additional 8 ounces) only as needed.
- Best for: Dips, quick mixing, and emergenciesespecially if you’ll beat it smooth afterward.
5) Warm spot trick (not hot spot): use residual warmth, not direct heat
Want a gentle nudge? Place cream cheese (cut into pieces) in a slightly warm arealike near (not on) the stove while the oven preheats,
or on top of the fridge. The goal is mild warmth, not a heat blast.
- How: Cut into pieces, cover loosely, set in a mildly warm place.
- Time: Around 30 minutes (varies a lot).
- Best for: When you don’t want to microwave but you’d like to speed things up.
6) “Mix it soft” (when the recipe allows)
For some savory dips and spreads, you can start mixing slightly cool cream cheese in a food processor or mixer and let friction help.
This works best when you’re adding liquid ingredients (lemon juice, salsa, milk) that help loosen the mixture.
It’s not ideal for cheesecake, where temperature affects smoothness and baking performance.
Food Safety + Quality: How Long Can Butter or Cream Cheese Sit Out?
Here’s the practical reality: softening something for 10–60 minutes is different from storing it on the counter all day.
For most refrigerated foods, food-safety guidance commonly points to a two-hour window at room temperature (or one hour if it’s over 90°F).
Cream cheese: treat it like the perishable dairy product it is. Keep it out only as long as needed to soften and mix,
then return it to the fridge. If it’s been sitting out past recommended time limits, toss itbecause “it smells fine” is not a food-safety strategy.
Butter: butter is a little different because it has lower water activity than many dairy products, so some experts consider it more forgiving.
Still, quality can drop (rancid flavors, odor absorption), and many brands recommend returning it to the fridge when you’re done.
If you do keep butter out, keep it covered, keep your kitchen reasonably cool, and leave out only what you’ll use soon.
Softening for Specific Jobs (Because Not All “Soft” Is the Same)
For creaming butter and sugar (cookies, cakes, buttercream)
Aim for butter that’s pliable and coolnot greasy, not shiny, not drooping. If it’s too warm, your dough can spread more and your cake can lose structure.
The rolling pin method or warm-glass method is your best bet.
For spreading on toast
You can go a bit softer than “baking soft.” Microwaving on low power can work here because a little melt doesn’t ruin toast.
(Your toast will forgive you. Your cookie dough may not.)
For cheesecake batter
Lumps are the enemy. Use the cube method for cream cheese and give it enough time to soften evenly. If you rush it and end up with hot edges and cold centers,
you’ll beat longer, trap more air, and increase your chances of cracks later.
For cream cheese frosting
Softened cream cheese should be smooth, but still cool. If it gets warm and loose, frosting can turn runny fast.
Use gentle methods (cubes, warm water bath) and stop microwaving before it looks “melty.”
Common Mistakes (And How to Fix Them Fast)
Mistake: The butter melted a little on the edges
Fix: scrape it into a bowl and chill briefly, then stir. If it’s only partially melted, a short rest in the fridge can bring it back toward workable.
If it’s fully melted, you can’t “unmelt” itsave it for a recipe that uses melted butter.
Mistake: Cream cheese turned oily or soupy
Fix: stop heating immediately. Let it cool slightly, then beat it with a paddle (or food processor) to help smooth it out.
If it’s very warm, chill briefly and re-beat. For frosting, you may need to chill the mixture and adjust expectations (or switch to a sturdier frosting plan).
Mistake: You softened butter but your kitchen is freezing
Fix: warm-glass dome or warm microwave trick. Also: cut smaller pieces next time. Surface area is the quiet hero of softening hacks.
Extra: of Real-World “Been There” Kitchen Experiences (So You Don’t Have To)
Let’s talk about the kind of “experiences” that live rent-free in kitchens everywherethose moments when a recipe is going great until it suddenly becomes a
personality test. Specifically: how you handle cold butter and stubborn cream cheese when you’re already committed.
Scenario one: it’s a Sunday night, you’re making chocolate chip cookies, and you swear you took the butter out. You did not. You took out the soy sauce.
Your options feel dramatic: (1) wait an hour, (2) microwave and risk butter lava, or (3) abandon dessert and become a “fruit for dessert” household.
This is where the rolling pin method shines. It’s the rare kitchen fix that’s both effective and emotionally satisfying. You’re not just softening butter
you’re working through something. Ten minutes later, you have evenly softened butter and a better attitude.
Scenario two: you’re making a dip for guests and the cream cheese is rock solid. You try to stir it anyway, and the spoon bends like it’s in a cartoon.
The warm-water bath in a sealed bag is basically a cheat code here. It softens cream cheese quickly without turning the edges into warm goo.
And because it doesn’t require a microwave, you’re free to chop herbs, set out chips, and pretend this was all part of a calm, elegant plan.
Scenario three: you’re making cream cheese frosting, and you think “I’ll just microwave it a little.” You microwave it a lot. Now it’s glossy and loose,
and your frosting looks like it’s trying to escape the bowl. This is the lesson: cream cheese is not butter. Cream cheese has boundaries.
If you do overheat it, the best save is to stop, cool it down, and beat it until it’s as smooth as it can bethen chill before you frost.
You might still end up with a softer frosting than planned, but you can often rescue it enough to swirl onto cupcakes without emotional damage.
Scenario four: you’re baking in a cold house and nothing will soften. The counter method feels like it’s happening in geological time.
This is when the warm-glass dome feels like magic. Cubed butter + warm bowl = gentle heat that doesn’t melt the butter. You can check it, rotate the cubes,
and keep moving. It’s also a great “I want control” methodbecause you’re not trusting a microwave with your happiness.
Finally, the biggest universal experience: the recipe says “room temperature” as if your kitchen, your fridge, and your life are all calibrated to the same
standard. They’re not. That’s why these methods matter. With a few smart tricksmore surface area, gentle warmth, and tiny microwave bursts only when needed
you can get soft butter and smooth cream cheese on demand, keep your baking on track, and avoid the dreaded sentence:
“It turned out… fine.” (We’re aiming for actually good.)
Conclusion: Your No-Stress Softening Game Plan
If you remember nothing else, remember this: smaller pieces soften faster, gentle heat beats direct heat,
and microwaves must be supervised like toddlers with markers. Use the rolling pin method for butter you’ll bake with, cube cream cheese for smooth batters,
and keep the warm-water bath in your back pocket for fast, even softening without melty edges.












