
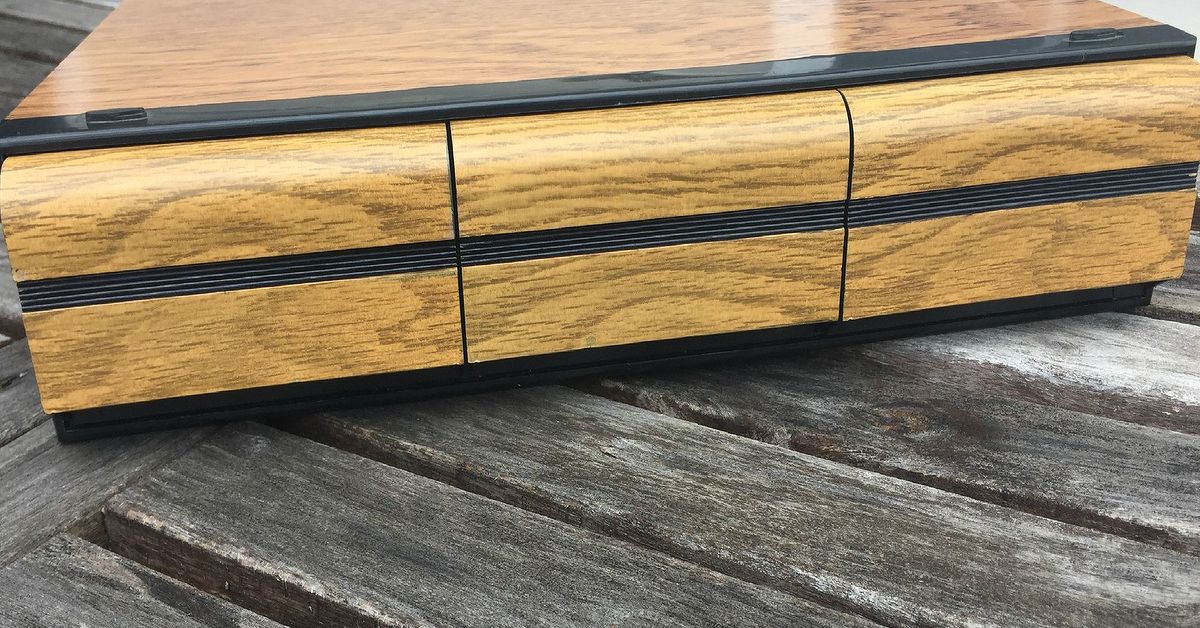
Somewhere in a closet, basement, thrift store bin, or your parents’ “I might need this someday” stash, there may be an old cassette tape holder quietly waiting for its second act. Once upon a time, it protected mixtapes, car-trip soundtracks, and possibly a dramatic breakup playlist or two. Today, it can become a clever painted storage organizer for craft supplies, office tools, jewelry, makeup, seed packets, mini hardware, and all the tiny things that seem to multiply when no one is looking.
This upcycled cassette tape holder DIY is a budget-friendly, beginner-friendly project that turns outdated plastic or wood storage into something stylish, useful, and totally custom. With the right prep, paint, and finish, you can transform a dusty relic into a modern storage piece that looks intentionalnot like you rescued it from the “free” table at a yard sale five minutes before rain.
The best part? Cassette tape holders already have built-in compartments. That means the hard work of organizing is mostly done for you. Your job is to clean it, paint it, style it, and give it a new mission. Let’s turn vintage media storage into a fresh home organization hero.
Why Upcycle a Cassette Tape Holder Into Storage?
Upcycling is more than a cute weekend project. It saves money, reduces waste, and gives personality to items that might otherwise end up in a landfill. A cassette tape holder is especially useful because it was designed to keep small rectangular items neat and visible. That same structure works beautifully for today’s clutter: paint tubes, washi tape, essential oil bottles, nail polish, charging cords, seed packets, small notebooks, greeting cards, label rolls, and even spice packets.
Unlike many store-bought organizers, an upcycled cassette holder has vintage charm. It brings a little nostalgia without turning your space into a museum of obsolete electronics. Painted in matte black, creamy white, sage green, terracotta, navy, or a cheerful color-block design, it can fit farmhouse, modern, cottagecore, industrial, retro, or minimalist decor.
Another reason this project works so well is scale. Cassette holders are usually compact enough for a desk, shelf, craft cart, pantry cabinet, or bathroom counter. They organize vertically, which is a big win for small spaces. If your drawer currently looks like a junk storm had a very busy afternoon, this DIY can help restore order.
Best Uses for a Painted Cassette Tape Holder
Before you paint, decide how you want to use the finished piece. Your purpose will influence the paint type, finish, color, and whether you need extra protection.
Craft Room Storage
A cassette tape holder can store acrylic paint tubes, embroidery floss cards, stamps, ink pads, ribbon spools, markers, small glue bottles, beads, and paper embellishments. If you love crafting, this organizer keeps supplies visible so you do not buy your fifth roll of gold washi tape because the first four were hiding in a drawer.
Desk and Office Organizer
Use it for sticky notes, binder clips, business cards, index cards, labels, charging cables, USB drives, and small notebooks. A painted cassette holder looks great on a desk and helps avoid the classic “I know I put that paperclip somewhere” mystery.
Bathroom or Vanity Storage
For a vanity, it can hold nail polish, lip gloss, makeup brushes, hair clips, cotton rounds in small containers, perfume samples, or travel-size products. Choose a moisture-resistant paint and a clear topcoat if it will live near a sink.
Kitchen and Pantry Organization
In the kitchen, use the compartments for tea packets, seasoning envelopes, reusable bag clips, small recipe cards, or food labels. Avoid direct food contact with painted surfaces. If storing kitchen items, place products in wrappers, jars, or small containers.
Entryway Drop Zone
A small cassette holder can become a catchall for sunglasses, keys, mail, transit cards, earbuds, and pocket items. Add felt pads underneath so it does not scratch your console table.
Materials You Will Need
You do not need a professional workshop to complete this project. A simple setup works well, especially if you take prep seriously.
- Old cassette tape holder, plastic, wood, or metal
- Mild dish soap and warm water
- Soft cloth or sponge
- Rubbing alcohol or degreaser
- Fine-grit sandpaper, around 220 grit
- Tack cloth or lint-free cloth
- Painter’s tape
- Plastic-friendly primer or bonding primer
- Spray paint or brush-on paint suitable for the holder material
- Clear protective topcoat, matte, satin, or gloss
- Drop cloth, cardboard, or newspaper
- Protective gloves and a mask or respirator rated for paint fumes
- Optional: stencils, decals, drawer labels, metallic wax, small knobs, or adhesive felt pads
Always read the product label on your primer, paint, and sealer. Different paints have different dry times, cure times, temperature ranges, and safety recommendations. Paint is not a “vibes only” material; it has rules, and the rules are there to help your project look good and keep you safe.
Step 1: Inspect the Cassette Tape Holder
Start by checking the holder’s material and condition. Plastic cassette holders are common, but you may also find wooden racks, metal cases, or acrylic display boxes. Look for cracks, broken dividers, rust, sticky residue, missing feet, loose hinges, or warped sections.
If the holder has sliding drawers or removable dividers, take everything apart before cleaning and painting. Remove old labels, stickers, and dust from corners. If there are rough edges, gently sand them smooth. If a crack is small, you may be able to repair it with an appropriate adhesive for the material, but let repairs fully cure before painting.
This inspection stage also helps you imagine the final design. A tall rack may look great in one solid color. A box-style case might be perfect for a two-tone design. A clear acrylic holder can be painted only on the outside edges, leaving some transparency for a cool modern effect.
Step 2: Clean It Like You Mean It
Paint does not like dust, oil, old fingerprints, mystery garage grime, or the ghost of 1987. Wash the cassette holder with mild dish soap and warm water. Use a soft sponge or cloth to remove dirt from the compartments. For tight corners, a cotton swab or old toothbrush works well.
After washing, rinse the piece thoroughly and let it dry completely. Then wipe it with rubbing alcohol or a gentle degreaser to remove any remaining residue. This step is especially important for plastic, which can hold oils that prevent paint from bonding properly.
Do not rush drying. If moisture hides in corners and you paint over it, your finish may bubble, peel, or look uneven. Let the holder sit in a warm, dry place until every compartment is fully dry.
Step 3: Lightly Sand the Surface
For most plastic, wood, metal, or glossy surfaces, light sanding helps paint grip. Use fine-grit sandpaper and gently scuff the surface. You are not trying to remove half the object. You are simply dulling the shine and giving primer something to hold onto.
Sand evenly across the exterior and any visible interior areas you plan to paint. Be careful around thin plastic dividers, because aggressive sanding can bend or snap them. After sanding, wipe away dust with a tack cloth or lint-free cloth.
If your cassette holder is clear acrylic and you want to keep part of it transparent, tape off those sections before sanding nearby areas. Scratches on clear plastic are not easy to hide unless you paint over them.
Step 4: Tape Off Areas You Do Not Want Painted
Painter’s tape is your best friend if you want crisp edges, color blocking, or protected hardware. Tape off hinges, handles, clear windows, label plates, drawer tracks, or any sections that need to move smoothly. If the holder has sliding parts, avoid heavy paint buildup on the tracks because it can make the piece sticky or difficult to open.
For color-blocked designs, plan your pattern first. A simple diagonal stripe, painted side panels, or contrasting interior compartments can make the finished organizer look boutique-level. The secret is patience. Let each color dry before taping over it for the next section.
Step 5: Choose the Right Paint
The best paint depends on the material. For plastic cassette tape holders, choose a spray paint made for plastic or use a plastic bonding primer before your color coat. For wood, acrylic craft paint, chalk-style paint, enamel paint, or spray paint can all work. For metal, use a primer and paint designed for metal surfaces, especially if rust is present.
Spray paint often gives the smoothest finish on small organizers with many compartments. It reaches corners better than a brush and reduces visible brush marks. However, brush-on paint gives more control indoors and is useful for detailed designs, stencils, or hand-painted accents.
Finish matters too. Matte paint looks modern and soft, but it can show fingerprints. Satin is a great all-purpose option because it has a slight sheen and is easier to wipe clean. Gloss feels bold and retro, but it highlights imperfections. For a cassette holder with lots of edges, satin usually hits the sweet spot.
Step 6: Prime for Better Adhesion
Primer may feel like an extra step, but it can be the difference between “Wow, you made that?” and “Why is it peeling like a sunburn?” Use a bonding primer if painting plastic, laminate, slick metal, or glossy surfaces. Apply a thin, even coat and let it dry according to the product instructions.
If using spray primer, place the holder on cardboard or a drop cloth in a well-ventilated area, preferably outdoors. Hold the can the recommended distance from the surface, usually about 8 to 12 inches, and spray in light, sweeping passes. Do not try to cover everything in one heavy coat. Heavy coats can drip, pool in corners, or create a bumpy texture.
Once the primer is dry, inspect the surface. If it feels rough, lightly sand with fine-grit sandpaper and wipe clean. This small step helps create a smoother final finish.
Step 7: Paint in Thin, Even Coats
Now comes the fun part: color. Shake your spray paint well if using a can, and test it on scrap cardboard first. Begin spraying slightly off the object, move across the surface, and release after passing the edge. This helps avoid blobs at the start and end of each stroke.
Use multiple thin coats rather than one thick coat. Thin coats dry more evenly, reduce drips, and create a stronger finish. Paint the inside compartments first if they will be visible, then move to the outside. Rotate the holder as needed so you can reach every angle.
If brushing paint, use a small synthetic brush or foam brush. Apply paint with the grain if the holder is wood. For plastic or metal, use smooth strokes and avoid overworking the paint. Let each coat dry before applying the next.
For a stylish look, try one of these color ideas:
- Matte black: sleek, modern, and perfect for office storage
- Warm white: clean, farmhouse-inspired, and easy to style
- Sage green: calm, trendy, and lovely for craft rooms
- Terracotta: warm, earthy, and great for plant or seed storage
- Mustard yellow: retro, cheerful, and a little cassette-era fabulous
- Navy blue: classic, polished, and ideal for a desk or entryway
Step 8: Add Decorative Details
Once your base color is dry, personalize the holder. This is where the project becomes less “old cassette rack” and more “custom storage piece with main character energy.” Add small adhesive labels to identify contents. Use stencils for numbers, letters, vines, stars, stripes, or geometric shapes. Apply peel-and-stick wallpaper to the back panel for pattern and depth.
You can also add metallic paint to the edges for a vintage brass effect. For a playful craft room, paint each compartment divider a different color. For a minimalist look, keep the body one solid shade and add tiny black or white labels.
If the holder sits on a table or shelf, attach felt pads underneath. If it is lightweight and you plan to mount it on a wall, use appropriate hardware for the wall type and the weight of the loaded organizer. Do not rely on weak adhesive strips for heavy items.
Step 9: Seal the Painted Finish
A clear topcoat protects the paint from scratches, fingerprints, and daily use. Choose matte, satin, or gloss depending on the look you want. For storage that will be handled often, a clear protective spray or brush-on sealer is a smart finishing step.
Apply the topcoat in thin layers and let it dry fully. Remember that dry-to-touch and fully cured are not the same thing. A piece may feel dry after an hour but still need several days to cure hard enough for regular use. During curing, avoid stacking heavy items on it or scraping objects across the surface.
Step 10: Style and Organize Your New Storage
After the paint has cured, fill your cassette holder with items that fit comfortably. Avoid forcing oversized objects into the slots, especially if the dividers are thin plastic. Group similar items together so the organizer makes sense at a glance.
For craft storage, sort by color or supply type. For office storage, keep daily-use items in the easiest-to-reach compartments. For vanity storage, place taller products in back and smaller items in front. For pantry use, label sections clearly so no one has to dig through tea packets like they are searching for buried treasure.
The goal is not only to make the holder pretty. The goal is to make it useful enough that it earns its spot in your home.
Common Mistakes to Avoid
Skipping the Cleaning Step
Dust and oil can ruin paint adhesion. Even if the holder looks clean, wash and wipe it before sanding or priming.
Using the Wrong Paint
Regular paint may not stick well to slick plastic. Use paint designed for the material or start with the right primer.
Applying Paint Too Thickly
Thick coats cause drips, uneven drying, and sticky corners. Thin coats are slower but much better looking.
Ignoring Cure Time
If you load the organizer too soon, items can dent or scratch the finish. Let the paint cure before regular use.
Painting Moving Parts Shut
If your cassette holder has drawers, hinges, or sliding trays, keep paint away from tight mechanical areas or move pieces while drying so they do not seal shut.
Design Variations for Different Decor Styles
If your home leans modern, paint the holder matte black or soft white and add simple printed labels. For farmhouse style, choose warm cream, sage, or weathered gray, then lightly distress the edges with sandpaper after painting. For a retro look, use bright colors like orange, teal, mustard, or bubblegum pink. A cassette holder has built-in vintage credibility, so retro colors feel right at home.
For a kids’ craft station, use rainbow colors and label each section with pictures or simple words. For a garage or tool area, paint the holder dark gray or navy and use it for screws, wall anchors, zip ties, and small parts stored in mini containers. For a plant lover, turn it into a seed packet organizer with botanical decals and a clear protective finish.
You can also mount several painted cassette holders together to create a larger storage wall. Mix vertical and horizontal orientations for visual interest. Just make sure each piece is securely attached and not overloaded.
Budget-Friendly Tips
This DIY is already affordable, but you can keep costs even lower. Look for cassette tape holders at thrift stores, garage sales, flea markets, online marketplace listings, and family storage spaces. Many people no longer know what to do with them, which means you may find one for a few dollars.
Use leftover paint from previous projects if it suits the material. Small organizers do not require much paint, so this is a great way to finish off a can. If you are buying supplies, choose a paint-and-primer product only if it is appropriate for the surface. Otherwise, a separate bonding primer may give better long-term results.
For labels, skip expensive accessories and use cardstock, printable stickers, masking tape, chalk labels, or a paint pen. You can even cut labels from cereal boxes and paint them to match. Your organizer does not need to be pricey to look polished.
Extra Experience: What I Learned From Painting an Upcycled Cassette Tape Holder
The first thing you learn when working with an old cassette tape holder is that compartments are both a blessing and a tiny test of patience. They make the finished piece incredibly useful, but they also collect dust in places you did not know dust could emotionally commit to. Cleaning those slots carefully is worth it. A rushed wipe across the front will not remove grime from the back corners, and paint has a sneaky way of revealing every lazy prep decision.
Another practical lesson is that spray painting from one angle is not enough. Cassette holders have dividers, rails, grooves, and little shadowy corners. If you spray only from the front, the project may look finished until you tilt it and discover unpainted strips hiding like tiny beige secrets. The best approach is to apply light coats from several angles, rotating the holder between passes. Start with the interior, then the sides, then the exterior frame. This reduces missed spots and prevents paint from building up too heavily on the front edges.
Color choice also matters more than expected. A bright color can make the organizer playful and fun, but it may compete with colorful craft supplies. A neutral color makes the contents easier to see. For a craft room, soft white, sage, or charcoal can create a calm background for supplies. For a desk, navy or matte black feels more grown-up. For a retro display, though, go bold. A cassette holder can absolutely handle mustard yellow or teal without looking embarrassed.
The biggest mistake is handling the piece too soon. Paint may feel dry quickly, especially spray paint, but the finish can still be soft underneath. If you slide markers, bottles, or metal clips into the compartments before the paint cures, you may leave scratches or dents. Waiting a few days is not exciting, but neither is repainting the same organizer because impatience won the first round.
I also found that labels make the project feel finished. Even simple black-and-white labels can turn a painted cassette holder from “cute container” into “organized system.” Labels are especially helpful if you use the holder for small items that look similar, such as thread, hardware, stickers, or seed packets. You do not need fancy label makers. A paint pen, small sticker labels, or printed paper tags can work beautifully.
Finally, this DIY is satisfying because it solves a real problem. It is not just decorative. It gives new life to an object with a strong shape and a forgotten purpose. Instead of buying another plastic organizer, you reuse one that already exists. That makes the project feel clever, personal, and practical. Plus, there is something funny and charming about using an old cassette holder to organize modern life. Yesterday’s mixtape storage becomes today’s clutter control. That is the kind of comeback story every junk drawer needs.
Conclusion
Learning how to paint storage from an upcycled cassette tape holder DIY is a simple way to combine creativity, organization, and sustainability. With proper cleaning, light sanding, the right primer, thin coats of paint, and a protective topcoat, an outdated cassette holder can become a stylish organizer for almost any room.
This project works because it respects what the original item already does well. Cassette holders were made to sort, separate, and display small items. Paint simply updates the look and helps the piece fit your current home. Whether you use it for craft supplies, office tools, beauty products, tea packets, or tiny hardware, the finished organizer proves that old storage can still have plenty of rhythm.
Note: Always paint in a well-ventilated area, wear appropriate protection, follow product labels, and allow the finish to fully cure before loading your organizer.













