
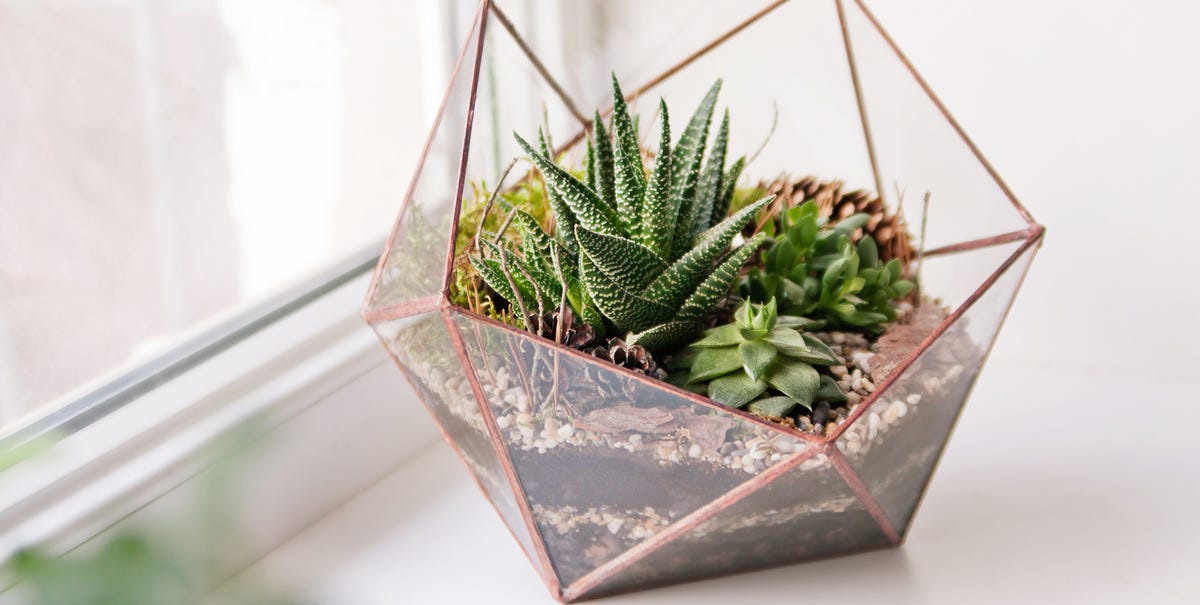
A terrarium is the houseplant world’s answer to a tiny vacation: a glass container, a few small plants, some well-planned layers, and suddenly your desk looks like it has a miniature national park. The best part? You do not need a greenhouse, a botany degree, or the ability to keep a fiddle-leaf fig alive through winter. Learning how to make a terrarium is mostly about choosing the right container, matching plants with the same needs, and resisting the heroic urge to overwater.
This guide walks you through how to build a terrarium in 6 steps, with practical advice for beginners and enough detail to help your little glass garden thrive. Whether you want a humid closed terrarium with moss and ferns or an open terrarium with succulents and air plants, the secret is simple: build the environment your plants actually want, not the one that looks cute on social media for exactly four days.
What Is a Terrarium?
A terrarium is a miniature indoor garden grown inside a clear glass or plastic container. Some terrariums are closed with a lid, creating a humid environment where moisture cycles inside the container. Others are open, allowing more airflow and drier conditions. Closed terrariums are usually best for tropical plants, mosses, miniature ferns, and other humidity-loving greenery. Open terrariums are better for succulents, cacti, and air plants that prefer ventilation and less moisture.
The key is not to mix plant personalities. A fern wants humidity and evenly moist soil. A cactus wants dry roots and airflow. Put them together, and one of them will eventually write a strongly worded resignation letter.
Open vs. Closed Terrarium: Choose Before You Build
Closed Terrarium
A closed terrarium works like a tiny greenhouse. Moisture evaporates, condenses on the glass, and returns to the soil. This makes it ideal for small tropical plants such as fittonia, baby tears, peperomia, miniature ferns, moss, and some small-leaved foliage plants. A closed terrarium should sit in bright, indirect light, never direct sun, because sealed glass can heat quickly.
Open Terrarium
An open terrarium has no lid and better airflow. It is a smarter choice for succulents, cacti, haworthia, echeveria, sedum, and air plants. These plants need a well-draining base, less water, and a brighter location. They still should not bake in harsh direct sun through glass, but they generally tolerate more light than tropical closed-terrarium plants.
Supplies You Need to Build a Terrarium
Before you start, gather your materials. You do not need anything fancy, but each layer has a job. Think of it like building lasagna for plants, except please do not add cheese.
- A clear glass container, jar, vase, bowl, or lidded vessel
- Small pebbles, gravel, or decorative stones
- Activated charcoal or horticultural charcoal
- Sphagnum moss or mesh barrier
- Potting mix suited to your plants
- Small terrarium plants with similar light and water needs
- Long tweezers, chopsticks, spoon, small brush, or funnel
- Decorative accents such as stones, bark, shells, or tiny figurines
- Spray bottle or narrow-spout watering can
For tropical terrariums, use a light indoor potting mix that holds some moisture but does not stay soggy. For succulent terrariums, choose cactus or succulent mix. The soil should match the plants, not your leftover bag from three gardening projects ago.
How to Make a Terrarium in 6 Steps
Step 1: Choose the Right Container
Pick a clear container that gives your plants enough room to grow. A wide-mouth jar is easiest for beginners because you can actually reach inside without performing wrist yoga. Narrow-neck bottles look beautiful but are more challenging to plant and maintain.
For a closed terrarium, choose a jar with a lid, cork, or glass top. For an open terrarium, use a bowl, vase, apothecary jar without a lid, or glass cylinder. Make sure the container is clean before planting. Wash it with mild soap and water, rinse well, and dry it. Clean glass helps prevent mold, bacteria, and mystery smudges that will haunt your photos later.
Step 2: Add a Drainage Layer
Most terrariums do not have drainage holes, so the bottom layer matters. Add about one to two inches of small pebbles, gravel, or stones. This layer gives excess water somewhere to collect so the plant roots are not sitting directly in moisture. Standing water is one of the fastest ways to turn a terrarium from “adorable mini forest” into “swamp with regrets.”
The exact depth depends on your container size. In a small jar, use less. In a taller container, use more. The goal is to create a visible buffer, not fill half the jar with rocks unless you are secretly building a quarry.
Step 3: Add Charcoal and a Barrier Layer
Next, add a thin layer of activated charcoal or horticultural charcoal. This is especially useful in closed terrariums because it can help reduce odors and keep the environment fresher. You do not need a mountain of it; a light layer is enough.
Then place a layer of sphagnum moss or a fine mesh barrier over the charcoal. This keeps the soil from filtering down into the rock layer. Without a barrier, your beautiful layers slowly become one muddy-looking layer, which is less “designer terrarium” and more “forgotten soup.”
Step 4: Add the Right Soil
Add enough potting mix to cover the roots of your plants. A good rule is to make the soil layer at least as deep as the largest plant root ball. For many small terrariums, two to three inches of soil is enough. Press the soil gently, but do not compact it into a brick. Roots need air as well as moisture.
Use a spoon, funnel, or folded paper to guide soil into narrow containers. Create small hills or slopes if you want a more natural landscape. A slight slope also helps show off small plants in the back. In terrarium design, height matters. Nobody wants the star plant hidden behind a pebble.
Step 5: Plant Your Mini Garden
Remove each plant from its nursery pot and loosen the roots gently. If the root ball is too large, trim it slightly with clean scissors. Dig a small hole in the soil, place the plant, and firm the soil around it. Start with the largest plant first, then add smaller plants around it.
Leave space between plants. Terrarium plants may be small, but they are still living things with ambitions. Crowding them can reduce airflow and encourage mold or disease. For a balanced design, combine different textures: a soft moss, a patterned fittonia, a trailing creeping fig, or a tiny fern. For an open succulent terrarium, try a rosette-shaped echeveria with upright haworthia and a low sedum.
Choose plants that enjoy the same conditions. Tropical plants, mosses, and ferns belong together in humid terrariums. Succulents, cacti, and air plants belong in open containers with more ventilation. Mixing the two is the botanical equivalent of making a penguin and a camel share an apartment.
Step 6: Water, Decorate, and Place It Correctly
After planting, water lightly. Use a spray bottle, pipette, spoon, or narrow-spout watering can. The goal is to moisten the soil, not flood the container. In a closed terrarium, start with very little water. You can always add more, but removing water from a sealed jar is much less fun.
Now add decorative stones, bark, shells, sand, or small figurines. Keep decorations clean and avoid anything painted with unknown chemicals. Finally, wipe the inside glass with a paper towel or small brush so your terrarium looks crisp and photo-ready.
Place your terrarium in bright, indirect light. Direct sun can overheat the container, especially if it is closed. A spot near an east-facing window or a few feet from a bright window often works well. If your room is dark, consider an LED grow light. Plants are cute, but they are not furniture; they still need light to live.
Best Plants for a Terrarium
Best Plants for Closed Terrariums
- Fittonia, also called nerve plant
- Baby tears
- Miniature ferns
- Moss
- Peperomia
- Selaginella
- Small creeping fig
- Polka dot plant
Best Plants for Open Terrariums
- Haworthia
- Echeveria
- Sedum
- Hens and chicks
- Air plants
- Small cacti
- Jade plant cuttings
When selecting terrarium plants, look for slow-growing varieties with small leaves. Fast-growing plants can quickly outgrow the container and turn your peaceful mini garden into a leafy traffic jam.
Terrarium Care Tips After Building
Water Less Than You Think
Overwatering is the most common terrarium mistake. Closed terrariums may go weeks or even months without needing more water once balanced. If you see light condensation in the morning that clears later, the moisture level is usually good. If the glass is constantly foggy, open the lid for a few hours to let excess moisture escape.
Open terrariums dry out faster, but they still need careful watering. Succulents should dry between waterings. If the soil is damp, wait. Your plants will appreciate your restraint, even if your watering can feels neglected.
Give It Bright, Indirect Light
Most terrariums prefer bright, indirect light. Too little light causes weak, stretched growth. Too much direct sun can scorch leaves or cook a closed container. Rotate the terrarium occasionally so plants grow evenly.
Prune and Clean
Trim yellow leaves, remove dead plant material, and prune plants that touch the glass. Decaying leaves can invite mold. Use clean scissors and wipe condensation or soil from the glass when needed. A clean terrarium is easier to monitor and much nicer to admire while pretending to work.
Watch for Mold and Pests
A little mold sometimes appears in new terrariums, especially closed ones. Remove affected leaves or debris, open the lid for ventilation, and reduce watering. If pests appear, isolate the terrarium and remove insects manually when possible. Healthy plants in the right light, moisture, and temperature are naturally less vulnerable to problems.
Common Terrarium Mistakes to Avoid
- Mixing succulents with tropical plants: They need different moisture and humidity levels.
- Using too much water: Terrariums without drainage can become waterlogged quickly.
- Placing a closed terrarium in direct sun: Glass traps heat and may damage plants.
- Skipping the barrier layer: Soil can sink into the drainage layer and create a muddy mess.
- Choosing plants that grow too large: Slow-growing, miniature plants are better.
- Sealing wet foliage inside: Let leaves dry before closing the lid to reduce mold risk.
Design Ideas for a Beautiful DIY Terrarium
A terrarium should be healthy first and beautiful second, but luckily you can have both. Create depth by placing taller plants in the back and shorter plants in front. Use odd numbers of plants for a natural look. Add one focal point, such as a textured rock, piece of driftwood, or colorful foliage plant.
For a woodland-style closed terrarium, use moss, tiny ferns, fittonia, and a curved piece of bark. For a desert-style open terrarium, use pale sand, small stones, haworthia, and echeveria. For a minimalist desk terrarium, choose one plant, one stone, and clean layers. Simple designs often age better because plants have room to grow.
Conclusion
Building a terrarium is one of the easiest ways to bring indoor gardening into a small space. The process is simple: choose the right container, build smart layers, use suitable soil, select compatible plants, water lightly, and place the terrarium in bright, indirect light. Once you understand the difference between open and closed terrariums, the rest becomes much easier.
A successful terrarium is not about stuffing as many cute plants as possible into a jar. It is about creating a tiny environment where every layer supports the next. Do that well, and your glass garden can become a low-maintenance, mood-boosting piece of living decor. Plus, it gives you something classy to stare at during awkward video meetings.
Real-Life Terrarium Experiences: What You Learn After Building a Few
The first terrarium many people build is usually too wet, too crowded, or both. It starts with enthusiasm: one jar, five tiny plants, decorative stones, moss, a ceramic mushroom, and maybe a tiny deer because apparently the deer has nowhere else to be. At first, it looks magical. Then, about a week later, the glass fogs up like a bathroom mirror after a hot shower. That is the terrarium’s polite way of saying, “Please open the lid before I become a swamp.”
One of the most useful lessons is that less water almost always works better than more water. In a closed terrarium, the moisture has nowhere to go. A few sprays may be enough after planting. If condensation appears every morning and clears later in the day, the terrarium is probably balanced. If water runs down the glass constantly, it needs ventilation. Opening the lid for a few hours can make a big difference.
Another experience-based tip: buy smaller plants than you think you need. In the store, miniature plants can look almost too tiny. Inside a glass jar, however, they suddenly become landscape giants. A plant that looks adorable in a two-inch pot may dominate the entire terrarium once planted. Slow-growing plants save you from constant trimming and help the design stay attractive longer.
Lighting is another area where beginners learn quickly. A terrarium placed in direct afternoon sun can heat up fast, especially if it is closed. Leaves may yellow, wilt, or scorch. Moving the container to bright, indirect light usually solves the problem. On the other hand, a terrarium placed in a dim corner may stretch toward the light and lose its compact shape. If your plants look pale or leggy, they are asking for a brighter spot.
Decorations also deserve a practical eye. Natural stones, clean bark, and small pieces of driftwood can look wonderful, but avoid materials that decay quickly or introduce mold. Wash stones before use. Use decorations sparingly so plants have room to breathe. A terrarium should look like a tiny landscape, not a storage closet for every cute object you found online at midnight.
The most satisfying part of making terrariums is watching them settle in. Moss brightens, tiny leaves turn toward the light, and condensation begins to follow a rhythm. You start noticing small changes: one new leaf, one trimmed stem, one area that needs more airflow. That is the charm of a DIY terrarium. It is not just decor; it is a small living system that rewards observation. Build it carefully, adjust gently, and your miniature garden will teach you more than any perfect photo ever could.











