
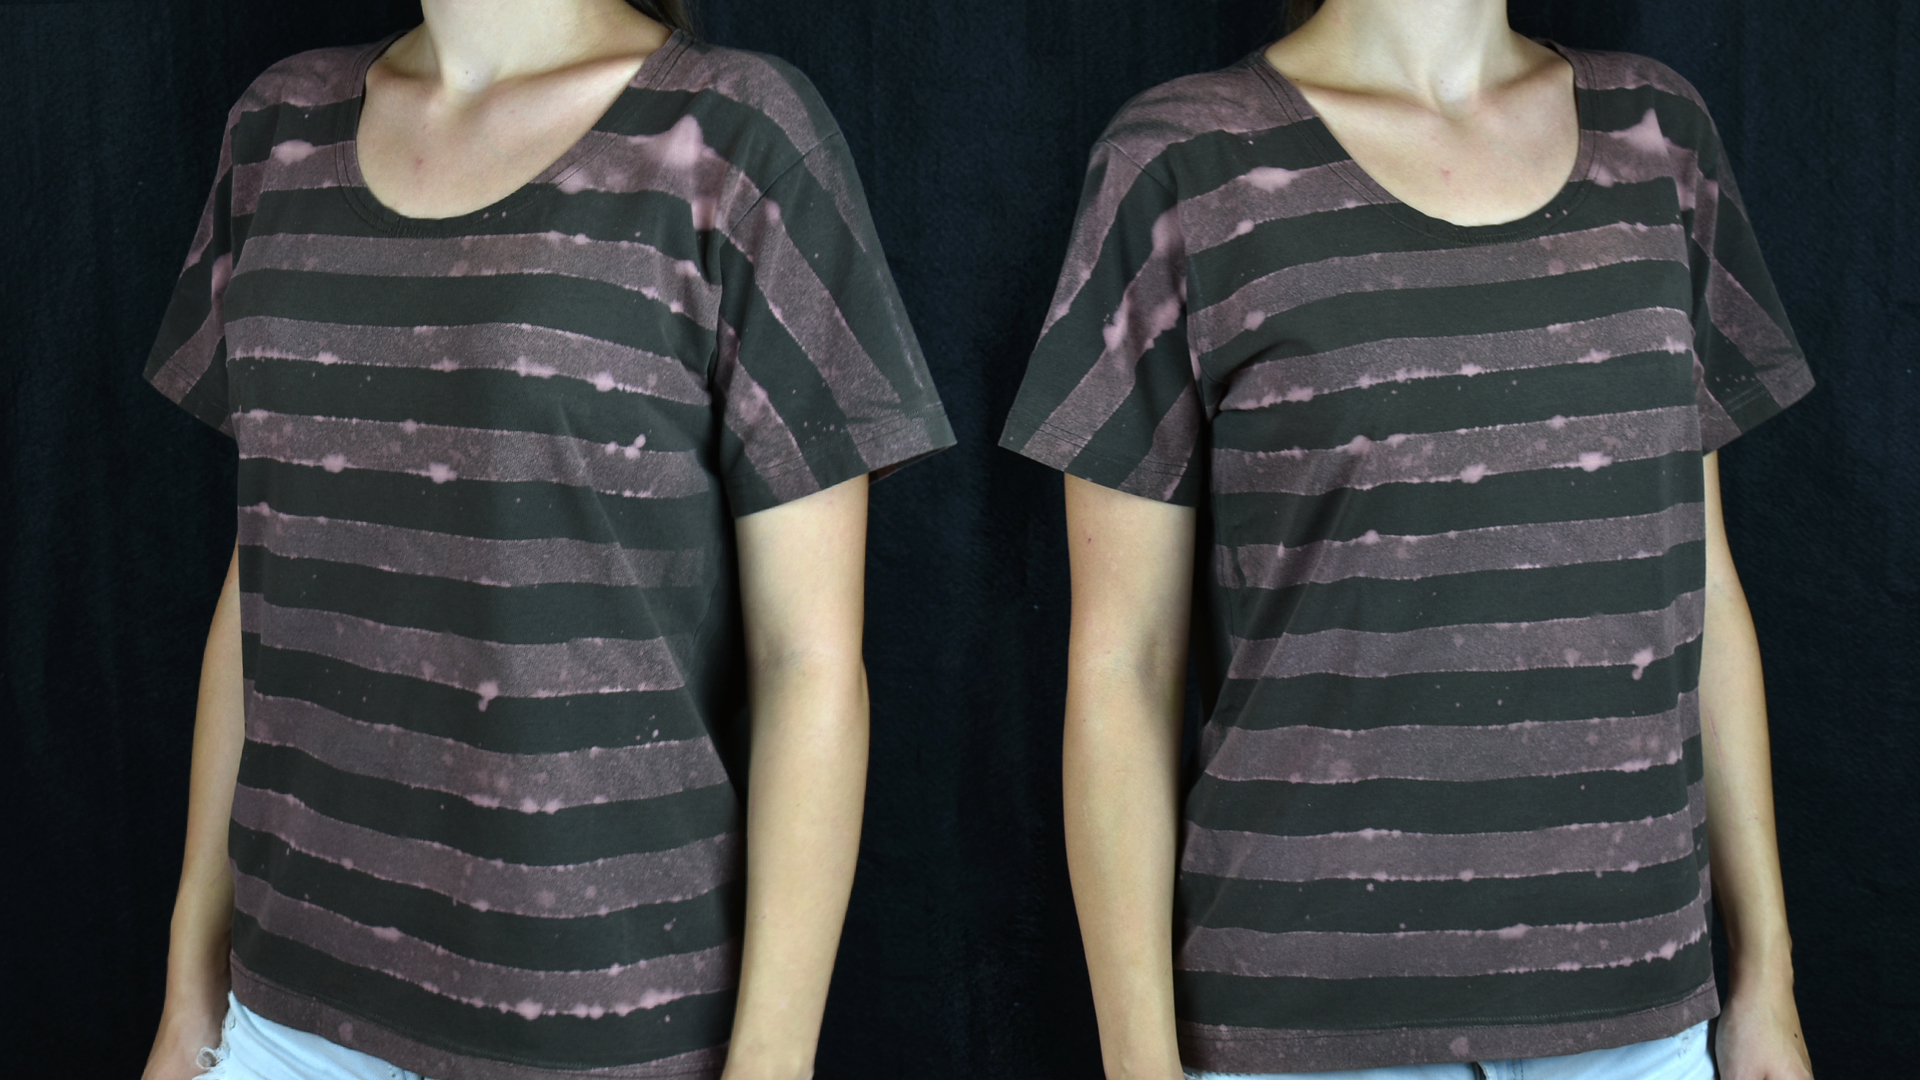
A bleach T-shirt turns an ordinary dark tee into wearable artwork by removing color instead of adding it. The technique is often called reverse tie-dye, and it can produce spirals, clouds, stripes, stars, lightning bolts, or the kind of abstract pattern that makes people assume you paid boutique prices. Fortunately, you probably spent less than lunch.
The process is beginner-friendly, but bleach is still a powerful chemical rather than magical craft water. Choosing the correct shirt, diluting the bleach, protecting yourself, and stopping the reaction at the right time will help you create a strong design without turning your T-shirt into Swiss cheese.
What Is a Bleach T-Shirt?
A bleach T-shirt is a colored shirt decorated by selectively removing its original dye with diluted chlorine bleach. Traditional tie-dye adds pigments to light fabric. Bleach dyeing does the opposite: it exposes lighter tones hidden beneath a dark surface color.
A black shirt may turn rust, orange, tan, pink, gray, or cream rather than pure white. Navy can fade toward reddish brown, while purple may reveal pink or orange. The result depends on the original dye formula, the fiber content, the strength of the bleach solution, and how long the fabric remains exposed.
This unpredictability is part of the fun. It is also why you should not begin with your irreplaceable concert shirt from 1997. Start with an inexpensive blank tee or a thrift-store shirt that will not cause emotional damage if the experiment becomes “modern textile archaeology.”
Choose the Best Shirt for Bleach Dyeing
Use a dark 100% cotton T-shirt
A dark, 100% cotton shirt usually produces the clearest and most dramatic bleach design. Cotton absorbs liquid easily, responds relatively predictably, and is available in enough colors to keep your closet looking like a craft laboratory.
Cotton-polyester blends can work, but the outcome may be softer or less even. Polyester fibers often retain more of their original appearance, so a 50/50 blend may produce a muted vintage effect rather than a bright reverse tie-dye pattern.
Avoid bleach-sensitive materials
Do not use chlorine bleach on wool, silk, mohair, leather, or any shirt containing spandex. Even a small percentage of spandex can be damaged. Chemical finishes, permanent-press treatments, decorative coatings, and specialty prints may also react unpredictably.
Read the care label before beginning. A triangle usually indicates that bleach is permitted, a triangle with diagonal lines means non-chlorine bleach only, and a crossed-out triangle means no bleach. Because this project intentionally removes color, the label will not predict the final shade, but it can warn you about incompatible fibers.
Perform a hidden bleach test
Test the inside hem before committing to the entire design. Mix 2 teaspoons of regular chlorine bleach with 1/4 cup of water. Apply one small drop, wait about one minute, rinse, and blot the area dry.
If the fabric changes to an attractive lighter color without becoming brittle, the shirt is a reasonable candidate. If nothing happens, the dye may resist bleach. If the fibers look yellow, weak, gummy, or damaged, choose another shirt.
Supplies You Will Need
- One dark, preferably 100% cotton T-shirt
- Regular unscented household chlorine bleach
- Cool water
- Protective household gloves
- Safety glasses or goggles
- Rubber bands
- A plastic tub, tray, or bleach-safe container
- A plastic spray or squeeze bottle
- A plastic table covering or large garbage bags
- Cardboard for stencil designs
- Paper towels and an old cotton towel
- Mild laundry detergent
- Optional stencils, painter’s tape, clothespins, or foam brushes
- Optional 3% hydrogen peroxide for a properly prepared stopping solution
Use tools dedicated to crafting or cleaning. Do not return a bleach-measuring cup to food preparation, even after washing it. Your next pancake recipe does not need that kind of suspense.
Essential Bleach Safety Rules
Work outdoors whenever possible. If you must work indoors, open windows and doors and create strong cross-ventilation. Keep children, pets, food, drinks, and anyone with breathing sensitivities away from the work area.
Wear gloves, eye protection, old clothes, and closed-toe shoes. A face covering may reduce accidental droplets, but it is not a replacement for fresh air and proper ventilation.
Use regular unscented household bleach with a clearly stated sodium hypochlorite concentration. Avoid experimenting with concentrated industrial products or mysterious bottles discovered under the sink next to a sponge from a previous decade.
Never pour hydrogen peroxide directly into a bleach container or bleach bath. When a tested method uses diluted 3% hydrogen peroxide to stop the reaction, the shirt must be transferred into a separate prepared container.
How to Make a Bleach T-Shirt Step by Step
Step 1: Prewash the shirt
Wash the T-shirt with detergent before decorating it. Do not use fabric softener. Prewashing removes body oils, manufacturing finishes, dust, and residues that could prevent the bleach solution from reaching the fibers evenly.
You can work with the shirt slightly damp for softer transitions or completely dry for sharper, more concentrated marks. A damp shirt allows the solution to travel farther through the fabric, while a dry one gives you more control.
Step 2: Protect the workspace
Cover your table, patio, or floor with a plastic sheet. Place the shirt inside a plastic tub or on a wire rack positioned over a tray. The rack prevents excess solution from pooling beneath the garment and accidentally bleaching the back.
For a one-sided stencil design, slide a thick piece of cardboard inside the shirt. Make sure it covers the entire design area so the bleach does not soak through to the opposite side.
Step 3: Create the pattern
Choose a folding or masking technique before mixing the bleach. Preparation matters because the chemical reaction may begin within seconds.
- Spiral: Pinch the shirt at the desired center, twist it into a flat disk, and secure it with several crossing rubber bands.
- Scrunch: Gather random handfuls of fabric and secure the bundle with rubber bands for a cloudy, marbled pattern.
- Bullseye: Pinch one point, pull the fabric upward, and place rubber bands at intervals down the resulting fabric tube.
- Stripes: Accordion-fold the shirt vertically, horizontally, or diagonally and add a rubber band every two or three inches.
- Stencil: Lay the shirt flat, insert cardboard, and secure a stencil or painter’s-tape design to the surface.
- Galaxy: Leave the shirt flat and apply scattered fine mist, droplets, and a few brighter clusters.
Step 4: Mix a diluted bleach solution
Always follow the instructions on your bleach label because concentrations can vary. For a controlled spray-art method using regular household bleach, one established formula is 1/2 cup bleach mixed with 2 cups of cool water. Add the water to a labeled plastic spray bottle, add the measured bleach carefully, attach the nozzle, and gently swirl.
For an immersion-style reverse tie-dye bath, a commonly used formula is 1 cup of regular bleach in 1 gallon of cool water. Prepare only as much solution as the project requires.
Never use full-strength bleach on the shirt. It may lighten faster, but it can continue weakening the fibers and create holes after several washes.
Step 5: Apply the bleach
For a folded shirt, apply the solution gradually to selected sections. Saturating every inch can erase the contrast and produce one large faded blob. Flip the bundle carefully and repeat on the other side if you want a balanced pattern.
For stencil art, use a fine mist or lightly dab the solution with a foam brush. Spray from directly above rather than at an angle so the mist does not creep beneath the stencil. Blot puddles immediately with paper towels.
For a galaxy design, begin with a very light mist. Add a few concentrated drops by adjusting the nozzle or flicking a small amount from a stiff brush. Remember that stars are charming; an accidental bleach tsunami is less charming.
Step 6: Watch the color develop
Do not walk away. Check the color continuously because some shirts change almost immediately. Carefully lift a rubber band or inspect a hidden fold after approximately two minutes.
Stop when the design is slightly darker than your ideal finished color. Rinsing and washing may reveal a somewhat lighter result. As a conservative rule, avoid leaving the shirt in an active household-bleach solution for more than about five minutes unless your product’s textile instructions specify a different process.
Step 7: Stop the bleaching action
The simplest method is to move the shirt immediately to a sink or separate tub and rinse it thoroughly with cool running water. Keep rinsing while carefully removing the rubber bands.
Some manufacturer-tested methods use a separate diluted 3% hydrogen peroxide solution to halt the bleaching action more quickly. One example uses 1 cup of 3% hydrogen peroxide in 1 gallon of water for an immersion project. Transfer the shirt from the bleach bath into the separately prepared peroxide solution and move it gently until fizzing stops.
Do not pour the peroxide solution into the bleach bath. Keep the containers separate, follow the product instructions, and rinse the shirt thoroughly afterward.
Step 8: Wash the shirt separately
Wash the finished shirt by itself with a small amount of mild detergent. Use cool water and an extra rinse if your washing machine offers that option. Do not wash it immediately with your favorite jeans, towels, or bedding.
Air-drying is gentle on newly treated fibers. After the first wash, inspect the shirt for weak spots before putting it in a dryer. Future washes should also use cool water, a mild detergent, and a gentle cycle.
Four Easy Bleach T-Shirt Design Ideas
Classic reverse tie-dye spiral
Twist the shirt from the center into a disk and divide it into wedge-shaped sections with rubber bands. Apply the bleach solution to alternating wedges. This preserves dark areas between the light sections and creates a bold spiral.
Minimalist striped shirt
Lay the shirt flat and apply strips of painter’s tape. Spray a light layer over the exposed fabric, wait for the color shift, and rinse before removing all the tape. This technique works well for geometric lines, checkerboards, and simple lettering.
Starry galaxy shirt
Start with a black or navy tee. Mist several cloudy areas, then add smaller droplets around them. Use a star stencil for a few crisp highlights. Restraint is important: empty dark space makes the brighter “nebula” sections stand out.
Botanical silhouette
Place flat leaves, ferns, or durable plastic botanical stencils on the shirt. Lightly mist around them to create negative-space silhouettes. Do not use valuable leaves from a plant you have spent three years keeping alive; craft stores sell stencils for a reason.
Common Bleach-Dye Mistakes
Using too much bleach
More bleach does not automatically create a better design. Heavy saturation reduces contrast, encourages bleeding beneath stencils, and increases fiber damage. Begin lightly and add more only where necessary.
Waiting for the shirt to become white
Many commercial dyes will never bleach to pure white. Waiting for a rust-colored area to turn snow-white may simply weaken the fabric. Accept the underlying color as part of the design.
Using the wrong fabric
A shirt containing spandex, delicate protein fibers, or specialized coatings can stretch, dissolve, yellow, or deteriorate. Checking the label takes 15 seconds and may save an entire garment.
Forgetting the cardboard insert
Without a barrier, a front design can transfer to the back. Sometimes that creates a pleasant surprise. Other times it creates a large pale rectangle positioned exactly where nobody requested one.
Mixing bleach with vinegar
Vinegar is frequently recommended for ordinary laundry and traditional dye projects, but it must never be mixed with chlorine bleach. An acidic product can cause bleach to release dangerous chlorine gas.
Making the folds too loose
Loose folds allow the bleach solution to reach nearly everything. Tighter rubber bands preserve more dark fabric and create stronger separation between the bleached and unbleached sections.
My Experience Making Bleach T-Shirts: What Actually Matters
After experimenting with several bleach T-shirts, the biggest lesson was that the fabric choice mattered more than artistic talent. My first attempt used a black cotton-polyester shirt that looked perfect for the project. I expected bright cream spirals. Instead, it produced a subtle brown pattern that looked as if the shirt had spent six years sitting beside a sunny window. It was not ugly, but it was definitely not the dramatic transformation I had imagined.
The next shirt was inexpensive, black, and 100% cotton. The difference was immediate. Within a couple of minutes, the sprayed sections shifted from black to deep red, then coppery orange. I stopped before they became extremely pale, rinsed the shirt, and ended up with strong contrast and a design that looked much more deliberate.
I also learned that bleach spreads farther than expected on damp fabric. During one galaxy-style project, I created several small misty clouds and assumed they would remain compact. A minute later, they had expanded into one enormous continent. The shirt survived, but the galaxy looked less like outer space and more like a weather map showing a major storm system.
For sharper artwork, dry fabric and light applications worked better. A stencil placed tightly against the shirt produced reasonably crisp edges when I sprayed from directly above. Spraying from the side pushed mist beneath the stencil and softened the details. Small amounts applied in several passes gave me more control than one dramatic squeeze of the trigger.
Rubber-band pressure made another major difference. A loosely wrapped spiral allowed bleach to reach the center of almost every fold, leaving very little of the original black. Tight bands created dark lines that made the spiral recognizable. However, extremely tight bands were difficult to remove while wearing gloves. Cutting them carefully with scissors was easier than trying to wrestle them off like tiny rubber pythons.
My most useful habit became setting a timer before applying the solution. Bleach projects encourage constant improvisation: one more spray here, one more drop there, perhaps a dramatic star in the corner. Without a timer, two minutes can quietly become ten. Monitoring the shirt continuously produced stronger fabric and better color than waiting for the brightest possible result.
I also stopped expecting every black shirt to reveal the same shade. One turned copper, another faded toward dusty pink, and a third became beige. A hidden test spot is therefore not merely a safety step; it is a preview of the color palette. That tiny test can tell you whether the project will look like vintage streetwear, desert camouflage, or a peach-colored surprise.
Finally, I learned to stop while the shirt still looked slightly underdone. The design became clearer after rinsing and washing. Projects that appeared perfect while saturated sometimes became too pale once dry. The most successful shirts came from controlled application, short exposure, immediate rinsing, and accepting a little unpredictability. Bleach art is part planning and part collaboration with chemistry, and chemistry occasionally has its own creative director.
How to Care for a Bleach T-Shirt
Wash your bleach-designed shirt in cool water using a gentle cycle. Turn it inside out to reduce surface abrasion, and use a modest amount of mild detergent. Avoid repeated chlorine-bleach treatments because they can continue weakening the material.
Air-drying offers the gentlest care, although a low dryer setting may be suitable if the care label allows it. Do not over-dry the shirt. Heat, friction, and repeated chemical exposure can make treated sections wear out faster than the untouched fabric.
Conclusion
Learning how to make a bleach T-shirt is mostly about controlling three things: fabric, concentration, and time. Choose a dark cotton shirt, protect yourself and the workspace, dilute the bleach, apply it gradually, and rinse as soon as the pattern reaches the desired shade.
You do not need advanced drawing skills or expensive equipment. A few rubber bands can create a spiral, a spray bottle can produce a galaxy, and painter’s tape can turn an ordinary tee into clean geometric streetwear. The results will never be completely predictable, but that is precisely why every shirt becomes unique.
Note: Bleach formulations and concentrations vary. Always read the product label, follow its protective-equipment instructions, maintain strong ventilation, and never combine chlorine bleach with another household cleaner.












