
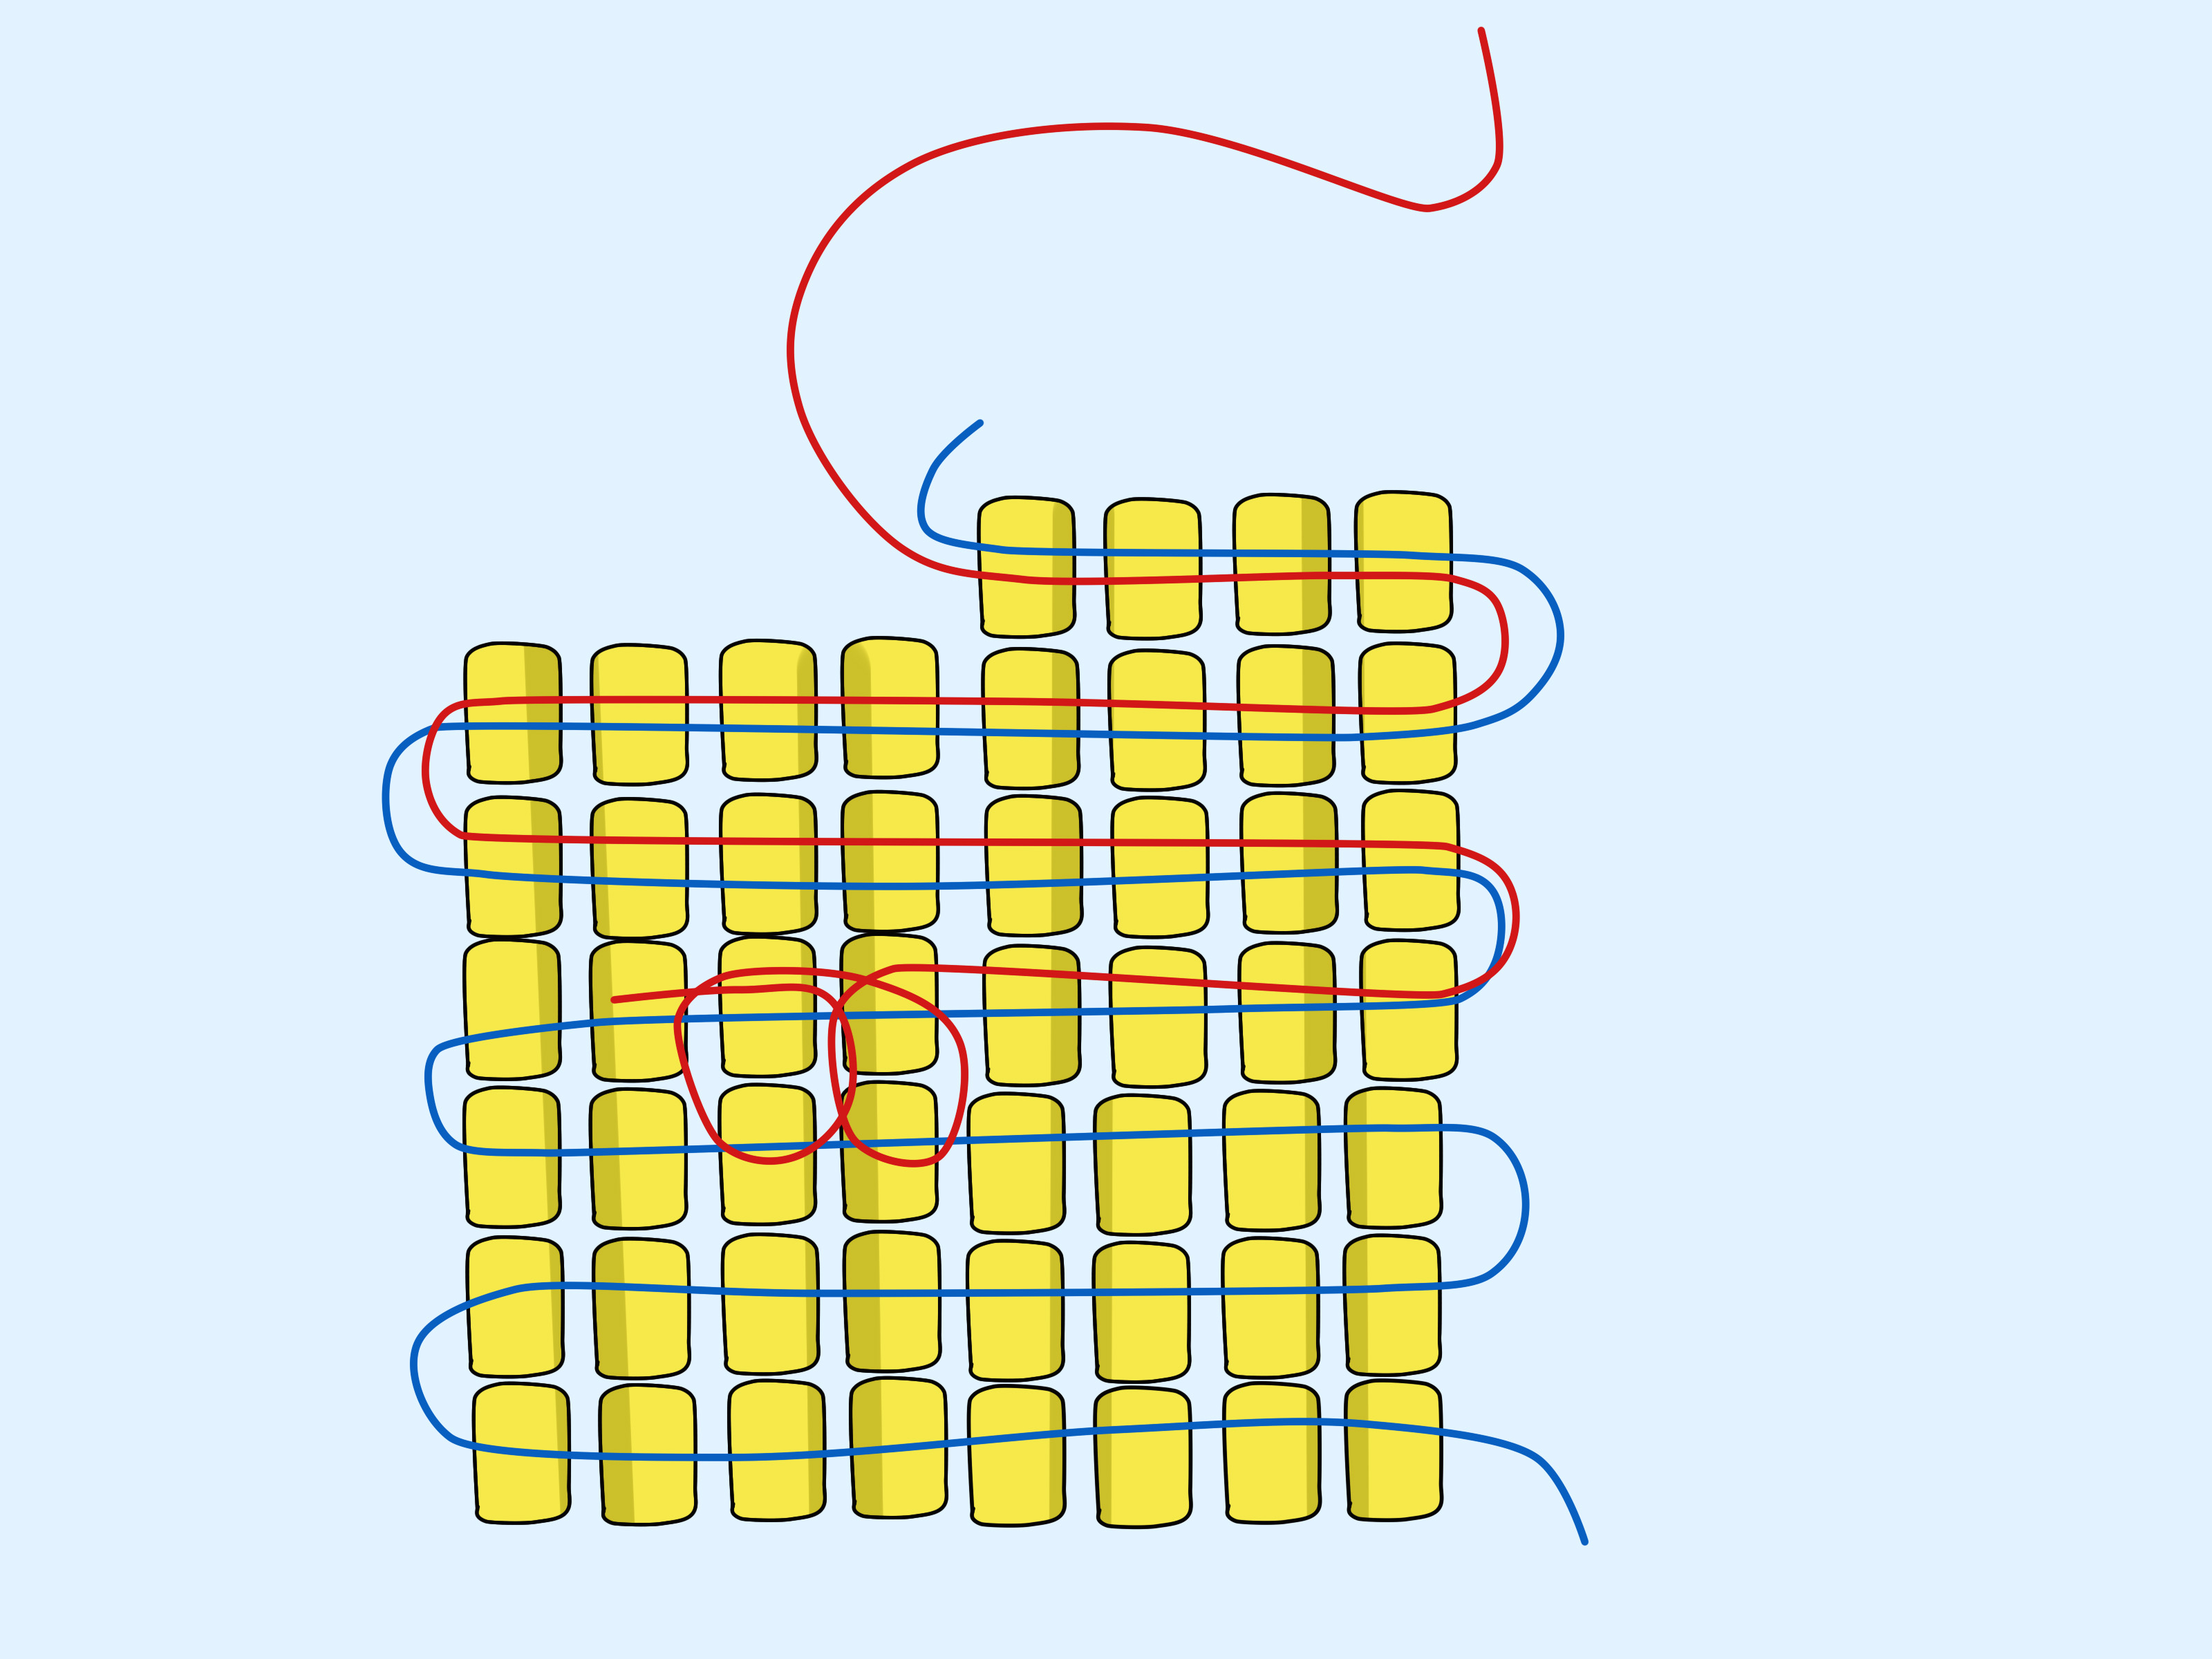
Bead weaving is what happens when sewing, jewelry making, color theory, and an impressive number of tiny objects decide to share one table. Using a needle and thread, you connect seed beads into flexible sheets, ropes, geometric shapes, earrings, bracelets, pendants, and miniature works of art.
The finished designs can look intimidating, but the basic process is surprisingly approachable. You do not need expensive machinery, a professional studio, or the eyesight of an eagle. You need a few suitable supplies, one beginner-friendly stitch, a well-lit workspace, and enough patience to accept that at least one bead will escape onto the floor.
This guide explains how to learn bead weaving basics step by step, from choosing beads and thread to controlling tension, reading patterns, correcting mistakes, and completing a first project.
What Is Bead Weaving?
Bead weaving is a technique in which small beads are joined with thread to create a fabric-like structure. Unlike basic bead stringing, where beads are placed in a single line, bead weaving sends the thread through beads multiple times and in specific directions. The resulting beadwork may be flat, circular, tubular, curved, or three-dimensional.
There are two major approaches:
- Off-loom bead weaving: The beads are stitched together by hand without a frame. Peyote stitch, brick stitch, square stitch, herringbone stitch, netting, and right-angle weave belong to this category.
- Loom bead weaving: Long warp threads are stretched across a bead loom. Rows of beads are placed beneath those threads and secured by passing the needle back through the beads above the warp.
Off-loom weaving is usually the easiest place to begin because it requires fewer supplies. A loom can be added later when you want to create wider bracelets, patterned bands, bookmarks, or decorative panels.
Gather a Simple Beginner Bead-Weaving Kit
One of the best things about learning bead weaving is that the basic shopping list is refreshingly short. Resist the temptation to buy every shimmering bead in the store on your first trip. That path leads to forty shades of turquoise and no suitable needle.
Seed Beads
Seed beads are the small glass beads used in most woven projects. Their sizes are written as numbers such as 6/0, 8/0, 11/0, and 15/0. The numbering may feel backward because larger numbers indicate smaller beads.
Size 11/0 seed beads are widely used in patterns and produce detailed, wearable beadwork. However, size 8/0 beads are often more comfortable for a first practice sample because they are larger, easier to pick up, and make the thread path more visible. Size 15/0 beads are beautiful but tiny enough to test the emotional stability of an otherwise peaceful beginner.
Choose beads with a consistent shape and hole size. Japanese cylinder beads create especially smooth, precise surfaces in peyote stitch, brick stitch, and loomwork. Round seed beads produce a more textured, traditional appearance. For practice, use two strongly contrasting colors so you can distinguish one row from another.
Beading Needles
A regular sewing needle is usually too thick for repeated passes through small seed beads. Beading needles are long, narrow, and flexible, with an eye that is approximately the same width as the shaft.
A size 10 or 11 beading needle works well with many 8/0 and 11/0 beads. Finer size 12 or 13 needles are useful for 15/0 beads or patterns that require several thread passes through the same hole. Needles eventually bend, and occasionally one will snap, so keeping a few extras nearby is practical rather than pessimistic.
Beading Thread
The thread determines how flexible, firm, and durable the finished beadwork feels. Common choices include:
- Nylon beading thread: Soft and flexible, making it useful for fringe, tassels, bead embroidery, and projects that need graceful drape.
- Braided or fused beading line: Stronger and more abrasion-resistant, making it useful for bracelets, crystals, sharp-edged beads, and jewelry that will receive frequent wear.
- Specialized Japanese beading thread: Smooth, thin, and designed to pass through seed beads repeatedly.
Use the thickest thread that can still pass through every bead as many times as the pattern requires. Nylon thread may benefit from gentle pre-stretching and thread conditioner, which can reduce tangling and fraying.
Basic Accessories
Add sharp embroidery scissors, a bead mat, a small tray, and good lighting. A bead mat prevents beads from rolling away and makes them easier to pick up with the needle. You may also need a clasp, jump rings, ear wires, or other findings when you begin turning practice samples into wearable jewelry.
A thread burner is convenient for trimming certain synthetic threads, but it is not essential for a beginner. Scissors work perfectly well, provided you do not use the pair that has been opening cardboard boxes since 2009.
Learn How the Thread Path Works
Before memorizing stitch names, learn to follow the thread path. The thread path is the route your needle takes through the beads. Every woven structure is created by repeating a particular route.
When studying a diagram, identify three things:
- Where the thread exits the beadwork.
- Which new bead or beads are picked up.
- Which existing bead or thread bridge receives the next stitch.
Do not simply watch where the needle enters. Notice where it exits, because that determines the starting position for the next stitch. Many beginner mistakes occur because the correct bead was added from the wrong direction.
Practice with light-colored thread and two contrasting bead colors. A visible thread may not be your final artistic choice, but it is an excellent teacher. Once the movement makes sense, you can switch to thread that blends into the finished design.
Start With Ladder Stitch
Ladder stitch is a useful foundation for brick stitch and herringbone stitch. It arranges beads side by side, creating a stable first row.
How to Make a Basic Ladder Stitch
- Cut a manageable length of thread, usually about an arm span to four feet.
- Thread the needle and leave a tail several inches long.
- Pick up two beads and slide them toward the tail.
- Pass the needle through both beads again in the same direction.
- Pull gently so the beads sit beside each other rather than end to end.
- Pick up one new bead.
- Pass through the previous bead and then back through the new bead.
- Repeat until the foundation row reaches the required length.
Reinforcing the row by passing through all the beads again can make it flatter and sturdier. Do not worry if the first few beads wobble. Many bead-weaving stitches become easier to control after several rows have been added.
Learn Even-Count Peyote Stitch
Even-count peyote stitch is one of the most useful bead-weaving basics. It creates rows of offset beads that resemble a tiny brick wall. It can be used for flat bracelets, rings, tubes, amulet bags, beaded bezels, and shaped components.
How Flat Even-Count Peyote Works
- Pick up an even number of beads, such as eight. These beads will become the first two rows.
- Pick up one new bead.
- Skip the final bead in the original group and pass through the next bead.
- Pick up another bead, skip one bead, and pass through the following bead.
- Continue across the row.
- Turn the beadwork, pick up one bead, and pass through the next raised bead.
- Repeat across every row.
After the first few stitches, alternate beads begin to rise above the others. These raised beads become easy-to-see connection points for the following row. Even-count peyote is generally easier than odd-count peyote because the turn at the end of each row is straightforward.
For your first sample, use one color for the original beads and another for the beads added during the next row. The contrast reveals the structure immediately and prevents the pattern from looking like a bowl of decorative confetti.
Try Brick Stitch Next
Brick stitch produces a staggered arrangement similar to peyote stitch, but the direction of construction is different. Instead of stitching through raised beads, you stitch beneath the thread bridges between beads in the previous row.
Begin with a ladder-stitch foundation. Pick up two beads for the start of a new row, pass the needle beneath the first available thread bridge, and come back up through the second bead. For the remaining stitches, pick up one bead at a time, pass beneath the next bridge, and stitch upward through the new bead.
Brick stitch is excellent for geometric earrings, triangles, diamonds, fringe bases, shaped pendants, and small decorative figures. Increasing and decreasing the number of beads allows you to build clean angles and curves.
Explore Other Essential Bead-Weaving Stitches
Square Stitch
Square stitch stacks beads directly above one another, producing a grid that resembles loomwork. Each bead in the new row is attached to the bead directly beneath it. It is slower than loom weaving but requires no loom and is easy to use with charted designs.
Herringbone Stitch
Herringbone stitch usually adds beads in pairs, causing them to angle into a distinctive V-shaped formation. It can be worked flat or tubular and creates elegant ropes, cuffs, and necklaces.
Right-Angle Weave
Right-angle weave connects beads in small circular units, often made from four beads. The thread changes direction repeatedly, creating a flexible structure that can be flat, tubular, or cubic. The basic version is manageable for beginners, while cubic right-angle weave is better saved until the thread path no longer feels like a maze designed by jewelry-loving squirrels.
Netting
Netting uses groups of beads and connecting points to form an open, lace-like structure. It is useful for flexible necklaces, decorative collars, ornaments, and coverings for beads or objects.
These stitches do not need to be learned simultaneously. Build confidence with ladder stitch and even-count peyote, add brick stitch, and then explore the others according to the projects that interest you.
Control Thread Tension Without Wrestling the Beads
Thread tension describes how firmly the thread holds the beads together. Good tension keeps the work neat while allowing the finished piece to behave as intended.
- If the tension is too loose, gaps appear and the beadwork may feel floppy.
- If the tension is too tight, the work may curl, buckle, or become difficult to stitch through.
- If the tension changes from row to row, the edges may look uneven.
After each stitch, pull the thread with a small, controlled motion. Do not yank it as though you are starting a lawn mower. Hold the existing beadwork between your fingers while tightening so that the thread settles into place without distorting the row.
Different stitches require different firmness. A structural beaded box needs more tension than flowing fringe. The goal is not maximum tightness; it is consistency.
Read Bead-Weaving Patterns More Easily
Patterns may use written steps, photographs, color charts, or diagrams with arrows. Before beginning, read the complete pattern once and highlight unfamiliar terms.
Common pattern abbreviations include:
- PU: Pick up.
- Pass through: Stitch through a specified bead or group of beads.
- Exit: Position the needle so it emerges from a particular bead.
- Repeat: Perform the same sequence again.
- Step up: Move into the correct bead or beads to begin a new circular round.
- Reinforce: Follow the existing thread path again to strengthen it.
Lay out beads in small labeled piles before starting. Count beads carefully, especially when a sequence contains similar colors. Checking each repeat immediately is much easier than discovering thirty minutes later that one silver bead has been socializing in the gold section.
Choose a Manageable First Project
Your first project should be small enough to finish in one or two sessions. Good choices include:
- A flat peyote ring.
- A narrow striped bracelet sample.
- A brick-stitch triangle pendant.
- A pair of simple fringe earrings.
- A square-stitch keychain tab.
Avoid choosing a wide cuff with fifteen colors, complicated shaping, and three unfamiliar stitches. Ambition is admirable, but completing a small project teaches more than abandoning a huge one halfway through row four.
A Simple Two-Color Peyote Practice Band
- Select size 8/0 or 11/0 beads in two contrasting colors.
- Cut approximately three to four feet of thread.
- Add a temporary stop bead several inches from the tail.
- Pick up eight beads, alternating the two colors.
- Work even-count peyote, adding one bead at a time.
- Continue until the sample is long enough to wrap around a finger or serve as a small decorative tab.
- Join the ends by weaving through alternating raised beads, or finish the ends separately and attach a clasp.
- Secure and hide the thread tails inside the beadwork.
Fix Common Beginner Problems
The Beads Will Not Sit Straight
Check that the beads are consistent in size and that each stitch follows the correct direction. Uneven beads naturally create a more textured surface. If you want a precise grid, use uniform cylinder beads.
The Thread Keeps Tangling
Use a shorter working length, allow the needle to hang occasionally so the thread can untwist, and avoid pulling a large loop through the beadwork too quickly. Thread conditioner can also help certain nylon threads.
The Needle Will Not Pass Through a Bead
Do not force it. The hole may already contain several thread passes, or the bead may have a narrow or blocked opening. Try entering from the opposite direction. If that fails, carefully remove and replace the bead or switch to a finer needle and thread.
A Bead Was Added in the Wrong Color
If the mistake is recent, reverse the thread path and remove the incorrect bead. Pull the thread gently rather than dragging the needle backward through a tight hole. For an older mistake, decide whether it affects the structure. A harmless color error can become a “design feature,” the traditional craft term for “I am absolutely not undoing twelve rows.”
The Edges Look Uneven
Count beads at the end of every row and pay special attention to turns. Uneven tension and missed edge beads are common causes. Practicing with a narrow strip makes edge problems easier to identify.
Finish Beadwork Securely
Do not rely on one large knot at the edge of the project. A bulky exposed knot can loosen, catch on clothing, or look untidy.
To finish a thread, weave the needle through several nearby beads while following the existing thread path. Make one or more small half-hitch knots around the thread between beads, continue through additional beads, and trim the thread close to the surface. When adding new thread, begin several beads away from the working area, secure it inside the beadwork, and weave toward the point where stitching will resume.
Reinforce attachment points for clasps, ear wires, and jump rings. These areas receive more stress than the rest of the design. Passing through them several times can significantly improve durability.
Build Skill Through Short Practice Sessions
Bead weaving is based on muscle memory. Twenty focused minutes several times a week can be more productive than one exhausting session in which every bead eventually looks identical.
Create a small stitch library by making labeled samples of ladder stitch, peyote stitch, brick stitch, square stitch, herringbone stitch, and right-angle weave. Record the bead size, needle, thread, and tension used for each sample. These pieces become useful references when planning future jewelry.
Once a stitch feels comfortable, experiment with one variable at a time. Change the bead size, introduce a second color, add a shaped bead, adjust the width, or try the tubular version. Controlled experiments make it easier to understand why a design behaves differently.
What Learning Bead Weaving Actually Feels Like: A Beginner Experience
The first bead-weaving session often begins with confidence. The supplies look simple, the tutorial looks clear, and the instructor’s beads line up with military precision. Then the beginner picks up eight beads, forgets whether the stop bead counts, pulls the thread, and produces something resembling a glittery caterpillar.
This is normal. The first rows of most stitches are the least stable because there is not yet enough beadwork to hold comfortably. Peyote stitch may look confusing until the raised beads become obvious. Ladder stitch may twist before the next row stabilizes it. Tubular stitches may flop sideways before enough rounds have formed. A beginner can mistakenly assume the entire project is wrong when it is simply unfinished.
One of the most useful early experiences is making the same small sample twice. During the first attempt, attention is consumed by counting beads and finding the next entry point. During the second attempt, the repeated thread path begins to feel familiar. By the third sample, the hands often know where to go before the brain finishes narrating every movement.
Color choice also changes the learning experience. A monochromatic palette may look sophisticated, but it can hide the structure. Two contrasting colors reveal rows, turns, and repeated units. Once the stitch is understood, returning to a subtle palette becomes much easier. The practice piece does not have to match an outfit. Its job is to teach.
Tension usually improves through observation rather than force. Beginners often pull harder when they see gaps, only to make the next row curl. A better approach is to hold the beadwork close to the active stitch and use the same gentle pull each time. After several rows, the thread begins to settle more consistently.
Mistakes become less dramatic too. At first, removing five stitches can feel like a craft emergency. Later, unweaving part of a row becomes routine maintenance. Experienced beaders do not avoid every mistake; they recognize mistakes sooner and know which ones require correction.
The workspace develops its own personality. A shallow tray replaces the smooth tabletop after the first major spill. Spare needles appear in a small container. Scissors acquire a designated location. Bead colors are kept in separate piles instead of one ambitious rainbow heap. These minor adjustments reduce frustration and make practice more enjoyable.
The first completed project may have uneven edges or a slightly visible knot, but finishing it is important. A completed object teaches closure attachment, thread management, sizing, and durabilityskills that practice swatches alone cannot provide. Wearing or gifting that first imperfect piece also creates motivation. It proves that hundreds of loose beads can become something intentional.
Progress becomes especially noticeable when revisiting the original stitch after learning a second or third technique. The once-confusing thread path suddenly appears simple. The hands move more efficiently, the tension looks steadier, and fewer beads need to be removed. That moment is one of the quiet pleasures of bead weaving: improvement is visible, row by tiny row.
Conclusion
Learning how to weave beads is less about memorizing dozens of stitches and more about understanding a few dependable principles. Start with suitable seed beads, a fine needle, strong thread, and a stable workspace. Learn to read the thread path, practice ladder stitch and even-count peyote, and then add brick stitch or another technique that suits the projects you want to make.
Keep early projects small, check your tension frequently, and correct mistakes before they travel across several rows. With regular practice, the movements become natural and complicated-looking designs begin to reveal themselves as simple sequences repeated with patience.
Note: Beads may be tiny, but progress does not have to be. Complete one row, understand what happened, and then make the next one.













