
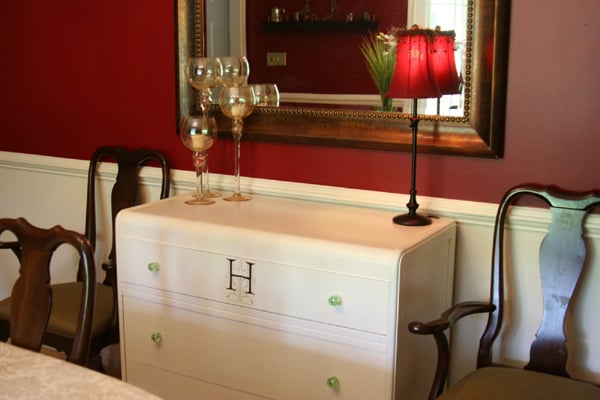
An old dresser may look like it has reached the end of its career, especially when the drawers stick, the finish resembles orange pancake syrup, and one handle is hanging on through sheer optimism. Look again, however, and that tired bedroom piece might be the perfect future buffet for your dining room, kitchen, or entertaining space.
Turning a dresser into a buffet is one of those satisfying furniture revamp projects that combines practical storage, creative design, and the thrill of rescuing something that might otherwise end up on the curb. The drawers that once held socks can organize table linens, serving utensils, candles, bar accessories, and the mysterious collection of takeout menus nobody admits to keeping.
This guide explains how to choose the right dresser, repair it, prepare the surface, select a finish, add buffet-style details, and avoid the mistakes that can turn a fun weekend makeover into a month-long relationship with sandpaper.
Why a Dresser Makes an Excellent Buffet
A traditional buffet or sideboard is essentially a storage cabinet with a generous top surface. A wide dresser already provides those basic ingredients: drawers, a sturdy frame, and room on top for serving dishes or decorative objects. The transformation is less about rebuilding the furniture and more about changing its visual identity.
A dresser-to-buffet makeover can also be considerably more affordable than buying a new sideboard. Thrift stores, estate sales, online marketplaces, and family basements are filled with solid pieces whose only serious offense is wearing a finish last fashionable when wall-to-wall carpeting was considered glamorous.
Design publications and home-improvement resources regularly feature dressers transformed through paint, new legs, wallpaper, contrasting tops, updated hardware, and creative drawer configurations. These projects demonstrate that a structurally sound chest can become a serving station, bar cabinet, entry console, or dining-room focal point without losing its useful storage.
Choose the Right Dresser for the Revamp
Check the Size and Proportions
Measure the intended location before buying or dragging home a dresser. Leave enough clearance for people to walk around it and enough space to open every drawer comfortably. A low, wide dresser usually looks more like a traditional buffet than a tall chest, but proportion matters more than the furniture’s original label.
Also consider the working height. The top should be comfortable for setting down platters, pouring drinks, or arranging food. If the dresser feels too low, furniture legs or a sturdy base can add height. If it is unusually tall, it may work better as a coffee station or bar cabinet than as a serving buffet.
Inspect the Structure
Open every drawer and examine the frame. Minor scratches, water rings, loose knobs, and ugly stain are cosmetic problems. Split structural rails, severe swelling, active insect damage, or a badly warped case require more work and may make the piece unsuitable.
Press gently on the top and corners. The dresser should not wobble like a café table waiting for a folded napkin under one leg. Check the drawer bottoms, runners, joints, back panel, and feet. Solid wood and high-quality veneer are often easier to repair, but laminate furniture can also be painted successfully when cleaned, scuff-sanded, and coated with an appropriate bonding primer.
Look Beyond the Existing Finish
Try to imagine the dresser without its current color and hardware. Decorative drawer fronts, attractive proportions, dovetail joints, carved feet, or a beautiful wood top may be hiding beneath a dated finish. Conversely, an impressive paint color cannot compensate for a piece that is unstable or poorly constructed.
Plan the Buffet Before Opening the Paint Can
A furniture revamp goes more smoothly when the final design is decided before demolition begins. Start by choosing the buffet’s function. Will it store formal table linens? Serve as a home bar? Hold everyday dishes? Support a coffee machine? Display seasonal decorations?
The answer affects nearly every design decision. A coffee station needs a durable, moisture-resistant top and convenient access to mugs and supplies. A dining buffet benefits from deep drawers for linens and shallow drawers for flatware. A bar cabinet may need bottle storage, open shelving, or removable trays.
Possible Design Directions
- Modern farmhouse: A warm wood top, painted base, simple cup pulls, and restrained distressing.
- Midcentury-inspired: Tapered legs, sleek knobs, natural wood accents, and a muted green, navy, or charcoal finish.
- Classic traditional: Rich stain, polished brass hardware, and a satin protective topcoat.
- Colorful eclectic: Bold paint, patterned drawer liners, mixed hardware, or wallpaper on selected drawer fronts.
- Minimal contemporary: A smooth enamel finish, discreet pulls, and clean styling with little visual clutter.
Create a quick sketch or digital mockup. It does not need to qualify for an architecture award. Its job is simply to prevent spontaneous decisions involving six paint colors, decorative molding, gold leaf, and regret.
Tools and Materials
The exact supply list depends on the existing finish and desired result, but most dresser-to-buffet projects require the following:
- Screwdrivers and basic hand tools
- Wood glue, clamps, and wood filler
- Degreasing cleaner and clean cloths
- Sandpaper in medium and fine grits
- Sanding block or orbital sander
- Vacuum and tack cloth or lint-free cloth
- Primer suited to wood, veneer, or laminate
- Furniture paint, cabinet enamel, stain, or decorative finish
- Quality brushes and a small foam or microfiber roller
- Clear protective topcoat when appropriate
- New knobs, pulls, legs, or decorative trim
- Drop cloths, gloves, eye protection, and suitable respiratory protection
Preparation is consistently emphasized in professional furniture-painting guidance. Removing hardware, cleaning away grease, sanding enough to improve adhesion, removing sanding dust, using the correct primer, and applying thin coats generally produce a more durable and professional-looking finish than simply painting over the existing surface.
How to Turn a Dresser Into a Buffet
Step 1: Remove Drawers and Hardware
Take out every drawer and remove the knobs, pulls, labels, and other detachable parts. Place screws in labeled bags so they do not vanish into the same dimension that collects missing socks and single earbuds.
Number the drawers discreetly with painter’s tape. Older handmade pieces are not always perfectly interchangeable, and a drawer that fits beautifully in one opening may stage a small rebellion in another.
Step 2: Clean Thoroughly
Furniture accumulates wax, cooking residue, hand oils, polish, dust, and unidentified household history. Wash the entire piece with a cleaner appropriate for the surface. Pay special attention to drawer fronts, edges, and the area around the old hardware.
Allow the dresser to dry completely before repairing or sanding. Painting over contamination can cause peeling, craters, uneven sheen, or poor adhesion.
Step 3: Make Structural Repairs
Tighten loose joints and screws. Reglue separated joints, clamp them until cured, and replace damaged drawer stops or runners. Fill dents and unwanted hardware holes with wood filler. Once dry, sand the repairs flush with the surrounding surface.
If you plan to install pulls with a different hole spacing, fill the old holes carefully before priming. Measure the new hardware twice. A buffet with seven perfectly aligned handles and one wandering off toward the corner will attract the eye for all the wrong reasons.
Step 4: Decide Whether to Strip or Scuff-Sand
A finish in reasonably good condition may only need cleaning and scuff-sanding. Peeling paint, failing varnish, deep damage, or a desire to expose natural wood may require stripping and more extensive sanding.
When stripping, work in a ventilated area and follow the product’s safety instructions. Remove softened finish carefully, clean away residue as directed, let the piece dry, and sand progressively until the surface is smooth. Home-improvement guides generally recommend evaluating the existing finish before choosing between light preparation and complete removal.
If the piece has an old painted surface that may contain lead, do not casually dry-sand or scrape it. The EPA warns that disturbing pre-1978 painted surfaces can create hazardous lead dust and recommends lead-safe practices or qualified professional help when lead may be present.
Step 5: Prime the Surface
Primer improves adhesion, helps create an even base, blocks some stains, and reduces the number of finish coats needed. Use a stain-blocking primer when dark wood tannins or old discoloration may bleed through a light color. Use a bonding primer for slick laminate, glossy coatings, or other difficult surfaces.
Apply a thin, even coat and let it dry according to the manufacturer’s directions. Lightly sanding between primer and paint can remove dust nibs and leave a smoother surface.
Step 6: Apply Paint or Stain
For a painted buffet, use a durable furniture, cabinet, trim, or enamel product suited to the material. Brush detailed areas first, then roll broad flat surfaces. Work in thin coats, follow the grain where visible, and resist the urge to keep brushing paint as it begins to set.
Two or three thin coats are usually more attractive than one heroic coat thick enough to preserve fingerprints. Let each layer dry as directed before sanding lightly or applying the next.
For a stained finish, remove the previous coating sufficiently to expose absorbent wood. Test the stain on a hidden area because different woods and veneers can produce dramatically different colors. Complete the finish with a compatible protective coating.
Paint and finish manufacturers recommend matching the primer and coating to the substrate, allowing proper drying time, and using compatible topcoats. Water-based and oil-based products behave differently, so the labelnot impatienceshould determine recoating and curing schedules.
Step 7: Protect the Buffet Top
The top of a buffet experiences more abuse than the top of a bedroom dresser. Platters slide across it, glasses leave condensation, serving spoons drip, and somebody will eventually place a warm dish directly on the surface despite being shown the trivets.
Choose a durable finish appropriate for the paint or stain underneath. Depending on the product system, this may be a water-based polyurethane, oil-based polyurethane, furniture wax, or a paint that does not require an additional clear coat. Test clear finishes over white or very light paint because some products can shift the color.
Allow the finished buffet to cure fully before heavy use. Dry paint can still be soft paint. Treating the top gently during the curing period helps prevent dents, sticking objects, and permanent marks.
Details That Make the Dresser Look Like a Real Buffet
Add New Hardware
Hardware is the furniture equivalent of changing glasses and getting a good haircut. It can alter the entire personality of the piece. Brass pulls add warmth, matte black hardware creates contrast, glass knobs introduce vintage charm, and streamlined bar pulls make an ornate dresser feel more modern.
Whenever possible, choose hardware with the same center-to-center measurement as the original holes. This reduces filling and drilling. If new holes are required, make a simple cardboard template to keep every pull level and consistently positioned.
Upgrade the Top
A dresser can gain visual authority with a contrasting top. Options include refinishing the existing wood, adding a properly supported hardwood panel, creating a painted faux-stone effect, or using a durable removable protective surface.
Do not attach a heavy stone top without confirming that the dresser can carry the load. Added materials should be secured appropriately and should not make the furniture dangerously top-heavy.
Raise It With Legs
New feet can improve height, proportion, and style. Tapered wood legs create a lighter midcentury look, turned feet suit traditional designs, and square legs feel clean and contemporary.
Attach legs to structurally sound framing or properly installed mounting platesnot merely to a thin bottom panel. After installation, check that the buffet sits level and does not rack from side to side.
Convert a Drawer Opening
If a drawer is damaged beyond repair, the empty space can become open shelving. Remove obsolete runners, repair the interior, add a finished shelf if necessary, and paint or wallpaper the compartment. Baskets can conceal clutter, while an open shelf can display dishes, bottles, or serving trays.
Line the Drawers
Wallpaper, removable liner, fabric, or decorative paper gives the interior a polished surprise. Drawer liner is especially useful when the original bottoms are stained or worn but still structurally sound.
Organizing and Styling the Finished Buffet
Assign storage based on frequency of use. Keep flatware, napkins, coasters, and serving tools in upper drawers. Store tablecloths, placemats, candles, and seasonal items below. Heavy dishes belong in lower areas, where their weight contributes less to instability.
On top, combine function with restraint. A lamp, framed artwork, plant, tray, or pair of candlesticks may be enough. Leave open surface area if the buffet will be used for serving. A beautiful piece covered with seventeen decorative objects quickly becomes a very expensive obstacle course.
Even after a dresser becomes a buffet, it remains a drawer-based storage unit. Secure it to the wall with appropriate anchoring hardware, particularly in homes with children. The CPSC warns that furniture tip-overs can happen quickly, and both federal safety guidance and independent consumer testing recommend anchoring dressers and similar furniture rather than relying on how stable they appear.
Common Furniture Revamp Mistakes
Skipping the Cleaning Stage
Sanding dirty furniture can grind grease and wax into the surface. Clean first, then sand.
Using the Wrong Primer
A general-purpose primer may not bond well to laminate or block stains from dark wood. Match the primer to the actual surface and finish problem.
Applying Paint Too Thickly
Thick paint dries slowly, collects in corners, softens details, and shows brush marks. Thin coats require patience but usually save time in the end.
Ignoring the Drawers
Painting drawer sides too heavily can make a previously functional drawer stick. Test the fit and avoid unnecessary coating on tight contact points.
Rushing Reassembly
Hardware can scratch paint that feels dry but has not cured. Give the finish enough time before reinstalling parts or loading the drawers.
Choosing Beauty Over Stability
Decorative legs, heavy tops, and removed structural pieces can change how the furniture carries weight. Every cosmetic alteration should preserve or improve the dresser’s strength and balance.
Real-World Experience: What a Dresser-to-Buffet Revamp Actually Feels Like
The most useful lesson from furniture revamping is that the project rarely unfolds exactly as imagined. The dresser may look perfect in the online listing, but once it arrives in the garage, its charming “vintage character” sometimes turns out to include sticky drawer runners, a perfume smell from 1987, and enough furniture polish to waterproof a canoe.
On one typical dresser-turned-buffet project, the original plan was wonderfully simple: clean it, paint it dark green, install brass pulls, and finish before Sunday dinner. The cleaning stage immediately exposed several old repairs and two different surface materials. The main frame was wood, the drawer fronts were veneer, and the top had a glossy coating that appeared capable of repelling both paint and criticism.
The first practical victory came from slowing down. Instead of covering the entire piece with paint and hoping for an emotional miracle, each surface was tested. A small hidden area was cleaned, sanded, primed, and painted. That test revealed that the top needed a stronger bonding primer, while the wood frame accepted the standard primer without trouble.
Hardware selection created the next surprise. The beautiful new pulls had a different hole spacing from the originals. Filling the old holes seemed straightforward until the filler shrank slightly and the circles reappeared beneath the primer like tiny ghosts. A second filling, careful sanding, and another primer coat solved the issue. The experience confirmed that surface preparation is not glamorous, but neither is staring at visible hardware holes for the next ten years.
Painting the large side panels with a small roller produced a much smoother result than brushing everything. A quality angled brush still worked best around the trim, corners, and drawer openings. Thin coats looked unimpressive at first, particularly when the primer showed through the first layer. By the third coat, however, the finish was even, rich, and far better than the thick, hurried application originally contemplated.
The most frustrating stage was waiting. Paint labels contain drying and curing instructions for a reason, yet a freshly painted buffet creates an almost irresistible desire to install hardware immediately. Waiting before reassembly prevented the brass backplates from imprinting themselves into the soft finish. Waiting longer before placing appliances and trays on top prevented sticking and dents.
The finished buffet worked because its storage plan was considered before the drawers were loaded. The top drawer held serving utensils and corkscrews. The middle drawers stored napkins, placemats, and candles. The deepest lower drawers held less frequently used platters and holiday linens. Drawer dividers kept small tools from becoming a noisy metal landslide every time someone opened the buffet.
Styling required another round of editing. At first, the top held a lamp, a plant, stacked books, framed art, a bowl, two candlesticks, and a decorative wooden chain whose job description remained unclear. Removing half of those items made the buffet more attractive and restored enough open space to serve food.
The project also changed how secondhand furniture was evaluated afterward. Scratches became less intimidating, while structural problems became more important. An ugly color could be fixed. Loose veneer could sometimes be repaired. A missing knob was trivial. A badly twisted frame, severe water damage, or unstable construction was a warning to keep walking, no matter how persuasive the price tag.
Most importantly, the dresser did not need to imitate a factory-made buffet perfectly. Its slightly unusual drawer arrangement became part of its charm. The goal was not to erase every sign of age but to create a durable, useful piece that looked intentional. That balancerespecting the original construction while giving it a new functionis what makes a furniture revamp satisfying rather than merely decorative.
Conclusion: Give an Old Dresser a Better Job
A dresser turned buffet can provide customized storage, a useful serving surface, and a distinctive focal point for far less than many new dining-room cabinets. The strongest transformations begin with a sound piece, a realistic design plan, careful preparation, compatible finishing products, and enough patience to let every coat dry properly.
Paint and hardware may deliver the dramatic before-and-after photographs, but cleaning, repairing, sanding, priming, and reinforcing are what make the finished buffet last. Add thoughtful storage, a durable top, and appropriate wall anchoring, and the former bedroom dresser can confidently begin its second careerthis time holding serving bowls instead of sweaters.
Note: Follow all product-label instructions for ventilation, protective equipment, application, drying, and disposal. Test unfamiliar coatings in a hidden area, and seek qualified help when dealing with possible lead paint, serious structural damage, electrical additions, or heavy countertop materials.











