
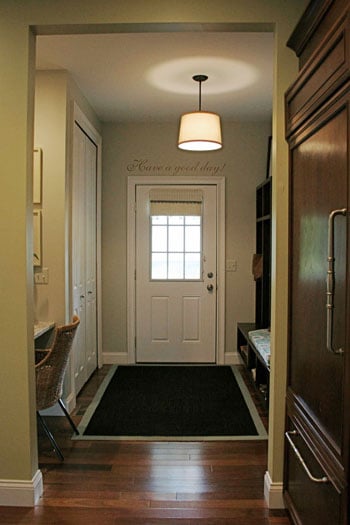
Note: This article is written as original, web-ready content based on real DIY mudroom planning, storage, and organization best practices.
A mudroom wall is one of those home projects that sounds fancy until you realize what it really does: it stops shoes, coats, backpacks, dog leashes, sports gear, and mysterious “I’ll put this away later” objects from staging a rebellion near your door. Whether you have a full mudroom, a narrow hallway, a laundry-room entrance, or one sad blank wall begging for purpose, DIYing a mudroom wall with hanging storage and shoe storage can make daily life feel dramatically less chaotic.
The best part? You do not need a mansion, a custom cabinetmaker, or a trust fund labeled “entryway transformation.” With careful measuring, smart materials, strong wall mounting, and a layout that matches your household habits, you can build a practical mudroom drop zone that looks intentional, stores everyday items, and saves your floor from becoming a shoe swamp.
What Is a Mudroom Wall?
A mudroom wall is a vertical storage system placed near an entrance to catch the items people use when coming and going. It usually includes wall hooks, shelves, cubbies, a bench, shoe storage, baskets, or a combination of all of them. Think of it as the home’s “landing strip” for real life. It is where rain jackets dry, backpacks hang, keys stop vanishing, and shoes finally learn boundaries.
The beauty of a DIY mudroom wall is flexibility. A large family may need assigned hooks, labeled bins, and deep shoe cubbies. A small apartment may only need a slim bench, a row of hooks, and a boot tray. A pet owner may want leash hooks and a towel basket. The goal is not to copy a magazine photo exactly; the goal is to build a system that works when everyone is tired, hungry, late, and carrying too many things.
Why Build One Yourself?
DIYing a mudroom wall gives you control over size, style, budget, and function. Pre-made hall trees can be useful, but they often come in fixed dimensions that may not fit your wall, your baseboards, or your family’s shoe situation. A custom DIY design lets you use every inch wisely.
You can also choose durable finishes that match your home. Want modern farmhouse shiplap? Go for it. Prefer clean white board-and-batten? Excellent. Need dark paint because your kids treat walls like abstract art installations? Smart move. A DIY mudroom wall can look polished while still being tough enough for muddy boots and Monday mornings.
Plan the Layout Before Buying Materials
Before heading to the hardware store, stand near the entry and watch how the space is actually used. Where do shoes pile up? Where do bags land? Which door does the family use most? Are coats currently thrown on a chair, a stair rail, or an innocent treadmill that has seen no exercise since 2021?
Measure the wall width, ceiling height, baseboard depth, nearby doors, light switches, outlets, and floor clearance. A good mudroom wall usually has three functional zones: hanging storage at eye level, shoe storage near the floor, and optional upper storage for seasonal or less-used items.
Recommended Mudroom Wall Zones
Top zone: A shelf or cabinets for hats, bins, seasonal gloves, extra bags, or rarely used items.
Middle zone: Hooks, pegs, or rails for coats, backpacks, purses, umbrellas, dog leashes, and tote bags.
Bottom zone: Shoe cubbies, a storage bench, boot tray, baskets, or open shelves for everyday footwear.
Best Materials for a DIY Mudroom Wall
For a sturdy mudroom wall, use materials that can handle daily wear. Plywood, MDF, pine boards, poplar trim, beadboard, shiplap, and pre-primed boards are common choices. Plywood is strong and reliable for benches and cubbies. MDF paints smoothly but should be kept away from wet areas unless well sealed. Solid wood trim adds durability to edges and corners.
For the wall treatment, board-and-batten is a popular choice because it creates structure and gives hooks a secure visual home. Shiplap offers a casual, clean look. Beadboard works beautifully in cottage-style or traditional spaces. If your budget is tight, you can simply paint the wall, install a strong horizontal rail, and mount hooks into studs.
Tools You May Need
A basic DIY mudroom project usually requires a tape measure, pencil, level, stud finder, drill, screws, saw, nailer or hammer, caulk, wood filler, sandpaper, paintbrush, roller, and safety glasses. If you are building shoe cubbies or a bench from scratch, a circular saw or miter saw will make the job easier. A pocket hole jig can help create strong hidden joints, especially for bench frames and cubby boxes.
The non-negotiable tool is the stud finder. Hooks that hold coats, backpacks, and bags should be anchored securely. Drywall alone is not a heroic substance. It is more like a polite suggestion. When possible, screw rails, hooks, and bench supports into wall studs. If a stud is unavailable, use weight-rated anchors appropriate for the wall type.
How to Design Hanging Storage That Works
Hanging storage is the heart of the mudroom wall. Hooks are faster and more forgiving than hangers, which makes them perfect for busy households. Install hooks at different heights if kids will use the space. Lower hooks encourage children to hang their own coats and backpacks, which is basically home organization magic disguised as carpentry.
For adults, hooks placed around 60 to 66 inches from the floor usually work well. For children, 36 to 48 inches may be more practical. If you are adding a bench underneath, make sure coats and bags will not drag across the seat. Space hooks far enough apart so bulky winter coats do not crowd each other into a fabric traffic jam.
Hook Ideas for Different Households
For families: Assign each person a hook or locker-style section.
For small spaces: Use a single hook rail with a shelf above it.
For pet owners: Add a small hook for leashes, collars, and walking bags.
For athletes: Use heavy-duty hooks for gear bags and sports equipment.
Smart Shoe Storage Options
Shoe storage is where mudroom dreams either succeed or collapse into a pile of sneakers. The trick is to store the shoes people actually wear every day, not every shoe they have ever loved. Keep special-occasion shoes, off-season boots, and rarely used pairs somewhere else. Your mudroom wall should serve daily routines, not become a footwear museum.
Open cubbies are excellent for quick access. A storage bench with lower shelves gives people a place to sit while putting on shoes. Baskets can hide visual clutter, but they work best when they are not overstuffed. A boot tray is ideal for wet shoes, muddy boots, and rainy-day chaos. If your space is narrow, consider vertical shoe racks or slim shelves.
Open vs. Closed Shoe Storage
Open shoe storage is easy to use and encourages fast clean-up. The downside is that shoes remain visible, and shoes are not always known for their elegance. Closed storage, such as cabinets or lidded benches, creates a cleaner look but requires an extra step. For many homes, the best solution is a mix: open cubbies for daily shoes and closed bins for accessories, hats, gloves, or less attractive gear.
Step-by-Step: DIY Mudroom Wall With Hooks and Shoe Storage
Step 1: Clear and Measure the Wall
Remove furniture, hooks, artwork, and clutter from the area. Measure the width and height of the wall. Mark studs with painter’s tape so you know where strong mounting points are located. Check door swings and walking paths. A mudroom wall should make movement easier, not create a new obstacle course.
Step 2: Choose Your Structure
Decide whether you want a simple hook rail, a board-and-batten feature wall, a built-in bench, or a full cubby system. Beginners may prefer a painted wall with a sturdy wood rail, hooks, a floating shelf, and a purchased shoe bench. More experienced DIYers can build custom cubbies and a bench from plywood.
Step 3: Build or Install the Shoe Storage
If using a bench, place it first so the rest of the layout can be designed around it. A comfortable bench height is often around 17 to 19 inches. For shoe cubbies, keep compartments tall enough for sneakers and flats, and consider one taller section for boots. Sand edges smooth before painting or sealing.
Step 4: Add the Wall Treatment
Install shiplap, beadboard, or board-and-batten if desired. Use a level to keep lines straight. Caulk seams where boards meet the wall, fill nail holes, and sand rough spots. This stage makes the project look custom, even if your budget is whispering, “Please be gentle.”
Step 5: Install the Hook Rail
A hook rail is one of the strongest ways to mount hanging storage. Attach a horizontal board directly into studs, then screw hooks into the board. This distributes weight more effectively than placing individual hooks randomly into drywall. Choose hooks with a finish that matches your home’s hardware, such as matte black, brushed nickel, brass, bronze, or wood pegs.
Step 6: Add Upper Storage
If ceiling height allows, install a shelf above the hooks. Use baskets or labeled bins for gloves, scarves, pet supplies, sunscreen, bug spray, or seasonal items. Keep heavier items lower and lighter items higher. Nobody wants to be bonked by a rogue basket of winter hats.
Step 7: Paint and Finish
Use durable paint in a satin, semi-gloss, or washable finish. Mudroom walls take abuse from backpacks, wet sleeves, shoes, and the occasional dramatic door slam. A scuff-resistant finish makes cleaning easier. For benches, consider a tough enamel paint, stain with polyurethane, or a sealed wood top.
Step 8: Organize by Daily Routine
Once the build is complete, organize based on use. Everyday shoes go in the easiest cubbies. Bags hang on assigned hooks. Keys, mail, sunglasses, and wallets can live in a small tray or wall basket. If an item does not belong in the entry, do not give it permanent residency there.
Design Ideas for Small Mudroom Walls
Small spaces need discipline. A narrow hallway or apartment entry can still become a functional mudroom wall with a slim bench, a row of hooks, and a shoe tray. Floating shelves can hold keys and décor without eating floor space. A mirror can make the entry feel brighter and more open. Hooks under a shelf create vertical storage without making the area feel crowded.
For a tight entry, avoid oversized furniture. Choose shallow shoe cabinets, wall-mounted racks, or stackable cubbies. Use one consistent color palette to keep the look calm. Light colors can make a small space feel airy, while darker lower sections can help hide scuffs and dirt.
Design Ideas for Busy Families
Families need systems that are obvious. If everyone has to think too hard, the system will fail by Wednesday. Assign each person a hook, cubby, basket, or labeled section. Use lower storage for kids and higher storage for adults. Add a small command center with a calendar, corkboard, or whiteboard if the mudroom wall is near the main exit.
For school mornings, create a “ready-to-go” zone. Backpacks hang on hooks, shoes sit below, and lunch bags or sports gear go in bins. This prevents the classic morning performance known as “Where Is My Other Shoe?”a drama nobody asked to attend.
Style Tips That Make It Look Custom
Trim is the secret ingredient. Adding crown molding, base trim, side panels, or simple vertical battens can make a basic mudroom wall look built-in. Matching the paint color to nearby cabinetry or interior doors creates a cohesive design. A wood bench top adds warmth. A patterned cushion brings comfort and personality.
Hardware also matters. Hooks are functional, but they can be decorative too. Oversized hooks, classic pegs, brass finishes, or black metal hooks can define the style of the entire wall. Add baskets with matching textures to reduce visual clutter. If you love color, the mudroom is a great place to try a bold shade because it is usually a smaller zone.
Common Mistakes to Avoid
The first mistake is installing too few hooks. If your household owns six coats and you install three hooks, the math will become visible on the floor. The second mistake is building shoe storage that is too shallow or too narrow. Measure real shoes before cutting wood. Boots, athletic shoes, and kids’ footwear all need different clearances.
Another common mistake is ignoring airflow. Wet shoes and damp jackets need ventilation. Avoid sealing everything into airtight boxes unless items are dry first. Finally, do not overdecorate the mudroom wall. A few beautiful details are great, but the space must stay functional. This is not a museum. It is where muddy cleats go to calm down.
Budget-Friendly Mudroom Wall Ideas
A mudroom wall does not have to be expensive. Use a pre-made bench and upgrade it with paint, cushions, or baskets. Install a basic pine board as a hook rail. Add peel-and-stick wallpaper above the rail for style. Use affordable cube storage for shoes. Repurpose baskets you already own. Paint can do a lot of heavy lifting, especially when paired with clean trim and matching hardware.
If you want the built-in look without the built-in price, combine stock cabinets or cube organizers with DIY trim. Secure everything properly, add a wood top, paint the unit one color, and caulk the seams. Suddenly, your entryway looks custom, and your wallet is not quietly sobbing in the corner.
Maintenance: How to Keep the Mudroom Wall Organized
The best mudroom wall still needs regular editing. Once a week, remove shoes that do not belong, toss junk mail, return toys to their rooms, and empty baskets that have become emotional support clutter. Once a season, rotate coats, boots, hats, and sports gear. Keep only daily-use items in the prime storage spots.
A simple rule helps: every item needs a home, and every home needs a limit. One basket for gloves. One cubby per person. Two or three everyday shoes per person near the entry. When limits are clear, clutter has fewer places to hide.
Experience Section: Real-Life Lessons From DIYing a Mudroom Wall
The biggest lesson from building a DIY mudroom wall is that your original plan will probably look perfect on paper and then meet reality like a raccoon meeting a locked trash can. You may measure the wall carefully, only to discover the baseboard sticks out more than expected. You may buy beautiful hooks, then realize your backpacks are wider than the spacing. You may paint the wall a dreamy soft white, then watch one muddy boot scuff it within 24 hours. This is normal. DIY projects are not just about building furniture; they are about negotiating with walls, floors, habits, and occasionally gravity.
One practical experience is to mock up the layout with painter’s tape before drilling anything. Tape rectangles for the bench, cubbies, shelf, and hooks directly on the wall. Then hang a real coat on the pretend hook area. Place real shoes where the cubbies will go. Set a backpack against the wall. This simple test reveals problems early. Maybe the hooks are too low. Maybe the bench blocks a door. Maybe the shoe storage is not deep enough for boots. Painter’s tape is cheaper than rebuilding.
Another lesson is to build for the mess you actually have, not the lifestyle you imagine. If your family always drops shoes by the door, do not design a system that requires opening three cabinet doors and sliding out a tray. Open cubbies may be better. If backpacks are heavy, decorative hooks alone may not be enough; use strong hooks mounted into a rail secured to studs. If pets come in wet, add a towel basket and washable mat. The mudroom should cooperate with human behavior, not demand everyone become a professional organizer overnight.
Paint choice matters more than expected. Flat paint may look lovely at first, but high-traffic walls need washable finishes. Satin or semi-gloss paint is easier to wipe down. A darker color on the lower half of the wall can hide scuffs, while a lighter color above keeps the space bright. If using a wood bench top, seal it well. Wet bags, snow pants, leaky water bottles, and forgotten snacks are all part of the mudroom ecosystem.
Finally, leave room for change. Kids grow. Seasons change. Shoe sizes multiply. Sports gear appears without warning. A flexible mudroom wall with movable baskets, adjustable shelves, and extra hooks will serve you longer than a design that is too rigid. The best compliment for a DIY mudroom wall is not “Wow, that looks expensive.” It is “I can find my shoes.” That, dear homeowner, is domestic victory.
Conclusion
DIYig a mudroom wall with hanging storage and shoe storage is one of the most satisfying home organization projects because it improves both appearance and daily function. It turns an underused wall into a practical drop zone, gives shoes a proper place, keeps coats and bags off the floor, and makes the entryway feel calmer. Whether you build a full custom bench with cubbies or start with a simple hook rail and shoe tray, the key is to design around real habits.
Measure carefully, mount securely, choose durable materials, and keep the system easy to maintain. A great mudroom wall does not have to be complicated. It simply needs to answer the everyday question: “Where does this go?” When your wall can answer that before the clutter hits the floor, you have officially won the entryway.












