
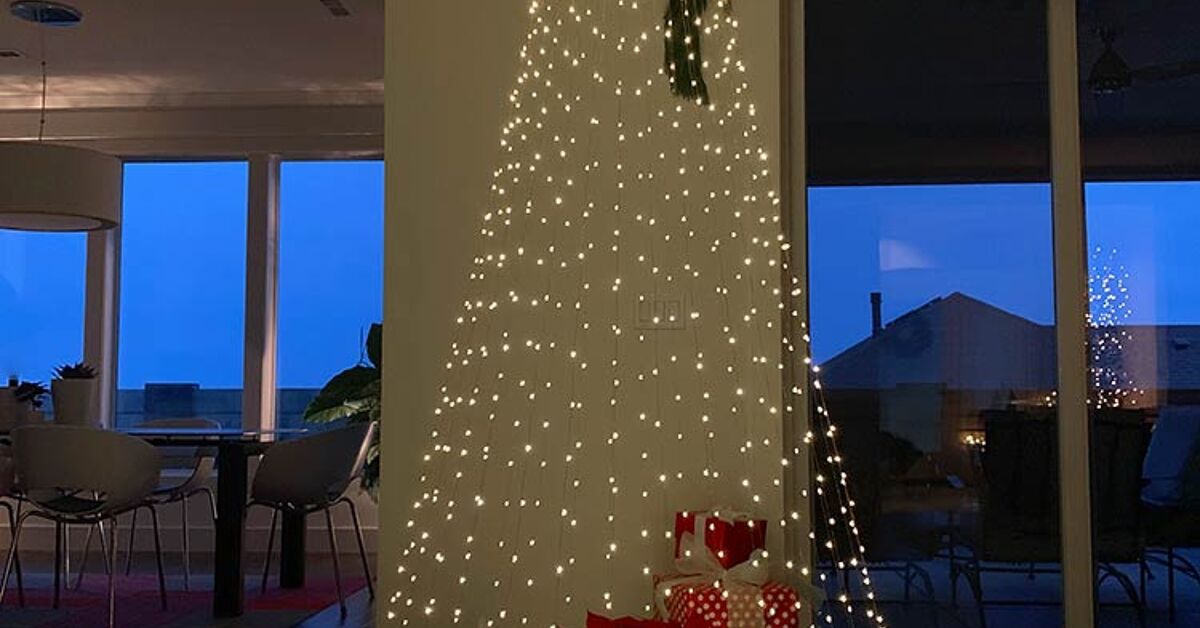
There is a very specific moment in December when you look at your living room and think, “This space needs more Christmas.” Not necessar Sometimes you simply need lightsoft, warm, slightly magical light.
That is where a DIY Christmas tree made of firefly lights earns its holiday cookies.
Made with delicate LED micro-lights arranged in a triangular tree shape, this alternative Christmas tree creates the illusion of dozensor hundredsof tiny glowing fireflies floating against a wall. It takes up almost no floor space, works beautifully in apartments and bedrooms, and can be customized without requiring advanced woodworking skills or an emergency call to your most tool-obsessed neighbor.
Better yet, the basic design is remarkably flexible. You can make a minimalist Scandinavian-style light tree, a colorful kids’ room version, a sparkling outdoor display, or a dramatic floor-to-ceiling Christmas centerpiece.
Let’s build one.
Why Make a Christmas Tree With Firefly Lights?
A traditional Christmas tree is lovely. It is also, depending on the tree, a large seasonal roommate that demands several square feet of real estate.
A firefly light Christmas tree gives you the recognizable triangular silhouette of a holiday tree without the bulky branches. The lights become the design instead of merely decorating it.
This makes the project especially useful for small apartments, dorm-style spaces, offices, guest rooms, entryways, and homes where a second Christmas tree sounds delightful until someone remembers who must decorate and store it.
LED holiday lights are also a practical choice for light-focused décor. Modern LED strands typically use substantially less electricity than conventional incandescent holiday lights and produce less heat during operation. Small micro-LED bulbs are particularly well suited to the floating sparkle associated with firefly or fairy light designs.
Visually, the result sits somewhere between a Christmas tree, a constellation, and a very organized gathering of lightning bugs.
What Are Firefly Lights?
Firefly lights are tiny LED bulbs positioned along a thin, flexible wire. They are also commonly described as fairy lights, micro-LED string lights, or copper wire lights.
Unlike heavier traditional Christmas light strands, the wire can almost disappear when viewed from several feet away. Once the room becomes darker, your eyes notice the pinpoints of light first. That nearly invisible support wire creates the floating effect.
Firefly lights may be battery-operated, USB-powered, or plug-in. Some include timers, remote controls, dimmers, and lighting modes such as slow fade, twinkle, waves, and steady illumination.
For this DIY Christmas tree, warm white LEDs create a cozy, classic look. Cool white lights lean more modern and icy. Multicolor lights bring instant nostalgia, while amber-toned micro-lights can make the wall appear as though it has been politely invaded by tiny stars.
Materials You’ll Need
The shopping list is pleasantly short. Your exact materials will depend on the size and location of your light tree.
- One or more strands of LED firefly lights
- Removable clear decorating hooks or suitable light clips
- Measuring tape
- Pencil
- Painter’s tape
- Twist ties or reusable cable ties
- A lightweight tree topper, optional
- Lightweight ornaments, optional
- A timer or smart plug compatible with your lighting setup, optional
If the tree will be installed outdoors, every electrical component used outside should be rated for that environment. The lights, extension cord, and connection setup all matter. Outdoor lighting should use appropriate outdoor power arrangements, including GFCI-protected receptacles where applicable.
Inspect strands and cords before installation. Frayed wires, cracked sockets, loose connections, or damaged insulation are not festive quirks. Damaged electrical decorations should be retired rather than repaired with three layers of mystery tape and seasonal optimism.
Choose the Right Location
Before attaching a single hook, step back and study the room.
Look for a Clear Vertical Surface
A large blank wall provides the easiest canvas. The DIY firefly light tree also works on wood panels, a covered porch wall, large windows, or an apartment wall where removable decorating hooks are appropriate for the surface.
Try to avoid locations where the lights will compete with a television or several bright lamps. The subtle glow is most impressive when the surrounding lighting is relatively soft.
Think About Power Before You Decorate
Locate the electrical outlet or decide where a battery pack or USB power supply will sit. Planning this first prevents the classic DIY ending in which your masterpiece is finished but the plug hovers seven feet from electricity.
If you are using plug-in lights, arrange the tree so the power cord can travel neatly toward an outlet without becoming a tripping hazard or disappearing under a rug.
Pick Your Tree Size
A small tabletop-style wall tree might measure 3 feet tall. A standard statement tree can be approximately 5 to 7 feet tall. A dramatic staircase or living room installation can stretch significantly higher.
For a balanced shape, the bottom width can measure roughly one-half to two-thirds of the tree’s height. This is a design guideline, not Christmas geometry law. A narrow tree feels sleek and contemporary. A wide tree appears fuller and more traditional.
How to Make a DIY Christmas Tree Made of Firefly Lights
Step 1: Mark the Top and Bottom of the Tree
Use painter’s tape to mark the top point of your tree. Then mark the approximate left and right corners of the bottom.
Stand across the room and look at your three marks. This thirty-second inspection can save twenty minutes of wondering why the finished tree appears to be leaning toward the kitchen.
Adjust the bottom marks until the triangle looks balanced within the surrounding room.
Step 2: Create a Temporary Tree Outline
Run narrow strips of painter’s tape from the top point to the bottom corners. Add a horizontal strip along the imagined base if you find it helpful.
This outline acts as a visual guide. You do not have to attach lights directly along every section of tape. The goal is simply to establish the overall silhouette before installing hooks.
Step 3: Plan the Light Pattern
The easiest arrangement uses a horizontal zigzag.
Imagine drawing a giant Christmas tree without lifting your pencil. Start at the top. Move toward one side. Cross the tree to the opposite side slightly lower. Continue traveling left and right, making each row wider as you move downward.
This method fills the triangular shape with glowing lines instead of merely outlining the perimeter.
For a more organic tree, vary the width and angle slightly. Perfectly even rows can look architectural. Uneven spacing gives the tree a softer, branch-like personality.
Step 4: Install the Hooks
Place removable hooks or appropriate decorating clips at each turning point of your zigzag pattern.
Start with the top hook. Add alternating hooks down the left and right sides, gradually increasing the distance from the center as you approach the bottom.
Do not use metal staples or nails directly through electrical light wires. Dedicated light clips and other suitable non-damaging supports help secure strands without piercing the cord.
Once the hooks are installed, remove the temporary painter’s tape outline.
Step 5: Test the Lights
Turn on your firefly lights before hanging them.
Yes, before.
Few holiday experiences create personal growth faster than carefully arranging 200 tiny lights and discovering that the strand has a problem after the final hook.
Confirm that the strand operates properly and review the manufacturer’s instructions, including any limits on connecting multiple sets. Electrical capacities and connection limits vary by product, so the packaging or supplied instructions should guide the installation.
Step 6: Weave the Lights Into a Tree
For many wall-tree designs, beginning with the non-plug end near the top makes it easier to finish with the powered end closer to the outlet. Your exact starting point may depend on the design of the light strand.
Loop the wire around the top support, then guide it diagonally toward the first side hook. Cross toward the opposite side and continue downward.
Keep mild tension on the wire, but do not pull it aggressively. Firefly light wire is flexible, and the tree usually looks better with a slightly relaxed line rather than a string stretched like it is competing in an archery tournament.
As the tree widens, step backward every few rows. Look for dark gaps, awkward angles, or sections that seem noticeably tighter than the rest.
Adjust now. Tiny corrections are easy before the entire strand is installed.
Step 7: Create the Base
You have several options for the bottom of your DIY Christmas light tree.
The easiest approach is to finish the final zigzag row and run the remaining wire toward the power source. For a stronger Christmas tree silhouette, use a short vertical section of lights to suggest a trunk.
Another idea is to place a decorative basket, wood box, or fabric-wrapped empty gift box beneath the light tree. This visually anchors the glowing shape and creates the illusion that the tree has a base.
A few wrapped presents placed underneath will complete the effect suspiciously quickly.
Step 8: Turn Off the Room Lights
This is the good part.
Switch on the firefly lights and lower the surrounding room lighting. Examine the tree from the main viewing angle.
If the shape feels too sparse, add a second light strand between the existing rows. If the tree looks overly bright, use a compatible dimmer or lighting control if your product supports one.
A layered approach can create more depth. Tiny micro-lights provide the overall shimmer, while a limited number of slightly larger decorative lights or illuminated ornaments can become focal points.
How to Make the Firefly Light Tree Look More Expensive
Good DIY holiday décor is not necessarily complicated. It is usually edited.
Choose One Dominant Light Temperature
Warm white lighting creates a welcoming traditional atmosphere. For a deliberately modern tree, use consistent cool white lights.
Mixing several unrelated shades of white can produce an accidental patchwork effect. If you intentionally combine light styles, make the contrast obviousfor example, warm micro-lights with a small number of colorful vintage-inspired bulbs.
Add Depth Instead of More Stuff
Rather than covering the tree with dozens of decorations, add a second firefly strand slightly inside the original pattern.
This creates an inner glow and makes the illuminated Christmas tree appear more dimensional. Traditional tree-lighting techniques often use lights at different visual depths for the same reason: the eye reads layers as fullness.
Use Lightweight Ornaments
Paper stars, felt decorations, small wooden ornaments, ribbons, and lightweight acrylic pieces work well.
Avoid hanging heavy glass ornaments directly from delicate micro-light wire. The light strand should remain a lighting product, not become a structural cable for your family’s collection of ceramic snowmen.
Hide Excess Wire Neatly
Bundle unused wire carefully near the base with a reusable tie, following the product instructions and without sharply kinking or damaging the cord.
Visual clutter around the outlet can undermine an otherwise elegant design. A basket, decorative gift box, or narrow console can help organize the lower portion of the display without covering electrical components improperly.
Creative Firefly Light Christmas Tree Ideas
The Minimalist Scandinavian Tree
Use warm white lights and no ornaments. Place the tree on a white, beige, pale gray, or natural wood backdrop.
Add three or four simply wrapped kraft-paper gifts at the base. Done. Your living room now looks calm enough to sell extremely expensive candles.
The Floating Ornament Tree
After installing the light silhouette, hang lightweight ornaments at different points inside the triangle.
From across the room, the nearly invisible light wire allows the ornaments and LEDs to appear suspended against the wall.
The Color-Changing Tree
Use compatible smart or multicolor LED firefly lights. Select warm white for quiet evenings, red and green for a classic Christmas party, or soft colors for a children’s room.
Resist the temptation to use every flashing mode simultaneously unless your holiday theme is “North Pole Airport Runway.” A gentle twinkle normally suits the firefly effect best.
The Outdoor Light Tree
Create the same triangular pattern against a fence, exterior wall, or sturdy outdoor frame using lights and accessories specifically rated for outdoor use.
Secure the strands with suitable outdoor light clips or weather-appropriate ties. Use outdoor-rated cords when needed, keep electrical connections arranged according to manufacturer guidance, and use appropriate GFCI-protected power.
When working at height, use a suitable ladder on stable ground and avoid overreaching. Moving the ladder is less exciting than dramatically stretching sideways, but it is also considerably more sensible.
The Tree With Photo Memories
Attach lightweight photo clips to a separate decorative line woven near the lights. Add family photographs, holiday cards, children’s drawings, or favorite travel pictures.
The finished project becomes part Christmas tree and part memory board. It is especially charming in a family room or hallway.
Common Mistakes to Avoid
Making the Tree Too Narrow at the Bottom
A tree shape needs visual weight near its base. If every zigzag row is almost the same width, the finished design may look more like a glowing ladder than an evergreen.
Increase the width noticeably as you move down the wall.
Using Too Few Lights
A sparse design can be elegant, but an unintentionally empty tree usually looks unfinished.
If large dark areas remain inside the triangle, tighten the spacing between rows or introduce a second strand. Firefly lights are small, so their strength comes from repeated points of illumination.
Skipping the Pre-Installation Test
Test every strand first. Inspect it first, too.
Holiday safety guidance consistently emphasizes checking lighting sets and cords for visible damage. Do not continue using a strand with frayed wiring, cracked components, or exposed conductors.
Ignoring Product Connection Limits
Do not assume every LED strand can be connected indefinitely simply because LED lights use less energy.
Manufacturers specify how their lighting products should be connected and powered. Follow those instructions and avoid overloading outlets, cords, timers, or other electrical accessories.
Leaving the Display Powered Without Thought
A timer or compatible smart plug can simplify the nightly routine. Many homeowners prefer scheduling decorative lighting to operate only during the hours when it is actually being enjoyed.
Electrical decorations should also be kept away from situations where children or pets may pull, chew, or repeatedly handle the cords.
My Practical Take on the Firefly Light Tree Experience
The interesting thing about a DIY Christmas tree made of firefly lights is that the project looks easier than it feels for the first ten minutesand then becomes much easier than expected.
The first challenge is not electrical, artistic, or technical. It is standing in front of a blank wall and deciding exactly where the top of the tree should go.
Move the top point two inches left. Step back. Move it one inch right. Step back again. At some stage, you may begin questioning whether walls themselves are secretly crooked.
The most useful lesson from setting up this kind of project is to establish the three major points first: the top and the two bottom corners. Once those points look balanced, everything between them becomes adjustable.
The next surprise is how dramatically the tree changes when the lights are switched on.
During daylight, the installation can look underwhelming. You see wire. You see hooks. You notice the one row that is perhaps half an inch lower on the left. Your inner perfectionist arrives carrying a clipboard.
Then evening comes.
The room darkens, the thin wire visually fades, and suddenly the points of light take control. The small imperfections that seemed enormous at 2 p.m. become almost invisible. What remains is a floating triangular cloud of warm light.
That transformation is probably the most satisfying part of the entire DIY experience.
Spacing also teaches you something quickly. More lights are not automatically better. My preferred visual approach for this style would be to begin with a moderately spaced zigzag and evaluate the tree from ten or fifteen feet away. The viewing distance matters.
Up close, individual bulbs may seem widely separated. Across a living room, your eye connects them into one illuminated shape.
If the design still seems thin, adding a second strand to the inner section works better than randomly cramming more lights around the outer edge. The inner layer gives the tree visual depth and produces a concentrated glow near the imaginary trunk.
Another practical experience common to decorative lighting projects is discovering that cord management deserves attention much earlier than expected.
You can create the most elegant light tree in the neighborhood, but if a bright green extension cord then travels diagonally across a white wall like an escaped garden hose, the illusion suffers.
Plan the power route before hanging the first row. Position the powered end logically. Keep connections accessible and arranged safely. Visually, use furniture or holiday décor to integrate the lower area rather than trying to disguise cords in ways that conflict with electrical safety guidance.
Decorating the finished tree is another exercise in restraint.
The first lightweight paper star looks charming. The fifth ornament adds personality. By ornament number twenty-eight, you may realize you have recreated a traditional Christmas treeexcept now it is attached to the wall.
The firefly effect is strongest when the light itself remains the star. A topper, a few ornaments, thin ribbon, or family photographs can personalize the display without burying the delicate glow.
Taking the tree down is pleasantly easy compared with wrestling an artificial evergreen back into a cardboard box that somehow became 30 percent smaller since November.
Remove decorations first, unplug the lights, and work backward through the installation. As the strand comes down, wrap it loosely around a dedicated light reel, piece of sturdy cardboard, or suitable organizer. Labeling the strand with its length or intended location can make next year’s setup easier.
The biggest takeaway is that this project does not need to be flawless to be beautiful.
A firefly light tree is supposed to feel airy and slightly magical. One row may be wider than another. A few lights may sit closer together. The shape may lean toward modern minimalism rather than Christmas-card symmetry.
Once those tiny LEDs begin glowing in a dark room, the handmade character becomes part of the charm.
Conclusion: A Christmas Tree That Is Almost All Magic
A DIY Christmas tree made of firefly lights proves that holiday decorating does not have to involve a huge budget, a large room, or a tree capable of dropping needles into places that will remain mysterious until March.
With LED micro-lights, carefully positioned supports, and a simple zigzag layout, you can create a glowing alternative Christmas tree that feels modern, cozy, and surprisingly dramatic.
Measure the space. Plan the power source. Inspect your lights. Build the silhouette slowly and follow the lighting manufacturer’s installation and connection instructions. Then dim the room and let the firefly effect do what it does best.
Sometimes the simplest holiday decorations create the strongest atmosphere. In this case, a thin wire and hundreds of tiny lights can turn an empty wall into the brightest part of Christmas.












