
There is a special kind of annoyance reserved for furniture that is perfectly functional but looks like it belongs in a waiting room from 1997. The dresser works. The drawers slide. Nothing is technically wrong. Yet every time you walk past it, the tiny plastic knobs whisper, “We have given up.”
Good news: you do not need a full furniture makeover, a professional workshop, or a second mortgage disguised as “designer hardware” to fix that feeling. Braided leather drawer pulls are one of the easiest ways to make a basic dresser, cabinet, nightstand, vanity, or storage bench look warmer, more intentional, and far more expensive than it actually is.
With inexpensive leather remnants, a few screws, and a little patience, you can make braided leather drawer pulls for about $1.25 each when you buy supplies in bulk, reuse an old belt, or work from scrap leather. Replacing cabinet hardware is widely considered one of the simplest high-impact updates for kitchens and furniture, especially when the existing pulls are worn, dated, or simply boring enough to deserve a polite farewell.
Note: The $1.25 estimate assumes low-cost leather remnants or repurposed belts plus bulk screws or hardware you already own. Premium full-grain leather, specialty brass fasteners, and an emotional support trip to the craft store can increase the total.
Why Braided Leather Drawer Pulls Work So Well
Leather has a useful talent: it can look rustic, modern, Scandinavian, industrial, bohemian, farmhouse, or quietly expensive depending on the color and hardware around it. A dark brown braid paired with black screws feels rugged and moody. Natural tan leather with brass screws looks warm and polished. Black leather against pale painted furniture has the kind of contrast that makes people ask where you bought it.
Unlike metal bar pulls, braided leather has softness. It adds texture without making a drawer front visually busy, which is helpful when you are working with small furniture pieces or a room that already has enough patterns, plants, pillows, baskets, and “I saw this online and needed it immediately” décor.
Leather drawer pulls are also surprisingly forgiving. A tiny scratch can blend into the material’s character instead of announcing itself like a dent in shiny chrome. This is one reason leather works especially well on frequently touched furniture, such as dresser drawers, bathroom vanities, bedside tables, kids’ room storage, and entryway cabinets. Hardware in these areas needs to be durable, easy to grip, and simple to clean.
What You Need for This Budget DIY Project
| Material or Tool | What It Does | Budget-Friendly Option |
|---|---|---|
| Leather scraps or an old leather belt | Forms the braid and mounting ends | Remnant bin, thrifted belt, leftover upholstery leather |
| Sharp utility knife or fabric scissors | Cuts the leather strips cleanly | Use sharp scissors for thin leather |
| Metal ruler | Keeps strip widths consistent | Any straight edge with measurements |
| Awl, nail, or leather punch | Marks or creates screw holes | Small nail and hammer |
| Short pan-head wood screws | Secures each pull to the drawer front | Bulk hardware-store screws |
| Small finish washers | Helps prevent leather from tearing around screws | Use only if your leather is thin |
| Drill and small bit | Creates pilot holes in wood | Borrow one from your tool-loving neighbor |
| Beeswax, leather conditioner, or clear leather finish | Improves the leather’s finish and longevity | Optional but worthwhile |
For a single standard drawer pull, plan on using three leather strips that are roughly 3/8 inch wide and 10 to 12 inches long. That gives you enough material for a compact braid, a comfortable loop, and mounting tails at both ends.
If you are making pulls for large drawers, use wider strips or longer leather lengths. A pull should feel proportional to the drawer. A tiny braid on a massive dresser drawer can look less “minimalist” and more “lost shoelace.”
Choose the Right Leather Before You Start Cutting
Best Leather Types for Drawer Pulls
The easiest leather to use is medium-weight leather that bends without feeling flimsy. Vegetable-tanned leather, pull-up leather, upholstery leather, and sturdy belt leather are all good options. Avoid extremely thin fashion leather unless you plan to reinforce the mounting tabs with washers or a second layer of leather.
An old leather belt is one of the cheapest shortcuts. It already has thickness, structure, and a worn-in finish. You may need to cut it into narrower strips, but it saves you from buying a large hide for a project that only needs a few feet of material. Repurposed belts are commonly used for small home projects, including decorative drawer pulls and hanging hardware.
Leather Colors That Look Great on Furniture
- Natural tan: Great for white, sage, navy, charcoal, and light oak furniture.
- Dark brown: Works beautifully with black, cream, forest green, and antique wood finishes.
- Black: Sharp, modern, and especially good on pale painted dressers.
- Cognac: Warm and slightly vintage without looking overly rustic.
- Gray or taupe: Excellent for modern neutral interiors.
- Colored leather: Fun for kids’ rooms, craft cabinets, or furniture that needs a little personality.
Leather craft suppliers recommend smoothing and finishing leather edges because rough edges can make an otherwise polished project look unfinished. A quick edge treatment with water, beeswax, or a leather finishing product can make the pulls feel noticeably more refined.
Measure Your Drawer Pull Placement First
Before cutting leather, decide where the pull will sit. For a single drawer pull, center it horizontally. On a wide drawer, you may prefer two pulls placed evenly across the front. The most important measurement is the distance between the centers of the two mounting holes, often called the center-to-center measurement or pull spread. Common hardware spacing includes 3 inches, 3.75 inches, and 5 inches.
For a simple DIY leather pull, a 3-inch center-to-center spacing works well on small and medium drawers. Wider drawers can handle 4- or 5-inch spacing. If your drawer already has holes from old hardware, use them whenever possible. That saves time, avoids patching, and lets you pretend this project was always part of the grand plan.
For stacked drawers, placement does not always need to be mathematically identical. Designers often place pulls slightly above the visual center on lower drawers so the overall arrangement looks balanced to the eye. A reusable drilling template or a homemade cardboard jig can help keep every pull aligned.
How to Make Braided Leather Drawer Pulls
Step 1: Make a Test Pull From Paper or String
Before you cut the leather, test the size with string, ribbon, or paper strips. Tape the ends to the drawer where the screws will go and lift the middle slightly to create a handle shape. You want enough room for fingers to slide behind the braid comfortably, but not so much slack that the pull droops like it has lost its will to live.
For most drawers, aim for a loop that rises about 3/4 inch to 1 inch from the drawer face. Heavy drawers may need slightly more room for a secure grip.
Step 2: Cut Three Even Leather Strips
Use a metal ruler and sharp utility knife to cut three strips of leather that are the same width. For a standard pull, cut each strip about 3/8 inch wide and 10 to 12 inches long. If you are using a thick belt, you can cut three narrower strips from it. Keep the cuts as straight as possible because uneven strips create an uneven braid.
Leave about 1 1/4 inches unbraided at each end. Those loose tails will become the mounting tabs.
Step 3: Braid the Leather
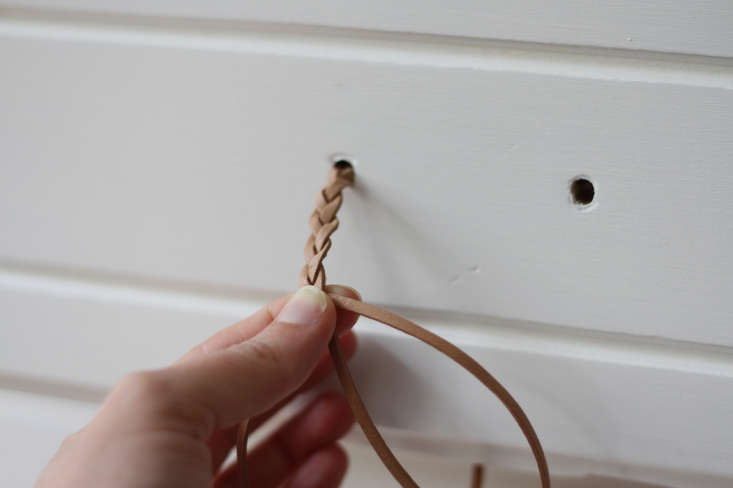
Lay the three strips side by side. Cross the left strip over the center strip, then cross the right strip over the new center strip. Continue alternating left and right until you have a neat braid through the middle of the leather lengths.
Do not pull the braid extremely tight. A tight braid looks tidy at first, but it shortens the handle and can become stiff. A slightly relaxed braid has more texture, feels better in the hand, and creates a more natural curve when mounted.
Leather braiding methods are commonly used to create decorative structure in straps and accessories. The key is consistency: keep each crossover similar in tension so the braid does not twist or bulge.
Step 4: Trim and Secure the Ends
Once the braid is the length you want, trim the loose ends so they are even. Arrange the three tails at each end into a flat stack or slight fan shape. You can hold the tails together with a tiny dab of leather glue, but glue is optional. The screws and washers will provide the real structural support.
For a cleaner finished look, cut two small leather rectangles, about 1 inch by 1 1/4 inches, and place one over each stacked braid end. These become decorative mounting tabs that hide the individual strips and make the pull look intentionally designed rather than accidentally assembled during a coffee break.
Step 5: Mark the Screw Holes
Hold the braided pull against the drawer front and position the leather tails over the intended screw locations. Mark the center of each screw hole with an awl, nail, or pencil.
If you are using existing drawer holes, line up the leather directly over them. If you are making new holes, measure twice, step back, measure again, and then drill. The drawer will forgive many things, but it will remember crooked handles forever.
Step 6: Drill Pilot Holes Carefully
Use a small drill bit to make pilot holes in solid wood drawer fronts. Pilot holes reduce the chance of splitting wood and make screw installation easier. Choose screws short enough that they will not poke through the inside of the drawer.
If your furniture is made from particleboard, MDF, or thin veneer, use machine screws with washers and nuts where possible, or reinforce the inside of the drawer front with a small wood backing block. Thin composite material can strip more easily than solid wood when a pull gets repeated use.
Step 7: Attach the Leather Pulls
Place a finish washer over each leather mounting tab if the leather is thin or soft. Drive the screws through the leather and into the pilot holes. Tighten until the leather is secure, but do not crush it flat. The pull should remain slightly raised in the center so fingers can grip it comfortably.
Open and close the drawer several times. Check that the braid does not twist, the screws stay snug, and the pull feels comfortable. If it leans to one side, loosen one screw slightly, adjust the leather, and retighten.
Easy Styling Ideas for Leather Cabinet Handles
Minimal Modern
Use black leather, black screws, and a simple three-strand braid on white, gray, or pale wood furniture. Keep the braid narrow and clean. This style works especially well for nightstands, entry cabinets, and Scandinavian-inspired storage.
Warm Farmhouse
Choose tan or cognac leather with antique brass screws. Pair it with chalk-painted furniture, natural wood, cane details, or vintage baskets. A slightly looser braid looks charming here because farmhouse style is allowed to have personality. It is practically in the job description.
Vintage Dresser Refresh
Use dark brown leather on a thrifted wood dresser. Keep the original finish if it has character, or paint the dresser deep green, navy, or charcoal. Leather pulls can make an old piece feel restored without erasing everything interesting about it.
Kids’ Room Storage
Use colorful leather scraps or faux leather in bright shades. Short braided pulls are soft to grab and add a playful detail to toy storage, art supply drawers, or small closet cabinets.
Common Mistakes to Avoid
Using leather that is too thin: Thin leather can stretch around the screw hole. Add washers, double the leather at each mounting tab, or choose sturdier material.
Making the braid too tight: A tightly packed braid becomes shorter and harder to grip. Leave a little flexibility so the pull forms a comfortable loop.
Skipping the test fit: Leather can shorten as it is braided. Always tape or hold the finished braid against the drawer before drilling.
Using screws that are too long: This is how a cute furniture project becomes an unexpected splinter hazard inside the drawer. Measure the drawer front thickness before choosing screws.
Ignoring existing holes: Existing hardware holes can save a lot of work. If they do not match your design, fill and sand them before painting or refinishing the piece rather than hoping a leather tab will magically hide everything.
Mixing too many finishes: Leather already provides visual warmth, so keep the surrounding hardware simple. Black, brass, bronze, and brushed nickel can all work, but choose a finish that feels intentional with the furniture and room.
Care Tips for Leather Drawer Pulls
Dust the pulls with a dry cloth as needed. For light cleaning, wipe gently with a barely damp cloth and allow the leather to air dry. Avoid soaking the leather or spraying it with harsh cleaners.
Every few months, apply a small amount of leather conditioner or beeswax-based treatment if the pulls begin to look dry. This is especially helpful in sunny rooms, dry climates, or bathrooms where humidity changes more often than anyone invited it to.
Check the screws occasionally, particularly on heavily used drawers. Leather may compress slightly after the first few weeks of use, so a gentle retightening can keep everything secure.
Conclusion: A Small Upgrade With Big Personality
DIY braided leather drawer pulls prove that furniture upgrades do not need to be expensive, complicated, or powered by a garage full of intimidating tools. With a few strips of leather, short screws, and basic measuring, you can turn ordinary drawers into something warmer, more custom, and much more memorable.
Whether you are refreshing a thrift-store dresser, upgrading a plain bathroom vanity, or making a flat-pack cabinet look less flat-pack, leather drawer pulls add texture and personality without screaming for attention. They are small details, but small details are often the ones that make a room feel finished.
Real-World DIY Experience: What You Notice After Making Braided Leather Pulls
The funny thing about a project like braided leather drawer pulls is that it looks almost too simple before you start. You see a few strips of leather and two screws, and your brain says, “This will take fifteen minutes.” That may be true for one pull. By the sixth pull, however, you will have developed opinions. Strong opinions. Possibly a spreadsheet-level commitment to braid tension.
The first lesson is that leather has a personality. One strip lies flat and behaves like it attended finishing school. Another curls at the edges, twists halfway through the braid, and demands several dramatic repositions before it agrees to cooperate. This is normal. Leather is not plastic, and that is exactly why it looks better. Slight variations make the finished pulls feel handmade rather than factory-perfect.
The second lesson is that measurement matters more than the braid itself. A beautifully braided pull mounted 1/4 inch too high will somehow become the only thing you see when you enter the room. This is why making a quick cardboard template is worth the extra five minutes. Once you have a template, the rest of the pulls go faster, line up better, and look like they belong to the same furniture piece instead of meeting for the first time at a family reunion.
Another useful discovery is that the leather color changes the entire personality of the furniture. Natural tan leather tends to brighten dark furniture and soften painted finishes. Dark brown leather can make inexpensive laminate look more grounded. Black leather creates a cleaner, sharper contrast, especially on white cabinets or pale dressers. The same furniture can feel rustic, modern, or vintage simply by changing the leather color and screw finish.
You will also notice that the braid becomes more attractive after a little use. At first, it may look slightly stiff. After drawers are opened and closed for a few weeks, the leather relaxes, develops a softer shape, and starts to look like it has always belonged there. This is one of the rare occasions where normal wear can improve a project instead of slowly ruining it.
For beginners, the most satisfying part is that the upgrade is both visual and practical. You are not just gluing decorative objects to a drawer and calling it a makeover. You are making something that gets touched every day. When the pull feels good in your hand and the drawer opens easily, the project earns its place.
Finally, braided leather drawer pulls tend to create a chain reaction. Once one dresser looks better, the nightstand starts looking suspiciously plain. Then the bathroom vanity has potential. Then the cabinet in the entryway quietly asks for a makeover. Before long, you may find yourself inspecting every old belt in the house like it is a future luxury hardware collection.












