
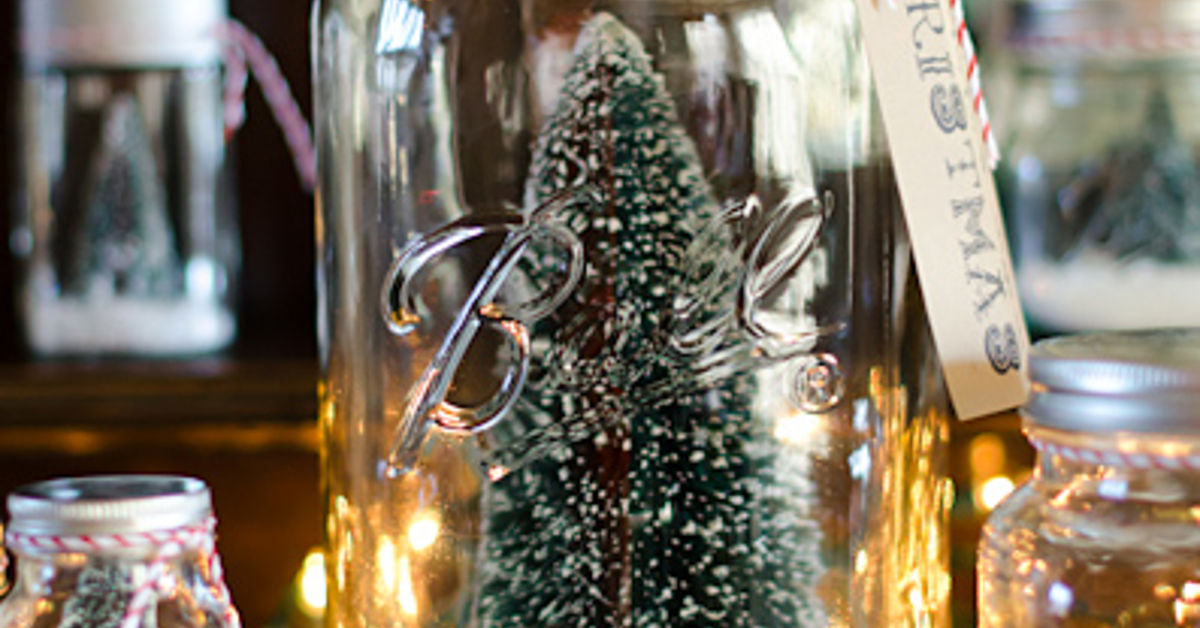
Some Christmas decorations demand a ladder, three extension cords, and the patience of a mall Santa on December 23. Christmas tree snow jars are the cheerful exception. With a clean glass jar, a miniature tree, a little faux snow, and dependable adhesive, you can build a tiny winter scene that looks charming on a mantel, dining table, bookshelf, or holiday gift tray.
This project is a waterless take on traditional DIY snow globe jars. That means no cloudy liquid, leaking lid, or frantic attempt to rescue glitter from the tablecloth. The finished decoration still delivers the nostalgic look of a Christmas tree standing in fresh snow, but construction is simpler and easier to customize. Make one polished centerpiece or create a miniature forest using jars of different shapes and sizes.
Why Make Waterless Christmas Tree Snow Jars?
A waterless snow jar is ideal for beginners because the scene stays where you place it. Bottle-brush trees do not float, painted details do not dissolve, and the faux snow remains fluffy instead of turning into mysterious holiday soup. The project is also easy to pause between steps, which is useful when glue needs time to cure or children are helping with the decorating.
These jars are inexpensive, reusable, and flexible enough to match nearly any Christmas decorating style. Traditional green trees and white snow feel classic. Pink trees, metallic stars, and iridescent glitter create a playful modern look. Natural twine, tiny pinecones, and cream-colored snow work well with farmhouse décor. The basic technique remains the same, so one set of supplies can produce several distinctly different displays.
Supplies You Will Need
- One clean glass jar with a secure lid, preferably wide-mouthed
- One miniature bottle-brush Christmas tree that fits inside the jar
- A small wood disk, cork circle, or piece of dense craft foam for a riser
- Strong clear-drying craft adhesive, epoxy, or hot glue for a dry display
- Loose faux snow, white craft flakes, or fine decorative snow
- Optional fine iridescent glitter for extra sparkle
- Ribbon, baker’s twine, jingle bells, greenery, or a gift tag
- Scissors, a spoon or funnel, and a clean, dry cloth
Choose decorations that are clearly smaller than the jar opening. A tree may look adorably tiny beside the jar and then become a stubborn green bottle stopper when you try to insert it. Test the height, width, and position before opening the glue. The tree should have breathing room above its top and around its branches, especially if the jar narrows near the neck.
Christmas Tree Snow Jars in 4 Easy Steps
Step 1: Prepare the Jar and Plan the Miniature Scene
Inspect the jar for cracks, chips, rough edges, or a bent lid. A damaged jar is not worth saving for a craft that people may pick up and move. Wash the jar, lid, and band in warm, soapy water, rinse thoroughly, and dry every piece. Even a small film of grease can weaken adhesive or make the glass look foggy under holiday lights.
Set the jar upside down on the lid to understand how the finished snow jar will stand. Most designs place the tree on the inside of the lid and display the jar inverted. This arrangement makes the lid a convenient base and gives the miniature tree the widest part of the jar. If your jar has a decorative glass bottom or an unusual shape, you can keep it upright and build the scene directly on the bottom instead.
Next, create a dry test layout. Place the riser on the lid, position the tree on top, and lower the empty jar over the arrangement. Check the view from every side. A short riser lifts the tree above the metal rim and prevents its lower branches from disappearing behind the lid. Trim the foam, cork, or wood base until it fits comfortably without touching the jar walls.
This is also the moment to audition extra figures. A tiny deer, snowman, wrapped present, or miniature house can add personality, but resist turning the jar into a holiday storage unit. One main tree and one small accent usually look more convincing than seven figurines standing shoulder to shoulder like commuters during rush hour.
Step 2: Build and Secure the Christmas Tree Base
Glue the riser to the inside of the lid. Then attach the miniature Christmas tree to the center or slightly behind center, leaving room for any small figure in front. Apply adhesive sparingly. A thick puddle may squeeze out around the base and remain visible through the glass. For a cleaner snowy finish, sprinkle a pinch of faux snow over the exposed adhesive while it is still tacky.
If the lid has two pieces, secure the flat lid insert to the screw band before building the scene. This prevents the insert from spinning or separating when the completed jar is assembled. Follow the adhesive manufacturer’s curing directions rather than relying on the surface feeling dry. Hot glue sets quickly and works well for lightweight, waterless decorations, while clear epoxy generally offers a firmer bond for heavier ceramic or metal miniatures.
Once the tree is stable, shape its branches with your fingers. Bottle-brush trees often arrive flattened from packaging and may need a little grooming. Add a tiny star, miniature ornaments, or narrow metallic-thread garland if desired. Keep embellishments lightweight and firmly attached. Loose beads look festive until they detach and roll around the jar like tiny Christmas bowling balls.
Allow the completed lid scene to cure fully in a well-ventilated area. Do not rush this stage. A tree that leans slightly while drying will lean dramatically once the jar is inverted, and gravity is famously indifferent to holiday deadlines.
Step 3: Add the Snow and Assemble the Jar
Place one or two spoonfuls of faux snow into the clean, dry jar. Start with less than you think you need. The snow should create a soft ground layer without burying half the tree. Add a small pinch of fine iridescent glitter for a frosty shimmer, but avoid large amounts. Too much glitter can coat the glass, obscure the scene, and announce its presence on every surface in your home until approximately spring.
Use a paper funnel if the snow clings to the jar’s rim. Wipe the threads with a dry cloth so the lid can close evenly. Hold the jar upright in one hand and carefully insert the lid scene with the other. Screw the lid or band into place, then turn the jar upside down slowly. The loose snow will fall around the tree and settle naturally.
Gently rotate and tap the jar to distribute the snow. Avoid aggressive shaking, especially with a glass container. If the tree disappears under a blizzard, turn the jar upright, reopen it, and remove a spoonful. If the base looks bare, add a little more. This easy adjustment is one advantage of making a waterless snow globe: the weather forecast inside the jar remains completely under your control.
For a decoration that will be handled frequently or given as a gift, add a narrow bead of suitable clear adhesive around the outer lid seam after you are satisfied with the scene. This optional seal helps prevent curious hands from opening the jar and releasing a countertop snowstorm. Let the seal cure before adding ribbon or displaying the piece.
Step 4: Finish, Style, and Display Your Snow Jar
Wrap ribbon, velvet trim, baker’s twine, or a small strip of plaid fabric around the lid. Add a bell, miniature pinecone, wooden tag, or short artificial evergreen sprig. Keep the trim proportional to the jar. A giant bow can make a delicate miniature scene look as though it is being attacked by gift wrap.
Display one Christmas tree snow jar on a stack of books, or group three jars at varying heights for a fuller centerpiece. Repeating one element, such as the same ribbon or tree color, makes mismatched jars feel intentional. A battery-operated micro-light strand placed around the jars can create a warm glow, but keep the battery pack accessible and never place an open flame inside or directly beside the display.
These DIY snow globe jars also make memorable handmade gifts. Tie on a tag with the recipient’s name, the year, or a short message such as “A little winter wonderland for you.” For family keepsakes, add a tiny house, pet figure, or miniature object connected to a shared memory. The jar becomes more than seasonal décor; it becomes a compact story under glass.
Design Variations for Different Christmas Styles
Classic Woodland Jar
Use a deep green bottle-brush tree, white snow, a miniature deer, brown twine, and a tiny pinecone. A clear jar and restrained color palette give this version a cozy, traditional look that works well with greenery, plaid fabrics, and wooden Christmas decorations.
Colorful Retro Snow Jar
Choose a pink, turquoise, red, or chartreuse tree and decorate it with tiny metallic beads. Pair the bright tree with iridescent snow and a gold-painted lid. This style works especially well in mid-century-inspired holiday décor and adds energy to an otherwise neutral room.
Minimal Scandinavian Version
Use a plain white tree, coarse white snow, a natural wood base, and no glitter. Finish the lid with thin cream ribbon or unbleached cotton twine. The result feels calm, clean, and wintry without becoming visually busy.
Personalized Family Keepsake
Add a laminated miniature photo, a tiny initial, a house number, or a small model that represents a family milestone. Keep paper elements away from wet adhesive and seal them before placing them in the jar so humidity does not cause curling over time.
Miniature Christmas Village Jar
Use a slightly larger jar and combine a narrow tree with a tiny house, lamppost, or snowman. Place the tallest object toward the back and the shortest near the front. This creates depth and prevents the scene from looking like every decoration is competing for the same parking space.
Common Problems and Simple Fixes
The tree is crooked: Remove it before the adhesive fully cures, clean the base, and reglue it. During drying, brace the trunk with folded cardstock or removable tape.
The lid will not close: The riser or tree may be too wide, or dried adhesive may be blocking the threads. Trim the base and clean the rim before trying again.
The snow sticks to the glass: Static is common with lightweight plastic flakes. Use less snow, wipe the outside of the jar with a slightly damp cloth, and keep the inside completely dry. Coarser decorative snow usually clings less than very fine flakes.
The scene looks buried: Remove some snow and create a taller riser. Elevating the tree often improves visibility more effectively than reducing the snow to a nearly invisible dusting.
The jar looks empty: Add one supporting detail rather than five. A small deer, star, gift box, or background tree can balance the composition while keeping the main Christmas tree easy to see.
The glass looks cloudy: Fingerprints, adhesive residue, or fine snow dust may be responsible. Clean the outside with glass cleaner applied to a cloth rather than sprayed directly onto the decorated lid.
How to Turn Snow Jars Into a Holiday Centerpiece
A single snow jar makes a sweet accent, but a small collection can anchor an entire holiday table. Begin with three jars in different heights. An odd-numbered grouping usually feels more natural than a perfectly symmetrical row. Place the tallest jar near the center and turn each miniature tree slightly so the best side faces the room.
Set the jars on a wood tray, cake stand, mirrored base, or folded table runner. Fill the empty spaces with artificial greenery, pinecones, ornaments, or battery-powered fairy lights. Keep the arrangement low enough that guests can see one another across the table. A centerpiece should encourage conversation, not force everyone to speak through an artificial pine forest.
For a coordinated look, repeat colors already used on your Christmas tree or gift wrap. Red ribbon and green trees create a traditional display. Champagne ribbon, cream trees, and warm lights feel more refined. Multicolored trees and metallic snow can become a playful centerpiece for a family party or children’s table.
Using Christmas Tree Snow Jars as Handmade Gifts
Snow jars are especially useful when you want to give something personal without beginning a complicated craft marathon. Make several jars assembly-line style: clean all the containers, build all the lid scenes, allow everything to cure, add snow, and finish the ribbons last.
Customize each jar with a color or miniature that suits the recipient. A tiny cabin works for someone who loves mountain vacations. A dog or cat figure makes a thoughtful gift for a pet owner. A miniature schoolhouse can become a teacher gift, while a small wrapped present and personalized tag create an easy hostess gift.
Place the completed jar in a small box with tissue paper or reusable fabric padding. Add a label explaining that the jar is decorative and should be handled gently. If the lid has not been permanently sealed, transport the jar upright so the snow remains inside where it belongs instead of staging an escape inside the gift bag.
Safety and Storage Tips
Adults should handle hot glue, epoxy, sharp scissors, and glass jars. Work in a ventilated space, follow every product label, and keep loose glitter, artificial snow, small figurines, and button-sized decorations away from young children and pets. Artificial snow is decorative, not edible, and airborne powders or aerosol flocking should not be used in a closed room.
Store finished jars upright in a sturdy box with soft padding between them. Keep them away from extreme heat, moisture, and direct sunlight, which can discolor miniature trees or weaken some adhesives. Before displaying the jars next season, inspect the glass and lid and make sure every decoration remains firmly attached.
Practical Experience Notes: What Crafters Learn After Making a Batch
The first Christmas tree snow jar usually teaches one immediate lesson: scale matters more than the shopping aisle suggests. A miniature tree labeled “small” can still be much too broad for a narrow-necked jar. Experienced makers bring the jar while choosing decorations or measure the opening, interior height, and lid diameter before buying anything. That tiny bit of preparation prevents the classic scene in which a perfectly decorated tree refuses to enter its new glass home.
Another useful lesson is that the simplest jar often looks the most expensive. During a group crafting session, people naturally reach for extra deer, presents, houses, stars, bells, and glitter. The early versions can become crowded quickly. After comparing several finished jars, the designs with one well-positioned tree, a neat snow layer, and one supporting detail generally appear cleaner and photograph better. Empty space is not wasted space; it allows the miniature scene to read clearly through curved glass.
Adhesive patience also separates the sturdy jars from the dramatic ones. A tree may feel secure after a few minutes, yet shift when the lid is turned upside down. Letting the base cure for the full recommended time is less exciting than decorating, but it prevents the tree from slowly leaning toward the glass like it has heard a secret. When several jars are being made, a productive rhythm is to assemble all the lids first, leave them to cure, and prepare ribbons, tags, and snow while waiting.
Snow quantity is another area where experience improves the result. Beginners often pour in a generous drift because the empty jar appears to need it. Once inverted, that same amount can swallow the tree trunk and cover small figures. Adding snow by the spoonful gives much better control. A shallow layer usually creates enough movement and texture, especially when a riser already lifts the scene above the lid.
Batch-making reveals the value of a shared design rule. Jars do not need to match, but they benefit from one repeated feature. It might be identical cream ribbon, the same green tree in three jar sizes, or a consistent mix of white snow and gold accents. This visual connection turns an assortment of recycled jars into a coordinated holiday centerpiece instead of a meeting of unrelated glass containers.
Lighting also changes the finished appearance more than many first-time makers expect. Under bright overhead light, every adhesive mark and stray piece of glitter becomes visible. Under soft Christmas lights, the glass reflects warm points of light and the snow appears more dimensional. Testing the jars in their intended display location makes it easier to decide whether they need more sparkle, a brighter tree, or a simpler ribbon.
Recycled jars can produce beautiful results, but labels and adhesive residue deserve attention. Soaking the jars in warm, soapy water loosens many paper labels, while a suitable residue remover can handle stubborn glue. The jar must then be washed and dried again. A perfectly composed scene loses some of its magic when the back still displays half of a spaghetti sauce label.
Finally, the best part of the project is often personalization. A plain bottle-brush tree becomes surprisingly meaningful when paired with a tiny dog figure, miniature cabin, house number, wedding date, or tag marked with the year. Those details invite conversation and make the jar worth unpacking every December. The craft is easy, but the memory attached to it can grow richer each time the decoration returns to the mantel.
Conclusion
Christmas tree snow jars prove that impressive holiday décor does not require advanced skills or a workshop full of tools. Prepare a clean jar, secure a miniature tree to the lid, add a controlled layer of faux snow, and finish the scene with simple trim. In four manageable steps, an ordinary container becomes a nostalgic winter display that can be customized, gifted, stored, and enjoyed for years.
Note: These jars are decorative items, not toys or food containers. Use adult supervision with glass, adhesives, glitter, artificial snow, and small embellishments, and follow the safety and curing instructions printed on every craft product.












