
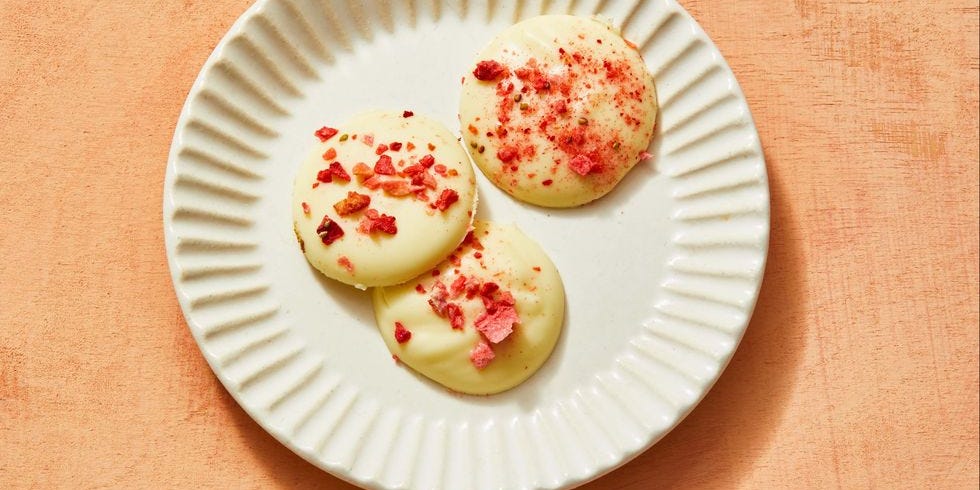
White chocolate meltaways are the kind of candy that make people say, “Wait, you made these?” They look polished, taste luxurious, and somehow manage to feel fancy without requiring a culinary degree, a marble slab, or the emotional stamina of a competitive baking show contestant. If you love silky candy that melts quickly on the tongue and plays well with toppings like freeze-dried berries, crushed pistachios, toasted coconut, or a tiny pinch of sea salt, this is the recipe to keep in your back pocket.
The beauty of white chocolate meltaways is that they are simple on paper but impressive in real life. At their core, they rely on good white chocolate, gentle heat, and a little patience. That is it. No dramatic sugar syrups. No candy thermometers unless you want to get extra precise. No “stir constantly for 47 minutes while whispering encouraging words to the saucepan.” Just clean ingredients, a smart method, and a few practical tricks that help the candy set with a smooth, creamy bite.
In this guide, you will learn exactly how to make white chocolate meltaways, how to avoid common mistakes, which toppings work best, and how to store them so they stay pretty and delicious. I will also share a longer experience-based section at the end for anyone who wants the real-world scoop on making these for holidays, parties, gifts, or random Tuesday cravings that suddenly become your whole personality.
What Are White Chocolate Meltaways?
White chocolate meltaways are small candies made by melting white chocolate, portioning it into bite-size rounds or shapes, and letting it firm up until smooth and tender. The best versions feel creamy rather than chalky, sweet but not cloying, and delicate enough to soften quickly when you take a bite. Some recipes keep them extremely simple with just white chocolate and a garnish, while others add flavor accents like citrus zest, peppermint, or crushed freeze-dried fruit.
The secret is not magic. It is ingredient quality and temperature control. White chocolate is more delicate than dark chocolate, so it can scorch, seize, or turn grainy if overheated or exposed to moisture. Once you know that, you are already halfway to success.
Why This Is the Best White Chocolate Meltaways Recipe
There are plenty of ways to make candy at home, but this version hits the sweet spot between easy and elegant. It uses a short ingredient list, relies on techniques most home cooks can handle, and creates a polished final result that works for dessert platters, edible gifts, party favors, or late-night “quality control” while standing in the kitchen.
Why this recipe works
- It starts with real white chocolate: That means better flavor, a creamier texture, and a cleaner finish.
- It keeps the method simple: Microwave or double boiler, both work.
- It is easy to customize: You can dress these up with berries, nuts, citrus, or holiday toppings.
- It looks bakery-worthy: Even if your kitchen confidence is currently “I burn toast with charisma.”
Ingredients for White Chocolate Meltaways
Main ingredients
- 16 ounces good-quality white chocolate, finely chopped
- 2 tablespoons refined coconut oil or cocoa butter, optional but helpful for a silkier bite
- 2 tablespoons freeze-dried strawberries or raspberries, crushed
- 1 tablespoon finely chopped pistachios or toasted almonds, optional
- Flaky sea salt, optional, for finishing
Why these ingredients matter
Good-quality white chocolate: This is the entire game. Look for bars or wafers made with cocoa butter, not just sugary white chips that behave more like confectionery shortcuts. Better chocolate melts more smoothly, tastes less waxy, and gives you that signature meltaway effect.
Refined coconut oil or cocoa butter: This is optional, but a small amount can help the chocolate loosen up and set with a softer, more delicate mouthfeel. Refined coconut oil is best if you do not want any coconut flavor. If your white chocolate melts beautifully on its own, you can skip it.
Freeze-dried fruit: Fresh fruit adds moisture, and moisture is white chocolate’s sworn enemy. Freeze-dried fruit brings color, tang, crunch, and drama without ruining the texture.
Nuts and sea salt: These are optional, but they make the candy taste more balanced and less one-note. White chocolate loves contrast.
Equipment You Will Need
- Microwave-safe bowl or heatproof bowl
- Silicone spatula or spoon
- Baking sheet, tray, or flat plate
- Parchment paper or a silicone baking mat
- Piping bag or zip-top bag with the corner snipped, optional
- Small spoon, if you prefer spooning instead of piping
That is all. No candy molds required, although you can absolutely use silicone molds if you want neat little hearts, squares, or discs.
How To Make White Chocolate Meltaways
Step 1: Prepare your pan and toppings
Line a baking sheet, tray, cutting board, or plate with parchment paper or a silicone mat. Set out your crushed freeze-dried fruit, chopped nuts, and any finishing salt before you melt the chocolate. This is one of those recipes where “I’ll grab it later” becomes “Why is the chocolate setting while I search for pistachios?”
Step 2: Chop the white chocolate
If you are using a bar, chop it into small, even pieces. Smaller pieces melt faster and more evenly, which lowers the chance of scorching. If you are using wafers, you can leave them as they are.
Step 3: Melt gently
Microwave method: Place the white chocolate and optional coconut oil or cocoa butter in a microwave-safe bowl. Microwave in 20-second intervals, stirring well after each one, until the mixture is almost fully melted. Stop before it looks perfectly smooth; the residual heat will finish the job as you stir.
Double-boiler method: Set a heatproof bowl over a pan of barely simmering water. Make sure the bottom of the bowl does not touch the water. Add the chocolate and stir gently until melted and smooth. Keep the heat low and avoid steam sneaking into the bowl.
Step 4: Portion the meltaways
Transfer the melted white chocolate to a piping bag or spoon. Pipe or spoon small rounds, about the size of a quarter to a half-dollar, onto the prepared surface. They do not have to be perfect circles. This is candy, not geometry class.
Step 5: Add toppings
While the chocolate is still soft, sprinkle each piece with crushed freeze-dried fruit, nuts, or a tiny pinch of flaky sea salt. Work fairly quickly so the toppings stick before the surface firms up.
Step 6: Let them set
Allow the meltaways to set at cool room temperature for 30 to 60 minutes, or refrigerate for about 10 to 15 minutes if your kitchen is warm. Once firm, peel them off the parchment and serve.
Tips for Smooth, Creamy Meltaways Every Time
1. Use real white chocolate
If the label shows cocoa butter, you are on the right path. If it is mostly sugar and vegetable oils, the flavor and texture will be less elegant. For homemade candy, ingredient quality is not a bonus. It is the whole plot.
2. Keep everything dry
Water causes white chocolate to seize and turn grainy. Dry your bowl, spatula, measuring spoons, and even your hands if you just rinsed them. White chocolate notices everything.
3. Do not overheat
White chocolate burns faster than darker chocolate. That is why short bursts and frequent stirring matter. If it looks almost melted, stop heating and stir until smooth.
4. Add toppings, not wet mix-ins
Fresh berries, juicy citrus segments, or liquid flavorings can throw off the texture. Use freeze-dried fruit, toasted nuts, or oil-based flavoring if you want to experiment.
5. Let the candy rest before stacking
Even when the tops look set, the bottoms may still be slightly soft. Give them enough time to firm up before packing them into a container.
Easy Flavor Variations
Raspberry White Chocolate Meltaways
Top with crushed freeze-dried raspberries and the tiniest pinch of sea salt. This one tastes bright, creamy, and slightly fancy.
Lemon White Chocolate Meltaways
Add a small amount of finely grated lemon zest to the melted chocolate and finish with more zest on top. Use a light hand so the citrus lifts the candy instead of overpowering it.
Pistachio White Chocolate Meltaways
Sprinkle with finely chopped pistachios for color and crunch. This version looks especially good on holiday trays.
Peppermint White Chocolate Meltaways
Add a drop or two of peppermint extract or oil, then top with crushed candy canes. Keep the peppermint subtle unless you want your candy to taste like it majored in mouthwash.
Toasted Coconut Meltaways
Scatter toasted coconut over the tops while the candy is still warm. This variation works beautifully in summer dessert assortments.
Common Mistakes to Avoid
The chocolate turns grainy
This usually means moisture or too much heat. Next time, use a dry bowl, melt more slowly, and stir between every heating interval.
The candy is too soft
Your kitchen may be warm, or you may have added too much oil. Chill the candies briefly, and use a lighter hand with added fat next time.
The flavor is too sweet
Balance helps. Add tart freeze-dried berries, nuts, or flaky salt. White chocolate likes supporting characters.
The candies stick together in storage
Let them set completely, then layer them with parchment paper in an airtight container.
How To Store White Chocolate Meltaways
Store the candies in an airtight container in a cool, dry place for up to 5 days, or refrigerate them for up to 2 weeks. If stacking, place parchment between layers. Before serving from the refrigerator, let them sit at room temperature for 10 to 15 minutes so the texture softens slightly and the flavor comes through more clearly.
If your house runs warm, the refrigerator is your friend. If your kitchen is cool and dry, room-temperature storage is fine for shorter periods. Either way, keep the container sealed well so the candy does not absorb moisture or stray refrigerator odors. White chocolate does not need to smell like leftover onions. Nobody asked for that twist.
Serving Ideas
- Add them to holiday cookie trays for a glossy, elegant candy option.
- Package them in small gift boxes with parchment for edible presents.
- Serve them after brunch with coffee or tea.
- Use them as cupcake toppers or dessert board accents.
- Pair them with dark chocolate treats for contrast in color and flavor.
Why People Love Homemade White Chocolate Meltaways
They are easy, yes, but that is not the whole story. Homemade white chocolate meltaways hit that sweet spot between nostalgic and polished. They remind people of candy shop treats and holiday tins, but they also feel current and customizable. You can make them minimalist with just white chocolate and fruit, or go all out with toppings, drizzles, and gift packaging worthy of an overachieving December afternoon.
They are also forgiving once you understand the basics. You do not need to be a pastry chef. You just need decent ingredients, low heat, and the willingness to stop microwaving before the chocolate starts plotting revenge.
Experiences From Making White Chocolate Meltaways at Home
One of the most interesting things about making white chocolate meltaways is how quickly they teach you the difference between a recipe that is technically easy and one that rewards attention. On paper, the process looks almost silly in its simplicity. Melt chocolate. Pipe rounds. Add toppings. Let set. Done. But once you start actually making them, you realize the experience is all about details: how warm your kitchen feels, whether your bowl is truly dry, whether your chopped chocolate is even, and how fast you move once the candy is melted. That is part of what makes them fun. They are low-effort in ingredients, but high-reward in payoff.
For many home bakers, the first batch is a lesson in timing. You melt the chocolate and suddenly discover that all the toppings you meant to prepare are still in unopened bags. You snip a piping bag corner too wide and create candy blobs the size of coasters. You refrigerate them for “just a minute” and forget them while answering a text. None of this ruins the candy. It simply initiates you into the unofficial club of people who now understand why mise en place is not just a TV cooking phrase but a deeply practical way to avoid chaos.
The best experience usually comes by batch two. That is when confidence kicks in. You already know that white chocolate needs gentle handling. You know that freeze-dried raspberries are dramatically better than fresh fruit here. You know that sea salt is not just decorative; it actually rescues sweetness and gives the candy balance. You start to notice that these meltaways are one of the easiest homemade candies to personalize. They can feel festive in winter, pretty in spring, bright in summer, and giftable all year round.
They are especially satisfying for holiday baking because they fill a very specific role on a dessert tray. Cookies bring chew. Brownies bring richness. Fudge brings density. White chocolate meltaways bring that smooth, quick-melting bite that makes a platter feel more varied and polished. They also hold visual appeal beautifully. A few crushed berries, a dusting of pistachios, or a tiny stripe of dark chocolate can make them look like they came from a boutique candy counter instead of your kitchen counter next to a dish rack and a half-read grocery list.
Another real-life experience with these candies is discovering how much people love them even when they insist they are “not really into white chocolate.” That changes quickly when the candy is made with good ingredients and balanced toppings. Cheap white chocolate can taste one-dimensional, but quality white chocolate paired with tart fruit or toasted nuts tastes smoother, creamier, and far more nuanced. These meltaways are often the candy that disappears first because they are small, elegant, and dangerously easy to keep eating. One becomes two, two becomes six, and suddenly you are explaining to your family that the tray looks sparse because you were “testing consistency.”
What also stands out is how useful this recipe becomes once you have made it once or twice. It is a last-minute dessert, a backup gift, a party tray filler, and a good answer to “I want to make something homemade, but I do not want to turn my kitchen into a stress documentary.” That versatility is the real experience people remember. White chocolate meltaways are not just pretty little candies. They are practical little wins.
Conclusion
If you want a homemade candy that looks polished, tastes luxurious, and does not require a week of preparation or advanced confectionery skills, white chocolate meltaways are an excellent choice. Start with real white chocolate, melt it gently, keep moisture away, and finish with toppings that add contrast. From there, the recipe becomes wonderfully flexible. You can keep it classic, go fruity, add nuts, or turn it into a seasonal signature treat.
Once you make a batch successfully, you will understand why this candy has such staying power. It is easy enough for beginners, elegant enough for gifting, and customizable enough to make again and again without getting bored. In other words, it is the kind of recipe that quietly becomes a staple. And honestly, that is the sweetest victory of all.












