
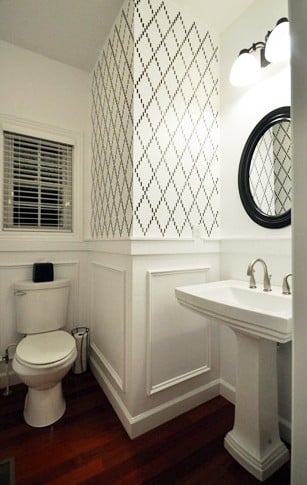
A bathroom wall is a tiny stage with enormous dramatic potential. Give it plain paint, and it politely stands there holding a towel. Give it a trellis stencil, and suddenly the room has opinions, rhythm, charm, and the confidence of a boutique hotel powder room that charges $18 for hand soap. The best part? Adding a trellis stencil to the bathroom wall is one of those rare DIY projects that looks expensive but does not require a contractor, a demolition plan, or a week of eating cereal in the hallway because the bathroom is “under construction.”
A trellis stencil can mimic the elegance of wallpaper while giving you more control over color, scale, and cost. It works especially well in bathrooms because the repeating geometric pattern brings structure to a small room. Whether your style leans modern farmhouse, coastal cottage, traditional, glam, or “I saw this on Pinterest at 1:00 a.m. and now I must do it,” a trellis wall stencil can add instant personality without overwhelming the space.
Still, bathroom walls are not the same as bedroom walls. Bathrooms deal with steam, splashes, toothpaste mist, hairspray fog, and the mysterious humidity cloud that appears after one hot shower. That means your stencil project needs more than enthusiasm and a cute paint color. It needs smart prep, the right paint finish, careful technique, and a realistic plan for corners, fixtures, and touch-ups.
Why Choose A Trellis Stencil For A Bathroom Wall?
The trellis pattern has remained popular because it sits in the sweet spot between classic and trendy. It has the symmetry of latticework, the movement of wallpaper, and the flexibility to look soft or bold depending on the colors you choose. In a bathroom, where the wall space is often broken up by mirrors, vanities, towel bars, tile, windows, and doors, a trellis stencil creates visual order. It makes the room feel decorated instead of merely painted.
Another advantage is scale. Small bathrooms can handle pattern better than many people think. A large trellis stencil can actually make the wall feel more expansive because the eye follows the repeat around the room. A smaller trellis design feels delicate and decorative, especially in a powder room or guest bath. If you have a narrow wall behind a vanity, a trellis stencil can turn that awkward strip into a focal point instead of leaving it looking like the wall equivalent of a blank stare.
Compared with wallpaper, stenciling is also more forgiving in humid spaces. Wallpaper can be beautiful, but bathrooms require careful product selection and excellent ventilation. Paint, on the other hand, is easier to clean, easier to touch up, and easier to change later. If your future self decides the bathroom should become sage green, navy, blush, charcoal, or some color called “Foggy Mushroom Latte,” you can paint over a stencil much more easily than removing wallpaper.
Planning The Project Before You Open The Paint Can
Before you begin adding a trellis stencil to the bathroom wall, decide whether you want an accent wall or a full-room pattern. An accent wall behind the vanity is the easiest starting point because it gives maximum impact with less measuring and fewer corners. A full-room stencil creates a more custom look, but it takes patience. It is not difficult, exactly; it is more like assembling furniture with no missing screws but a lot of opportunities to mutter at the ceiling.
Choose The Best Wall
The best wall for a trellis stencil is smooth, clean, and visible. Walls behind toilets, vanities, freestanding tubs, or open shelves are great candidates. Avoid walls that receive direct water spray, such as inside a shower or directly beside an unprotected tub surround. Paint can handle bathroom humidity when properly chosen, but it is not tile, and it does not enjoy being treated like tile.
Think About Pattern Size
A large trellis stencil gives a modern, wallpaper-like effect and usually takes less time because fewer repeats are needed. A small trellis stencil can feel charming and detailed, but it may require more placements. If your bathroom has lots of obstacles, such as outlets, towel hooks, medicine cabinets, and trim, a medium-scale trellis is often the most practical choice.
Pick A Color Combination That Works With The Room
The safest approach is a tone-on-tone combination: a soft white stencil over a warm white wall, pale gray over greige, muted blue over light blue, or taupe over cream. This gives the pattern depth without making the bathroom feel busy. For a stronger statement, try navy over white, charcoal over pale gray, black over warm beige, or metallic gold over deep green. Just remember that bathroom lighting can be sneaky. A color that looks elegant in the paint store may look oddly theatrical under vanity bulbs. Always test a sample before committing.
Tools And Supplies You Will Need
A successful stencil project depends heavily on tools. You do not need a professional painter’s entire van, but you do need the basics. Gather a trellis wall stencil, painter’s tape, a small high-density foam roller, a stencil brush for corners and tight spots, a paint tray, paper towels, a level, a pencil, drop cloths, mild cleaner, sandpaper or a sanding sponge, spackle, primer if needed, base wall paint, stencil paint, and a clear protective topcoat if your bathroom sees heavy use.
The small foam roller is important. A thick, fluffy roller holds too much paint and can push paint under the stencil edges. That is how crisp trellis lines turn into fuzzy little paint caterpillars. A dense foam roller with very little paint gives cleaner results. For detailed edges, a stencil brush used with a dry-brush or stippling motion helps prevent bleeding.
Preparing The Bathroom Wall
Preparation is the least glamorous part of adding a trellis stencil to the bathroom wall, but it is also the part that separates a polished result from a “we tried our best” wall. Bathroom walls collect residue from soap, moisture, cleaning sprays, cosmetics, and general daily life. Paint needs a clean surface to bond properly.
Step 1: Clean The Wall
Remove dust, lint, and grime with a mild cleaner and a damp cloth. Pay special attention to the wall near the sink, where invisible splashes can create trouble. Let the wall dry completely. Do not stencil over a damp wall unless your design goal is regret.
Step 2: Repair Imperfections
Fill nail holes, dents, and cracks with spackle. Once dry, sand the repairs smooth. Trellis stencils look best on smooth walls because repeating patterns highlight bumps, ridges, and sloppy patchwork. A little sanding now prevents a lot of side-eye later.
Step 3: Paint The Base Coat
If the bathroom wall needs a fresh base color, apply it before stenciling. Satin or semi-gloss paint is often preferred for bathrooms because these finishes are easier to wipe clean and more resistant to moisture than flat paint. Satin gives a softer look and hides small flaws better, while semi-gloss is more durable and washable but can emphasize wall imperfections. Let the base coat cure properly before stenciling. Dry to the touch is not the same as ready for painter’s tape.
How To Add A Trellis Stencil To The Bathroom Wall
Once the wall is clean, smooth, painted, and dry, the fun begins. Put on comfortable clothes, turn on good lighting, and accept that you will probably get paint on at least one finger, one elbow, and possibly your soul.
Step 1: Start In A Smart Location
For an accent wall, start in the center of the wall or above the most important visual point, such as the faucet or mirror. This helps the trellis pattern look balanced. Use a level to make sure the stencil is straight. Bathroom walls and ceilings are not always perfectly square, so trust the level more than your eyeballs.
Step 2: Secure The Stencil
Use painter’s tape to hold the stencil in place. Repositionable spray adhesive can help keep delicate stencil edges flat, especially on larger trellis designs. If you use adhesive, apply it lightly and away from the bathroom fixtures. You want the stencil to stick, not the entire room to feel like a craft-store incident.
Step 3: Load The Roller Lightly
Pour a small amount of stencil paint into a tray. Roll the foam roller through the paint, then roll off most of the excess onto paper towels. This step feels wrong at first because the roller looks too dry. Good. A nearly dry roller is exactly what you want. Stenciling is built on thin layers, not paint enthusiasm.
Step 4: Apply Paint With Gentle Pressure
Roll lightly over the stencil openings. Do not press hard. Heavy pressure forces paint under the stencil and creates bleeding. Use several light passes instead of one thick coat. For corners and edges, use a stencil brush and dab gently in an up-and-down motion rather than brushing side to side.
Step 5: Remove And Reposition
Carefully peel the stencil away while the paint is still fresh. Align the stencil with registration marks or the previously painted pattern, then tape it in place again. Repeat across the wall. Work patiently. A trellis stencil is a rhythm project: place, level, tape, roll, remove, align, repeat. It is oddly soothing until you reach the toilet tank, at which point it becomes a puzzle with plumbing.
Handling Corners, Trim, And Awkward Spaces
Corners are where stencil projects test your character. The easiest method is to bend the stencil gently into the corner and use a stencil brush with very little paint. If the stencil is too stiff, you can complete the main wall first, then return to fill partial patterns by hand or with a smaller section of the stencil. Some DIYers cut a separate stencil copy for corners, but only do this if you are comfortable sacrificing a stencil in the name of geometry.
For areas around towel bars, outlets, mirrors, and trim, remove hardware when possible. If you cannot remove it, stencil as close as you can and use a small artist brush for touch-ups. Do not worry if every hidden corner is not perfect. No guest is going to crawl behind your toilet with a flashlight and judge the trellis alignment. If they do, you have larger social problems than paint.
Preventing Paint Bleed
Paint bleed is the number one enemy of crisp stencil lines. Fortunately, it is also mostly preventable. Use less paint than you think you need. Keep the stencil flat against the wall. Roll gently. Clean the back of the stencil occasionally, especially if paint begins building up around the edges. If a small bleed happens, wait until the paint dries, then touch it up with the base wall color and a fine brush.
Another helpful trick is to stencil with the same sheen or a slightly different sheen rather than a completely different texture. For example, satin base paint with satin stencil paint gives a smooth, cohesive finish. If you use metallic paint, test it first because metallics can look stunning but may show roller marks if applied too heavily.
Best Paint Finish For A Bathroom Stencil Wall
Because bathrooms are humid, choose paint that can stand up to moisture and cleaning. Satin is a strong choice for many bathroom walls because it offers durability with a softer appearance than semi-gloss. Semi-gloss is even easier to clean and more moisture-resistant, making it useful for high-use family bathrooms. However, semi-gloss reflects more light, so it can highlight wall texture and stencil mistakes.
If you love a matte look, look for a high-quality washable matte or bathroom-rated paint rather than standard flat paint. Traditional flat paint is not ideal for a busy bathroom because it can absorb moisture and is harder to wipe clean. For trim, doors, and baseboards, semi-gloss remains a practical option because those surfaces take more bumps, splashes, and cleaning.
Design Ideas For Trellis Bathroom Walls
A trellis stencil is flexible enough to fit almost any bathroom style. For a coastal bathroom, use a white base with a pale blue or soft aqua trellis. Add natural wood, woven baskets, and brushed nickel hardware. For a modern black-and-white bathroom, stencil a black trellis over a white wall and pair it with matte black fixtures. For a vintage-inspired space, try cream walls with a muted sage or dusty blue stencil. Add brass accents, framed art, and a charming mirror that looks like it has stories.
For a glam powder room, choose a deep base color such as navy, emerald, or charcoal, then apply the trellis stencil in champagne, pearl, or soft gold. Keep the rest of the room simple so the wall can shine. In a small guest bath, a trellis pattern above painted wainscoting or beadboard creates a custom look without covering every inch of wall.
Maintenance After Stenciling
Once your trellis stencil wall is finished, let it cure before heavy cleaning. Paint can feel dry quickly but still need time to harden. Use the bathroom fan during showers to reduce humidity. Wipe splashes gently with a soft cloth and mild cleaner. Avoid abrasive scrubbers, especially on metallic or decorative stencil paint.
If you want extra protection, apply a clear water-based topcoat after the stencil paint has dried fully. Choose a finish that matches the look of the wall. A satin clear coat can add wipeability without making the surface too shiny. Test it in a hidden area first, because clear coats can slightly change the appearance of paint colors.
Common Mistakes To Avoid
The most common mistake is using too much paint. The second most common mistake is rushing. The third is starting in a random corner and discovering halfway through that the pattern lands awkwardly above the mirror. Measure first, plan the layout, and use a level. Another mistake is stenciling over dirty or glossy walls without proper prep. Paint needs grip, and bathroom walls need cleaning.
Do not skip ventilation. If your bathroom has no window, run the fan while painting and during drying. Avoid painting during very humid weather if possible. High humidity can slow drying and contribute to streaking or tackiness. Also, keep pets and small children away from the project area unless you want a trellis pattern that includes paw prints and emotional damage.
Is A Trellis Stencil Better Than Wallpaper?
It depends on your goals. Wallpaper delivers a highly polished look and can include textures or complex designs that paint cannot easily copy. But a trellis stencil is usually more budget-friendly, easier to customize, and simpler to repair. If one section gets scuffed, you can touch up paint. If wallpaper peels near a steamy shower, repair can be more complicated.
For renters, a stencil may or may not be allowed depending on the lease, so always check first. For homeowners, stenciling is a great way to get a designer look without committing to wallpaper removal later. It is also ideal for people who enjoy DIY projects but prefer not to spend their weekend matching wallpaper seams while questioning every life decision.
Real-Life Experience: What It Feels Like To Stencil A Bathroom Wall
Adding a trellis stencil to the bathroom wall sounds like a tidy Saturday project, and it can be, but the real experience is a mix of creativity, patience, and learning to respect painter’s tape as though it holds the secrets of the universe. The first thing most people notice is that the prep takes longer than expected. You think you are going to start painting immediately, but then you see a dent near the towel ring, a suspicious smudge beside the sink, and a patch of old paint that looks like it has survived three owners and one questionable decorating era. So you clean, patch, sand, wipe, and suddenly you are emotionally invested in wall smoothness.
The first stencil placement is always the most intimidating. You hold the trellis stencil against the wall, check the level, adjust it, check again, step back, squint, and then wonder whether the entire house is crooked. This is normal. Once the first repeat is painted, the nerves calm down. The project becomes more mechanical, almost meditative. Roll off the excess paint. Light pressure. Peel the stencil. Smile at the crisp lines. Repeat. For a brief moment, you may feel like a professional decorative painter. Enjoy that moment. It is free.
Then come the obstacles. The wall behind the vanity is easy until the mirror interrupts the pattern. The space above the toilet requires a body position that belongs in beginner yoga. The corner near the door trim refuses to cooperate. This is where patience matters. Instead of forcing the stencil into every awkward spot, it helps to finish the large open areas first. Once the main pattern is complete, the small spaces feel less scary. You can fill them with a stencil brush, a partial stencil, or careful touch-up painting.
One practical lesson: keep a damp cloth nearby, but do not panic-wipe every tiny mistake. Wet paint can smear and make a small issue larger. Often, the cleaner fix is to let the mistake dry and touch it up later with the base color. Another lesson: clean the stencil more often than you think. Paint buildup on the back can transfer to the wall, especially when working in a humid bathroom. A quick wipe keeps the pattern sharper.
The final reveal is the best part. A plain bathroom suddenly looks intentional. The mirror looks more stylish. The vanity looks more expensive. Even the hand towel seems to stand a little taller. A trellis stencil gives the room a finished quality that paint alone often cannot achieve. And because you chose the colors yourself, the wall feels custom rather than copied. It is the kind of project that makes guests say, “Wait, is that wallpaper?” and allows you to reply, very casually, “No, I stenciled it,” as if you did not spend several hours negotiating with a foam roller.
The biggest takeaway from the experience is that perfection matters less than consistency. A tiny flaw disappears inside the full pattern. What people see is the overall rhythm, color, and charm. So yes, measure carefully. Use the right tools. Keep the roller dry. But do not let fear of mistakes stop you. A trellis stencil is one of the most rewarding bathroom wall upgrades because it turns a small space into something memorable without requiring a major remodel. In other words, it is a high-impact DIY project with a refreshingly low chance of needing a plumber.
Conclusion
Adding a trellis stencil to the bathroom wall is a smart way to bring pattern, texture, and personality into a space that often gets overlooked. With the right preparation, moisture-conscious paint choices, and a light-handed stencil technique, you can create a bathroom wall that looks polished, custom, and far more expensive than it really is. The key is to clean and repair the wall, choose a bathroom-friendly finish, test your colors, use very little paint, and take your time with alignment.
A trellis stencil works because it blends classic structure with creative freedom. You can keep it soft and subtle, make it bold and graphic, or add a little shimmer for a powder room that knows how to enter a conversation. Whether you stencil one accent wall or wrap the pattern around the entire bathroom, the result can transform the room from basic to beautifully designed. And unlike many home upgrades, this one does not require tearing anything out, moving plumbing, or pretending you understand contractor estimates. It just asks for patience, planning, and maybe a good playlist.











