
A clicking bike drivetrain is like a tiny metal cricket living rent-free near your rear wheel. One click is charming. Two clicks are suspicious. A whole ride of skipping, grinding, and mystery clunks? That is your bicycle politely asking for a rear derailleur adjustment before it begins writing complaint emails.
The good news is that learning how to adjust a rear bicycle derailleur is not wizardry. It is a careful sequence: check the bike, set the limit screws, tune the cable tension, adjust the B-screw, and test the shifting under real pedaling conditions. Once you understand what each screw does, the rear derailleur becomes less intimidating and more like a very picky waiter guiding your chain to the correct cog.
This guide explains the process in 14 practical steps for common mechanical rear derailleurs found on road bikes, mountain bikes, hybrids, gravel bikes, commuter bikes, and many e-bikes. Electronic systems have their own setup procedures, but the same core ideas still apply: alignment, safe limits, smooth movement, and quiet shifting.
What a Rear Derailleur Actually Does
The rear derailleur moves the chain across the cassette, which is the stack of sprockets on the rear wheel. When you shift to an easier gear, the derailleur moves the chain toward a larger cog near the spokes. When you shift to a harder gear, it moves the chain toward a smaller cog near the frame. Simple idea, fussy execution.
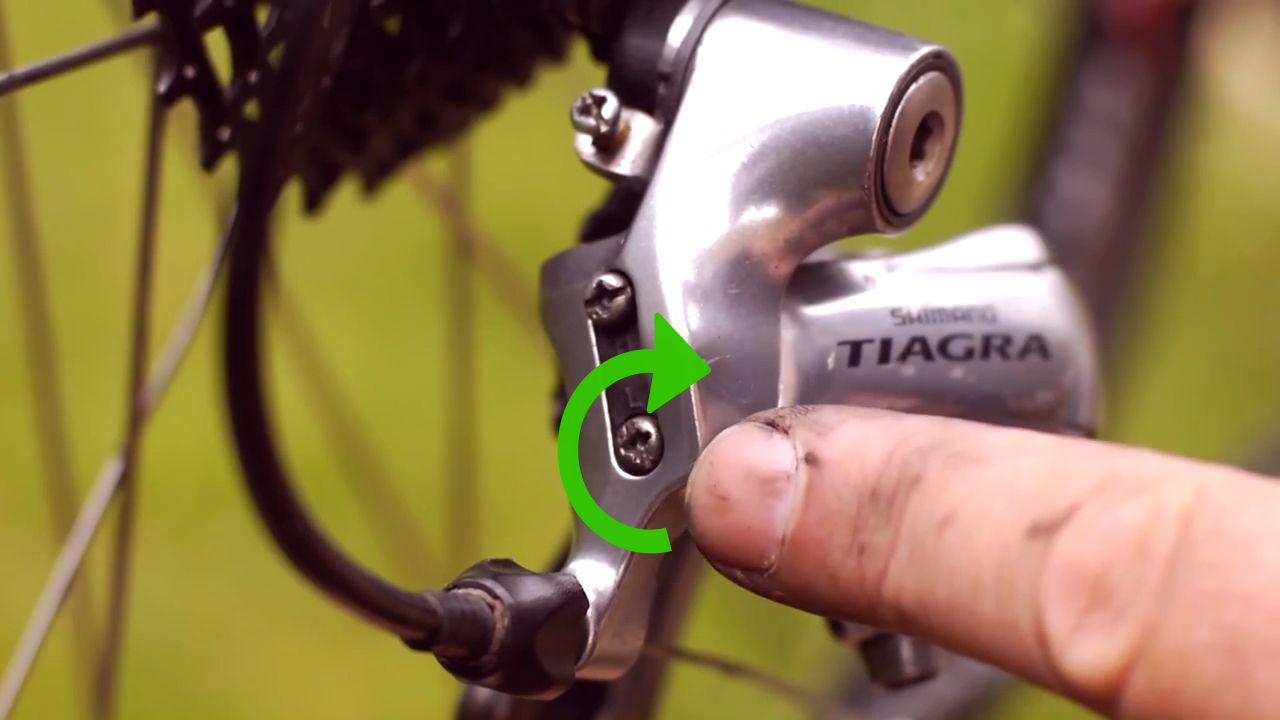
A derailleur has three main adjustments. The H-limit screw controls how far the derailleur can move toward the smallest cog. The L-limit screw controls how far it can move toward the largest cog. The barrel adjuster fine-tunes cable tension so each click of the shifter lines up with one cog. A fourth adjustment, the B-screw or B-tension screw, controls the gap between the upper pulley and cassette.
Tools You Need Before You Start
You do not need a professional workshop that smells like chain lube and heroic Saturday mornings. For most rear derailleur adjustments, you need a bike repair stand or a safe way to lift the rear wheel, a Phillips screwdriver or hex key depending on your derailleur, a 5 mm hex key for the cable pinch bolt on many models, and a clean rag. A work light helps. Patience helps more.
Before turning screws, inspect the obvious. A dirty chain, worn cassette, frayed cable, bent derailleur hanger, loose rear wheel, or damaged housing can make even a perfect adjustment behave like a raccoon in a tool shed. If the bike recently fell on the drive-side, suspect the derailleur hanger first.
How to Adjust a Rear Bicycle Derailleur in 14 Steps
Step 1: Put the Bike in a Stable Position
Place the bike in a repair stand if you have one. If not, carefully lift the rear wheel using a sturdy bike rack or flip the bike upside down on a soft surface, protecting the saddle and handlebar. You need to pedal by hand while shifting, so the rear wheel must spin freely. Keep fingers, sleeves, hoodie strings, and curious pets away from the chain and spokes.
Step 2: Shift to the Smallest Rear Cog
Shift the chain onto the smallest cog at the back. On bikes with front chainrings, shift the front derailleur to the middle or large chainring if possible. This position releases most cable tension from the rear derailleur and makes the high-limit adjustment easier to read. If the chain refuses to reach the smallest cog, do not force it. That refusal is already a clue.
Step 3: Inspect the Derailleur Hanger
Stand behind the bike and look at the derailleur. The cage should hang straight, not leaning inward toward the spokes or outward toward the frame. A bent hanger causes shifting problems that barrel adjusters cannot fix. If the derailleur looks crooked after a crash, transport mishap, or dramatic garage incident involving a folding chair, have the hanger aligned or replaced before continuing.
Step 4: Check the Cable and Housing
Look for frayed cable strands, cracked housing, rust, kinks, or sticky cable movement. A rear derailleur adjustment depends on smooth cable travel. If the cable feels gritty or slow to return, replace or lubricate the cable system as appropriate. New cables also stretch slightly after installation, which is why bikes often shift beautifully on day one and start gossip-clicking a week later.
Step 5: Identify the H and L Limit Screws
Find the two small limit screws on the derailleur body. Many are labeled “H” and “L.” On some older or less clearly marked derailleurs, the labels may be hard to see. The H screw limits movement toward the smallest cog. The L screw limits movement toward the largest cog. Do not randomly twist both screws and hope the bike appreciates your enthusiasm. It will not.
Step 6: Set the H-Limit Screw
With the chain on the smallest cog, look from behind the bike. The upper guide pulley should sit directly under the smallest sprocket. If the pulley is too far outward, the chain may drop between the cassette and frame. If it is too far inward, the chain may hesitate to shift into the smallest cog. Turn the H-limit screw in small quarter-turn increments until the guide pulley lines up cleanly.
Step 7: Reset the Barrel Adjuster
Before adjusting cable tension, turn the barrel adjuster clockwise until it is almost fully seated, then back it out one or two turns. This gives you room to increase or decrease tension later. Think of it as starting in the middle of the argument instead of at the dramatic end. The barrel adjuster may be located at the rear derailleur, at the shifter, or inline along the cable housing.
Step 8: Attach or Retension the Shift Cable
If the cable was disconnected, pull it snug by hand and tighten the cable pinch bolt. Do not yank it like you are starting a lawn mower. Firm, clean tension is enough. If the cable was already attached, confirm that it is seated correctly in the derailleur’s cable groove. Incorrect cable routing can ruin indexing and make every adjustment feel haunted.
Step 9: Shift One Click and Test Indexing
Pedal by hand and shift one click from the smallest cog to the next larger cog. The chain should climb quickly and quietly. If it hesitates or rattles without moving up, add cable tension by turning the barrel adjuster counterclockwise in small increments. If the chain overshoots, rubs toward the next larger cog, or seems too eager, reduce cable tension by turning the barrel adjuster clockwise.
Step 10: Work Across the Cassette
Shift one gear at a time up the cassette and then back down. Listen carefully. Smooth shifting should feel boring, which is exactly what you want. If the derailleur shifts well in one direction but poorly in the other, cable tension may still be slightly off. Make small barrel-adjuster changes, usually a quarter turn or half turn at a time. Tiny adjustments beat heroic spinning every time.
Step 11: Set the L-Limit Screw
Shift carefully into the largest rear cog, the one closest to the spokes. The upper guide pulley should align under that largest sprocket. If the derailleur moves too far inward, the chain can fall into the spokes, which is expensive, loud, and deeply unfashionable. If it cannot reach the largest cog, the L-limit may be too tight. Adjust the L screw in small increments until the chain reaches the largest cog without overshooting.
Step 12: Adjust the B-Screw or B-Tension
The B-screw controls the distance between the upper guide pulley and the cassette. Shift into the largest rear cog and observe the gap. If the pulley is too close, the drivetrain may rumble or shift poorly. If it is too far away, shifting may feel slow or vague. Many modern wide-range mountain bike derailleurs need a specific gap, so check the manufacturer’s recommendation when possible.
Step 13: Test Under Light Pedaling Load
Once the bike shifts well in the stand, take it for a careful test ride in a safe area. Shift through all gears while pedaling lightly. A drivetrain can behave perfectly in the air and then act dramatically under real load, like it just remembered it has feelings. Avoid shifting while stomping on the pedals. Smooth pedaling gives the chain a better chance to move cleanly.
Step 14: Fine-Tune and Recheck Everything
After the test ride, make final barrel-adjuster tweaks. If shifting to larger cogs is slow, add a little cable tension. If shifting to smaller cogs is slow, reduce tension. Recheck the H and L limits only if the chain struggles at the extreme ends of the cassette. Once every shift is quiet, quick, and predictable, wipe the chain, clean your hands, and accept your new title: Household Minister of Gears.
Common Rear Derailleur Problems and Fixes
The Chain Skips Under Pressure
If the chain skips when you pedal hard, the problem may not be adjustment. A worn chain, worn cassette, stiff chain link, or bent derailleur hanger can cause skipping. Indexing fixes alignment between the shifter and cassette; it cannot magically restore worn teeth. Sadly, the barrel adjuster is powerful, but it is not a time machine.
The Bike Shifts Up but Not Down
If shifting toward larger cogs works but shifting back toward smaller cogs is slow, cable tension may be too high, or the cable may be sticky inside the housing. Turn the barrel adjuster clockwise slightly. If that does not help, inspect the cable and housing. A sluggish return often means friction is hiding somewhere in the system.
The Chain Will Not Reach the Largest Cog
This usually points to one of three issues: not enough cable tension, an L-limit screw set too tight, or a bent hanger. Add cable tension first if the shifting is generally slow moving inward. If the derailleur physically stops before reaching the largest cog, check the L-limit screw. If the derailleur angle looks crooked, stop chasing the barrel adjuster and inspect the hanger.
The Chain Wants to Jump Into the Spokes
This is a red-alert problem. Stop pedaling and adjust the L-limit screw so the derailleur cannot travel beyond the largest cog. A chain in the spokes can damage the wheel, derailleur, hanger, and your mood. The low-limit screw exists to prevent this exact mechanical soap opera.
Rear Derailleur Adjustment Tips for Different Bikes
Road bikes often use tighter cassette spacing, so tiny cable-tension changes matter. Gravel bikes may collect mud and grit, making cable housing maintenance more important. Mountain bikes with wide-range cassettes are especially sensitive to B-gap. Commuter bikes may suffer from stretched cables, knocked derailleurs, and the occasional bike-rack wrestling match. The adjustment principles stay the same, but the symptoms may vary by bike type.
For 1x drivetrains, where there is only one front chainring, rear derailleur setup becomes even more important because the rear cassette covers the full gear range. On bikes with two or three front chainrings, test the rear shifting in practical front-ring combinations, but avoid extreme cross-chaining such as big front chainring to biggest rear cog. Your drivetrain can do many things; that does not mean it wants to.
When You Should Visit a Bike Shop
Adjusting a rear derailleur is a great home maintenance skill, but a mechanic is the right call when parts are bent, cracked, badly worn, or incompatible. Visit a shop if the derailleur hanger needs alignment, the rear derailleur is damaged, the cable routing is confusing, the chain keeps dropping into the spokes, or the bike uses a complex clutch or electronic system you are not comfortable servicing.
Also, if you have adjusted the barrel one full turn in both directions and nothing improves, stop. That is the bicycle equivalent of repeatedly clicking “refresh” during a power outage. The issue is probably not simple indexing.
Experience Notes: What Riders Learn After Adjusting a Few Derailleurs
The first time you adjust a rear derailleur, it may feel like every screw is connected to a secret bicycle committee. Turn the H screw and the chain gets quiet. Turn it again and suddenly the smallest cog is offended. Add cable tension and shifting improves in one direction but complains in the other. This is normal. The process teaches you to diagnose symptoms instead of guessing.
One useful experience is learning to listen. A healthy drivetrain has a soft, steady sound. If the chain chatters while sitting on a cog, it is often rubbing against the next gear. If it hesitates climbing to a larger cog, it usually wants more cable tension. If it refuses to drop to a smaller cog, it may have too much tension or sticky housing. Your ears become a surprisingly good tuning tool.
Another lesson: small turns are king. New mechanics often twist the barrel adjuster like they are opening a jar of pickles. Then the bike goes from “slightly noisy” to “jazz drummer falling down stairs.” Quarter turns are safer. After each change, pedal and shift again. Give the drivetrain a moment to show you what changed.
Limit screws deserve respect. They are not regular shifting adjusters; they are safety boundaries. If your middle gears are noisy, do not immediately attack the H and L screws. Use the barrel adjuster for indexing. Use the limit screws to stop the derailleur at the two ends of the cassette. Mixing up those jobs is one of the fastest ways to turn a five-minute tune-up into an evening with greasy hands and a suspiciously quiet family.
Real-world riding also exposes cable stretch. A new bike or freshly installed cable may shift perfectly at first, then slowly become lazy moving toward larger cogs. That does not mean the derailleur has betrayed you. It often means the cable and housing have settled. A small counterclockwise turn of the barrel adjuster can bring the shifting back.
Finally, do not ignore cleanliness. A filthy drivetrain can imitate bad adjustment. Before blaming the derailleur, wipe the chain, clean the jockey wheels, check for packed debris around the cassette, and add appropriate chain lubricant. Many “mysterious shifting problems” are just dirt wearing a fake mustache.
The satisfying part is that once you learn the pattern, rear derailleur adjustment becomes quick. You shift to the smallest cog, check alignment, test one click, tune tension, check the largest cog, verify B-gap, and ride. The bike feels crisp again. The clicking cricket moves out. You feel mechanically competent enough to nod thoughtfully at your own work, which is at least 12 percent of bicycle maintenance.
Conclusion
Learning how to adjust a rear bicycle derailleur gives you smoother shifting, quieter rides, and fewer awkward roadside moments where you stare at the cassette as if it might apologize. The main secret is sequence. Set the high limit, prepare the barrel adjuster, secure the cable, tune indexing, set the low limit, check B-tension, and test ride carefully.
Do not rush, and do not treat every screw like it owes you money. Make small changes, observe the result, and work logically. If the bike still shifts badly after careful adjustment, look beyond the derailleur: hanger alignment, cable condition, chain wear, cassette wear, and housing friction all matter. A well-adjusted derailleur is not just about silence; it is about confidence every time your thumb or finger clicks the shifter.











