
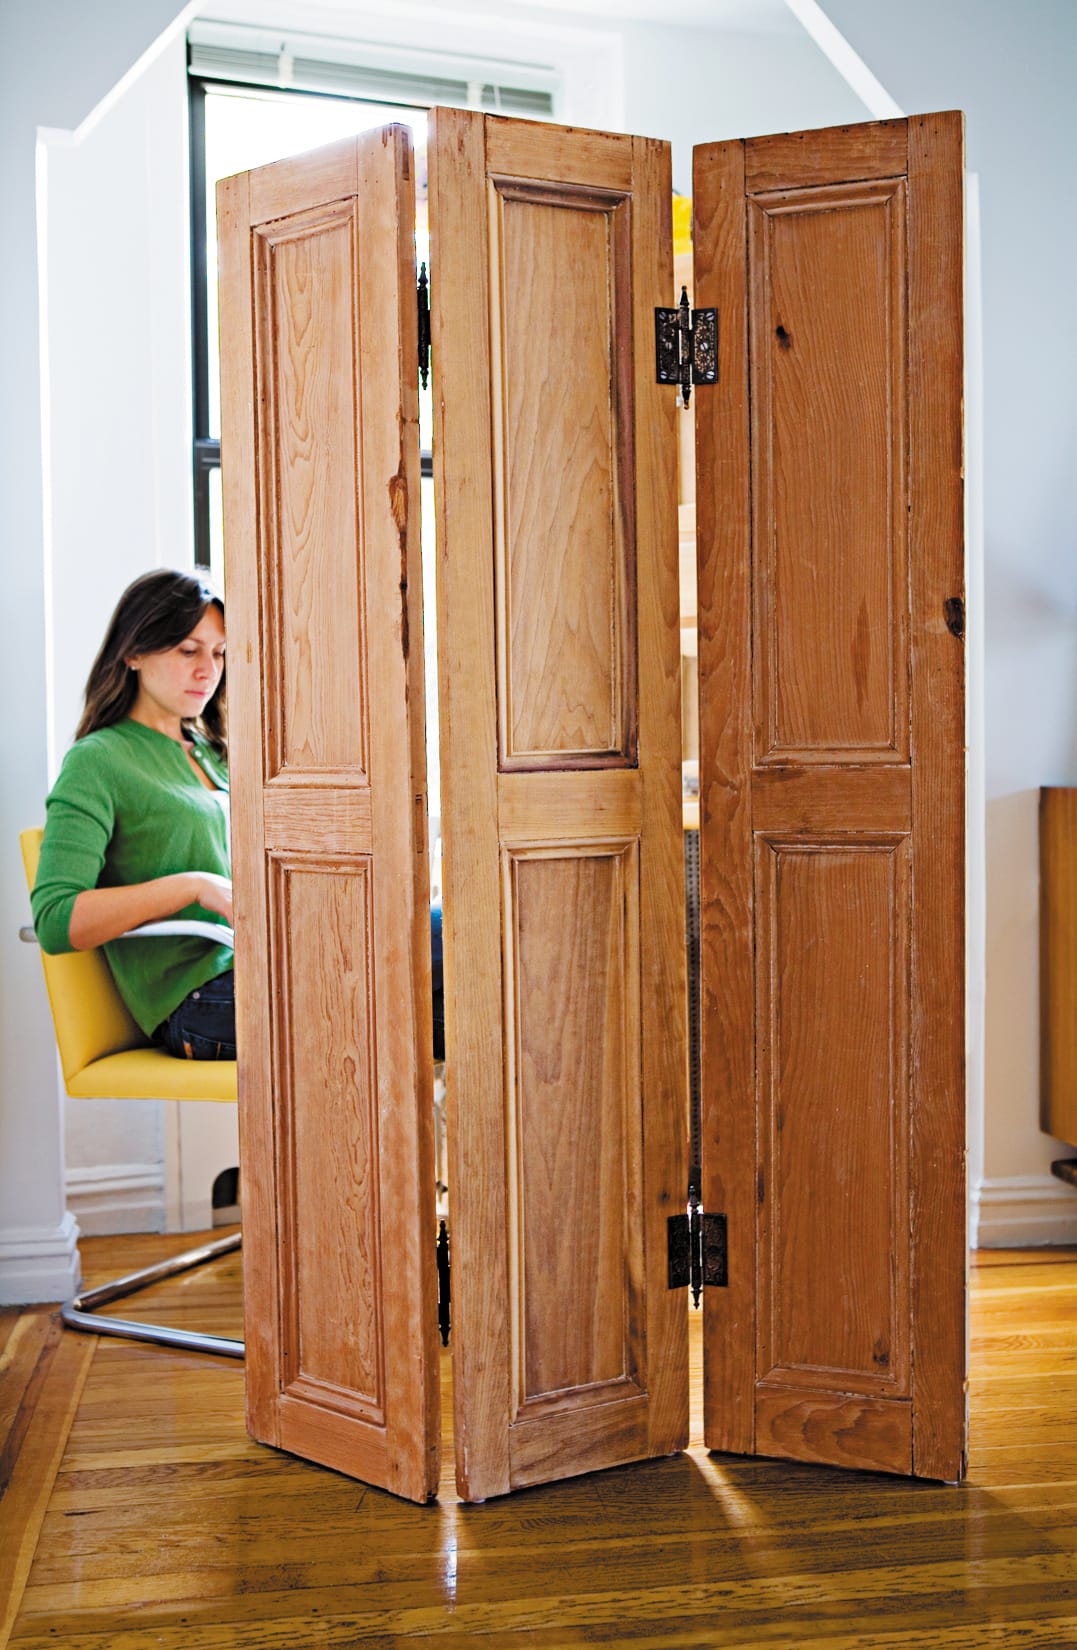
Some DIY projects begin with a grand vision. Others begin with a pile of old shutters in the garage and a quiet voice saying, “Surely these are not trash.” A folding screen made from old hinges and shutters sits beautifully in that second category. It is practical, charming, budget-friendly, and just rustic enough to make guests ask where you bought it. You may then casually say, “Oh, I made it,” while pretending not to enjoy the applause.
A shutter folding screen can work as a room divider, privacy screen, decorative backdrop, home office partition, dressing screen, plant corner, or clever way to hide the exercise bike currently serving as a laundry monument. With three or more shutters, a few hinges, basic tools, and a careful approach, you can turn salvaged materials into a freestanding piece with personality.
This guide explains how to make a folding screen using old hinges and shutters, from choosing the right panels to finishing, attaching hardware, and styling the final piece. The process is beginner-friendly, but a few smart details make the difference between “vintage farmhouse chic” and “wobbly haunted saloon doors.”
Why Old Shutters Make a Great Folding Screen
Old shutters already have the bones of a good folding screen. They are tall, narrow, visually interesting, and often lightweight enough to move around the house. Louvered shutters let air and light pass through, while solid panel shutters offer more privacy. Either style can become a beautiful DIY room divider with the right hardware.
Repurposing shutters is also a sustainable home decor idea. Instead of buying a new divider, you give existing wood and hardware a second life. That means less waste, more character, and fewer awkward conversations with your wallet.
Best Uses for a Shutter Folding Screen
A folding shutter screen works well in many spaces, especially where you need flexible separation without building a wall. Use it to divide a studio apartment, create a Zoom-friendly background, soften a bedroom corner, hide storage, frame a reading nook, or add architectural charm to a plain wall.
Unlike a permanent divider, a hinged folding screen can move with your needs. Open it wide when you want coverage, angle the panels for stability, or fold it flat when you need more floor space.
Materials and Tools You Will Need
Before you begin, gather everything in one place. This prevents the classic DIY tradition of walking back and forth across the house holding one screw and muttering at a drawer.
Materials
- Three old shutters of similar height and width
- Four to six hinges, preferably salvaged or decorative
- Wood screws that fit the hinge holes
- Wood filler for cracks or old screw holes
- Sandpaper or sanding sponge
- Primer, paint, stain, or clear protective topcoat
- Soft furniture glides, felt pads, or rubber bumpers
- Optional: decorative knobs, handles, stencils, cane webbing, or fabric backing
Tools
- Tape measure or folding rule
- Pencil
- Combination square
- Drill and drill bits
- Screwdriver or drill driver
- Clamps
- Drop cloth
- Safety glasses and dust mask
- Small brush or vacuum for dust cleanup
Step 1: Choose the Right Shutters
The best shutters for a folding screen are similar in size, straight, and structurally sound. They do not need to be perfect. In fact, a few dings and worn edges can make the finished screen look collected rather than manufactured. Still, charm has limits. A shutter with deep rot, loose rails, missing slats, or major twisting may need repair before it can stand safely.
Place the shutters on a flat surface and compare their height. If one panel is slightly taller, you can trim it if the construction allows. If the difference is tiny, furniture glides may help even things out. If the panels are wildly different sizes, consider using the tallest shutter as the center panel and the shorter ones as side panels for a playful, asymmetrical look.
How Many Panels Should You Use?
Three panels are ideal for most DIY folding screens. A three-panel screen is stable, easy to fold, and simple to build. Four panels provide more coverage but need extra attention to hinge alignment. More than four panels can work, but the screen becomes heavier and more likely to wobble unless the panels are narrow and the hinges are strong.
For a living room or bedroom, shutters between 60 and 72 inches tall often feel balanced. Shorter shutters can still make a lovely decorative screen behind a sofa, entry table, or plant display.
Step 2: Inspect Old Paint Before Sanding
This step matters. Many old shutters were painted decades ago, and older paint may contain lead. If the shutters came from an older home or you do not know their history, do not aggressively sand, scrape, or cut the painted surface until you have considered lead safety.
For shutters with unknown old paint, use a lead test kit as a starting point or consult a certified professional for a more reliable assessment. If lead may be present, avoid creating dust. Keep the finish intact where possible, clean gently, and use lead-safe work practices. If the paint is badly chipping, the safest choice may be to choose different shutters or have them professionally handled.
If the paint is modern and safe to work with, you can lightly sand rough spots and edges. The goal is not to erase every sign of age. You want the surface smooth enough to handle and finish, not so polished that the shutters lose their story.
Step 3: Clean and Repair the Shutters
Old shutters often arrive with dust, cobwebs, mystery grime, and maybe one spider who believes he has legal ownership. Start with a dry brush or vacuum to remove loose debris. Then wipe the panels with a damp cloth and mild soap. Let the wood dry completely before repairing or finishing.
Check every rail, stile, and slat. Tighten loose screws if the shutters have existing hardware. Use wood glue and clamps to secure loose joints. Fill unwanted holes with wood filler, let it dry, and sand the area smooth. If a louver is cracked but still attached, you may be able to glue it. If a slat is missing, either replace it or turn the gap into a design feature by backing the panel with fabric, cane, or decorative paper.
Keep the Patina or Start Fresh?
There is no single correct finish. If the shutters have a beautiful aged surface, keep it and seal it with a clear topcoat. If the color looks tired rather than charming, paint them. If the wood is bare or stripped, stain can highlight the grain. A folding shutter screen can look coastal in soft white, farmhouse in warm gray, cottage-style in sage green, or dramatic in matte black.
Step 4: Plan the Folding Direction
The secret to a functional folding screen is hinge direction. The panels should fold in a zigzag pattern, often called a “Z” shape. That means one pair of panels hinges on the front, and the next pair hinges on the back. If all hinges go on the same side, the screen may not fold properly, and you will spend quality time staring at it like it personally betrayed you.
Lay three shutters side by side on the floor with narrow gaps between them. Decide which side will be the front. Attach the first set of hinges between panel one and panel two on the front side. Then flip or reposition the third panel so the next set of hinges between panel two and panel three attaches on the back side. This alternating pattern lets the screen fold flat and stand in angled sections.
Step 5: Mark Hinge Placement
For a small or lightweight screen, two hinges between each pair of shutters may be enough: one about 10 to 12 inches from the top and one about 10 to 12 inches from the bottom. For taller or heavier shutters, use three hinges per joint: top, middle, and bottom. The middle hinge reduces twisting and helps the screen feel sturdier.
Place the first two shutters face up with a small gap between them. The gap should be just wide enough for the hinge barrel to move freely. Set the hinges in position and use a pencil to mark the screw holes. A combination square helps transfer matching hinge measurements to the next panel so all hardware lines up neatly.
Take your time here. Hinge placement is one of those steps where careful measuring saves you from creative vocabulary later.
Step 6: Drill Pilot Holes
Before driving screws into old wood, drill pilot holes. A pilot hole helps prevent splitting, especially near panel edges or in dry vintage wood. Choose a drill bit slightly smaller than the screw shaft. Mark the depth on the bit with painter’s tape so you do not accidentally drill through the shutter.
Clamp the panel to a stable work surface if possible. Keep the drill straight, go slowly, and clear dust from the holes. This simple step gives the screws a cleaner path and helps the hinges sit flush.
Step 7: Attach the Hinges
Reposition the first hinge over the pilot holes and drive the screws by hand or with a drill driver set to low torque. Do not overtighten. Old shutters can be delicate, and overtightening may strip the hole or crack the wood.
Attach the top hinge first, then the bottom hinge, then the middle hinge if you are using one. Open and close the panels gently to test movement. Repeat the process for the next shutter joint, remembering to place the hinges on the opposite side so the panels fold in a zigzag.
If a screw will not tighten because the old hole is worn, fill the hole with a sliver of wood and wood glue, let it dry, trim it flush, and drill a new pilot hole. A toothpick can work for small holes, though the shutter may act offended by such humble surgery.
Step 8: Add Feet, Glides, or Felt Pads
Once the screen is hinged, add soft furniture glides, felt pads, or rubber bumpers to the bottom corners. These protect floors and help the screen slide without scratching. They can also correct tiny height differences between panels.
For hardwood or tile floors, rubber pads add grip. For carpet, felt pads may move more easily. If the screen feels unstable, check that the panels are angled rather than stretched flat. A folding screen is most stable when each joint is slightly bent.
Step 9: Paint, Stain, or Seal the Screen
You can finish the shutters before or after attaching the hinges. Finishing before assembly is cleaner because you can reach every edge easily. Finishing after assembly lets you blend the whole piece together visually. Either method works.
For painting, clean the surface, patch holes, lightly sand safe surfaces, prime bare wood or glossy areas, and apply two thin coats of paint. Thin coats beat one thick coat every time. Thick paint on louvers can collect in corners and make shutters look like they were frosted by a cake decorator with commitment issues.
For staining, sand in the direction of the grain, remove dust, apply wood conditioner on soft or blotchy wood, then apply stain and wipe away the excess. Finish with a clear protective topcoat. For a rustic look, lightly distress edges after painting and seal with clear wax or water-based polyurethane.
Design Ideas for a Custom Folding Screen
The basic folding screen is only the beginning. Old shutters are wonderfully customizable, so you can match the finished piece to your home’s style.
Farmhouse Style
Paint the shutters warm white, cream, sage, or charcoal. Leave the hinges dark or oil-rubbed bronze. Add light distressing on raised edges, then seal the finish. This look pairs well with wood floors, linen curtains, baskets, and plants.
Coastal Style
Choose pale blue, weathered white, driftwood gray, or sandy beige. Louvered shutters are especially good for coastal rooms because they keep the screen airy. Add rope handles or shell-toned knobs if you want a beach-house detail without going full souvenir shop.
Industrial Vintage
Use darker paint, exposed metal hinges, and a matte finish. Black, deep green, or espresso stain can make old shutters feel bold and modern. Pair the screen with leather, metal shelving, or Edison-style lighting.
Garden Room Look
Use the folding screen behind houseplants or as a backdrop for a sunny corner. Green, terracotta, and natural wood finishes work beautifully. You can hang small planters from sturdy slats, but keep weight light and balanced.
Common Mistakes to Avoid
The most common mistake is attaching all hinges on the same side. Remember: alternate the hinge sides so the panels fold in a Z shape. Another mistake is skipping pilot holes. Old wood splits easily, especially near edges.
Do not use shutters that are too heavy for the hinges. If your panels are thick exterior shutters, choose sturdy hinges and use three per joint. Also avoid opening the screen completely straight. A freestanding folding screen needs angles to stay upright.
Finally, do not ignore old paint safety. A pretty project is not worth filling your workspace with hazardous dust. When in doubt, test, seal, or consult a professional.
How to Style Your Finished Folding Screen
Once your folding screen is complete, place it where it solves a real problem or adds visual depth. In a bedroom, set it near a closet or corner chair. In a living room, angle it behind a console table. In a home office, use it as a background that looks intentional, even if the rest of the room contains three mugs and a printer that only works emotionally.
For small spaces, keep the screen light in color so it does not visually shrink the room. For large rooms, darker colors can help anchor a zone. Add a floor lamp beside it for warmth, or place it behind plants to create layered texture.
Extra Experience: Lessons Learned from Making a Shutter Folding Screen
The first thing you learn while making a folding screen from old hinges and shutters is that “old” is not a measurement. One old shutter may be charming and sturdy; another may be one sneeze away from becoming kindling. Before falling in love with the look, check the structure. Wiggle the slats, press the corners, and inspect the rails. If the shutter flexes too much, it may still work as decor, but it may not be safe as a freestanding divider.
A second lesson is that matching shutters are wonderful, but not mandatory. Some of the best DIY folding screens have slight differences in color, grain, or wear. The trick is to repeat something across all panels. Use the same paint color, the same hinge finish, or the same topcoat sheen. That repeated detail makes mismatched shutters feel curated instead of random.
Hinges deserve more respect than they usually get. Decorative old hinges can be beautiful, but they need to move smoothly and hold weight. Before installing salvaged hinges, open and close them several times. Clean off rust, tighten loose pins if possible, and make sure the screw holes are not worn beyond usefulness. If the hinge looks gorgeous but feels weak, use it somewhere decorative and choose stronger working hinges for the screen.
Another practical experience: assemble the screen on the floor before finishing the final look. Dry-fitting helps you see how the panels fold, where the best face should point, and whether the shutters need trimming. This is also when you discover that one panel may have a slightly bowed edge. Better to find that out before you paint everything a perfect shade called “Sunday Linen” and then realize the hinge gap looks like a winding country road.
Paint choice also changes the personality of the project. Glossy paint makes shutters easier to wipe down, but it highlights dents and uneven spots. Matte and satin finishes are more forgiving and tend to suit vintage wood better. Stain is beautiful on clean bare wood, but old shutters often have mixed grain, patches, and previous repairs. If the wood is uneven, paint may create a more polished final result.
Stability is mostly about angle. A folding screen should not stand perfectly straight. Bend the panels slightly at each hinge so the screen creates its own base. If you have pets, younger siblings, or a vacuum cleaner with a reckless personality, place the screen where it will not be bumped constantly. For extra grip, add rubber pads to the bottom. For extra safety in a busy area, position one end near a wall or furniture piece.
The most satisfying part of this project is how quickly the final screen changes a room. It adds height, texture, privacy, and a little mystery. A plain corner suddenly looks styled. A messy storage area becomes “hidden.” A home office background looks like you planned it, even if you built it because you found shutters on sale and had a free afternoon.
In short, making a folding screen using old hinges and shutters is a forgiving project with a big decorative payoff. Measure carefully, drill pilot holes, alternate your hinges, respect old paint, and let the imperfections work for you. The result is useful, attractive, and proudly handmadethe kind of piece that looks like it has a story because it actually does.
Conclusion
A DIY folding screen made with old hinges and shutters is one of those rare projects that combines function, style, and common sense. It gives you privacy without construction, character without a furniture showroom price tag, and a good excuse to rescue old shutters before they disappear into a landfill or someone’s “future project” pile forever.
With the right shutters, safe preparation, accurate hinge placement, pilot holes, and a finish that suits your space, you can build a folding screen that looks custom and feels personal. Whether your home leans farmhouse, coastal, vintage, or modern rustic, this project adapts easily. Best of all, every scratch and weathered edge becomes part of the design. That is the magic of upcycling: the flaws get promoted.











