
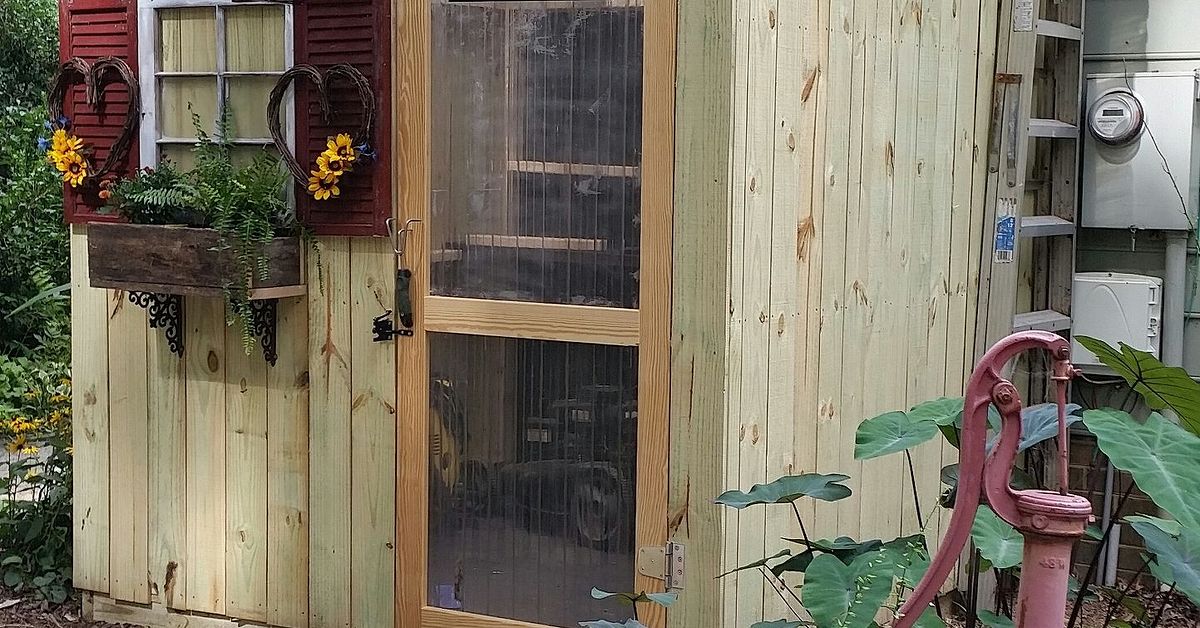
An old picket fence may look ready for retirement, but those weathered boards could be one good weekendand several cups of coffeeaway from becoming the most charming garden shed on the block. With a proper structural frame behind them, reclaimed fence pickets make distinctive exterior cladding while reducing waste and adding instant cottage character.
Why Build a Garden Shed with Reclaimed Fence Pickets?
A DIY garden shed from picket fence boards combines practical storage with the satisfying magic of reuse. Instead of sending old boards to a landfill, you can turn them into rustic siding, decorative trim, shutters, doors, shelving, or even a small covered porch.
The important phrase is decorative exterior material. Most reclaimed pickets should not be treated as structural framing. They may be thin, split, weathered, or weakened around old fastener holes. Build the shed with conventional structural lumber, sheathing, and approved connectors, then install the pickets as the visible outer layer.
This approach gives you the storybook appearance of a miniature garden cottage without expecting a 15-year-old fence board to hold up a roof. The pickets get to be pretty. The framing does the heavy lifting. Everyone stays in their lane.
Plan the Shed Before Pulling Out a Saw
Choose a Practical Size
An 8-by-10-foot shed works well for many gardens. It offers room for a mower, wheelbarrow, hand tools, potting supplies, and wall-mounted storage without swallowing the entire yard. A smaller 6-by-8-foot footprint may be enough for hand tools, hoses, and seasonal equipment.
Make a list of everything the shed must hold before choosing dimensions. Measure the widest machine or cart that will pass through the entrance. A 48-inch double-door opening is much more convenient for a mower than a narrow single door that requires advanced steering skills and mild profanity.
Check Local Rules
Contact the local building department before buying materials. Some versions of the model residential code exempt certain one-story detached accessory structures of no more than 200 square feet from a building permit. Local jurisdictions can adopt different limits, setbacks, anchoring rules, height restrictions, zoning requirements, or homeowners association standards.
Permit-exempt does not mean rule-exempt. The shed may still need to remain a required distance from property lines, easements, septic systems, utility corridors, or other buildings. Call the local utility-marking service before digging.
Pick the Right Location
Select a reasonably level, well-drained area with convenient access from the garden. Avoid low spots where water collects after rain. Leave working space around the walls for painting, repairs, and vegetation control. Positioning the doors toward a path makes daily use easier, while placing windows away from direct afternoon sun can keep the interior cooler.
Inspect and Prepare the Old Fence Pickets
Sort the Boards
Remove the pickets carefully so you preserve as much usable length as possible. Divide them into three groups:
- Best boards: Straight, firm pickets suitable for prominent siding and doors.
- Serviceable boards: Pieces with cosmetic cracks or damaged ends that can be trimmed shorter.
- Rejects: Soft, rotten, insect-damaged, severely twisted, or deeply split material.
Probe suspicious areas with a screwdriver. Sound wood resists pressure; decayed wood feels soft, crumbly, or strangely similar to stale cake. Do not use questionable material around doors, lower wall edges, or other places where strength and water resistance matter.
Remove Metal and Clean the Wood
Pull every nail, screw, staple, and wire fragment before cutting or planing. Sweep both faces with a handheld metal detector when possible. One forgotten nail can damage a saw blade, launch debris, and transform a peaceful Saturday into an expensive lesson.
Scrub dirty boards with water, mild detergent, and a stiff nylon brush. Avoid forcing water deeply into the grain with an aggressive pressure washer. Stack the washed pickets with spacers between layers and allow them to dry thoroughly under cover.
Be Careful with Old Paint
If the fence is old or its coating history is unknown, treat deteriorating paint cautiously. Sanding, scraping, sawing, and demolition can create contaminated dust when lead-based paint is present. Consider professional testing or follow appropriate lead-safe containment, dust-control, cleanup, and disposal practices before disturbing questionable coatings.
Materials and Tools
Typical Materials for an 8-by-10-Foot Shed
- Pressure-treated skids, floor joists, rim boards, and exterior-grade floor panels
- Crushed stone and approved concrete blocks, piers, anchors, or slab materials
- Dimensional lumber for studs, plates, headers, rafters, and blocking
- Structural wall and roof sheathing
- Weather-resistant wall membrane and compatible flashing tape
- Roof underlayment, drip edge, and shingles or metal roofing
- Reclaimed fence pickets for siding and decorative details
- Exterior trim boards
- Corrosion-resistant nails, screws, connectors, hinges, and latches
- Exterior primer, paint, stain, or clear finish
- Screened vents, door hardware, and optional windows
Useful Tools
- Tape measure, chalk line, framing square, speed square, and level
- Circular saw or miter saw with an appropriate wood-cutting blade
- Drill, impact driver, hammer, and pry bar
- Shovel, rake, hand tamper, and wheelbarrow
- Ladders or rated work platforms
- Clamps and temporary wall braces
- Eye protection, hearing protection, work gloves, and dust control equipment
Use connectors and fasteners compatible with pressure-treated lumber. Hot-dipped galvanized or stainless steel hardware is commonly selected for exterior applications because ordinary fasteners can corrode when exposed to moisture and copper-based wood preservatives.
How to Build the DIY Garden Shed
Step 1: Prepare a Stable Foundation
Remove sod, roots, and loose topsoil from an area slightly larger than the shed. Excavate as required for your chosen foundation, install compacted crushed stone, and confirm that the base is level in every direction.
A small shed may sit on pressure-treated skids supported by properly placed blocks or piers over compacted gravel. A concrete slab is another durable option, especially for heavier equipment. Areas with frost, expansive soil, high winds, or poor drainage may require deeper footings or engineered anchorage.
Do not place untreated wood directly on soil. Ground moisture, splashing rain, and trapped leaves create excellent conditions for decay. Elevating the structure also improves airflow beneath the floor.
Step 2: Build and Square the Floor
Construct the floor frame from pressure-treated lumber sized for the planned span and load. Assemble the rim boards and joists on a flat surface, using an approved framing schedule. Measure diagonally from corner to corner. When both diagonal measurements match, the frame is square.
Anchor the floor frame according to local wind requirements and the selected foundation system. Install exterior-grade floor sheathing with panel edges properly supported. Stagger joints where appropriate and leave manufacturer-recommended expansion gaps.
Step 3: Frame the Walls
Lay out the bottom and top plates together so stud locations align. Conventional 2-by-4 framing at 16 inches on center is common for small sheds, but lumber size and spacing must suit the roof load, wall height, local wind conditions, and approved plans.
Frame the back wall first, followed by the side walls and front wall. Build proper rough openings for doors and windows, including king studs, jack studs, headers, and cripple studs where required. Raise each wall with help, temporarily brace it, check it for plumb, and fasten it securely to the floor and adjoining walls.
Step 4: Add Structural Sheathing
Reclaimed pickets do not provide the same predictable bracing as rated structural panels. Cover the framed walls with approved structural sheathing, following the panel manufacturer’s orientation, edge-spacing, and fastening instructions.
The sheathing helps prevent the shed from racking sideways under wind loads. It also creates a smooth backing for the weather-resistant barrier and reclaimed siding. Flash door and window openings carefully so water is directed out over lower layers rather than trapped inside the wall.
Step 5: Frame and Cover the Roof
A simple gable roof complements picket-fence siding and provides useful overhead space. Rafters or prefabricated trusses must be sized for the building width, spacing, roof pitch, snow load, wind exposure, and roofing material. Use recognized span tables or approved plans rather than guessing.
Install roof sheathing over the framing, keeping panels dry and properly spaced. Add drip edge, roof underlayment, flashing, and the selected roofing material in the sequence required by the manufacturer. Asphalt shingles are familiar and widely available; corrugated metal can be lighter and visually appropriate for a rustic garden shed.
Roof work carries serious fall risk. Use stable access equipment, avoid wet or windy conditions, and hire a qualified professional when the height, pitch, or installation exceeds your experience.
Step 6: Install the Picket-Fence Siding
Cover the wall sheathing with a properly installed weather-resistant barrier. Depending on the siding pattern and local climate, vertical furring strips may be added to create a drainage and drying space behind the pickets.
Lay several boards on the ground to test the pattern before fastening anything. Mixing narrow and wide pickets can create a pleasing patchwork, while arranging them by height produces a cleaner cottage look. Trim damaged bottoms square, but consider preserving decorative pointed or rounded tops around gables, doors, and accent panels.
Install the pickets vertically over framing or furring, leaving a small gap where needed for seasonal movement and drainage. Use corrosion-resistant fasteners long enough to penetrate the supporting material securely. Avoid driving screws or nails so tightly that they crush the board fibers.
For better weather protection, overlap pickets, add narrow battens over the joints, or install the boards over conventional lap siding. A random edge-to-edge arrangement may look charming, but charm is less impressive when rain blows directly into the wall cavity.
Step 7: Build the Doors
Create door frames from straight structural lumber, then apply reclaimed pickets as the decorative face. A diagonal brace running from the lower hinge side toward the upper latch side helps resist sagging. Use three heavy-duty hinges on tall doors and mount hardware into solid framing rather than thin pickets alone.
Double doors make bulky garden equipment easier to move. Install a cane bolt or interior latch on the inactive door and weather-resistant locking hardware on the active door. Leave enough clearance at the threshold for seasonal swelling and minor movement.
Step 8: Add Ventilation and Interior Storage
Install screened vents high on opposing walls or in the gable ends. Air movement helps reduce condensation and musty odors, particularly when damp hoses, muddy tools, or lawn equipment are stored inside.
Add shelves, pegboard, wall hooks, and freestanding racks without overloading individual studs. Store long-handled tools vertically, keep chemicals in approved containers, and leave a clear pathway to the doors. Place heavy equipment near the floor-frame supports rather than concentrating everything in one unsupported corner.
Step 9: Finish and Protect the Exterior
Scrape loose finish, sand rough edges as appropriate, and spot-prime bare wood. Seal vulnerable end grain, especially at freshly cut bottoms. Apply a compatible exterior primer and paint, or use a penetrating exterior stain suitable for the wood species and existing finish.
A painted body with contrasting trim creates a classic cottage effect. For a more weathered appearance, combine muted gray, white, sage, or barn-red boards. Decorative variation is welcome; active rot is not. Continue to inspect the lower siding, corners, trim joints, roof edges, and door bottoms every year.
Design Ideas That Make the Shed Look Intentional
Reclaimed projects look best when at least one design element creates order. Use matching trim around every opening, repeat a single picket shape in the gables, or paint the door and corner boards one consistent color.
- Create miniature shutters from short pickets.
- Use pointed pickets as decorative gable trim.
- Add a narrow potting bench beneath a window.
- Build a small ramp from ground-contact-rated lumber.
- Install a rain chain or gutter that directs runoff away from the foundation.
- Mount an exterior tool rack beneath a roof overhang.
- Surround the shed with gravel to reduce mud and splashback.
Keep shrubs, vines, mulch, and stored materials away from the siding. Plants pressing against wood slow drying, conceal insect activity, and make maintenance difficult.
Common Mistakes to Avoid
Using Pickets as Structural Studs
Fence boards are cladding, not substitutes for studs, rafters, floor joists, headers, or structural sheathing.
Building on Loose Soil
A beautiful shed on a weak foundation eventually becomes a crooked shed with stubborn doors. Compact the base carefully and use a foundation appropriate for local soil and frost conditions.
Skipping Water Management
Roof overhangs, flashing, drip edges, drainage gaps, exterior coatings, and ground clearance are not optional decorations. They are the details that keep reclaimed wood from returning to compost ahead of schedule.
Ignoring Fastener Compatibility
Indoor screws and bright common nails can rust quickly outdoors. Use exterior-rated, corrosion-resistant fasteners compatible with treated lumber and the local environment.
Installing Damp Boards
Wet pickets may shrink, twist, cup, or split after installation. Let reclaimed boards dry under cover before trimming and fastening them.
Practical Experiences and Lessons from Similar Shed Builds
The first lesson from reclaimed-fence projects is that board preparation takes longer than expected. Builders often imagine removing a fence in the morning and installing its boards that afternoon. In reality, pulling fasteners, trimming rotten ends, washing dirt from the grain, sorting widths, and allowing the wood to dry can consume several days. Preparing all the pickets before framing begins makes the later installation faster and produces a more consistent result.
Material estimates also deserve a generous margin. A fence may appear to contain enough boards to cover four walls, but damage becomes more obvious after removal. Old nail holes split, buried ends reveal decay, and warped boards sometimes refuse every reasonable invitation to lie flat. Reserving roughly 15 to 25 percent more picket area than the calculated wall coverage reduces the risk of running short midway through the most visible wall.
Another common experience is discovering that reclaimed boards rarely share identical dimensions. A difference of only one-quarter inch can gradually throw an entire siding course out of alignment. Sorting pickets by width and thickness before installation helps. Some builders alternate sizes deliberately so the variation looks like a design choice rather than a measurement accident wearing work boots.
Squaring the foundation and floor is the point at which patience pays the highest dividend. A small error at the base travels upward into wall corners, roof framing, trim joints, and doors. Experienced DIYers repeatedly measure the floor diagonals, brace the frame, and check again after sheathing. Five extra minutes with a tape measure can prevent five hours of persuading a crooked door to close.
Door weight is another surprise. Reclaimed pickets look light when handled individually, but a full-size door covered with them can become heavy. A rigid frame, diagonal bracing, strong hinges, and solid fastening points are essential. Hanging the door before applying every decorative board can make final fitting easier. Additional pickets can then be installed while periodically testing the swing and latch alignment.
Builders also learn that rustic does not mean unfinished. Leaving weathered color visible can be attractive, but exposed end grain and lower edges still need protection. Water often enters through cut ends faster than through the broad face of a board. Sealing cuts, maintaining ground clearance, directing roof runoff away from the walls, and repainting vulnerable areas provide more longevity than simply coating the front surface.
Finally, successful shed projects are usually completed in stages rather than one heroic weekend. A realistic sequence might include site preparation and foundation work first, floor and walls second, roofing third, and siding, doors, paint, and storage later. Getting the structure dried-in quickly is more important than rushing decorative details. Once the roof and weather barrier are secure, the picket-fence personality can be added without racing the next rain cloud.
The finished shed will probably contain a few uneven boards, visible nail holes, and variations in color. Those details are not defects when the structure beneath them is square, dry, and secure. They are evidence that the material had a previous lifeand that someone saw a garden building where everyone else saw an old fence.
Conclusion
A DIY garden shed from picket fence boards succeeds when creative reuse is supported by sound construction. Build a stable foundation, frame the shed with structural lumber, brace it with rated sheathing, install a weatherproof roof, and treat the reclaimed pickets as attractive exterior cladding.
The project requires more preparation than assembling a prefabricated shed, but the result has far more personality. You gain organized garden storage, keep usable wood out of the waste stream, and create an outbuilding that looks as though it has always belonged among the flower beds.
Note: Dimensions, lumber sizes, footing details, fastener schedules, roof loads, anchoring methods, and permit requirements vary by location. Verify the design with the local building authority and use manufacturer instructions for all structural panels, connectors, coatings, and roofing products.











