
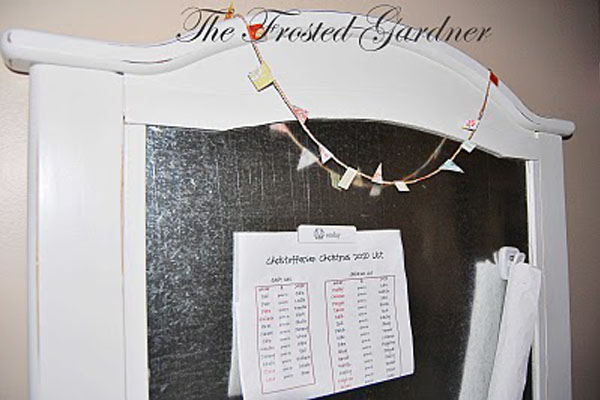
Some baby furniture has a second life hiding inside it. A crib, for example, may retire from nursery duty, but its sturdy rails, sentimental value, and charming shape can still work overtime. Instead of letting an old crib collect dust in the garage like a wooden guilt trip, you can turn one side rail into a stylish magnet board for notes, photos, schedules, kids’ artwork, grocery lists, craft-room inspiration, or that one school form you swear you will not lose this time.
This Crib Turned Magnet Board Re-purpose Project is a smart blend of upcycling, home organization, and budget-friendly DIY décor. It keeps a meaningful piece out of the landfill, gives your wall a useful focal point, and creates a custom magnetic memo board that looks more personal than anything pulled from a big-box aisle. Even better, the project is flexible. You can make it farmhouse, modern, colorful, vintage, nursery-inspired, or “I had 40 minutes and coffee” chic.
Before grabbing the drill and declaring yourself the Picasso of power tools, there are a few safety and design choices worth understanding. Old cribs should not automatically be reused for babies, especially if they are drop-side, damaged, missing hardware, or older than current crib safety standards. But as a wall-mounted organizer, a solid crib rail can become a beautiful and practical piece of décor when properly cleaned, repaired, sealed, and secured.
Why Turn an Old Crib Into a Magnet Board?
A crib often carries emotional weight. It may be the place where your child learned to stand, where stuffed animals held late-night board meetings, or where parents discovered that sleep deprivation is not a personality trait but a lifestyle. Throwing it away can feel wasteful. Repurposing it lets you keep the memory while changing its function.
From a design standpoint, a crib rail already has structure. The slats create a built-in frame, the wood is usually sized for visibility, and the rectangular shape fits naturally above a desk, mudroom bench, kitchen counter, laundry area, playroom table, or homeschool station. By adding a magnetic surface behind or within the crib rail, you transform a simple piece of baby furniture into a command center with character.
Best Uses for a Crib Magnet Board
A finished crib magnet board can work in several areas of the home. In a kitchen, it can hold meal plans, coupons, chore charts, and appointment reminders. In a mudroom, it can organize school notes, sports schedules, keys, permission slips, and seasonal checklists. In a craft room, it becomes an inspiration board for fabric swatches, color palettes, sketches, and tiny creative sparks that would otherwise vanish under a pile of receipts. In a child’s room, it can display artwork and photos, as long as you use large, child-safe magnets and mount everything securely.
The beauty of this project is that it looks intentional. A plain magnetic board can feel office-like, but an upcycled crib rail adds warmth, texture, and story. It says, “Yes, I organize my life,” while also saying, “Yes, this used to hold a baby who once ate a board book.” That is range.
Materials and Tools You Will Need
The exact supply list depends on your crib style and the look you want, but most versions of this DIY crib repurpose project require a few basic materials. Start with one crib side rail or end panel. Choose the piece that has the best shape, strongest frame, and least damage. Avoid anything cracked, rotted, splintered, or badly warped. Sentiment is lovely; structural sadness is not.
Basic Materials
- One old crib rail or crib end panel
- Galvanized steel sheet or thin ferrous metal panel
- Sandpaper or sanding sponge
- Degreasing cleaner or mild soap
- Primer suitable for wood
- Paint, stain, chalk paint, or clear protective finish
- Small screws, finishing nails, or construction adhesive
- Picture-hanging hardware, D-rings, French cleat, or wall-mounting brackets
- Drywall anchors or screws long enough to reach wall studs
- Large decorative magnets
Helpful Tools
- Tape measure
- Pencil
- Drill or screwdriver
- Tin snips or metal-cutting tool if trimming sheet metal
- Gloves for handling metal edges
- Stud finder
- Level
- Paintbrush, foam roller, or sprayer
- Clamps, if attaching a backing panel
For the magnetic surface, galvanized steel is usually the easiest option. Magnets need a ferrous surface to stick well, so do not assume every shiny metal will work. Aluminum will not hold magnets. Some stainless steel is not magnetic either. Before buying or cutting, test the material with a magnet. If the magnet slides off like it has somewhere better to be, choose another panel.
Safety First: What to Check Before Repurposing a Crib
This project is not about making an old crib safe for sleeping. It is about using part of the crib as décor. That distinction matters. Older cribs may no longer meet modern safety rules for infant sleep, and drop-side cribs have been a major safety concern in the United States. If the crib is outdated, recalled, modified, or damaged, do not pass it along for baby use. Repurposing it for non-sleep décor is a much better option.
Check for Lead Paint
If the crib is vintage, antique, or you do not know its age, take lead safety seriously. Older painted furniture can contain lead-based paint. Sanding, scraping, or cutting lead-painted surfaces can create dangerous dust. Use a lead test kit or consult a professional before disturbing old paint. If you suspect lead, do not sand it casually in the driveway while telling yourself, “It’ll probably be fine.” That sentence has never improved a DIY project.
Inspect the Wood
Look for loose joints, cracked rails, splinters, missing hardware holes, peeling finish, and water damage. Tighten what can be tightened, fill minor holes, and sand rough edges smooth. A magnet board will be touched often, so the surface should be comfortable and snag-free. If the rail feels weak when you flex it, skip it or use it only as a lightweight decorative frame over a fully supported backer board.
Use Magnets Wisely
Magnets are useful, but small high-powered magnets can be hazardous if children swallow them. For family spaces, choose large magnets that are too big to be swallowed and avoid loose rare-earth magnet sets around young children. If the board will hang in a playroom, use decorative magnets with secure, enclosed backs and inspect them regularly. A magnet board should organize chaos, not create a new emergency-room subplot.
Step-by-Step: How to Make a Crib Turned Magnet Board
Step 1: Choose the Crib Section
Select the crib panel that best fits your wall. A long side rail makes a wide horizontal board, perfect for a kitchen or hallway. A shorter end panel works well above a desk or in a small entryway. Measure the wall first, then measure the crib piece. This prevents the classic DIY mistake of building something magnificent that only fits in the garage, next to the holiday bins.
Step 2: Clean the Frame Thoroughly
Remove dust, old stickers, grime, and mystery nursery residue. Mild soap and warm water are usually enough for newer furniture. For glossy finishes, use a cleaner that removes grease so primer can adhere properly. Let the wood dry completely before sanding or painting. Moisture trapped under paint can lead to bubbling, peeling, or the kind of finish that makes you whisper, “We do not speak of this wall.”
Step 3: Sand and Prep the Surface
Lightly sand the crib frame to remove shine and smooth rough spots. You are not trying to erase its entire past; you are simply giving primer something to grip. Wipe away dust with a tack cloth or damp rag. If the piece has dents or screw holes you dislike, fill them with wood filler and sand smooth after it dries.
Step 4: Prime and Paint
Apply primer if you plan to paint the crib rail. Primer helps improve adhesion and gives the final color a more even finish. For a farmhouse look, choose white, cream, sage, navy, or soft gray. For a child’s room, try cheerful colors like sky blue, coral, apple green, or sunny yellow. For a modern command center, matte black or charcoal can look surprisingly polished.
Use thin coats rather than one heavy coat. Thick paint may drip around the slats and make the frame look gummy. Let each coat dry as directed by the product label. If using chalk-style paint, consider sealing it with wax or a clear topcoat, especially in a busy kitchen or mudroom.
Step 5: Add the Magnetic Surface
Measure the opening behind the crib rail and cut a galvanized steel sheet to fit. Many home improvement stores sell sheet metal in standard sizes, and some metal suppliers can cut it for you. Wear gloves when handling cut metal because the edges can be sharp. If necessary, smooth edges with a metal file and cover them with trim, wood strips, or the crib frame itself.
You can attach the metal sheet behind the crib panel so the slats sit in front like a decorative frame. This creates depth and gives the board a charming grid effect. Another option is to mount the steel panel to a thin plywood backing, then secure the crib rail over it. This approach adds strength and makes hanging easier.
Step 6: Secure the Backing
Attach the metal panel using small screws, finishing nails with washers, or construction adhesive rated for metal and wood. If using adhesive, clamp the pieces while they cure and follow the manufacturer’s timing. Screws are often more dependable for a board that will be handled frequently. Place fasteners where they are hidden by the crib frame or evenly spaced so they look intentional.
If the metal surface feels too industrial, you can paint over it with latex paint. Magnets will still stick if the paint layer is not too thick, though stronger magnets may work better. Another option is to cover the metal with thin fabric, wallpaper, or removable peel-and-stick paper. Test magnet strength before committing. A gorgeous board that cannot hold a grocery list is basically wall jewelry with commitment issues.
Step 7: Add Hooks, Clips, or Small Shelves
A crib magnet board can do more than hold magnets. Add small cup hooks along the bottom rail for keys, scissors, lanyards, or measuring tape. Attach binder clips for papers. Mount a narrow ledge for chalk, pens, or envelopes. If you are using the board in a family command center, label sections for school, bills, meal planning, sports, and reminders. Organization is more likely to stick when every item has a home and that home does not involve being shoved under the toaster.
Step 8: Hang It Securely
Because crib rails and metal sheets can be heavier than they look, plan the hanging method carefully. The strongest option is to mount the board into wall studs. Use a stud finder, mark your placement, and check everything with a level. If studs are not available where you need them, choose wall anchors rated for more than the finished weight of the board. A French cleat is a great choice for wider or heavier boards because it distributes weight across the frame.
Do not rely on lightweight adhesive hooks for this project. They may be fine for a paper calendar, but a wood-and-metal magnet board deserves real hardware. Gravity is patient, and it loves dramatic timing.
Design Ideas for Different Home Styles
Farmhouse Crib Magnet Board
Paint the crib frame warm white, distress the edges lightly, and pair it with galvanized metal. Add black hooks and simple label tags. This style works beautifully in a kitchen, mudroom, or laundry room. It feels cozy without trying too hard.
Modern Minimalist Version
Choose a clean crib panel with straight lines. Paint it matte black, deep green, or soft greige. Use a smooth steel insert and simple round magnets. Keep accessories minimal. The result looks less like “baby furniture makeover” and more like a custom designer memo board.
Kids’ Art Display Board
Use a cheerful paint color and oversized magnets shaped like animals, letters, stars, or wooden circles. Add a child’s name across the top rail with painted letters or vinyl decals. Keep the board low enough for supervised use, but make sure it is firmly mounted and free of small magnets.
Craft Room Inspiration Board
For a craft space, keep the crib slats visible and use them to hang ribbon, small baskets, scissors, or lightweight tools. The magnetic panel can hold patterns, sketches, color cards, and project notes. It is especially helpful for visual planners who need ideas in sight or they vanish into the same mental drawer as passwords and dentist appointments.
Common Mistakes to Avoid
Using the Wrong Metal
Not all metal is magnetic. Always test the panel before attaching it. Galvanized steel is usually reliable, but aluminum is not. If you paint or cover the metal, test again with the magnets you plan to use.
Skipping Surface Prep
Paint needs a clean, lightly sanded surface. If the finish is glossy or dusty, paint may peel. Take the extra time to prep properly. Future you, the person not repainting peeling slats on a Tuesday night, will be grateful.
Choosing Tiny Magnets in a Family Space
Small magnets are easy to lose and can be dangerous around kids. Choose large magnets and check them often. Decorative magnets should be sturdy, not flimsy pieces with weak glued-on backs that pop loose after a week.
Mounting It Like a Poster
This is a real object with real weight. Use proper hanging hardware. When in doubt, mount into studs or use a French cleat. A finished board should feel solid when you remove a magnet or pull off a paper.
Budget Breakdown
If you already own the crib, this project can be surprisingly affordable. A sheet of galvanized steel, paint, primer, hardware, and magnets may cost less than buying a large decorative magnet board new. Costs vary depending on size, paint quality, and whether you need specialty tools. If you can reuse leftover paint, spare hooks, or existing wall anchors, the project becomes even more budget-friendly.
The best value comes from balancing sentiment and practicality. If the crib is meaningful and structurally sound, repurposing it gives you a custom piece with a story. If the crib is badly damaged, covered in questionable paint, or too heavy for your wall, consider using only part of it, such as the top rail or decorative end panel.
How to Maintain Your Crib Magnet Board
Once installed, maintenance is simple. Dust the frame regularly, wipe the metal surface with a soft cloth, and avoid soaking painted wood. Check wall hardware every few months, especially if the board is in a high-traffic area. Inspect magnets for loose parts. If the finish gets scuffed, touch it up with leftover paint.
To keep the board useful, reset it weekly. Remove outdated papers, rotate photos, update the meal plan, and clear clutter. A magnet board can become a beautiful organizing tool, but it can also become a paper museum if ignored. If a permission slip from three grades ago is still hanging there, it is time for a refresh.
Personal Experience: Lessons From Making a Crib Turned Magnet Board
The first thing you learn during a crib turned magnet board project is that old baby furniture is weirdly emotional. You begin with a practical plan: clean, sand, paint, attach metal, hang. Then suddenly you are holding one crib rail and remembering tiny pajamas, midnight feedings, and the era when a pacifier falling behind the crib felt like a national emergency. Repurposing the piece gives you a way to keep the memory without keeping a full crib in storage forever.
The second lesson is that measuring twice is not a cute saying; it is survival. Crib rails are rarely as square as they look, especially after years of assembly, disassembly, moving, storage, and being used as an indoor climbing gym by toddlers with no fear and suspicious upper-body strength. Before cutting the metal panel, measure the opening at the top, middle, and bottom. If the frame is slightly uneven, cut the insert to fit the smallest measurement, then hide minor gaps with trim or the back side of the rail.
Paint choice also matters more than expected. A glossy crib finish can reject paint if you do not sand and prime first. Skipping prep may save 20 minutes at the beginning and cost you two hours later when the paint scratches off with a fingernail. A bonding primer is helpful, especially if the crib has a slick factory finish. Thin coats look better around slats than thick ones. Slats are drip magnets, and not the useful kind.
One of the most satisfying parts of the project is choosing how the board will function. For a kitchen command center, it helps to divide the space into zones: meals, school, mail, and reminders. For a craft room, stronger magnets and hooks make the board more useful. For a kid’s art display, the goal is not perfect organization; it is giving artwork a place of honor that is not the refrigerator door slowly disappearing under construction paper.
The biggest surprise is how finished the project looks once it is on the wall. While it is lying on a workbench, it may feel like a strange crib-metal sandwich. But after mounting, adding magnets, and placing a few photos or notes, the piece becomes intentional. It has warmth that a store-bought board usually lacks. It also becomes a conversation starter. Guests notice it, ask where it came from, and then you get to say, “It used to be a crib,” which is much more interesting than “I panic-bought it online at 11:42 p.m.”
There is also a practical emotional benefit: it frees space. Many families keep old baby furniture because they are not ready to let it go. A repurpose project creates a middle path. You are not throwing away the memory, but you are not letting the memory occupy half the basement either. The crib becomes useful again, only now it holds birthday invitations, family photos, spelling lists, travel plans, and the weekly grocery list that somehow still forgets eggs.
Most importantly, this project teaches that good DIY is not about perfection. It is about thoughtful reuse, safe construction, and making something that fits your actual life. A small scratch, a slightly uneven slat, or a paint texture that shows the grain can add character. The finished crib magnet board does not need to look factory-made. In fact, it is better when it does not. It should look like a meaningful object that grew into a new job.
Conclusion
A Crib Turned Magnet Board Re-purpose Project is a practical, sentimental, and stylish way to give old baby furniture a new purpose. With a solid crib rail, a magnetic steel insert, safe hardware, and a little paint, you can create a custom memo board that organizes daily life while preserving a meaningful piece of family history.
The key is to approach the project with both creativity and care. Clean and inspect the crib, avoid unsafe old finishes, choose the right magnetic surface, use child-safe magnets, and mount the finished board securely. From farmhouse kitchens to craft rooms and kids’ art walls, this upcycled crib project proves that furniture can grow up right alongside the family that loved it first.
Note: This project is intended for decorative and organizational use only. Do not reuse an outdated, recalled, damaged, or modified crib for infant sleep. Always test old painted furniture for lead before sanding or refinishing, and keep small or high-powered magnets away from children.













