
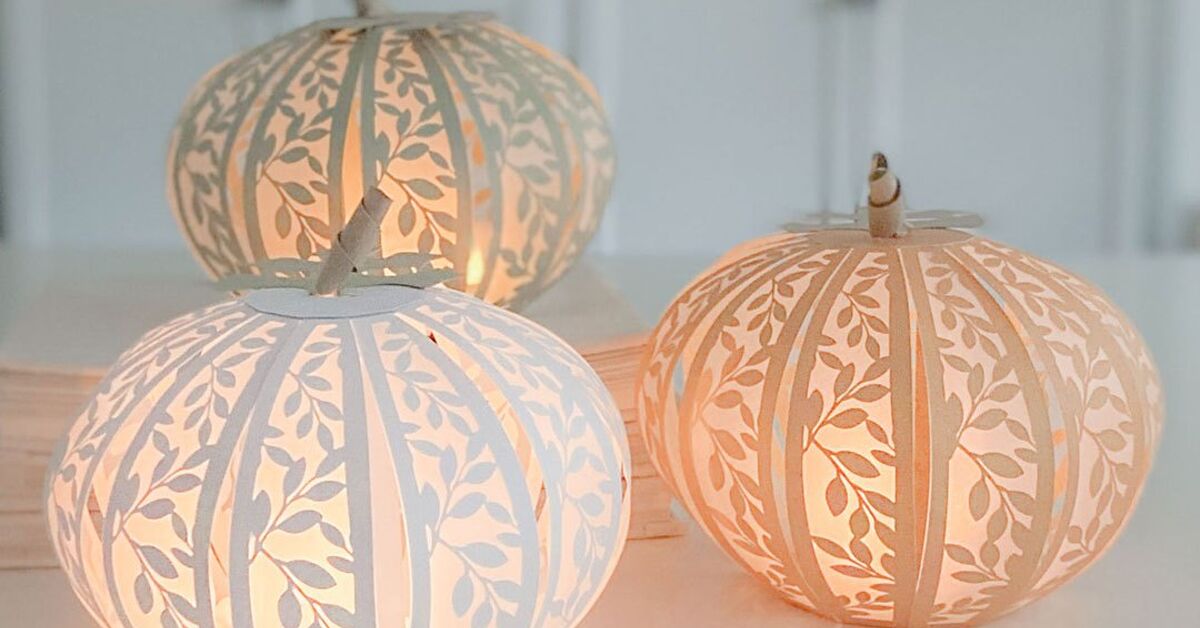
Fall decorating has a funny way of sneaking up on us. One minute you are sipping iced coffee in July, and the next minute your front porch is emotionally ready for hay bales, cinnamon candles, and pumpkins in every size known to civilization. But real pumpkins can be messy, expensive, heavy, andlet’s be honestoccasionally dramatic. They rot. They leak. They attract bugs. They collapse into a sad orange soup at exactly the wrong moment.
That is where paper pumpkins come in like the charming little heroes of autumn decor. They are affordable, lightweight, kid-friendly, apartment-friendly, and easy to customize for Halloween, Thanksgiving, fall weddings, classroom displays, office desks, mantels, tablescapes, and cozy reading corners. Even better, you do not need to be a professional crafter with a glitter-dusted studio and a glue gun holster. If you can cut paper, fold paper, and resist the urge to glue your fingers together, you can make beautiful DIY paper pumpkins.
In this guide, you will learn how to make paper pumpkins for your fall decor using simple supplies like cardstock, scrapbook paper, paper bags, book pages, tissue paper, and construction paper. We will cover several stylesfrom classic 3D paper strip pumpkins to rustic paper bag pumpkins and elegant folded paper pumpkinsplus decorating ideas, troubleshooting tips, and real-life experience notes to help your finished pumpkins look intentional instead of “craft project survived a small tornado.”
Why Paper Pumpkins Are Perfect for Fall Decorating
Paper pumpkins are one of the easiest fall crafts because they deliver a big seasonal look without requiring expensive materials. A few sheets of cardstock can become a mantel full of mini pumpkins. Brown lunch bags can become rustic farmhouse decor. Old book pages can become vintage-style pumpkins that look like they belong in a cozy library with a cat named Professor Biscuit.
They are also flexible. Want traditional orange pumpkins? Use orange cardstock. Prefer modern fall decor? Try cream, blush, sage green, terracotta, copper, or black-and-white patterned scrapbook paper. Decorating for Halloween? Add jack-o’-lantern faces, paper bats, black stems, or mini witch hats. Decorating for Thanksgiving? Pair paper pumpkins with dried leaves, wheat, acorns, faux berries, and warm candlelight from battery-operated candles.
Another major bonus: paper pumpkins are reusable if you store them carefully. Unlike real pumpkins, they will not betray you by decomposing on the porch. At the end of the season, place them in a shoebox or storage bin with tissue paper, and they can return next year like tiny autumn celebrities.
Best Paper to Use for DIY Paper Pumpkins
The type of paper you choose will affect the shape, durability, and style of your pumpkin. Lightweight paper is easier to fold and curve, while heavier cardstock gives structure. For most paper pumpkin crafts, a medium-weight cardstock or scrapbook paper is the safest choice.
Cardstock
Cardstock is ideal for 3D paper strip pumpkins, folded pumpkins, and pumpkins that need to stand upright. It holds its shape well and comes in many colors. Use 65 lb to 80 lb cardstock for easy cutting and curling.
Scrapbook Paper
Scrapbook paper is perfect when you want decorative patterns such as plaid, gingham, florals, dots, buffalo check, or vintage prints. Patterned paper makes your pumpkins look more polished with very little effort, which is the crafting equivalent of wearing sunglasses after a bad night’s sleep.
Construction Paper
Construction paper works well for kids’ crafts and casual decorating. It is affordable and easy to cut, though it may not hold a rounded shape as crisply as cardstock.
Brown Paper Bags
Paper bags create a rustic, farmhouse-style pumpkin. They can be stuffed with tissue, newspaper, or recycled packing paper and tied at the top to form a stem.
Book Pages or Sheet Music
Old book pages, dictionary pages, or printed sheet music create charming vintage pumpkins. Use copies or damaged books rather than treasured volumes. We are making decor, not committing literary crimes.
Tissue Paper and Crepe Paper
Tissue paper and crepe paper are great for party favors, soft pumpkin shapes, and lightweight garlands. They are delicate, so use them for decorative pieces that will not be handled too often.
Supplies You Will Need
For a basic set of paper pumpkins, gather the following materials:
- Orange, cream, brown, green, or patterned cardstock
- Scissors or a craft knife
- Ruler
- Pencil
- Hole punch
- Brads, paper fasteners, glue dots, hot glue, or craft glue
- Twine, raffia, yarn, or ribbon
- Green or brown paper for leaves and stems
- Cardboard tube, optional for some designs
- Floral wire or pipe cleaners, optional for curly vines
- Battery-operated tea lights, optional
If children are helping, choose safety scissors and regular craft glue. Adults should handle hot glue guns, craft knives, and any detailed cutting. Also, if you plan to place lights near your pumpkins, use battery-operated LED candles only. Paper and real flames are not fall friends.
Method 1: How to Make Classic 3D Paper Strip Pumpkins
This is the most popular style of DIY paper pumpkin because it looks impressive but is surprisingly easy. The pumpkin is made from paper strips that curve into a round shape, with a stem and leaves added on top.
Step 1: Cut the Paper Strips
Cut 8 to 12 strips of cardstock. For a medium pumpkin, make each strip about 1 inch wide and 10 to 12 inches long. For a smaller pumpkin, try 3/4 inch wide and 6 to 8 inches long. The more strips you use, the fuller your pumpkin will look.
Step 2: Punch Holes at Both Ends
Stack the strips neatly and punch a hole at each end. Keep the holes centered so the pumpkin forms evenly. If you do not have a hole punch, you can carefully poke holes with a craft needle, but a hole punch gives cleaner results.
Step 3: Secure the Bottom
Push a paper fastener or brad through the hole at one end of all the strips. Spread the strips out like a starburst. This will become the bottom of the pumpkin.
Step 4: Bring the Top Together
Gently curve each strip upward and gather the top holes together. Insert another brad through the top holes. As you bring the strips together, they will form a rounded pumpkin shape. Adjust the spacing so the strips are evenly distributed.
Step 5: Add the Stem
Roll a small rectangle of brown cardstock into a tube and glue it closed. Attach it to the top of the pumpkin. You can also use a small twig, cinnamon stick, rolled paper bag strip, or piece of twisted craft paper for a more natural look.
Step 6: Add Leaves and Vines
Cut one or two leaves from green cardstock. For curly vines, wrap floral wire, a pipe cleaner, or a thin paper strip around a pencil, then slide it off. Glue the leaves and vines near the stem.
These paper strip pumpkins are excellent for mantels, shelves, tiered trays, Thanksgiving place settings, and classroom crafts. Make several in different sizes to create a little pumpkin patch. A cluster always looks better than one lonely pumpkin wondering where its friends went.
Method 2: How to Make Folded Paper Pumpkins
Folded paper pumpkins have a more sculptural look. They are made by cutting several identical pumpkin shapes, folding them in half, and gluing them together to create a 3D design.
Step 1: Create a Pumpkin Template
Draw a simple pumpkin silhouette on a piece of cardboard. It should look like a rounded oval with a few soft bumps along the sides. Cut out the template.
Step 2: Trace and Cut
Trace the template onto cardstock or scrapbook paper 8 to 12 times. Cut out each pumpkin shape carefully. If you want a fuller pumpkin, use more pieces.
Step 3: Fold Each Shape
Fold each pumpkin shape in half vertically, with the decorative side facing inward if using patterned paper.
Step 4: Glue the Halves Together
Apply glue to one folded half and attach it to the folded half of another piece. Continue gluing until all pieces are connected. Before closing the final section, insert a small paper stem or twig at the top.
Step 5: Finish and Fluff
Glue the final two sides together to complete the pumpkin. Gently open and adjust the sections so the pumpkin stands evenly. Add a leaf, bow, or twine loop if desired.
Folded paper pumpkins are beautiful as table centerpieces because they look tidy from every angle. They also work well for fall wedding decor, neutral Thanksgiving tables, and book-page crafts.
Method 3: How to Make Rustic Paper Bag Pumpkins
Paper bag pumpkins are ideal when you want quick fall decor with a cozy, handmade feel. They are especially good for kids because the process is forgiving. If the pumpkin turns out lumpy, just call it “heirloom variety” and move on confidently.
Step 1: Fill the Bag
Open a brown paper lunch bag and stuff it with crumpled newspaper, tissue paper, or recycled packing paper. Do not overfill it. Leave enough space at the top to twist the bag closed.
Step 2: Shape the Pumpkin
Press the stuffed bag into a round pumpkin shape. Twist the top tightly to create a stem.
Step 3: Tie the Stem
Wrap twine, raffia, or yarn around the twisted top. Tie it securely. You can also wrap the stem with floral tape or brown paper for a more finished look.
Step 4: Add Pumpkin Ridges
To create ridges, wrap twine around the pumpkin from top to bottom several times, gently pulling to indent the sides. Tie the twine near the stem.
Step 5: Decorate
Add leaves made from cardstock, dried leaves, fabric scraps, or faux greenery. For Halloween, glue on black paper eyes and a smile. For Thanksgiving, add a small name tag and use each pumpkin as a place card.
Paper bag pumpkins are charming on entry tables, kitchen counters, kids’ craft displays, or casual fall party tables. They are also budget-friendly because you can make a whole patch from supplies you probably already have.
Method 4: How to Make Tissue Paper Pumpkin Party Favors
Tissue paper pumpkins are light, colorful, and perfect for Halloween parties or Thanksgiving kids’ tables. They can hold candy, small toys, stickers, or handwritten gratitude notes.
Step 1: Layer the Tissue Paper
Place two or three sheets of orange tissue paper on top of each other. Cut them into a large circle, about 10 to 12 inches across.
Step 2: Add the Filling
Place a small handful of candy or treats in the center. Do not overfill, or the pumpkin will look less like decor and more like it is smuggling snacks. Although, honestly, respect.
Step 3: Gather and Twist
Pull the edges of the tissue paper up around the treats and twist the top closed. Wrap the twisted section with green floral tape, ribbon, or washi tape to create a stem.
Step 4: Add Leaves
Cut small leaves from green paper and tape or glue them to the stem. You can also curl a thin strip of green paper around a pencil to make a vine.
Display these tissue paper pumpkins in a basket, use them as party favors, or place one at each table setting. They are quick, cute, and delightfully low-pressure.
Method 5: How to Make Book Page Paper Pumpkins
Book page pumpkins are perfect for vintage fall decor, farmhouse shelves, libraries, offices, and neutral interiors. They bring texture and charm without shouting “ORANGE!” across the room.
Step 1: Choose Your Paper
Use old book pages, dictionary pages, sheet music, or printed text pages. If the paper is thin, layer two sheets together for strength.
Step 2: Cut Pumpkin Shapes
Use the folded paper pumpkin method above, cutting 10 to 14 identical pumpkin shapes. Slight imperfections are fine. Vintage decor is allowed to have personality.
Step 3: Ink the Edges
For an aged look, lightly rub the edges with brown ink, a soft brown marker, or a little watered-down craft paint. Let the pieces dry before gluing.
Step 4: Assemble
Fold each shape in half and glue the halves together until you form a round pumpkin. Add a twig stem, twine bow, and paper leaf.
These pumpkins look lovely with brass candlesticks, dried eucalyptus, wood beads, amber glass, and cream-colored textiles. They are especially good for people who love fall decor but prefer subtle, cozy style over haunted-house energy.
Creative Ways to Decorate Paper Pumpkins
Once you understand the basic paper pumpkin techniques, you can customize them in endless ways. Paint the edges with metallic gold for a glam look. Use black cardstock for moody Halloween pumpkins. Try white, beige, and kraft paper for modern farmhouse decor. Add plaid paper for cabin style, floral paper for cottagecore charm, or newspaper print for a vintage effect.
You can also decorate the pumpkins with buttons, mini bows, faux leaves, dried flowers, tiny tags, lace, burlap, glitter paper, or hand-lettered words like “thankful,” “gather,” “boo,” or “hello fall.” If you want a kid-friendly version, let children draw faces with markers, glue on googly eyes, or add stickers. The goal is not perfection; it is seasonal joy with a reasonable amount of glue.
Where to Display Paper Pumpkins
Paper pumpkins are lightweight, so they work almost anywhere indoors. Place them on a mantel with garland and fairy lights. Arrange them down the center of a dining table with leaves and candles. Add them to a tiered tray with mugs, mini signs, and cinnamon sticks. Set a few on bookshelves, entry tables, kitchen islands, desks, windowsills, or coffee tables.
For parties, paper pumpkins make adorable place cards. Write each guest’s name on a paper leaf and attach it to the stem. For classrooms, create a pumpkin patch bulletin board. For offices, decorate a shared table without bringing in real pumpkins that may eventually become suspicious.
If you want to use paper pumpkins outside, keep them in a covered area away from rain, wind, and moisture. Paper is brave, but it is not waterproof. A protected porch is fine for short-term display, especially if you use heavier cardstock and avoid placing pumpkins directly on damp surfaces.
Common Mistakes and How to Fix Them
The Pumpkin Looks Flat
Add more paper strips or more folded sections. A fuller pumpkin usually needs at least 10 pieces, especially if the paper is thin.
The Strips Keep Sliding Around
Use brads, glue dots, or a small bead of hot glue to secure the strips at the top and bottom. Let the glue dry before adjusting the shape.
The Pumpkin Will Not Stand Up
Flatten the bottom slightly with your palm. For folded pumpkins, trim the bottom edge just a little to create a stable base.
The Paper Tears
Use thicker cardstock or handle the curves more gently. If using tissue paper, layer multiple sheets for strength.
The Decor Looks Too Childlike
Choose a more refined color palette. Cream, tan, rust, olive green, copper, and deep burgundy instantly make paper crafts look more sophisticated. Matching your paper choices to your home decor is the secret sauce.
How to Store Paper Pumpkins After Fall
To reuse your paper pumpkins, store them carefully. Dust them gently, then place them in a sturdy box. Use tissue paper or bubble wrap between delicate pieces. Do not crush folded pumpkins under heavy decorations. Label the box clearly so next year you are not digging through holiday bins muttering, “Where are my tiny pumpkins?” like a person in an autumn-themed mystery novel.
Paper strip pumpkins can sometimes be flattened slightly for storage, depending on how they are assembled. Paper bag pumpkins may not store as neatly, but they are so inexpensive that you can remake them each year if needed.
Experience Notes: What I Learned Making Paper Pumpkins for Fall Decor
The first thing I learned about making paper pumpkins is that the paper matters more than you think. I once tried to make a full centerpiece from very thin construction paper, and while the pumpkins were technically pumpkin-shaped, they had the posture of tired pancakes. Cardstock changed everything. It curved better, stood better, and made the finished pumpkins look more like intentional fall decor and less like an emergency school project completed five minutes before the bus arrived.
The second lesson is that size variety makes the display look more expensive. A row of identical paper pumpkins can be cute, but a mix of small, medium, and large pumpkins creates that collected, styled look you see in home magazines. I like making one large pumpkin for the center, two medium pumpkins for balance, and several mini pumpkins to scatter around the arrangement. The minis are especially useful because they fill awkward gaps on shelves and tables. They are basically the throw pillows of fall crafting.
I also learned not to underestimate neutral colors. Orange is classic, of course, and it instantly says fall. But cream, kraft brown, muted green, dusty rose, and soft copper can make paper pumpkins feel more grown-up. One of my favorite combinations is ivory cardstock, book pages, and brown twine. Add a few dried leaves or faux wheat stems, and suddenly the whole arrangement looks calm, warm, and cozy. It whispers “autumn” instead of shouting “pumpkin spice emergency.”
Hot glue is helpful, but it is not always necessary. For paper strip pumpkins, brads are cleaner and make the pumpkin easier to adjust. For folded pumpkins, a glue stick or double-sided tape can work better than liquid glue because it prevents wrinkling. For stems and heavier embellishments, hot glue is still the champion. Just use a small amount. A giant blob of glue can make the top of the pumpkin look messy, and it may show through thinner paper.
Another useful trick is to curl the paper strips before assembling the pumpkin. Run each strip gently over the edge of a table or around a marker, the same way you would curl ribbon with scissors. This helps the strips form a rounder shape and reduces creasing. Do not pull too hard, though, or you may bend the paper sharply. Gentle pressure is enough.
For a polished display, I like to style paper pumpkins in groups with different textures. Paper by itself can look flat, so pair it with wood trays, woven baskets, linen napkins, faux leaves, pinecones, acorns, dried flowers, cinnamon sticks, or amber glass jars. The contrast makes the paper pumpkins look like part of a designed fall arrangement rather than random crafts sitting around the house.
If kids are helping, embrace the chaos a little. Their pumpkins may be lopsided, extra sparkly, or decorated with facial expressions no pumpkin has ever made before. That is part of the charm. Set aside a separate “kid pumpkin patch” for the playful versions, and make a few more polished pumpkins for your mantel or table. Everyone wins, and nobody has to explain why the dining room centerpiece has seven googly eyes.
Finally, I learned that paper pumpkins are addictive. You may sit down intending to make three and somehow end up with twelve, plus a garland, a basket arrangement, and a strong opinion about stem shape. That is the magic of an easy fall craft: it gives you quick results, room to experiment, and a cozy handmade touch that makes your home feel ready for the season.
Conclusion
Learning how to make paper pumpkins for your fall decor is one of the simplest ways to bring warmth, creativity, and personality into your home. Whether you choose classic 3D paper strip pumpkins, folded book page pumpkins, rustic paper bag pumpkins, or tissue paper party favors, each version offers a budget-friendly alternative to store-bought decorations. You can keep the look traditional with orange cardstock, make it modern with neutral tones, or go playful with patterned paper and jack-o’-lantern faces.
The best part is that paper pumpkins are easy to personalize. They can be elegant enough for a Thanksgiving table, cute enough for a kids’ craft day, and practical enough for small spaces. With a few sheets of paper, some glue, and a little patience, you can create fall decor that feels festive, handmade, and completely your own. Real pumpkins may get all the attention, but paper pumpkins are the low-maintenance seasonal friends we all deserve.
Note: This article is written as original, web-ready content in standard American English and is based on practical DIY fall craft methods, seasonal decorating principles, and commonly used paper pumpkin techniques.












