
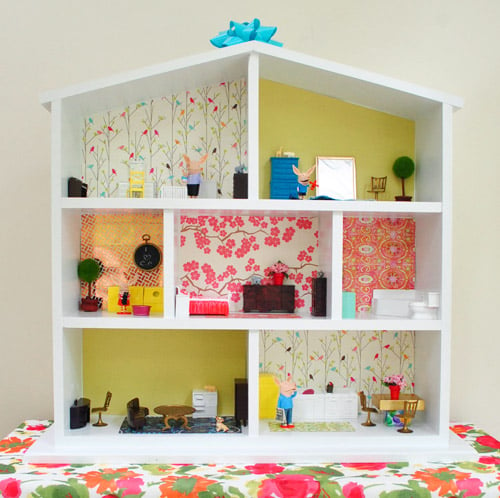
Decorating a dollhouse is interior design with lower mortgage payments, shorter ladders, and furniture you can move with tweezers. It is also a surprisingly thoughtful craft. Every floorboard, lamp, curtain, and tiny coffee cup contributes to the story of whoever supposedly lives thereeven if the residents are suspiciously well-dressed mice.
Whether you are restoring a childhood toy, finishing a wooden kit, or creating a collector-quality miniature, the process follows the same principles: choose a consistent scale, plan hidden work first, establish a design style, and add details gradually. Historic dollhouses can contain hundreds of carefully selected objects, while modern makers often combine handmade pieces, printables, craft materials, and purchased accessories.
Plan the Dollhouse Before Decorating
The easiest way to create a confused miniature interior is to buy furniture before deciding what kind of home you are designing. That is how a Victorian parlor ends up with a neon beanbag chair and a rustic kitchen acquires a chrome nightclub table.
Choose a Story and Style
Begin with a one-sentence design brief. It might be “a cozy 1940s family cottage,” “a modern desert retreat,” “an eccentric artist’s townhouse,” or “a magical bakery where the pastries may be plotting something.” This statement becomes your filter for every decorating decision.
Create a simple mood board using paint chips, fabric scraps, saved photographs, and examples of real interiors. Choose three or four repeating elements, such as warm wood, dusty blue paint, floral patterns, and aged brass. Repeating these elements creates visual unity without making every room look identical.
Measure Every Room
Record each room’s width, depth, ceiling height, door openings, and window placement. Measure large furnishings before purchasing them. Even tiny furniture can be too large, and dollhouse staircases have a remarkable ability to block the one cabinet you thought would fit perfectly.
Understand Dollhouse Scale
Scale determines whether a miniature room looks believable. A common collector scale is 1:12, also called one-inch scale, where one inch represents one foot in real life. Half scale is 1:24, quarter scale is 1:48, and houses made for 12-inch fashion dolls are generally closer to 1:6. Miniaturists work in many scales, but consistency within each scene protects the illusion.
To check an object in 1:12 scale, multiply its miniature measurement by 12. A six-inch miniature cabinet represents a six-foot cabinet. Absolute mathematical perfection is unnecessary for a child’s playhouse, but obvious mismatches are distracting. A dining chair should not tower over the refrigerator unless giants are expected for dinner.
Full-size materials can appear bulky in miniature. Fine-weave fabrics, narrow trim, thin paper, small prints, and lightweight wood usually look more natural than thick upholstery or oversized patterns.
Decorate in the Correct Order
A logical sequence prevents messy and expensive rework. Miniature-building guides recommend planning electrical systems, walls, flooring, trim, and fixed architectural features before filling rooms with furniture. Wallpaper paste is much less charming when it drips onto a completed canopy bed.
- Repair, clean, and sand the shell.
- Plan wiring or battery-light locations.
- Prime and paint ceilings and difficult corners.
- Install wallpaper or other wall finishes.
- Lay flooring.
- Add windows, doors, baseboards, and molding.
- Arrange large furniture.
- Finish with textiles, art, plants, books, and accessories.
Dry-fit important components before gluing them down. Paper templates, painter’s tape, and removable mounting putty allow you to test layouts without making a lifelong commitment to a miniature armoire.
Decorate Dollhouse Walls
Paint for a Flexible Finish
Prime raw wood or medium-density fiberboard so paint absorbs evenly. Matte or eggshell craft paint is easy to apply and tends to photograph well. Light shades make rooms easier to see, while deeper colors create drama and help pale furniture, trim, and artwork stand out.
Apply several thin coats with a small foam brush rather than one heavy coat. Thick paint may hide carved details or cause doors and windows to stick.
Install Miniature Wallpaper
Miniature wallpaper, scrapbook paper, thin wrapping paper, and printable designs can all work. Select small patterns that suit the scale. A flower that looks modest on full-size wallpaper may resemble a prize-winning cabbage inside a dollhouse.
Create a paper template for each wall, including the doors and windows. Transfer the template to the wallpaper, cut it with a sharp craft knife, apply adhesive evenly, and smooth the paper from the center outward. For easier future remodeling, attach wallpaper to thin cardstock panels and mount the panels with removable adhesive.
Add Architectural Details
Baseboards, crown molding, ceiling beams, wainscoting, tile backsplashes, brick paper, and exterior siding make a basic shell look finished. Commercial miniature trim is convenient, but coffee stirrers, basswood strips, cardstock, and carefully cut craft foam can also create convincing architectural details.
Choose Realistic Dollhouse Flooring
Flooring anchors the room, so choose it before selecting furniture. Options include miniature wood strips, printed tile, brick paper, cork, felt carpet, painted boards, and fine fabric. In a 1:12 kitchen, narrow wooden coffee stirrers can become attractive floorboards after cutting, sanding, staining, and staggering the joints.
Make a room template before cutting the flooring. When installing paper-backed material, spread adhesive smoothly across the entire back. Small dots of glue can create visible bumps and curled edges. Rugs made from embroidery, ribbon, upholstery samples, or fine-weave fabric can define seating and dining areas.
Furnish the Dollhouse Room by Room
Start With a Focal Point
Give each room a visual anchor: a bed in the bedroom, a range in the kitchen, a fireplace in the parlor, or a worktable in a studio. Position that piece first, then arrange supporting furniture around it. Leave enough open space for the room to remain readable. Miniature interiors can become cluttered faster than a junk drawer during tax season.
Combine Purchased and Handmade Furniture
A convincing dollhouse does not require every item to come from a specialty store. Basswood and craft sticks can become beds, shelves, tables, and benches. Beads can serve as lamp bases or perfume bottles. Jewelry findings make useful handles, frames, and decorative hardware. Polymer clay can become food, dishes, plants, and pottery. Printable projects can provide books, boxes, labels, artwork, and product packaging.
Repurposed objects work best when their original purpose disappears. Paint, sanding, trim, and thoughtful placement help a button look like a wall clock instead of a button experiencing an identity crisis.
Soften Rooms With Textiles
Curtains, bedding, pillows, rugs, and towels add warmth. Use lightweight cotton, silk, gauze, lawn, or fine linen-look fabric. Thick fabric rarely drapes naturally at miniature scale. Diluted white glue or fabric stiffener can help shape folds without making the material look rigid.
Add Miniature Lighting
Lighting transforms a decorated structure into a tiny environment. Traditional 12-volt systems can power several fixtures, while battery-operated LED lights are easier to install in an existing house. Decide on the system before completing walls and floors if wires must be hidden.
Warm light works well in cottages, bedrooms, and traditional rooms. Cooler light can suit modern kitchens, workshops, and stores. Layer ceiling fixtures with table lamps, wall sconces, or task lighting for a more realistic effect.
Test every fixture before securing it. Keep switches and battery compartments accessible. A sealed battery box is not clever design; it is a future argument with yourself.
Make the Dollhouse Tell a Story
Perfectly arranged rooms can resemble furniture catalogs. Memorable rooms suggest that someone has just stepped away. Place an open book beside a chair, a half-finished pie on the counter, boots near the door, a letter on the desk, or a cat occupying the most expensive cushion.
Museum miniatures demonstrate how accumulated objects can document routines, occupations, architecture, and personality. The Smithsonian’s Faith Bradford dollhouse contains rooms filled with household items, while specialist miniature museums display historical and contemporary scenes rich in period detail.
Give each room two or three clues about its resident. A child’s bedroom might have drawings and a missing sock. A botanist’s study could contain specimen jars and pressed plants. A glamorous aunt’s room may feature perfume bottles and a hat that clearly has opinions.
Decorating a Dollhouse on a Budget
Spend money where precision and reliability matter most, such as the house shell, electrical components, working windows, and a few focal furnishings. Save on accessories by using leftover paint, fabric scraps, packaging, thrifted jewelry, natural materials, and printable designs.
- Use paint sample containers instead of full-size cans.
- Turn wallpaper remnants into miniature accent walls.
- Cut rugs and curtains from fabric samples.
- Make dishes and food from air-dry or polymer clay.
- Create framed art from your own photographs.
- Decorate one room at a time to limit impulse purchases.
Modern miniature artists routinely combine common craft materials, kits, custom fabrication, and handmade details. High-end artisan pieces can be beautiful, but creativitynot priceis what gives a dollhouse personality.
Safety and Long-Term Care
When a dollhouse is intended for children, design for the child’s age rather than for collector-level realism. Small accessories can create choking hazards for children under three. Keep loose beads, magnets, button batteries, sharp tools, fragile glass, and uncured craft resin out of reach. Construction should be supervised by an adult.
For active play, choose sturdy furniture, washable finishes, rounded edges, and removable textiles. For a collector’s display, use an acrylic cover or cabinet, avoid prolonged direct sunlight, and remove dust with a soft brush.
Photograph hidden wiring and structural work before covering it. Store extra paint, wallpaper, flooring, bulbs, and trim in a labeled container. Repairs are much easier when you do not have to rediscover the exact formula for “moody mushroom beige” several years later.
Common Dollhouse Decorating Mistakes
- Mixing scales: Check measurements before purchasing accessories.
- Skipping the plan: Select the style, colors, and lighting system first.
- Using oversized patterns: Choose wallpaper and fabric suitable for the scale.
- Overfilling rooms: Preserve pathways and visual space around focal pieces.
- Using excessive glue: Apply small amounts with a toothpick or precision bottle.
- Making everything perfect: Add subtle wear and personal possessions for realism.
- Blocking future access: Keep batteries, wiring, and removable panels reachable.
Conclusion
Decorating a dollhouse combines interior design, model making, storytelling, and practical problem-solving. Begin with a clear concept, respect the scale, complete hidden construction before decorative work, and build each room in layers. Walls and floors establish the setting, furniture gives the space a purpose, lighting creates atmosphere, and personal objects make the house feel inhabited.
Most importantly, allow the project to evolve. A dollhouse does not need to be completed in one weekendor ever, according to the mysterious laws of miniature collecting. Add one thoughtful detail at a time and let the house become a small record of your taste, patience, humor, and imagination.
Personal Experience: What Decorating a Dollhouse Taught Me
My first serious attempt at decorating a dollhouse began with unreasonable confidence. I had a wooden shell, three paint colors, a bag of miniature furniture, and the belief that everything would be finished by Sunday evening. By Sunday evening, the kitchen had two different floor levels, the bedroom wallpaper leaned gently downhill, and a dining chair had become permanently attached to my sleeve.
The project improved the moment I stopped treating it like a quick craft and started treating it like a real renovation. I emptied every room and made paper templates for the floors and walls. I measured the furniture instead of trusting product photographs. I arranged each room using scraps of paper to represent beds, tables, and cabinets. This simple step revealed that my dream kitchen island would leave no room for an imaginary resident to open the imaginary refrigerator. Even fictional people deserve functional circulation.
I also learned that the most convincing materials were not always the most expensive. One of my favorite floors came from narrow wooden coffee stirrers. I cut them into varied lengths, sanded the edges, glued them in staggered rows, and brushed on a thin walnut stain. The result looked more natural than a glossy premade sheet because the boards had slight differences in tone.
A scrap from an old cotton shirt became kitchen curtains. A broken earring became a chandelier. A bead and a clipped piece of wire became a lamp that looked surprisingly respectable once nobody knew about its previous career.
The biggest visual improvement came from reducing perfection. At first, every chair was pushed squarely under a table, every picture was centered, and every pillow stood upright as though awaiting inspection. The rooms looked clean but lifeless. I turned one chair at an angle, draped a shawl over it, stacked two tiny books beside the bed, and left a mixing bowl on the kitchen counter. Suddenly, the house suggested activity. It felt less like a showroom and more like a home whose residents had stepped out brieflypossibly to complain about the wallpaper installer.
Lighting delivered the most dramatic lesson. I had planned to skip it because wiring seemed intimidating. After testing a small battery-operated warm LED in the living room, I changed my mind. The light highlighted the wood grain, softened the wallpaper, and produced shadows behind the furniture. It made the room feel deep instead of flat. I eventually added a ceiling fixture downstairs and two table lamps upstairs, keeping the battery compartments accessible behind removable panels.
There were still mistakes. I applied too much glue to a rug, chose fabric that was too thick for bed sheets, and installed one section of crown molding upside down. I left the molding in place. The error was almost invisible, and preserving one harmless flaw made the project feel human.
Decorating a dollhouse taught me that accuracy matters, but charm matters more. Planning prevents frustration, scale creates believability, and storytelling gives the rooms a pulse. The real pleasure was not reaching a final reveal. It was noticing several weeks later that the tiny desk still needed a penciland enjoying the fact that I could make one.













