
Note: This publication-ready article synthesizes real DIY, miniature gardening, outdoor décor, and woodworking best practices into original, web-friendly content without source-link clutter.
A fairy picnic table is exactly what it sounds like: a tiny table built for imaginary guests with excellent manners, questionable wing maintenance, and a strong preference for mossy real estate. It may be no bigger than your hand, but in a fairy garden, it becomes the social hub. One minute it is a few sticks and a dab of glue; the next, it is the charming little place where woodland sprites might gather for acorn soup, blueberry pie, and gossip about the gnome next door.
In practical terms, a fairy picnic table is a miniature garden accessory used in fairy gardens, terrariums, container gardens, dollhouse scenes, porch planters, and even backyard wildlife displays. It can be made from twigs, popsicle sticks, craft wood, cedar scraps, bark, bamboo skewers, miniature lumber, or repurposed materials. It can be rustic, painted, polished, shabby-chic, woodland-style, or so fancy it looks like it should require reservations.
What makes this small project so appealing is its mix of simplicity and imagination. You do not need a professional workshop, a degree in architecture, or a magical building permit. You need scale, balance, weather awareness, a little patience, and the willingness to accept that the first version may look less “enchanted meadow” and more “tiny raccoons had a renovation budget.” That is part of the fun.
What Is a Fairy Picnic Table?
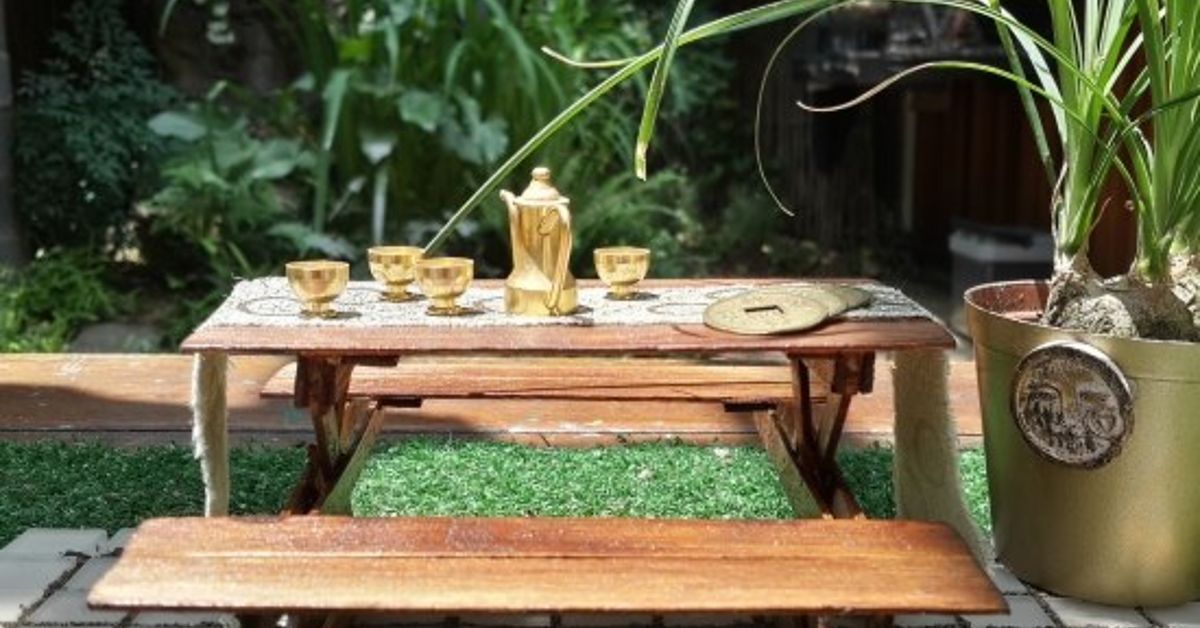
A fairy picnic table is a miniature version of the classic outdoor picnic table, designed to fit inside a fairy garden or small decorative landscape. It usually includes a tabletop, two benches, and tiny supports. Some versions are only decorative, while others are sturdy enough to hold pebbles, seed beads, tiny cups, miniature plates, or small wildlife snacks if the table is used outdoors as a squirrel or chipmunk feeder.
The table can be placed beneath a bonsai, beside a fairy house, near a miniature pathway, under a large hosta leaf, or inside a shallow container garden. In a well-designed fairy garden, the picnic table acts as a focal point. It tells the viewer, “Something delightful happens here.” A small chair says someone might sit down. A tiny picnic table says a whole committee of fairies has arrived, probably with an agenda and jam sandwiches.
Why Fairy Picnic Tables Are So Popular
Miniature gardening has a special kind of charm because it turns ordinary objects into story pieces. A pebble becomes a stepping stone. A broken flowerpot becomes a cliffside village. A shell becomes a serving bowl. A tiny picnic table becomes proof that the garden is not just planted; it is inhabited.
Fairy picnic tables are popular because they are approachable. Beginners can make one with craft sticks and glue. More advanced DIY fans can build one from cedar, pine, basswood, or small hardwood scraps. Parents can make one with children as a weekend activity. Gardeners can add one to a container planting for personality. Crafters can create seasonal versions for spring, summer, fall, Halloween, or Christmas fairy gardens.
They also work beautifully in small spaces. You do not need a large backyard to enjoy a fairy garden. A porch planter, tabletop terrarium, balcony pot, window box, or old wheelbarrow can become a miniature landscape. The fairy picnic table gives that landscape purpose and scale.
Best Materials for a Fairy Picnic Table
Wood and Natural Materials
Wood is the most popular choice because it looks natural in a garden setting. Twigs, bark, cedar scraps, bamboo skewers, popsicle sticks, basswood strips, and miniature craft boards are all useful. Cedar is especially attractive for outdoor projects because it naturally resists decay better than many softwoods. Pine is easy to cut and budget-friendly, but it needs better sealing if it will live outside.
Twigs create a woodland look that feels as though the fairies built the table themselves after watching too many home-improvement shows. Craft sticks create a cleaner, more uniform table. Mini lumber strips are best for a polished miniature picnic table with straight lines and predictable proportions.
Glue, Fasteners, and Finishes
For indoor fairy picnic tables, strong craft glue, wood glue, or hot glue can work well. For outdoor use, choose waterproof wood glue or small brads, nails, or screws where possible. Hot glue is fast, but it can soften in high heat and fail in wet weather. In other words, hot glue is enthusiastic, not always heroic.
If the table will be outside, seal it with an exterior-rated finish. A clear outdoor sealer, exterior paint, or outdoor stain can help protect the wood from moisture and sunlight. For fairy gardens with living plants, avoid finishes that may flake into soil or create unnecessary chemical exposure. Let painted or sealed pieces cure fully before placing them in a container garden.
Repurposed Materials
One of the best parts of building a fairy picnic table is using leftovers. A broken basket, trimmed skewers, wine corks, twine, old cloth, small stones, and scrap wood can all become part of the scene. A cork can become a barrel seat. A flat stone can become a tabletop. A bottle cap can become a pie pan. This is where fairy gardening becomes less about shopping and more about noticing.
How to Design the Perfect Fairy Picnic Table
Start With Scale
Scale is the secret ingredient in miniature design. If your fairy house is three inches tall, a picnic table that is eight inches long may look like it was built for a fairy football team. If your garden includes larger gnome figures or squirrel-themed décor, a bigger table may be perfect.
For a classic fairy garden, a table between three and six inches long usually works well. For a tiny terrarium, the table might be one or two inches long. For an outdoor squirrel picnic table, the table may be closer to eight or twelve inches long. The right size depends on the purpose: decorative fairy scene, dollhouse-style display, container garden, or backyard critter feeder.
Choose a Style
A rustic fairy picnic table can be made from bark, twigs, moss, and rough-cut wood. A cottage-style table might use white paint, pastel benches, and a tiny checked cloth. A woodland table could include acorn caps, seed pods, and flat stones. A modern fairy picnic table could be sleek, simple, and stained in a natural tone.
Think about the story your garden tells. Is it a fairy village in a shady forest? A sunny meadow café? A tiny campsite? A secret garden tea party? A miniature mushroom festival where everyone pretends they did not overdo the polka dots? The table should match the mood.
Plan the Setting
A fairy picnic table looks best when it is not floating randomly in soil. Give it a setting. Add a pea gravel patio, a path made of small stones, a moss rug, or a circle of tiny bark chips. Place it near a fairy door, under a dwarf plant, beside a mini pond, or next to a small sign that says “Reserved for Wings.”
Good miniature scenes use layers. Put taller plants or structures in the back, medium items in the middle, and small details in front. This keeps the table visible and helps the entire garden feel intentional rather than crowded.
Simple DIY Fairy Picnic Table Instructions
Materials
To make a basic fairy picnic table, gather craft sticks or small wood strips, wood glue, a craft knife or small saw, sandpaper, a ruler, a pencil, and exterior sealer if the table will go outdoors. Optional extras include paint, twine, moss, tiny dishes, acorn caps, beads, and miniature food pieces.
Step 1: Cut the Tabletop and Bench Pieces
Cut three equal pieces for the tabletop. Then cut two longer or equal pieces for the benches, depending on your design. If you are using craft sticks, trim the rounded ends for a more realistic plank look. Sand rough edges lightly so the table looks finished and nobody imagines a fairy getting a splinter lawsuit.
Step 2: Build the Tabletop
Lay the tabletop pieces side by side. Glue two small support strips across the underside to hold them together. Keep the supports slightly inset so they do not show too much from above. Let the glue dry before moving on. Miniature furniture rewards patience, even when your hands are already reaching for the moss.
Step 3: Add the Legs
Cut four small angled legs or use straight supports for an easier build. Glue them under the tabletop. For a realistic picnic table shape, angle the legs outward slightly. If you prefer a simpler version, use two solid side supports instead. The goal is stability, not passing a municipal inspection.
Step 4: Attach the Benches
Glue bench supports across the legs, then attach the bench planks. Make sure both benches sit evenly. If the table wobbles, trim the legs or add a small base. A tiny wobble can look charming; a dramatic lean suggests the fairies hired the lowest bidder.
Step 5: Paint, Stain, or Seal
Leave the table natural for a woodland look, stain it for a classic picnic-table style, or paint it in soft garden colors. White, sage green, mushroom brown, dusty blue, and faded red all work beautifully. For outdoor use, seal the table after painting or staining. Let it dry completely before placing it in the garden.
Where to Place a Fairy Picnic Table
The best location depends on the type of fairy garden you are building. In a container garden, place the table where it can be seen from the main viewing angle. Near the edge is often better than dead center because it gives the scene depth. In an outdoor garden bed, tuck the table near a tree root, large stone, fern, or ground cover plant.
If the table is made from untreated natural materials, keep it out of constant moisture. A little weathering looks charming, but standing water can cause wood to warp, split, or rot. In hot climates, painted pieces may fade faster in full sun, so partial shade is useful.
For indoor fairy gardens, avoid overwatering around wooden furniture. Use a saucer, drainage layer, or well-draining potting mix so your tiny table does not become a tiny raft.
Best Plants to Pair With a Fairy Picnic Table
Miniature gardens look most convincing when plants match the scale of the accessories. Choose small, slow-growing, or easily trimmed plants. For sunny gardens, consider small succulents, creeping thyme, sedum, miniature roses, dwarf mondo grass, or tiny annuals. For shade, try small ferns, moss-like ground covers, baby tears, or compact woodland plants.
The picnic table should remain visible as plants grow. That adorable baby plant from the nursery may become a leafy giant with main-character energy. Leave breathing room around the table and trim plants as needed. A fairy picnic table should look nestled, not swallowed.
Creative Fairy Picnic Table Ideas
The Woodland Lunch Table
Use twigs for the legs, bark for the tabletop, and acorn caps as bowls. Add moss around the base and a tiny path made of pebbles. This style looks natural and works well under ferns, miniature evergreens, or shade-loving plants.
The Fairy Tea Party Table
Paint the table white or pastel pink, add a tiny fabric runner, and decorate it with bead “cakes,” polymer clay teacups, or seed-pod plates. This design is perfect for a container garden on a porch or windowsill.
The Campsite Picnic Table
Pair the table with a tiny fire ring made from stones, a mini lantern, and a twig sign. Add sand, gravel, or bark chips for the ground. This is a great theme for kids because it invites storytelling.
The Seasonal Table
Change the decorations throughout the year. In spring, add tiny flowers. In summer, add miniature lemonade and berry baskets. In fall, scatter tiny leaves and acorns. In winter, use faux snow, mini pinecones, and a tiny mug of pretend cocoa. Fairies may be magical, but apparently they still enjoy seasonal merchandising.
Common Mistakes to Avoid
The biggest mistake is making the scene too crowded. Fairy gardens are tiny, but that does not mean every square inch needs a mushroom, bridge, chair, lantern, squirrel, sign, and dramatic backstory. Leave open space so the picnic table can stand out.
Another mistake is ignoring drainage. If the table sits in wet soil, it may decay quickly. Use gravel, small stones, or a raised base to keep it slightly above damp areas. If the fairy garden is in a container, make sure the container drains well.
A third mistake is using materials that cannot handle the environment. Paper accessories may be fine indoors but fail outdoors. Hot glue may not survive heat. Untreated softwood may weather quickly. Lightweight plastic pieces may blow away unless anchored. A little planning keeps the magic from becoming yard debris.
Fairy Picnic Table Safety Tips
If children will help build the table, use age-appropriate tools and supervise cutting, sanding, and hot glue. Smooth sharp edges and avoid tiny loose pieces for very young children. If the table will be used in a wildlife feeder, avoid paint or finishes where animals may chew. Keep food clean and do not place anything moldy or salty on the table.
For garden use, avoid old treated lumber, railroad ties, or unknown salvaged wood that may contain unsafe preservatives. Clean, untreated scraps or naturally durable woods are better choices for decorative miniatures placed near plants. If you paint or seal the table, let it cure fully before it touches soil or sits near delicate plants.
How a Fairy Picnic Table Improves a Miniature Garden
A fairy picnic table gives a miniature garden a sense of life. Without it, a fairy garden may look pretty but still. With it, the viewer starts imagining activity. Who sat there? What did they eat? Why is one acorn cap overturned? Did the fairy mayor storm out of brunch? The table creates questions, and questions create story.
It also helps organize the scene. A picnic table can anchor a patio area, mark the center of a village, or create a destination at the end of a tiny path. In design terms, it works as a focal point. In emotional terms, it makes people smile. That is not a bad job for something made from scraps.
Extra Experience Notes: Living With a Fairy Picnic Table
The first time you add a fairy picnic table to a garden, you may think it is just decoration. Then something funny happens: you start arranging the world around it. A pebble is no longer a pebble; it is a stepping stone. A small fern becomes a shade tree. A broken terracotta chip becomes a patio. Suddenly you are crouched beside a planter at 8:30 in the morning, deciding whether imaginary fairies would prefer the table angled toward the sunrise. This is how miniature gardening gets you. It begins politely, then steals your coffee time.
One practical lesson is that placement matters more than perfection. A handmade table with slightly uneven legs can look wonderful if it is tucked beside moss, surrounded by tiny stones, or placed near a curved path. A perfectly built table can look awkward if it is dropped into bare soil with no context. The scene around the table is what makes it believable. Think of it like staging a full-size patio: even the nicest table looks lonely without plants, texture, and a little atmosphere.
Another lesson is that weather has opinions. A fairy picnic table left outside will change. Wood may fade, paint may soften, moss may creep over the legs, and soil may splash after rain. Some of this aging is beautiful. A slightly weathered table looks as if it has hosted many magical lunches. But if you want it to last, lift it above wet soil and refresh the sealer when it starts looking tired. Miniature furniture has the same basic needs as regular outdoor furniture; it is just less likely to complain.
Children often interact with fairy picnic tables differently than adults. Adults tend to adjust the table, center it, photograph it, and worry about proportion. Children immediately begin telling stories. They add a leaf blanket, a pebble cake, a stick umbrella, and a snail shell that is apparently “the soup restaurant.” This is a good reminder that fairy gardens are not only about visual design. They are about play. The table becomes a stage for imagination.
For adults, the project can be surprisingly calming. Cutting small pieces, sanding edges, choosing colors, and arranging details slows the brain down. It is hard to doom-scroll while deciding whether a fairy picnic table needs a bark charcuterie board. The small scale makes the project manageable, and the result appears quickly. In a world full of large unfinished tasks, a tiny finished table feels oddly victorious.
The best experience comes from letting the table evolve. Add a mini pumpkin in October. Add a red ribbon in December. Put tiny seed beads on it in spring as “berry tarts.” Move it under new plants as the garden grows. A fairy picnic table does not have to be a one-time craft. It can become the little seasonal heartbeat of a miniature world.
Conclusion
A fairy picnic table is a small project with big personality. It combines DIY crafting, miniature gardening, outdoor décor, and storytelling into one charming accessory. Whether you build it from twigs, craft sticks, cedar scraps, or repurposed materials, the key is to think about scale, setting, durability, and mood. Place it thoughtfully, pair it with small plants, protect it from harsh weather, and let the details tell a story.
The beauty of a fairy picnic table is that it does not need to be perfect. In fact, a tiny bit of crookedness often makes it more magical. A table that looks handmade feels as though it belongs in a world where acorns are serving bowls and moss is luxury carpeting. Build one, place it in your garden, and do not be surprised if you start checking it every morning like the fairies might have left a five-star review.











