
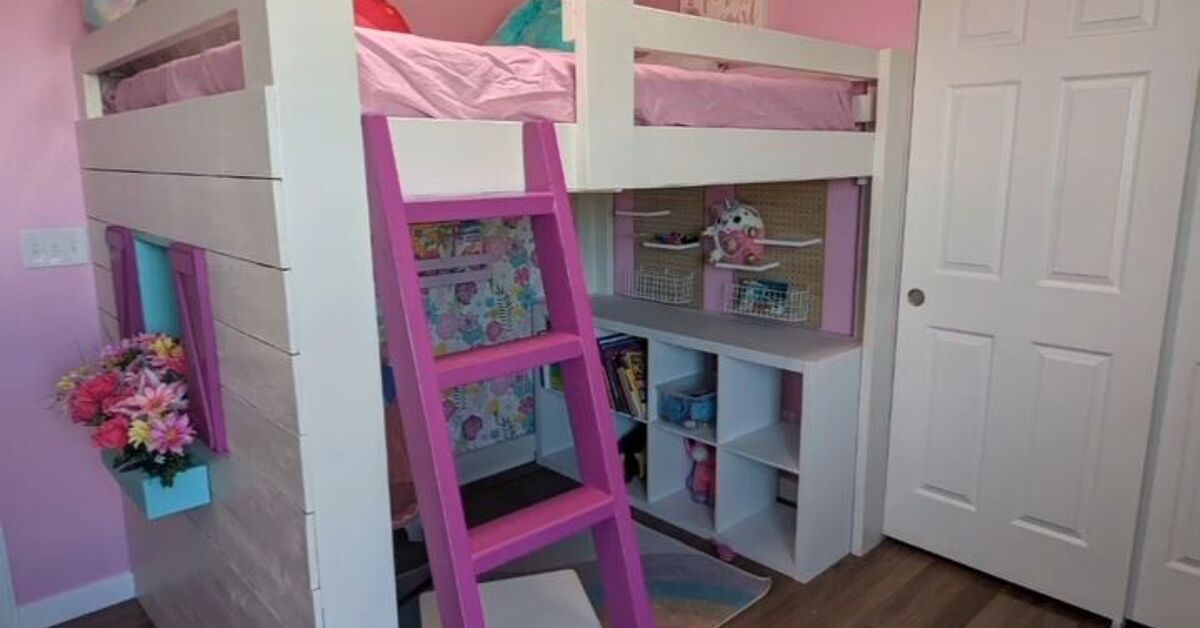
A small bedroom has a sneaky way of making every piece of furniture feel enormous. Add a bed, a dresser, and one ambitious pile of laundry, and suddenly the room has the traffic flow of a crowded airport.
A DIY loft bed solves that problem by moving the sleeping area upward and returning the floor to useful service. The space underneath can become a reading nook, play zone, homework station, or storage area. Add a built-in ladder and a decorative window box, and the project becomes more than a raised bedit starts looking like a tiny cottage that happens to have excellent vertical real estate.
This guide explains how to plan and build a sturdy wooden loft bed for a twin mattress. The dimensions are intentionally adaptable because mattresses, ceiling heights, room layouts, and lumber vary. Measure your actual space, use structural fasteners, and have a qualified carpenter or engineer review the design when you are uncertain about its strength.
Safety Comes Before the Cute Window Box
A loft bed is elevated furniture that supports a moving person, not a decorative shelf holding three tasteful candles. Every major connection must resist vertical weight, side-to-side movement, and the enthusiastic climbing style sometimes known as “launching oneself at the ladder.”
The U.S. Consumer Product Safety Commission requires manufactured upper bunks to have guardrails on both sides. The tops of those guardrails must be at least 5 inches above the mattress, and the access opening on the outer side cannot exceed 15 inches. Although a custom DIY bed is not the same as a factory-manufactured product, these requirements provide useful minimum safety benchmarks.
The American Academy of Pediatrics advises that children younger than 6 should not sleep in an upper bunk. It also recommends positioning bunk beds against two walls when possible to reduce exposed fall areas and improve stability.
Before construction, confirm that:
- The intended sleeper is capable of using a ladder safely.
- The mattress will remain below the required guardrail height.
- The ceiling provides enough room to sit up without meeting the drywall personally.
- The bed can be anchored directly to wall studs or suitable masonry.
- Ceiling fans, light fixtures, windows, vents, and electrical outlets are safely positioned.
- The ladder will not block the room’s doorway or emergency exit.
Place the bed against a wall whenever the room allows it. Home Depot’s loft-bed guidance recommends fastening the frame through the wall covering and into structural studs rather than depending on drywall anchors.
Plan the Loft Bed Around the Room and Mattress
Do not begin by cutting lumber. Begin with a tape measure, a notebook, and a mildly suspicious attitude toward every dimension.
Measure the mattress
A standard twin mattress is commonly described as approximately 38 inches wide by 75 inches long, but the actual mattress may differ. Measure its width, length, and thickness. The finished platform should provide a close fit without squeezing the mattress or leaving hazardous gaps around it.
Mattress thickness is especially important because it determines the effective height of the guardrails. A rail that looks tall with an empty platform may become alarmingly decorative after a thick pillow-top mattress arrives.
Measure the room
Record the ceiling height, baseboard depth, locations of wall studs, window trim, outlets, doors, and permanent fixtures. Decide how much usable space you want below the bed and how much sitting clearance the sleeper needs above it.
For an 8-foot ceiling, many builders choose a moderately raised platform rather than pushing the mattress close to the ceiling. The ideal height depends on the user, mattress, and intended function underneath. A desk requires more headroom than a toy-storage area, while a reading nook can work comfortably at a lower height.
Sketch the complete structure
Your plan should identify the mattress frame, four posts, slat supports, guardrails, ladder, wall-anchor points, and window box. Draw the design from the front, side, and top. Mark every connection before buying lumber.
Many successful DIY loft-bed plans assemble the mattress frame and end structures separately, carry those sections into the bedroom, and complete final assembly in place. This approach is easier than discovering that your beautiful finished bed is wider than the hallway. Construction guides from Fix This Build That and other established DIY builders use a similar staged process.
Materials and Tools
Suggested lumber
- Four straight 4-by-4 posts or appropriately laminated structural posts
- 2-by-8 boards for the main mattress-frame rails
- 2-by-4 boards for cleats, bracing, guardrails, and ladder components
- 1-by-4 boards or suitable plywood strips for mattress slats
- 1-by-6 or 1-by-8 boards for the decorative window box
- Optional plywood or tongue-and-groove boards for the finished underside
Fasteners and supplies
- Structural wood screws rated for framing connections
- Through bolts, washers, and locking nuts for major post connections
- Lag screws or approved structural screws for wall anchoring
- Wood glue for nonremovable joints
- Wood filler and paintable caulk
- Primer and durable low-odor interior paint or clear finish
- Non-slip ladder tread tape, if desired
Tools
- Tape measure, pencil, chalk line, and carpenter’s square
- Stud finder and level
- Miter saw or circular saw with a straightedge guide
- Drill and impact driver
- Bits sized for pilot holes, countersinks, bolts, and anchors
- Clamps
- Random-orbit sander
- Socket set and wrenches
- Eye protection, hearing protection, and dust protection
Select straight, dry lumber with minimal twisting, cracking, or loose knots. A board that resembles a wooden banana at the store will not become more cooperative in the bedroom.
How to Build the DIY Loft Bed
Step 1: Cut and label every part
Prepare a cut list from your final drawing. Cut the posts, long side rails, end rails, slat cleats, guardrail parts, ladder rails, rungs, braces, and window-box pieces. Label each part with painter’s tape.
Sand the faces and ease sharp edges before assembly. It is much easier to sand one board on a workbench than to crouch beneath a finished loft bed wondering why you rejected this excellent idea yesterday.
Step 2: Build the mattress frame
Arrange the two long rails and two end rails on a flat surface. Check the corner-to-corner diagonal measurements; equal diagonals indicate a square frame. Clamp the assembly before drilling.
Join the corners with through bolts or an engineered structural-screw pattern appropriate for the lumber and expected load. Do not rely solely on pocket screws, finish nails, or short multipurpose screws for the primary frame.
Install continuous 2-by-4 cleats along the inside lower edges of the long rails. These cleats support the mattress slats. Apply glue where the joint is intended to remain permanent, predrill, and secure the cleats with structural screws at regular intervals.
Step 3: Assemble the head and foot structures
Lay two posts parallel on a level work surface. Attach the end rail at the planned platform height, then add upper guardrail members and lower bracing. Repeat for the opposite end.
Use temporary spacer blocks to keep matching components at identical heights. Confirm that the posts are parallel and the rails are square before tightening every fastener.
Decorative house-shaped trim can be added later, but it should not replace structural bracing. A charming roofline is excellent at inspiring imaginary adventures and less impressive at resisting racking forces.
Step 4: Complete final assembly inside the bedroom
Move the end structures and mattress frame into the room. With at least one helper, lift the frame into position between the posts. Clamp it securely, check for level, and confirm that the entire assembly is square.
Bolt or structurally screw the frame to the posts according to your plan. Add corner blocks or approved metal brackets where useful, but remember that small brackets cannot compensate for an undersized frame or weak post connection.
Step 5: Add anti-racking braces
Push gently against the structure from each direction. If it shifts into a parallelogram, it needs more bracing. Install diagonal braces, solid end panels, or a securely fastened plywood section to prevent side-to-side movement.
Wall-attached designs are commonly used because the wall connections help stabilize the elevated frame. This Old House similarly emphasizes planning and constructing wall-attached beds with safety and long-term rigidity in mind.
Step 6: Anchor the bed to structural framing
Locate the wall studs and mark their centers. Fasten the loft-bed frame or rear posts directly into multiple studs using appropriately sized structural screws or lag screws with washers. Keep the bed level while tightening the anchors.
Never treat drywall anchors as structural support for a loft bed. For concrete or masonry walls, use anchors specifically approved for the substrate and load. When the wall construction is uncertain, consult a qualified professional before proceeding.
Step 7: Install and secure the mattress slats
Space the slats according to the mattress manufacturer’s support requirements. Foam and hybrid mattresses may require narrower spacing than traditional innerspring mattresses.
Secure each slat to the cleats so it cannot slide or flip. A loose slat has a remarkable talent for waiting until 2:00 a.m. to announce itself.
If you use a solid plywood deck, verify that it is thick enough for the span and provide ventilation as required by the mattress manufacturer. Do not assume one uninterrupted sheet is automatically stronger or better for every mattress.
Step 8: Build full-height guardrails
Install continuous guardrails along the wall side and protected ends. On the ladder side, leave only the access opening required for entry. The top of every guardrail should remain at least 5 inches above the top surface of the installed mattress; exceeding that minimum may be appropriate for your design.
Fasten the rails so they cannot be casually removed. Avoid large openings between horizontal and vertical members that could trap a child’s head, neck, or torso. Decorative cutouts may look playful, but safety testing has never been especially impressed by cuteness.
Step 9: Build the ladder
Cut two ladder rails from straight 2-by-4 lumber. Decide whether the ladder will be vertical or slightly angled. An angled ladder is generally easier to climb but occupies more floor space.
Lay the rails together and mark every rung position at the same time. This ensures the rungs remain level and evenly spaced. Use sturdy rungs with rounded edges and enough depth for secure footing.
Predrill each connection and attach the rungs with structural screws, housed joints, or through bolts. Fasten the completed ladder to both the bed frame and floor-level structure so it cannot swing, rotate, or pull away. Yellow Brick Home’s ladder project likewise highlights building a dedicated, firmly attached ladder rather than treating access as an afterthought.
Finish the ladder with a non-glossy coating. Highly polished rungs may look elegant, but they can become slippery when socks enter the story.
Step 10: Build the decorative window box
The window box gives the loft bed its cottage character. Build it from a front board, bottom, two ends, and optional trim. Round the corners and sand every exposed edge.
Mount the box below the mattress platform on the exterior facade, away from the ladder and guardrail opening. Attach it directly to posts or solid framing, not merely to thin decorative paneling.
Use the box for lightweight books, stuffed animals, or faux greenery. Avoid heavy ceramic planters, breakable objects, standing water, or anything that turns the box into a climbing step. If you want real plants, place them in a removable, watertight plastic liner and keep the total weight low.
Playhouse-inspired loft beds frequently use windows, trim, and small architectural details to make the structure feel like a miniature room. Remodelaholic’s documented playhouse build demonstrates how painted trim and gabled-window elements can transform a basic sleeping platform without replacing its structural framework.
Step 11: Fill, sand, prime, and finish
Fill cosmetic holes, sand rough areas, vacuum the structure, and wipe away dust. Apply primer to bare wood, followed by a durable interior finish. Allow each coat to cure according to the manufacturer’s instructions.
Painting components before final assembly can simplify coverage, but leave structural contact surfaces clean when the fastener manufacturer requires direct wood-to-wood seating. After assembly, touch up exposed fasteners and minor scratches.
Step 12: Test before anyone sleeps on it
Inspect every bolt, screw, anchor, rail, slat, and rung. Apply weight gradually while checking for movement, cracking, deflection, or unusual noises. Test the ladder separately and push the frame from multiple directions.
Do not use the bed until the finish has cured and the structure remains rigid under a controlled test. Recheck all fasteners after the first week and periodically afterward.
Smart Design Ideas for the Space Below
The main advantage of a space-saving loft bed is not merely that the mattress is higher. It is that the same footprint can perform two jobs.
- Reading nook: Add a washable rug, floor cushions, book ledges, and a low-voltage reading light.
- Homework station: Install a desk with adequate headroom and keep cords secured away from the ladder.
- Playhouse: Use curtains or removable fabric panels rather than rigid doors that could block visibility.
- Storage zone: Add labeled bins, rolling drawers, or a low dresser that does not interfere with braces.
- Guest lounge: Place a compact sofa or floor mattress underneath, provided emergency access remains clear.
Current loft-bed collections and DIY roundups consistently show desks, reading areas, storage, and play spaces beneath elevated platforms, demonstrating why these beds remain popular in compact rooms.
Common DIY Loft Bed Mistakes
Building around assumed mattress dimensions
Measure the actual mattress before finalizing the opening. A generous gap is not a helpful convenience when elevated sleeping furniture is involved.
Using ordinary screws for structural joints
Drywall screws and basic multipurpose screws are not substitutes for through bolts, rated structural screws, or properly engineered joinery.
Forgetting lateral movement
A frame can easily support downward weight yet wobble badly when someone climbs the ladder. Bracing and wall anchoring address forces that vertical posts alone do not.
Making the guardrails before choosing the mattress
The required safety height is measured above the mattress, not above the slats. Select the mattress first or establish a strict maximum thickness.
Creating a climbable facade
Window trim, shelves, and horizontal decorations can become unintended footholds. Keep decorative features below the platform and outside the access route.
Ignoring future maintenance
Bolts loosen, wood moves, and children discover new ways to test furniture. Design the bed so major connections remain visible and accessible for inspection.
A Realistic Build Experience: Lessons From the Workshop
The experience of building a DIY loft bed usually begins with confidence. The drawing looks straightforward: four posts, a rectangle, some rails, a ladder, and a cute little box. How hard could it be? This optimism generally survives until the first bowed board is placed beside a perfectly straight square.
The most productive first move is sorting the lumber before cutting anything. Lay every board on the floor, sight down its length, and reserve the straightest pieces for the mattress rails, posts, and ladder. Slightly imperfect boards may still work for short braces or trim. Using twisted lumber in the main frame creates a chain reaction in which one difficult joint introduces another, and soon the carpenter’s square seems to be delivering personal criticism.
Dry-fitting the major parts also saves hours. Assemble the mattress frame without glue, clamp it, measure both diagonals, and confirm that the mattress opening is correct. Then stand the end structures upright and temporarily connect everything. This trial assembly often reveals practical issues that drawings miss, such as a baseboard pushing one post away from the wall or a ladder colliding with a closet door.
The build becomes noticeably easier with two people during final assembly. One person can hold the frame level while the other installs bolts and checks alignment. Trying to balance an eight-foot rail, operate a drill, and read a level simultaneously is possible, but so is eating soup with a fork. Neither option deserves to become the official plan.
The ladder tends to require more care than expected. Even a minor error in rung layout becomes obvious when the ladder is viewed from across the room. Marking both rails together prevents mismatched heights. A temporary spacing block also helps keep every rung square while fasteners are installed.
The decorative window box is usually the morale-boosting stage. After hours of structural work, a small piece of trim can suddenly make the project look intentional rather than industrial. The best results come from keeping the box shallow, lightweight, and visually aligned with the bed’s other horizontal lines. Installing it too high can create a foothold, while mounting it beside the ladder invites climbers to use it as an unauthorized handhold.
Finishing requires patience. Fresh paint can feel dry while remaining soft underneath, especially where ladder hardware or mattress components press against it. Allowing the finish to cure prevents dents, stuck bedding, and the thrilling discovery that a favorite blanket has permanently joined the guardrail.
The final test should be methodical rather than theatrical. Tighten the anchors, add weight gradually, climb the ladder carefully, and listen for movement. A tiny creak may simply be wood settling, but visible shifting or loosening means the bed is not ready. Correct the problem before installing bedding.
The biggest lesson is that precision matters more than speed. A DIY loft bed does not need complicated ornamentation to feel special. Straight rails, smooth edges, solid anchoring, a comfortable ladder, and carefully placed cottage details will produce a result that looks polished and feels dependable. The window box gets compliments, but the hidden bolts and braces are the parts doing the heroic work.
Final Thoughts
Building a DIY loft bed with a ladder and window box is a substantial woodworking project, but the finished structure can completely change how a small bedroom functions. The mattress moves upward, the floor becomes useful again, and a plain sleeping area gains the charm of a miniature cottage.
Success depends on careful measurements, straight lumber, strong frame connections, adequate guardrails, a securely mounted ladder, structural wall anchors, and regular inspections. Treat the window box as lightweight decoration rather than structural furniture, and never allow style choices to create climbing hazards or weaken the frame.
Plan thoroughly, assemble patiently, and test conservatively. Your reward will be a space-saving bed that is practical, playful, and sturdy enough to survive bedtime stories, blanket forts, and at least several dramatic declarations that nobody is tired.













