
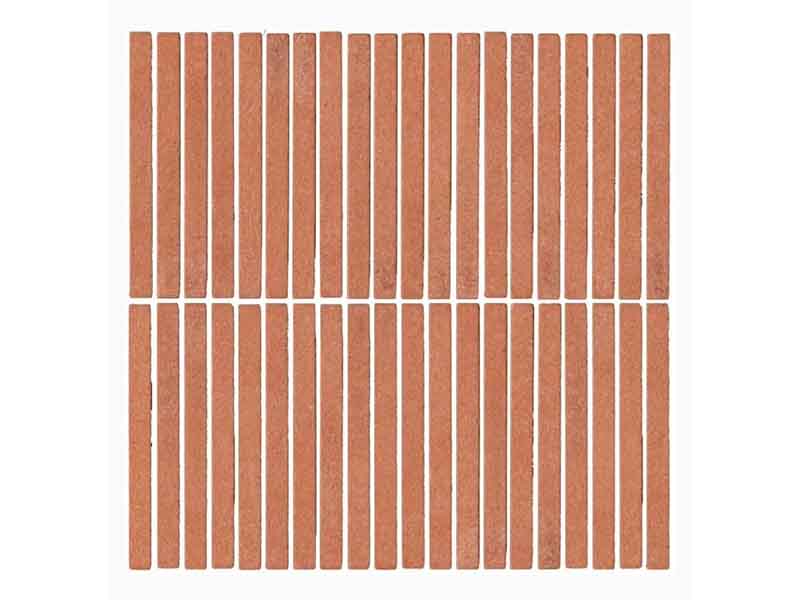
If you’ve ever wanted your backsplash (or bathroom wall, or entryway floor) to feel like it has a passport stamp from Tuscany,
Ema Terracotta Mosaic Forno is the kind of tile that quietly ruins “basic subway” for you forever.
It’s earthy. It’s architectural. It’s handmade-looking without screaming “I am handmade!” from across the room.
And yeslike most beautiful things in life, it does ask for a little commitment (hello, sealing).[1]
This guide breaks down what “Forno” means, why the mosaic format changes the whole vibe, where it performs best,
and how to install and maintain it so it ages into that warm, lived-in patina people pay designers to “accidentally” create.
You’ll also find a 500-word experience section at the endbecause the real story of terracotta always happens after the grout haze is gone.
What Is Ema Terracotta Mosaic Forno?
Ema Terracotta is a terracotta tile line commonly described as being made from Tuscan clay (often noted as “Galestro” clay)
sourced in the Florence area, named for the region around the Ema and Greve rivers.[1]
The “Mosaic Forno” version is the smaller-format mosaictypically supplied as mesh-mounted sheetsso you get the same clay character,
but in a pattern that reads more modern and graphic on the wall (or more grippy and joint-rich underfoot).[1]
In plain English: it’s terracotta with a tailor’s tape measure and a strong opinion about clean lines.
Designers often use it as a “quiet hero” finishwarm, textured, and humanespecially in kitchens and bathrooms where flat, perfect materials can feel a bit sterile.
Remodelista has featured Ema Terracotta mosaics in design inspiration and shopping coverage, highlighting the product and its visual impact in real interiors.[2][3]
Why the name “Forno” matters
“Forno” literally nods to the kiln/oven worldvery on-brand for fired claywhile the mosaic format gives you a rhythm that can feel
like stacked brick, slim “finger” tile, or a tight grid depending on how it’s installed and grouted.[1][3]
Why This Mosaic Hits Different Than Standard Terracotta
Traditional terracotta tiles tend to feel rustic, Mediterranean, and (in the right home) gloriously timeless.
A terracotta mosaic changes the scale and therefore the entire mood. You get:
- More joints (which means more visual textureand more grip on floors).[1]
- More pattern control, especially for vertical stacking, wraps, borders, and niche details.[3]
- More forgiveness in small, awkward spaces where large tiles create odd cuts.[13]
The trade-off is that mosaics demand a flatter substrate, tighter layout discipline, and extra care to avoid “sheet lines.”
It’s not hardit’s just not the moment to freestyle because you watched two tiling videos and now feel spiritually bonded to a trowel.[13]
Best Places to Use Ema Terracotta Mosaic Forno
1) Kitchen backsplash (the classic “wow” zone)
This is where Forno shines: the mosaic format creates a tailored, architectural surface that still feels warm and handmade.
It also plays beautifully with stone counters, plaster walls, and natural wood cabinetrybasically the whole “quiet luxury” pantry dream.[3]
2) Bathroom walls and wet zones (with the right waterproofing + finishing)
Terracotta is porous by nature, so water management is a systemnot a wish.
The tile can be specified in wet areas when you use proper waterproofing behind the tile and apply the appropriate sealers/finishes,
then maintain them over time as recommended by product guidance.[1]
3) Entryways and mudroom floors (patina-friendly and forgiving)
Terracotta floors are known for developing character. In an entry, that’s a feature, not a flawespecially if you’re into a warm, European look.
The key is protecting the surface with the right sealer and using gentle cleaners so the finish doesn’t get stripped or dulled prematurely.[7][10]
4) Fireplace surrounds and hearth-adjacent areas
Clay tile is a long-time favorite around hearths for its natural look. If you’re using it in a heat-adjacent area,
follow installation best practices and respect movement/expansion details (and always confirm suitability for your specific fireplace setup).[4]
Design Playbook: How to Make Forno Look Expensive (Without Being Loud)
Go vertical to “raise the ceiling”
A vertically stacked mosaic can make a low kitchen feel taller and a small powder room feel more intentional.
This is the same reason designers love vertical stacked tile trendsit’s minimal, modern, and quietly dramatic.[3]
Pick grout like you’re choosing a paint color (because you are)
- Close-match grout = a calmer, monolithic terracotta field.
- Soft contrast grout = more definition (great for highlighting the mosaic geometry).
- High contrast grout = graphic and bold (also: it will show more “life”).
If you want the tile to feel like a single surface, go closer in tone. If you want the mosaic pattern to read across the room,
lean into contrastbut do it intentionally, not accidentally-after-sanding-the-first-batch-of-grout.
Where it looks especially good
- Off-white plaster walls + warm oak cabinets + aged brass hardware
- Soapstone or honed black stone counters + terracotta backsplash
- Microcement floors + terracotta shower wall accents
Installation Checklist (So It Looks Like a Designer Did It)
This section is “practical reality,” not fear-mongering. The goal is a finished surface that lasts, cleans well,
and doesn’t crack because the house moved and the tile had nowhere to go.[4]
Step 1: Confirm substrate flatness (mosaics demand it)
Mosaic sheets telegraph bumps more than larger tiles. Many installation guides emphasize verifying the surface is flat and sound before setting tile,
especially when working with smaller pieces and sheet-mounted mosaics.[13]
Step 2: Plan movement joints (don’t skip the “boring” stuff)
Tile is a finish layer over a building that expands and contracts. Industry guidance recommends movement accommodationoften a perimeter gap in small rooms
and additional movement joints for larger areas or conditions like direct sun and moisture exposure.[4]
Movement-joint details are commonly referenced through EJ171 guidance; industry organizations also discuss minimum joint width and spacing considerations,
especially in exterior or high-movement conditions.[5][6]
Step 3: Dry layout + manage sheet lines
- Open multiple boxes/sheets and mix them (terracotta naturally varies).[1]
- Stagger sheet seams when possible so you don’t get a “checkerboard” of joints.
- Use a beating block and careful pressure to keep pieces aligned without squeezing thinset up into joints.
Step 4: Grout strategy
With mosaics, grout isn’t just fillerit’s the visual “outline.” Choose grout type and joint width based on the tile,
location (wall vs. floor), and exposure. Product lines and technical guidance from major setting-material manufacturers
typically offer grout/sealant options for porous tile and wet-area performance, including sealers intended for cement-based grout and porous surfaces.[8][9]
Sealing & Finishing: The Non-Negotiable Part of Terracotta
Terracotta and similar clay tiles are widely treated as porous surfacesmeaning sealing is commonly recommended to help reduce staining and simplify maintenance.[8]
Care guides for terracotta/clay surfaces also emphasize using gentle cleaners and avoiding harsh, highly alkaline, acidic, ammonia-based, abrasive, or bleach-based products
that can damage surfaces or degrade sealers/coatings.[7][10]
A practical sealing sequence many pros follow
- Pre-seal (before grout) to reduce grout staining and make cleanup easier.[7]
- Grout with the right technique for mosaics (wash carefully; avoid over-washing).
- Final seal (after grout cure) to help resist water/oil staining and simplify routine cleaning.[7][9]
Always test sealers and finishes in an inconspicuous area first. Terracotta can darken, enrich, or shift tone depending on the product and the tile’s absorption.
That’s not a defectit’s just terracotta being terracotta.[7]
Efflorescence: the “white powder” surprise (and what it means)
Efflorescence is commonly described as water-soluble salts transported to the surface by moisture movement, leaving visible whitish deposits as water evaporates.
It can be influenced by moisture sources, slab/mortar chemistry, and porosity of grout and substrate.[12]
The best prevention is controlling moisture in the overall assembly (proper waterproofing, vapor management where needed),
and being cautious with sealersespecially in systems where moisture is moving through from below. Some guidance notes that certain topical sealers
can whiten in the presence of moisture (a different issue than true efflorescence), so product selection matters.[12]
Maintenance Reality Check (A.K.A. How to Keep It Gorgeous)
The good news: terracotta can be low-drama if you treat it like the natural, porous material it is.
The not-as-fun news: it’s not a “spray anything and pray” surface.
- Weekly: vacuum/sweep, then damp mop with mild soap and water (or a cleaner made for stone/tile care).[7][10]
- Spills: wipe sooner rather than laterespecially oils, wine, tomato sauce, and anything that sounds delicious.[7]
- Long-term protection: follow your sealer/finish maintenance schedule and reapply as needed based on wear and exposure.[7]
In high-traffic or high-moisture areas, you may need more frequent refresh cycles than a low-use backsplash.
Always follow the product-specific recommendations for your chosen sealers/finishes.[1][7]
Cost & Sourcing Notes
Pricing varies by color, finish, and retailer, and can change over time. Remodelista’s shopping listing for Ema Terracotta Mosaic Forno provides
a snapshot of product positioning and typical presentation (color options, usage inspiration, and price-at-the-time context).[2]
From a budgeting perspective, it’s also smart to plan for the “supporting cast”: waterproofing (where needed),
setting materials, grout, sealers/finishes, and laborespecially because mosaics take more time than larger tiles.
General remodeling guidance often emphasizes following the manufacturer’s sealing recommendations for porous surfaces to prevent stains and discoloration over time.[11]
Conclusion: Why Forno Is Worth the Extra Steps
Ema Terracotta Mosaic Forno sits in a sweet spot: old-world clay character with modern, architectural rhythm.
It can read rustic, minimal, or softly luxurious depending on layout and grout. The big “if” is sealing and smart installation.
Do those well, and the tile doesn’t just look good on day oneit gets better as it lives with you.[1][7][8]
Real-World Experiences With Ema Terracotta Mosaic Forno (About )
Here’s what people typically experience when they choose a terracotta mosaic like Fornoespecially if they’re used to porcelain that behaves
like a well-trained spreadsheet.
Experience #1: The unboxing “wait… these aren’t identical” moment.
Terracotta is naturally variable, and that’s part of the charm. In practice, it means you’ll see subtle differences in tone, surface texture,
and edge character from piece to piece (and sometimes from sheet to sheet). The best installs don’t fight this; they blend it.
Installers will often open multiple boxes at once and mix sheets as they go, so one darker run doesn’t end up concentrated in a single corner.
The result looks intentionallike the tile has always been thererather than “batch #3 got a little moody.”[1]
Experience #2: Sheet lines are real… but preventable.
On day one, mosaics feel easy because they’re on mesh. On day two, you notice the grid can create faint “panel seams” if layout isn’t planned.
The fix is usually straightforward: stagger sheet joints where possible, keep thinset consistent (no ridges “printing” through),
and use careful pressure to set sheets evenly. A little patience here pays off because the finished surface reads as one continuous field,
not a set of 12-inch squares trying to pretend they’re not 12-inch squares.[13]
Experience #3: The first sealing test is oddly emotional.
Many sealers and finishes can deepen terracotta’s colorsometimes subtly, sometimes dramatically.
People often describe the moment like “Oh, there it isthe warmth.” That’s why testing matters: you’re deciding whether you want a more natural, dry look
or a richer, more saturated tone. Maintenance guides commonly recommend testing in an inconspicuous area and allowing proper cure time so you know exactly
how the finish will look and perform before committing to the whole surface.[7][9]
Experience #4: Cleaning becomes simpler once you stop using the wrong stuff.
The biggest “learning curve” is usually unlearning harsh cleaners. Terracotta rewards gentle routines: sweep, damp mop, mild soap, and products intended
for stone/tile surfaces. People who switch to pH-appropriate, non-abrasive care often find the tile stays more consistent in appearance
and the protective finish lasts longer. It’s less about babying the tile and more about not accidentally stripping the very layer that’s protecting it.[7][10]
Experience #5: Patina is the point.
The most satisfied homeowners tend to be the ones who want a surface that feels alive. Over time, terracotta can develop a soft glowespecially in kitchens and entries.
That doesn’t mean it should stain or look neglected; it means it looks lived-in in the best way.
When the install includes proper movement accommodation and a smart moisture strategy, the tile is more likely to age gracefully rather than crack or haze.
It becomes the kind of finish guests notice without immediately knowing why: warm, grounded, and quietly special.[4][12]












