
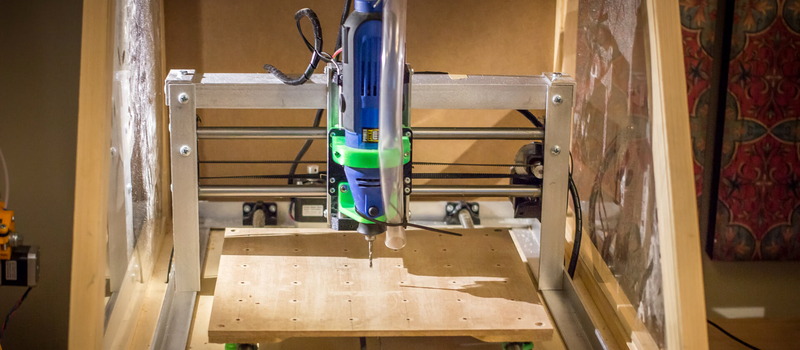
There is a special kind of workshop optimism that begins with the sentence, “How hard could it be?” In the world of homemade CNC machines, that sentence is usually followed by three weeks of aluminum chips, a mysteriously smoking stepper driver, and one very patient family member asking why the dining table is now a metrology surface. Still, the idea behind a CNC you could pop-rivet together is genuinely exciting: a simple, approachable machine made from common materials, basic tools, and enough mechanical stubbornness to turn a sketch into sawdust.
A CNC router does not have to begin as a giant industrial beast with a vacuum table, tool changer, and price tag that makes your credit card hide behind the toaster. At the hobby level, many machines start as a frame, three axes of motion, a small router or spindle, a controller, and a dream. The pop-rivet concept pushes that dream toward the garage-builder end of the spectrum: aluminum angle, sheet-metal thinking, 3D-printed brackets, belts or screws, and a structure that can be assembled with a drill, a rivet gun, and a careful eye for square.
Is it the right way to build a precision aerospace mill? Absolutely not. Please do not rivet together a machine and then announce you are making jet-engine parts unless your other hobby is meeting insurance adjusters. But for foam, MDF, plywood, plastics, signs, engraving, templates, and learning CNC fundamentals, a lightweight DIY CNC router can be a brilliant classroom. It teaches the important lessons: rigidity matters, alignment matters, workholding matters, feeds and speeds matter, and the machine will always reveal the one bolt you forgot to tighten.
What Does “Pop-Rivet Together” Really Mean?
A pop rivet, more formally called a blind rivet, is a fastener designed for situations where you can only reach one side of the joint. You drill a hole, insert the rivet, pull the mandrel with a rivet tool, and the body expands behind the material to clamp the joint. It is quick, inexpensive, and satisfying in a tiny mechanical-fireworks sort of way.
For a small CNC frame, the phrase “pop-rivet together” is less about copying aircraft construction and more about adopting a practical design philosophy. Use simple overlapping plates. Use repeatable hole patterns. Use aluminum angle and gussets. Avoid parts that require a milling machine to build the machine that is supposed to replace the milling machine. In other words, do not make the ladder so complicated that you need another ladder to reach it.
Blind rivets work especially well in sheet metal, brackets, covers, trays, and light structural assemblies. In a CNC router, they can be useful for joining panels, fastening braces, building electronics enclosures, attaching cable guides, and assembling non-adjustable parts of the frame. For joints that must be tuned, trammed, tensioned, or serviced later, screws and T-slot hardware may be better. A good DIY machine often uses both: rivets for “this should stay put” and bolts for “future me will definitely need to adjust this.”
The Appeal of a Riveted DIY CNC Router
The biggest attraction is accessibility. Aluminum angle is easy to find. A hand riveter is affordable. Drill bits are not exotic. You can make a surprisingly useful frame without welding, machining, or owning a surface plate large enough to host a Thanksgiving dinner.
That matters because the first CNC machine is rarely the final CNC machine. Most builders learn by building. A lightweight, riveted CNC router can become a stepping stone to a sturdier aluminum-extrusion machine, a ball-screw desktop mill, or a full-size rack-and-pinion router. The first build teaches what spec sheets cannot: how belts stretch, how gantries rack, how dust gets everywhere, and how a “quick test cut” somehow becomes an entire Saturday.
Cost: The Gateway Drug of CNC
Low cost is not just about saving money. It changes the psychology of the project. If the frame is made from hardware-store aluminum and rivets, you are more willing to drill another hole, add a brace, redesign a carriage, or admit that your first Z-axis was more interpretive dance than mechanical engineering. Expensive parts can make beginners timid. Cheap parts invite iteration.
Speed of Assembly
Rivets are fast. Once the holes are aligned, a joint can be locked in seconds. That makes them useful for repeated brackets and panel assemblies. When building a CNC, momentum helps. A project that sits half-built for months becomes a shelf, and shelves do not carve signs unless you have a very unusual shelf.
Lightweight Construction
Aluminum angle and thin plate keep the machine light enough to move, store, and repair. For a small desktop CNC router, that can be a major advantage. You can place it on a bench, add an enclosure, and still avoid reinforcing the floor like you are installing a medieval bell tower.
The Catch: CNC Machines Hate Flex
CNC routers are not magic pens. They are machines that push a spinning cutter through material. Every cutting force tries to bend the frame, twist the gantry, deflect the tool, and expose bad design decisions with the enthusiasm of a courtroom attorney. A riveted aluminum-angle machine can work, but it must be designed with stiffness in mind.
Rigidity is the difference between a clean cut and a musical instrument that plays the song of chatter. If the frame flexes, the cutter moves away from its intended path. If the gantry twists, circles become eggs. If the Z-axis wobbles, edges look furry enough to require grooming.
The solution is not always “use thicker metal.” Smart geometry often matters more. Triangles help. Box sections help. Short spans help. Wide bearing spacing helps. A spoilboard tied firmly into the frame can help. Gussets at corners can make a flimsy rectangle behave more like a machine and less like a folding lawn chair.
Key Parts of a Pop-Rivet-Friendly CNC Build
1. The Frame
The frame is the foundation. For a riveted design, aluminum angle can form rails, rectangular side frames, and cross braces. Sheet aluminum or plywood can be used as panels, but the structure should resist twisting. A flat torsion-box base is a smart option for wood-focused machines because it spreads loads and provides a stable platform for the spoilboard.
Before fastening anything permanently, dry-fit the frame. Measure diagonals. Clamp parts. Check for square. Then check again, because aluminum has a wicked sense of humor and will happily preserve your mistake forever once riveted.
2. Linear Motion
Every CNC needs controlled movement. Budget machines often use V-wheels on aluminum rails, smooth rods with bearings, drawer-slide experiments, timing belts, threaded rods, lead screws, or linear rails. Each choice has trade-offs.
Belts are fast and affordable, especially for light routers. Lead screws can offer better positional control at lower cost but may be slower and can whip over long distances. Ball screws are excellent but more expensive. Linear rails are stiffer and smoother than improvised guides, though they raise the budget quickly. For a pop-rivet-style CNC, the best choice is usually the one that matches the intended material. Foam and signs are forgiving. Aluminum plate is not.
3. The Gantry
The gantry is where many DIY CNC dreams go to learn humility. It must span the work area while carrying the Z-axis and router. If it is too light, it flexes. If it is too heavy, small motors struggle. If it is too tall, leverage turns tiny cutting forces into big errors.
A good lightweight gantry uses depth, not just thickness. A boxy beam resists twisting better than a flat strip. Adding front and rear plates, triangular side supports, and widely spaced bearings can dramatically improve performance. Think bridge, not curtain rod.
4. The Z-Axis
The Z-axis deserves respect because it holds the cutter. A loose Z-axis ruins jobs quickly. Keep it compact. Minimize overhang. Mount the spindle or trim router securely. If using 3D-printed parts, choose the right material, print with strong settings, and avoid designs that put layer lines in the worst possible direction. Plastic brackets can work, but they are not enchanted.
5. Spindle or Router
Small DIY machines often use rotary tools, trim routers, or compact spindles. A rotary tool is cheap and light, but it lacks the power and bearing stiffness of a router or proper spindle. A trim router is a popular middle ground for wood, plastics, and light aluminum experimentation. A VFD spindle can be quieter and more controllable, but it adds cost and electrical complexity.
The machine should be designed around the cutting tool. Putting a powerful spindle on a floppy frame is like installing a race engine in a shopping cart. Memorable? Yes. Advisable? Not really.
Electronics: The Nervous System
A CNC router needs motors, drivers, a controller, power supply, limit switches, wiring, and software. Many hobby builds use stepper motors because they are affordable and simple. NEMA 17 motors may work for very light machines, while NEMA 23 motors are common on larger hobby routers. Closed-loop steppers and servos add feedback, but they also increase cost.
For control, open-source options such as GRBL and LinuxCNC have helped make DIY CNC far more accessible. GRBL is popular for Arduino-class controllers and small routers. LinuxCNC is more powerful and flexible, especially for complex machines, but it requires more setup knowledge. Commercial controllers can simplify the process, but the learning value of open systems is hard to beat.
Limit switches are worth installing. An emergency stop is worth installing. Cable management is worth installing. Dust protection is worth installing. In fact, CNC electronics live in a hostile neighborhood filled with vibration, chips, static, and dust. Treat wiring like part of the machine, not decorative spaghetti.
Feeds, Speeds, and the Sound of Good Cutting
After the machine moves, the next challenge is making it cut well. Feeds and speeds describe how fast the cutter spins and how fast it moves through the material. The goal is to make chips, not powder, smoke, or tiny screams from the end mill.
Wood, MDF, acrylic, aluminum, and foam all need different strategies. A low-rigidity CNC should take shallow passes, use sharp cutters, and avoid aggressive feeds until the machine proves itself. Single-flute bits can be useful on smaller routers because they create room for chip evacuation. Compression bits are helpful for plywood edges. Upcut bits clear chips well but can fuzz the top surface. Downcut bits leave a cleaner top edge but may pack chips into the cut.
The best advice for a new riveted CNC is simple: start conservative, listen carefully, and change one variable at a time. If the router is screaming, burning, or vibrating like a haunted blender, stop and adjust. A CNC machine communicates constantly. Unfortunately, its native language is noise.
Workholding: The Unsung Hero
Many beginners obsess over motors and forget the material must stay still. A loose workpiece is dangerous and inaccurate. Screws into a spoilboard, clamps, painter’s tape with CA glue, tabs, wedges, and small vacuum fixtures can all work depending on the job.
For a lightweight CNC, workholding should be simple and secure. Avoid tall clamps near the toolpath. Use a spoilboard you are willing to cut into. Add threaded inserts or T-tracks if the frame supports them. When cutting small parts, leave tabs or use a strategy that prevents the final piece from becoming a tiny wooden helicopter.
What Can This Kind of CNC Actually Make?
A pop-rivet-friendly CNC router is best for learning and light production. It can make signs, foam molds, PCB isolation experiments, plywood templates, drawer organizers, engraving projects, small furniture parts, jigs, nameplates, model aircraft parts, and decorative panels. With patience and shallow passes, it may cut plastics beautifully. With even more patience, lubrication, and realistic expectations, it may nibble aluminum.
But this is not the ideal machine for heavy aluminum hogging, steel cutting, production cabinetmaking, or high-precision mold work. That is not an insult. A bicycle is not bad because it cannot tow a bulldozer. A small DIY CNC wins when it is used for the right work.
How to Design One Without Regretting Your Weekends
Keep the Work Area Reasonable
Bigger machines flex more unless everything gets stronger. For a first riveted CNC, a smaller work area is easier to make accurate. A 12-by-18-inch or 24-by-24-inch machine can teach more than a wobbly 4-by-8-foot monster that eats garage space and self-esteem.
Build in Adjustment Points
Rivets are permanent, so do not rivet every alignment-critical component. Use bolts where you need to tram the spindle, tension belts, square the gantry, or replace wear parts. Rivet the supporting brackets and panels; bolt the precision bits.
Use Bracing Generously
Every corner wants a gusset. Every long rail wants support. Every flat panel wants a return flange or rib. The machine should resist racking before the motors are installed. If you can twist the frame by hand, the cutter will twist it during a job. The cutter has no mercy and no hobbies.
Plan for Dust
Routing MDF creates a majestic beige fog that will coat everything you love. Add a dust shoe if possible. Use dust collection. Keep electronics enclosed. Clean rails and screws regularly. CNC routers are part machine tool, part confetti cannon.
Common Mistakes in DIY Riveted CNC Builds
The first mistake is making the frame square only in spirit. Measure diagonals and use reliable references. The second mistake is using motion components that are too flexible. The third is mounting the router too far from the gantry, increasing leverage. The fourth is ignoring belt tension or screw alignment. The fifth is expecting software calibration to fix mechanical problems.
Software can compensate for steps per millimeter. It cannot fully compensate for a frame that bends when the cutter touches wood. Mechanical accuracy comes first. Calibration refines it; it does not resurrect it.
The Real Value: Learning CNC From the Inside Out
The strongest argument for a pop-rivet-style CNC is education. Building one forces you to understand the whole system. CAD creates the model. CAM creates the toolpaths. The controller reads G-code. Motors move axes. The frame resists forces. The cutter removes material. Workholding prevents chaos. Each part matters.
Buying a finished CNC is convenient, and for business use it may be the smartest move. But building one creates a different relationship with the machine. When something goes wrong, you know where to look because you drilled the holes, pulled the rivets, wired the switches, and probably invented at least one new phrase while aligning the gantry.
Experiences From the Bench: What a Pop-Rivet CNC Teaches You
The first experience is the joy of speed. A riveted bracket goes together quickly, and that feels fantastic. You cut a piece of aluminum angle, clamp it, drill it, deburr it, pop the rivet, and suddenly the machine has a corner. Then another. Then a rectangle. Then something that looks suspiciously like progress. Compared with waiting for machined plates or custom brackets, riveted construction gives you visible results fast enough to keep motivation alive.
The second experience is that holes are destiny. With bolts, you can loosen and persuade. With rivets, your layout becomes law. That makes careful marking essential. A center punch becomes your best friend. A drill press helps, but even a hand drill can work if you use clamps, pilot holes, and patience. Skipping layout steps is the fastest way to create a machine that looks square from across the room but cuts parallelograms up close.
The third experience is learning that “rigid enough” depends on the job. A machine that carves foam like a champion may complain loudly in oak. A router that engraves acrylic cleanly may chatter in aluminum. This is not failure; it is feedback. The smart builder keeps a notebook of materials, bit sizes, spindle speeds, feed rates, depth of cut, and results. That notebook becomes more valuable than any online argument about the perfect machine design.
The fourth experience is the importance of small upgrades. Adding a diagonal brace can change the machine’s personality. Replacing a flexible Z plate can clean up edges. Improving belt tension can make circles rounder. Adding a better spoilboard can make workholding easier. A DIY CNC often improves by inches, not miracles. Each fix teaches one mechanical principle, and those lessons stick because you earned them in dust and mild frustration.
The fifth experience is humility. CNC looks automatic from the outside, but it is only as smart as the setup. The machine will do exactly what the file says, even if the file says to cut through a clamp. It will happily plunge too deep if the zero point is wrong. It will carve a beautiful mirrored part if the coordinate system is confused. A homemade CNC does not just teach fabrication; it teaches disciplined thinking.
The sixth experience is pride. When a machine you assembled from angle stock, rivets, printed parts, motors, wires, and stubbornness finally cuts its first clean shape, it feels wonderful. The part may be simple. The edge may need sanding. The machine may sound like a caffeinated sewing machine. But it moved under computer control and turned an idea into material reality. That moment is why people build these things.
Over time, the builder starts seeing projects differently. A broken appliance becomes a source of rods and switches. Scrap plywood becomes test stock. A failed cut becomes a diagnostic clue. The CNC stops being a mysterious robot and becomes a tool you understand from the inside out. That is the real reward of a CNC you could pop-rivet together: not just the machine, but the maker it creates.
Conclusion
A CNC you could pop-rivet together is not about pretending a garage-built router can compete with a commercial machining center. It is about making CNC approachable. It is about proving that motion control, digital fabrication, and practical engineering do not have to live behind factory doors. With aluminum angle, rivets, bolts, careful layout, modest expectations, and a willingness to learn, a builder can create a useful machine and gain a deep understanding of how CNC really works.
The best version of this project is honest about its limits. It cuts light materials. It teaches fundamentals. It invites upgrades. It rewards careful work. And most importantly, it gets you making chips instead of merely watching videos of other people making chips. In the workshop, that counts as a victory.












