
Figuring concrete yardage sounds like something that requires a hard hat, a laser level, and a mysterious uncle named Dale who “just knows.” Good news: it is mostly simple math. The trick is measuring carefully, converting everything into the same units, and adding a little extra so your project does not run short five minutes before the truck driver wants to leave.
Concrete is typically ordered by the cubic yard in the United States. Whether you are pouring a patio, sidewalk, driveway apron, shed slab, footing, post hole, curb, or small repair pad, the goal is the same: calculate the volume of the space you need to fill. Once you know that volume, you can convert it into cubic yards or concrete bags.
This guide walks you through how to figure concrete yardage in 14 practical steps, with examples, formulas, common mistakes, and field-tested advice. No wizardry required. Just a tape measure, a calculator, and a healthy respect for the fact that wet concrete waits for no one.
What Is Concrete Yardage?
Concrete yardage means the amount of concrete measured in cubic yards. A cubic yard is a three-dimensional measurement: 3 feet long, 3 feet wide, and 3 feet deep. That equals 27 cubic feet.
The basic concrete formula is:
Length × Width × Depth = Cubic Feet
Then:
Cubic Feet ÷ 27 = Cubic Yards
For example, if a slab measures 12 feet long, 10 feet wide, and 4 inches thick, you first convert the 4 inches to feet. Four inches is 0.333 feet. Then multiply:
12 × 10 × 0.333 = 39.96 cubic feet
39.96 ÷ 27 = 1.48 cubic yards
That means you need about 1.48 cubic yards before adding a waste allowance.
How to Figure Concrete Yardage: 14 Steps
Step 1: Identify the Type of Concrete Project
Before measuring, define what you are pouring. A flat slab is easier to calculate than a set of steps, a round footing, or a trench-style foundation. Common concrete projects include patios, sidewalks, driveways, garage slabs, shed pads, fence post holes, deck footings, curbs, retaining wall footings, and stairs.
For a square or rectangular slab, you will use length, width, and thickness. For a round pier or post hole, you will use diameter and depth. For steps, you may need to break the shape into several smaller rectangles and calculate each section separately.
Step 2: Measure the Length
Measure the inside length of the form, not the outside. This matters because the concrete fills the space inside the boards. If your forms are made with 2-by lumber and you measure from the outside edge, your estimate may be slightly high. That is not always a disaster, but accuracy starts with measuring the actual pour area.
Use feet whenever possible. If the project is 12 feet 6 inches long, write it as 12.5 feet. If it is 9 feet 3 inches long, write it as 9.25 feet. This makes the math much cleaner.
Step 3: Measure the Width
Next, measure the width of the concrete area. For a patio, this may be the shorter side. For a sidewalk, it may be 3 or 4 feet. For a driveway, measure the full width between the inside edges of the forms.
If the project is not perfectly square, take multiple measurements. For example, a patio may be 14 feet wide at one end and 13 feet 6 inches wide at the other. In that case, use the average width. Add the two widths together and divide by two:
14 + 13.5 = 27.5
27.5 ÷ 2 = 13.75 feet average width
Step 4: Decide the Concrete Thickness
Thickness is where many concrete estimates go off the rails. A 4-inch slab and a 6-inch slab may look similar from above, but the 6-inch slab uses 50% more concrete. That is a big difference for your budget and your wheelbarrow muscles.
Typical residential flatwork often uses 4 inches for patios, sidewalks, and light-use pads. Driveways are commonly 4 inches or more, depending on soil conditions, local code, vehicle weight, and reinforcement. Heavier loads, poor soil, commercial use, or engineered projects may require thicker concrete. Always follow local building codes or structural plans when they apply.
Step 5: Convert Inches to Feet
Concrete yardage formulas work best when length, width, and depth are all in feet. Since slab thickness is usually measured in inches, divide the thickness by 12.
- 3 inches = 0.25 feet
- 4 inches = 0.333 feet
- 5 inches = 0.417 feet
- 6 inches = 0.5 feet
- 8 inches = 0.667 feet
- 12 inches = 1 foot
This tiny conversion is the difference between a professional-looking estimate and a “why is there a mountain of leftover concrete in my yard?” situation.
Step 6: Calculate the Square Footage
For rectangular slabs, multiply length by width to get square footage.
Length × Width = Square Feet
Example: A 16-foot by 12-foot patio has:
16 × 12 = 192 square feet
Square footage alone does not tell you how much concrete you need because concrete has depth. Still, it is an important middle step.
Step 7: Multiply by Thickness to Find Cubic Feet
Now multiply the square footage by the slab thickness in feet.
Square Feet × Thickness in Feet = Cubic Feet
Using the 16-by-12 patio example at 4 inches thick:
192 × 0.333 = 63.94 cubic feet
This tells you the total volume before converting to cubic yards.
Step 8: Divide by 27 to Convert Cubic Feet to Cubic Yards
Since one cubic yard equals 27 cubic feet, divide your cubic feet by 27.
63.94 ÷ 27 = 2.37 cubic yards
So a 16-foot by 12-foot patio poured 4 inches thick requires about 2.37 cubic yards before adding extra.
Step 9: Add a Waste Allowance
Concrete estimates should include extra material for uneven subgrade, spillage, form movement, small measurement errors, and the concrete that clings to tools, buckets, chutes, and mixer drums. For most residential projects, adding 5% to 10% is a practical safety margin. If the base is rough, the forms are irregular, or the pour is complicated, consider a higher allowance or ask your ready-mix supplier.
For the 2.37-yard patio, adding 10% looks like this:
2.37 × 1.10 = 2.61 cubic yards
You would likely order around 2.75 or 3 cubic yards, depending on how your supplier rounds orders.
Step 10: Round Up, Not Down
Concrete is not something you want to run short on. Ordering slightly too much may be annoying. Ordering too little can create cold joints, delays, emergency bag mixing, and language your neighbors may learn through the fence.
Ready-mix concrete companies often sell in quarter-yard, half-yard, or full-yard increments, depending on the supplier and location. For bagged concrete, always round up to the next whole bag. You cannot buy 0.4 of a bag unless you are shopping in a cartoon.
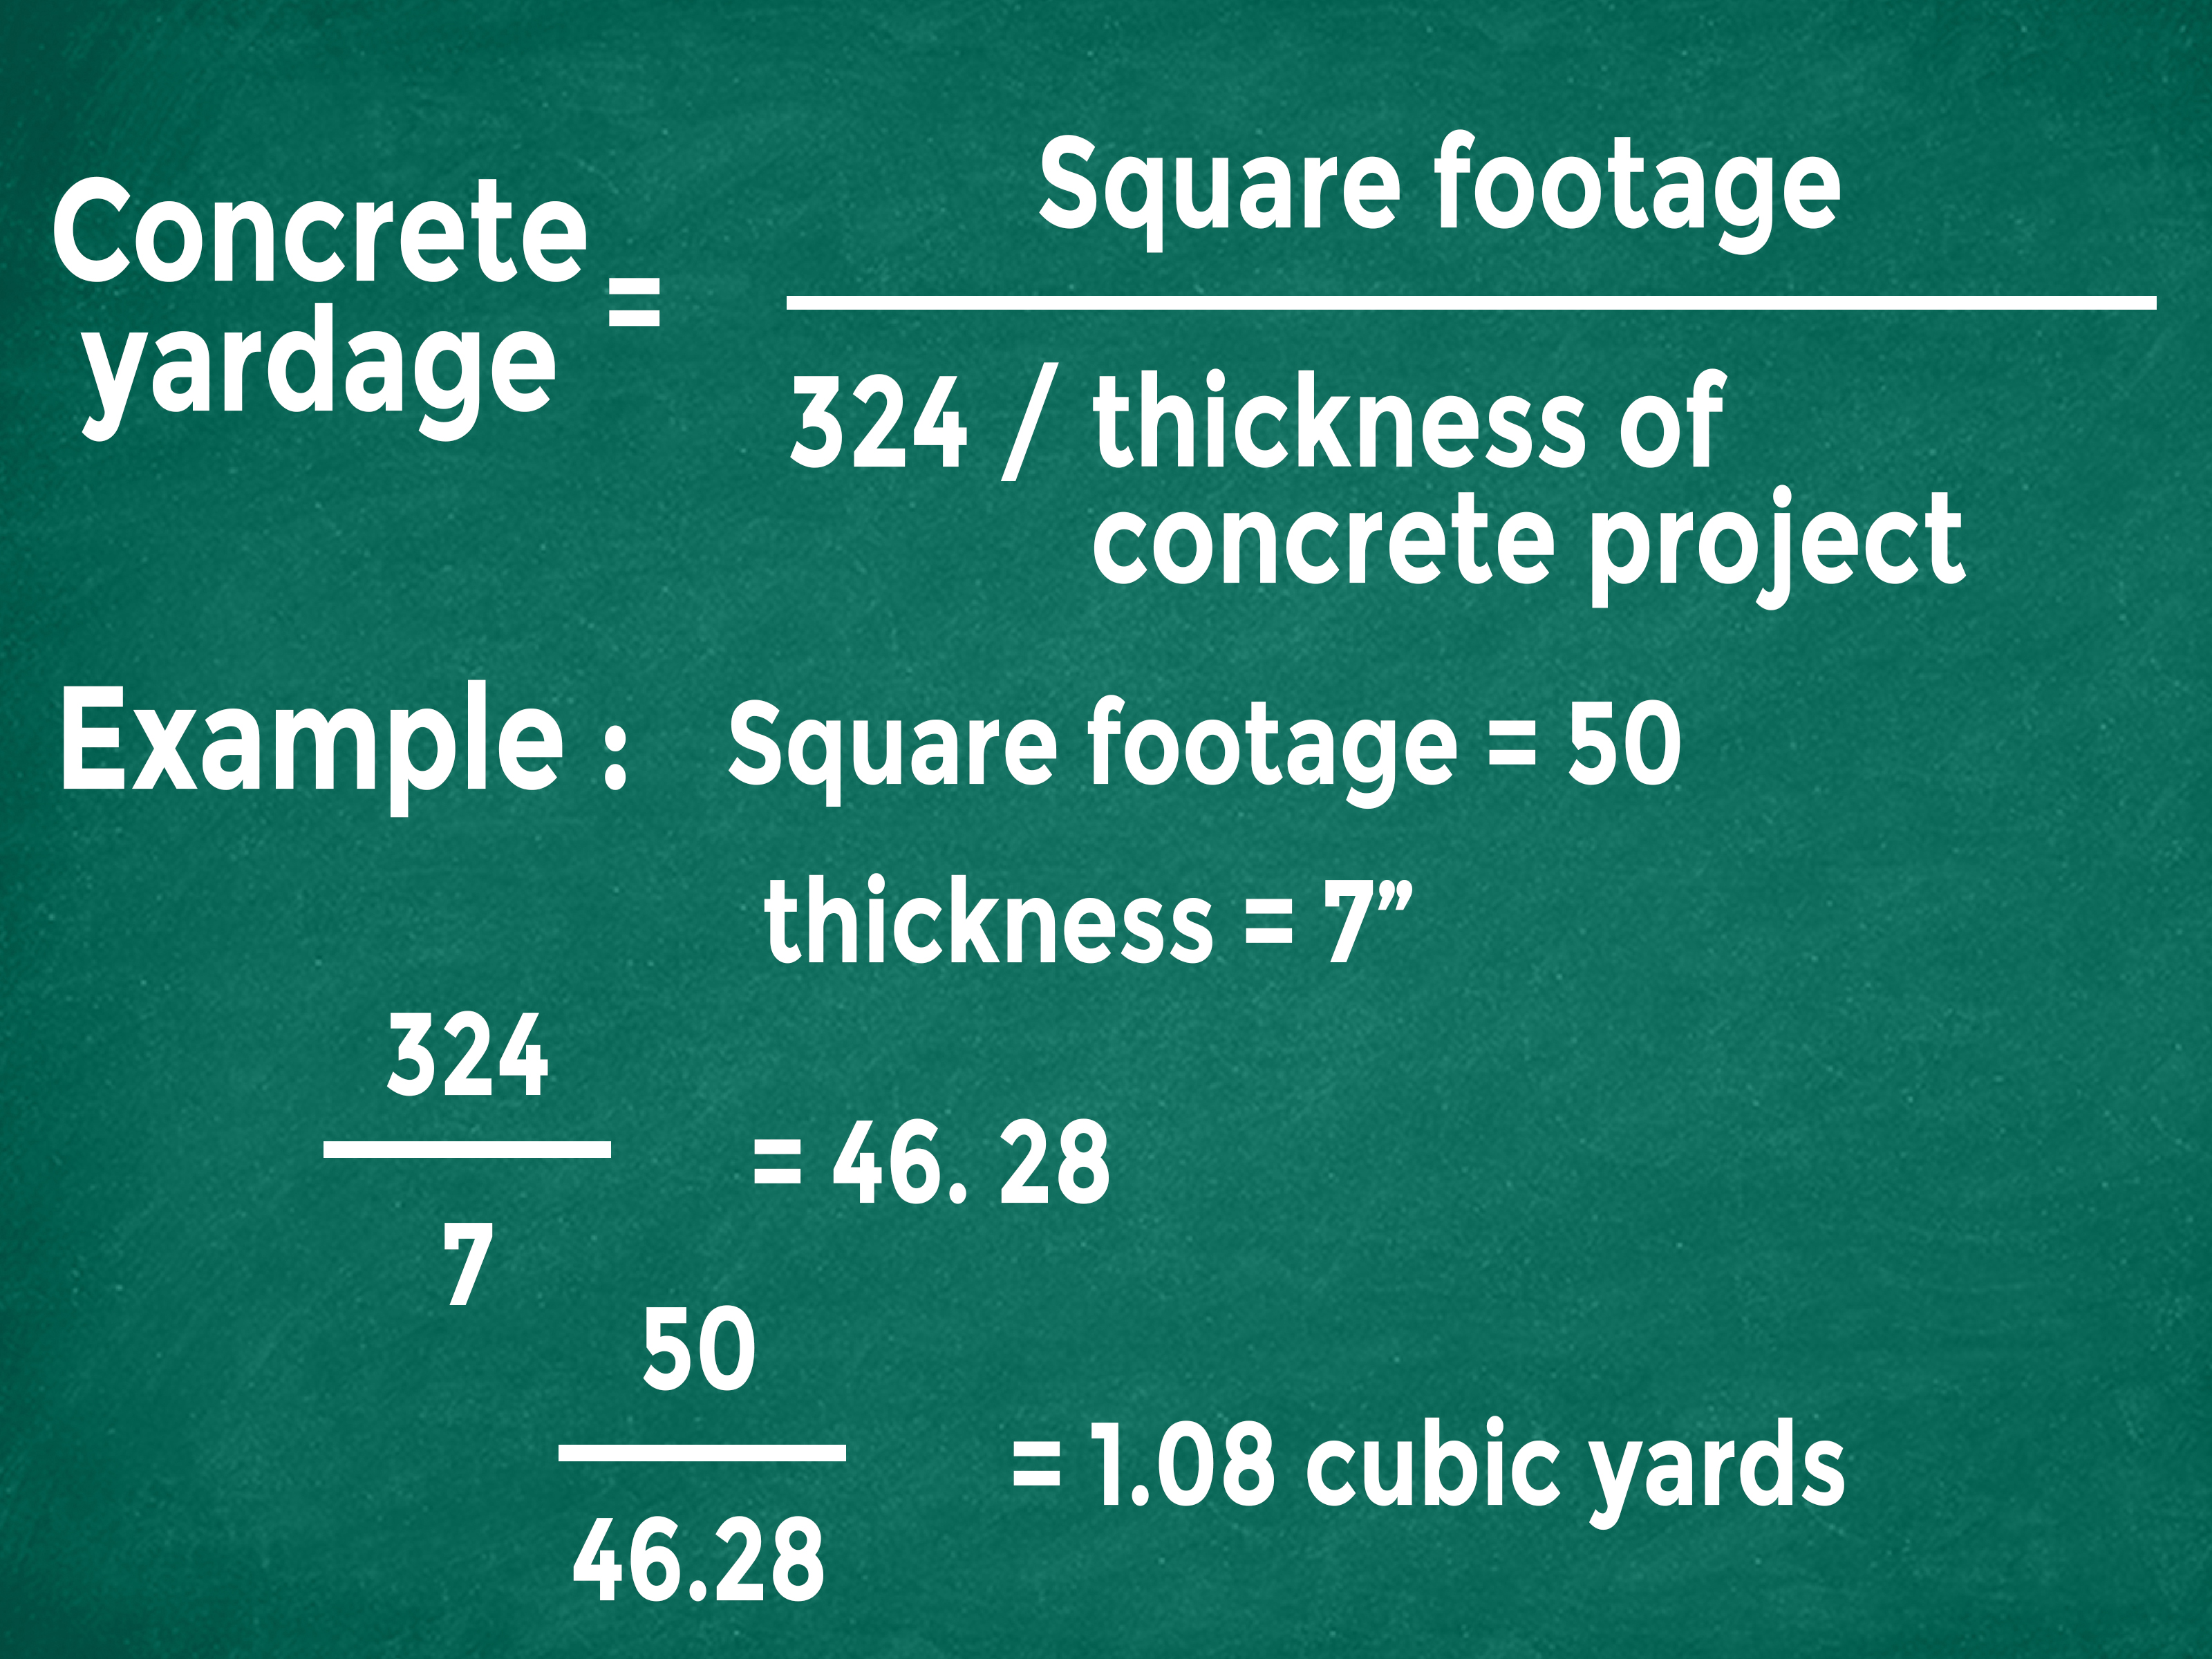
Step 11: Use the Shortcut for 4-Inch Slabs
For a slab that is exactly 4 inches thick, there is a handy shortcut:
Square Feet ÷ 81 = Cubic Yards
Why 81? Because one cubic yard of concrete covers about 81 square feet at 4 inches thick.
Example: A 10-foot by 20-foot slab has 200 square feet.
200 ÷ 81 = 2.47 cubic yards
Add 10%:
2.47 × 1.10 = 2.72 cubic yards
That means you may order about 2.75 or 3 cubic yards, depending on supplier rules.
Step 12: Calculate Round Holes or Piers Correctly
For round concrete forms, such as post holes, deck piers, or Sonotube-style forms, use the cylinder formula:
3.14 × Radius × Radius × Depth = Cubic Feet
Then divide by 27 to get cubic yards.
Example: You have a 12-inch diameter hole that is 36 inches deep. Convert to feet:
- Diameter: 12 inches = 1 foot
- Radius: 0.5 feet
- Depth: 36 inches = 3 feet
Now calculate:
3.14 × 0.5 × 0.5 × 3 = 2.355 cubic feet
2.355 ÷ 27 = 0.087 cubic yards
If you have 8 holes:
0.087 × 8 = 0.696 cubic yards
Add waste, then round up.
Step 13: Estimate Bagged Concrete When the Job Is Small
For smaller projects, bagged concrete may be easier than ordering a truck. The bag label is your best source because yield varies by brand and product, but common rough yields are:
- 40-pound bag: about 0.30 cubic feet
- 60-pound bag: about 0.45 cubic feet
- 80-pound bag: about 0.60 cubic feet
To calculate bags, divide total cubic feet by the bag yield.
Example: A small pad needs 12 cubic feet of concrete. If each 80-pound bag yields about 0.60 cubic feet:
12 ÷ 0.60 = 20 bags
Add a couple extra bags if the base is uneven. Your future self will appreciate not making a dusty emergency run to the store while half the slab is setting.
Step 14: Double-Check Before You Order
Before calling the ready-mix supplier or loading bags into your cart, review every number:
- Did you measure inside the forms?
- Did you convert inches to feet?
- Did you calculate depth correctly?
- Did you include footings, thickened edges, steps, or curbs?
- Did you add 5% to 10% extra?
- Did you round up according to supplier requirements?
Also confirm access for the concrete truck, chute reach, wheelbarrow route, weather, manpower, finishing tools, and control joint plan. Concrete yardage is only one part of a successful pour. The math gets the material there; planning gets it placed before it becomes an expensive rock.
Concrete Yardage Examples
Example 1: 10-Foot by 10-Foot Patio, 4 Inches Thick
Length: 10 feet
Width: 10 feet
Thickness: 4 inches = 0.333 feet
10 × 10 = 100 square feet
100 × 0.333 = 33.3 cubic feet
33.3 ÷ 27 = 1.23 cubic yards
1.23 × 1.10 = 1.35 cubic yards with 10% extra
Order estimate: about 1.5 cubic yards, depending on supplier minimums.
Example 2: 12-Foot by 20-Foot Driveway Section, 5 Inches Thick
Length: 20 feet
Width: 12 feet
Thickness: 5 inches = 0.417 feet
20 × 12 = 240 square feet
240 × 0.417 = 100.08 cubic feet
100.08 ÷ 27 = 3.71 cubic yards
3.71 × 1.10 = 4.08 cubic yards with 10% extra
Order estimate: about 4.25 cubic yards or as recommended by the supplier.
Example 3: Footing Trench, 30 Feet Long, 16 Inches Wide, 8 Inches Deep
Length: 30 feet
Width: 16 inches = 1.333 feet
Depth: 8 inches = 0.667 feet
30 × 1.333 × 0.667 = 26.67 cubic feet
26.67 ÷ 27 = 0.99 cubic yards
0.99 × 1.10 = 1.09 cubic yards with 10% extra
Order estimate: about 1.25 cubic yards, if ready mix is practical. For bagged concrete, divide cubic feet by bag yield.
Quick Concrete Yardage Reference Table
| Slab Size | Thickness | Approx. Cubic Yards | With 10% Extra |
|---|---|---|---|
| 10 ft × 10 ft | 4 in | 1.23 yd³ | 1.35 yd³ |
| 12 ft × 12 ft | 4 in | 1.78 yd³ | 1.96 yd³ |
| 10 ft × 20 ft | 4 in | 2.47 yd³ | 2.72 yd³ |
| 12 ft × 20 ft | 5 in | 3.71 yd³ | 4.08 yd³ |
| 20 ft × 20 ft | 6 in | 7.41 yd³ | 8.15 yd³ |
Common Mistakes When Figuring Concrete Yardage
Forgetting to Convert Inches to Feet
This is the classic mistake. If you multiply 10 × 10 × 4 and divide by 27, you will get a wildly wrong number because 4 inches is not 4 feet. Always divide inches by 12 first.
Ignoring Thickened Edges
Some slabs have thickened edges for strength. If the center is 4 inches thick but the edges are 8 or 12 inches deep, calculate the main slab and the thickened edge separately, then add them together.
Not Accounting for Uneven Ground
A slab that is supposed to be 4 inches thick may become 5 inches thick in low spots if the base is not level. Concrete will fill every dip, hollow, and “close enough” area. The ground does not care about your spreadsheet.
Ordering Exactly the Calculated Amount
If your math says 2.37 yards, do not order 2.37 yards unless your supplier specifically advises it and can deliver that exact amount. Add waste and round up. Running short is almost always worse than having a small amount left over.
Forgetting About Control Joints
Control joints do not change yardage much, but they matter for the finished slab. Concrete shrinks as it cures, and joints help manage where cracks occur. For many slabs, joint spacing is planned based on slab thickness, layout, reinforcement, and project requirements. A 4-inch slab often needs joints much closer than a huge open rectangle might suggest.
Ready-Mix Concrete vs. Bagged Concrete
Ready-mix concrete is usually best for larger pours because the concrete arrives mixed and ready to place. It saves time, labor, and the back-breaking joy of feeding bag after bag into a mixer. For patios, driveways, sidewalks, and larger slabs, ready mix is often the smarter choice.
Bagged concrete works well for small pads, fence posts, deck footings, mailbox posts, small repairs, and projects where a ready-mix truck cannot access the site. But once you approach half a cubic yard or more, compare the cost and labor carefully. Mixing dozens of 80-pound bags is a workout plan nobody asked for.
How to Handle Irregular Shapes
Not every concrete project is a neat rectangle. For L-shaped patios, curved walks, odd driveway extensions, and custom pads, divide the area into simple shapes. Calculate each rectangle, square, triangle, or circle separately, then add the totals.
For an L-shaped slab, treat it as two rectangles. For a circular patio, calculate the circle area with 3.14 × radius × radius, then multiply by thickness. For a triangular section, use base × height ÷ 2, then multiply by thickness.
The secret is not fancy math. It is breaking a weird shape into boring shapes. Boring shapes are your friends.
Experience-Based Tips for Figuring Concrete Yardage
After you have figured concrete yardage a few times, you learn that the calculator is only half the story. The other half is the jobsite. A slab drawn as 12 feet by 12 feet on paper may become 12 feet 2 inches by 12 feet 1 inch once forms are adjusted. A 4-inch depth may turn into 4.5 inches after you compact gravel and discover one corner is lower than expected. These small changes can add up, especially on larger pours.
One of the best habits is to measure after the forms are built, not just before. Early measurements help you buy lumber and plan the project, but final yardage should be based on the actual formed area. Walk the forms with a tape measure and check several spots. Measure the length at both sides, the width at both ends, and the depth in multiple places. If the base is uneven, use an average depth and add a healthy waste allowance.
Another practical lesson: do not let optimism calculate your concrete. Homeowners often say, “It should be fine,” right before discovering the forms are deeper than expected. Concrete has a talent for exposing wishful thinking. If you are between two order amounts, rounding up is usually cheaper than paying for a short-load rescue, renting tools longer, or hand-mixing bags to finish a corner that came up short.
It is also smart to plan where extra concrete will go. Before the truck arrives, prepare a small overflow form, stepping stone mold, fence post hole, splash block, or utility pad. Leftover concrete is annoying when you have nowhere to put it, but it becomes a bonus when you planned ahead. A few extra square feet of useful concrete beats a hardened lump beside the driveway.
For bagged concrete, the biggest experience-based tip is simple: respect the labor. People see “only 30 bags” and think it sounds manageable. Then bag number 18 arrives, and suddenly everyone develops a spiritual relationship with ready-mix trucks. If you are mixing by hand, stage the bags close to the pour, have enough water available, use a wheelbarrow or mixer, and recruit help. Concrete setting time does not pause because your arms are tired.
For ready-mix pours, talk to the supplier. Tell them the project dimensions, thickness, access conditions, and whether you have footings or thickened edges. Suppliers hear yardage estimates every day and may spot a missing detail quickly. They can also explain minimum orders, short-load fees, delivery windows, mix options, and whether the truck chute can reach your forms.
Finally, remember that accurate yardage supports good finishing. When the correct amount of concrete arrives, the crew can focus on placing, screeding, floating, edging, jointing, and curing instead of panicking over shortages. Concrete work is already a race against the clock. Good math gives you a fair start.
Conclusion
Learning how to figure concrete yardage is one of the most useful skills for any concrete project. The core formula is simple: multiply length by width by depth to get cubic feet, then divide by 27 to convert to cubic yards. The real skill is measuring accurately, converting inches to feet, accounting for odd shapes, adding 5% to 10% extra, and rounding up before you order.
Whether you are pouring a patio, driveway section, walkway, footing, shed pad, or post hole, a careful estimate saves money, prevents delays, and keeps the project moving smoothly. Concrete is heavy, impatient, and not especially forgiving, but with the right yardage calculation, it becomes much easier to manage.
Note: This guide is for estimating concrete yardage for common residential projects. Always follow local building codes, engineered plans, product labels, and ready-mix supplier recommendations for structural work, reinforcement, thickness, curing, and safety.












