
Finding the wall thickness of a pipe sounds like one of those jobs that should require a hard hat, a clipboard, and someone named Carl who “knows the system.” The good news? In many cases, you can figure it out with a caliper, a pipe schedule chart, a little math, and the patience not to call every round object “probably half-inch.”
Pipe wall thickness matters because it affects pressure rating, flow capacity, weight, durability, corrosion allowance, threading, welding, and whether a fitting will actually fit instead of becoming a very expensive paperweight. Whether you are working with steel pipe, stainless pipe, PVC, copper, or an unknown pipe in a repair project, the goal is the same: identify how thick the wall is from the outside surface to the inside surface.
Note: This guide is written for practical measuring, identification, and educational use. For pressure systems, gas lines, steam lines, structural loads, or code-regulated piping, confirm measurements with the applicable standard, manufacturer data, and a qualified professional.
Why Pipe Wall Thickness Is Important
Pipe wall thickness is not just a number on a chart. It tells you how much material the pipe has between the inside and outside diameters. A thicker wall usually means more strength, more weight, less inside diameter, and sometimes a higher pressure rating. A thinner wall may be easier to cut, lighter to handle, and perfectly suitable for drainage or low-pressure service, but it may not be safe for high-pressure applications.
In the United States, many steel pipes are identified by Nominal Pipe Size and schedule. The schedule number, such as Schedule 10, Schedule 40, or Schedule 80, refers to wall thickness. Here is the sneaky part: for many pipe sizes, the outside diameter stays the same while the inside diameter changes as the wall gets thicker. That is why a 2-inch Schedule 40 steel pipe and a 2-inch Schedule 80 steel pipe can have the same outside diameter but different inside openings. Pipe sizing has a sense of humor, apparently.
Simple Ways to Find Wall Thickness of a Pipe: 9 Steps
Step 1: Identify the Pipe Material First
Before measuring anything, identify the material. Steel, stainless steel, PVC, copper, cast iron, and tubing may follow different sizing conventions. A steel pipe may be listed by schedule. PVC pressure pipe may also use schedules such as Schedule 40 and Schedule 80. Copper tube often uses types such as Type K, Type L, and Type M. Tubing is commonly measured differently from pipe, often by actual outside diameter.
Look for markings printed, stamped, painted, or embossed on the pipe. PVC pipe often includes the manufacturer name, material, size, schedule, pressure rating, and standard. Steel pipe may have stencil markings showing size, grade, specification, heat number, or schedule. If the label is still readable, congratulationsyou just found the pipe’s résumé.
Step 2: Clean the Area You Plan to Measure
Accurate measurement starts with a clean surface. Dirt, rust, paint buildup, insulation residue, scale, or old adhesive can make a pipe appear thicker or larger than it is. Use a rag, wire brush, scraper, or light abrasive pad to clean the measuring point. For painted or coated pipe, be careful not to confuse coating thickness with wall thickness.
If the pipe is in service, do not grind, sand, or scrape aggressively without understanding what the line carries. Pipes may contain water, gas, chemicals, steam, or compressed air. Safety comes first; measuring comes second. The pipe is not going anywhere, and if it is, you have a much bigger problem than wall thickness.
Step 3: Measure the Outside Diameter
The outside diameter, often shortened to OD, is the distance across the outside of the pipe. The best tool for this is a digital caliper, dial caliper, outside micrometer, or pipe measuring tape. Place the caliper jaws squarely across the pipe and avoid measuring at an angle. If the pipe is large, use a circumference tape or wrap a flexible tape around the pipe, then divide the circumference by 3.1416 to estimate the OD.
For example, if the circumference is 7.46 inches, divide 7.46 by 3.1416. The result is about 2.375 inches. That is the common outside diameter for a 2-inch nominal steel pipe. Notice how 2-inch pipe does not actually measure 2 inches outside. Pipe sizing loves tradition more than common sense.
Step 4: Measure the Inside Diameter If the Pipe End Is Accessible
The inside diameter, or ID, is the opening inside the pipe. If you have access to a clean cut end, use inside caliper jaws to measure the internal opening. Measure across the center, not near the edge, and take readings in more than one direction. Pipe can be slightly oval, worn, corroded, or cut unevenly.
Once you have the OD and ID, the simplest pipe wall thickness formula is:
Wall thickness = (Outside diameter – Inside diameter) ÷ 2
For example, suppose the outside diameter is 2.375 inches and the inside diameter is 2.067 inches. Subtract 2.067 from 2.375 to get 0.308. Divide that by 2, and the wall thickness is 0.154 inches. That matches the typical wall thickness of 2-inch Schedule 40 steel pipe.
Step 5: Use a Pipe Schedule Chart
If you know the nominal pipe size and material, a pipe schedule chart can quickly tell you the standard wall thickness. Pipe schedule charts list nominal pipe size, outside diameter, schedule, wall thickness, inside diameter, and sometimes weight per foot. They are especially useful for carbon steel, stainless steel, and PVC pipe.
For steel pipe, common schedules include Schedule 10, 40, 80, and 160, along with older terms such as Standard, Extra Strong, and Double Extra Strong. For PVC pipe, Schedule 40 and Schedule 80 are common in many pressure and plumbing applications. Schedule 80 PVC has a thicker wall than Schedule 40 PVC of the same nominal size, which means the inside diameter is smaller.
Here is a simple example: a 2-inch nominal steel pipe usually has an outside diameter of 2.375 inches. In Schedule 40, its wall thickness is commonly 0.154 inches. In Schedule 80, its wall thickness is commonly 0.218 inches. The outside diameter stays the same, but the inside diameter shrinks because the wall gets thicker.
Step 6: Check the Pipe Markings
Pipe markings can save time, especially on newer installations. Look along the pipe for printed or stamped information such as “2 in. Sch 40,” “ASTM D1785,” “ASTM A53,” “PVC 1120,” “Type L,” or “Schedule 80.” These markings may tell you the size, material, pressure rating, and applicable standard.
If the marking includes the schedule, use a standard chart to confirm the wall thickness. If the marking includes the pressure rating but not the schedule, look up the manufacturer’s data sheet. This is common with some plastic pipe, specialty pipe, and tubing. Do not assume two pipes with similar outside diameters have the same wall thickness. That assumption has ruined many afternoons and at least a few hardware store trips.
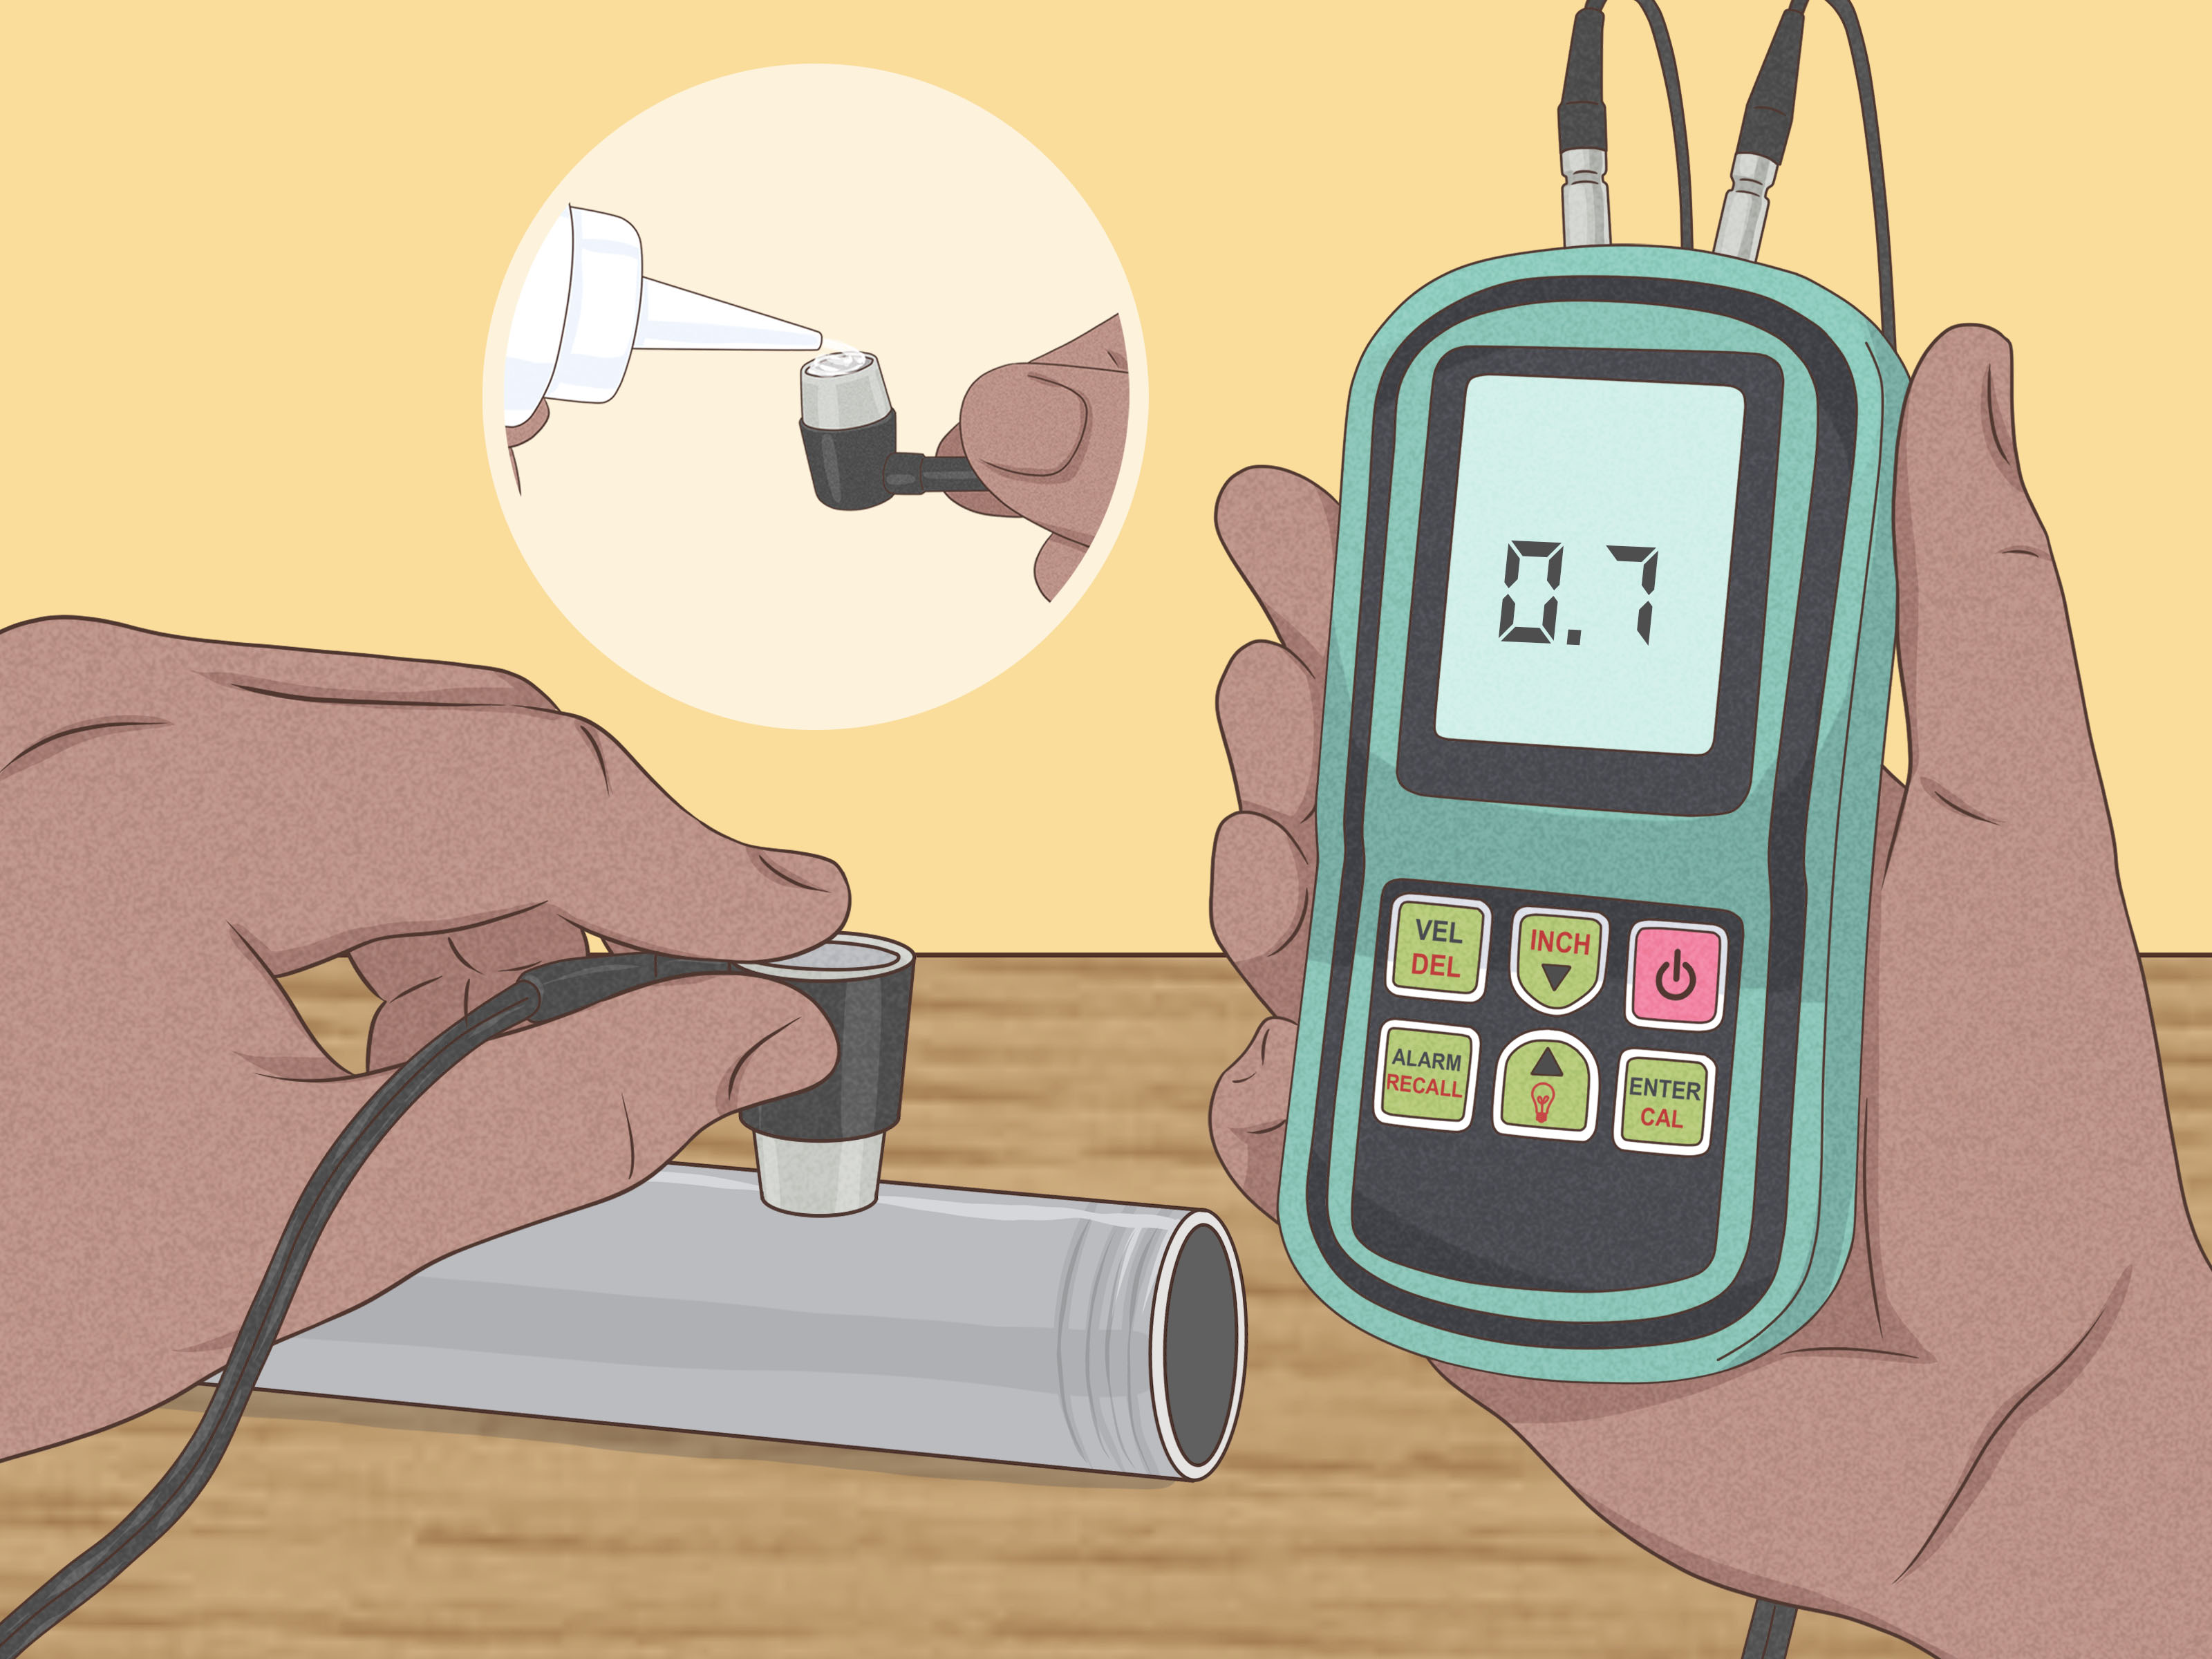
Step 7: Use an Ultrasonic Thickness Gauge When You Cannot Cut the Pipe
Sometimes you cannot access the inside of the pipe. Maybe it is installed in a wall, part of a working system, or connected to expensive equipment that nobody wants to disturb. In that case, an ultrasonic thickness gauge can measure wall thickness from the outside using sound waves.
An ultrasonic gauge sends a pulse through the pipe wall and measures how long it takes to bounce back. The tool then calculates thickness based on the sound velocity of the material. These gauges are commonly used for steel tanks, pipes, vessels, and corrosion inspections. Some models can measure through coatings, while others require the coating to be removed for best accuracy.
To use one properly, clean the surface, apply couplant gel, place the probe flat against the pipe, and take several readings around the circumference. A single reading is not enough, especially on old pipe. Corrosion rarely spreads politely in a perfect circle.
Step 8: Measure Several Points Around the Pipe
Pipe wall thickness may vary because of manufacturing tolerances, wear, corrosion, erosion, threading, bending, or damage. For a new pipe, one clean measurement may be enough for identification. For older pipe, take readings at multiple points: top, bottom, left, right, and near suspected problem areas.
This is especially important for pipes carrying water, chemicals, slurry, steam, or compressed air. The thinnest area matters most because it can become the weak point. A pipe may look solid on the outside while losing wall thickness from internal corrosion. Think of it like a donut with a serious commitment issue: the outside may look fine, but the inside tells the story.
Step 9: Compare Your Results With Standard Dimensions
After measuring, compare your results with a reliable pipe dimension chart or manufacturer table. Match the outside diameter first, then compare the measured wall thickness to the closest schedule or pipe type. If the pipe does not match standard pipe dimensions, it may be tubing, metric pipe, specialty pipe, worn pipe, or a pipe with coating buildup.
For example, if you measure an outside diameter of 2.375 inches and a wall thickness of about 0.154 inches, you are likely looking at 2-inch Schedule 40 steel pipe. If the same outside diameter has a wall thickness of about 0.218 inches, it is likely 2-inch Schedule 80 steel pipe. If your numbers are close but not exact, consider measurement error, corrosion loss, coating thickness, or manufacturing tolerance.
Tools You Can Use to Measure Pipe Wall Thickness
Digital Caliper
A digital caliper is one of the easiest tools for small and medium-size pipe. It can measure outside diameter, inside diameter, and sometimes depth. Use it on clean pipe ends for the best result. It is affordable, portable, and accurate enough for many home, shop, and maintenance tasks.
Micrometer
A micrometer gives very precise measurements, especially for smaller pipe, tubing, or cut samples. It is less convenient for large pipe but excellent when accuracy matters. If you have a pipe coupon or cut ring, a micrometer can measure the wall directly.
Pipe Schedule Chart
A schedule chart is not a measuring tool in the physical sense, but it is one of the fastest ways to identify wall thickness once you know the nominal size and schedule. Keep a chart handy if you often work with steel, stainless, or PVC pipe.
Ultrasonic Thickness Gauge
An ultrasonic gauge is the best option when the pipe cannot be cut or opened. It is commonly used in industrial maintenance, inspections, marine work, tanks, pressure piping, and corrosion monitoring. It costs more than a caliper, but it can save huge amounts of time when access is limited.
Common Mistakes When Finding Pipe Wall Thickness
Confusing Pipe With Tubing
Pipe and tubing are not always sized the same way. Pipe is commonly identified by nominal pipe size and schedule. Tubing is often identified by actual outside diameter and wall thickness. If you treat tubing like pipe, your measurements may lead you into a swamp of wrong fittings.
Assuming Nominal Size Equals Actual Size
A 1-inch nominal pipe does not necessarily measure 1 inch across the outside or inside. Nominal pipe size is a naming system, not a promise. Always measure the outside diameter and compare it to a chart.
Measuring Over Paint or Corrosion
Paint, rust, scale, or mineral buildup can distort measurements. Clean the surface whenever safe and possible. If using ultrasonic testing, follow the gauge instructions for coatings and couplant.
Only Measuring One Spot
One measurement can be misleading. Take multiple readings, especially on old pipe or pipe exposed to corrosion. The thinnest reading is often the most important one for safety and repair decisions.
Specific Example: Finding Wall Thickness With OD and ID
Let’s say you cut a piece of steel pipe and want to identify it. You measure the outside diameter with a caliper and get 2.375 inches. Then you measure the inside diameter and get 2.067 inches.
Use the formula:
Wall thickness = (2.375 – 2.067) ÷ 2
Wall thickness = 0.308 ÷ 2
Wall thickness = 0.154 inches
Now compare that with a pipe schedule chart. A 2-inch nominal Schedule 40 steel pipe commonly has a wall thickness of 0.154 inches, so your pipe is very likely 2-inch Schedule 40 steel pipe. If you measured closer to 0.218 inches, Schedule 80 would be the likely match.
Specific Example: Finding Wall Thickness Without Cutting
Now imagine a pipe is installed overhead and cannot be cut. You can measure the outside diameter with a circumference tape, but you cannot measure the inside diameter. In this case, you have two good options.
First, look for markings. If the pipe is labeled “2 in. Sch 40,” you can use a schedule chart. Second, use an ultrasonic thickness gauge. Clean a small area, apply couplant, place the probe on the pipe, and take multiple readings. If the readings are around 0.154 inches, the pipe may match Schedule 40. If the readings vary widely, corrosion or surface condition may be affecting the pipe.
How Wall Thickness Affects Flow and Strength
Wall thickness changes the inside diameter, and inside diameter affects flow. A thicker pipe wall leaves less room inside the pipe for water, air, gas, or other fluid. That means two pipes with the same outside diameter can perform differently in a system.
Thicker walls may improve pressure capacity and durability, but they also add weight and reduce internal space. In plumbing, irrigation, mechanical systems, and industrial piping, choosing the correct wall thickness helps balance strength, cost, flow, and installation requirements.
of Practical Experience: What Measuring Pipe Wall Thickness Teaches You
After you measure enough pipe, you learn one big lesson: never trust your eyeballs. A pipe that “looks like one-inch” may not be one-inch anything. It may be pipe, tubing, conduit, copper, PVC, or a mysterious leftover from someone’s garage engineering era. The tape measure is honest. The eye is optimistic.
One practical habit is to measure the outside diameter first, then pause before making conclusions. Many beginners jump straight from “it looks like two inches” to buying a fitting. That is how you end up standing in the aisle holding three couplings and questioning your life choices. Measuring OD first narrows the possibilities. Then the pipe schedule, material, and wall thickness finish the story.
Another useful experience is learning that pipe ends are not always perfect. If someone cut the pipe with a dull saw, crushed it in a vise, dropped it, threaded it poorly, or left burrs inside, the inside diameter may measure smaller than it should. Before measuring the ID, remove burrs carefully and measure in two directions. If the pipe is oval, average the readings or investigate whether the deformation matters for your project.
For old steel pipe, corrosion is the wild card. You may measure one area and think the wall is healthy, then measure another area and discover significant thinning. Low spots, bottom sections, elbows, threaded areas, and places where water sits are common trouble zones. In field maintenance, the thinnest reading is often the reading that drives the decision. A pipe does not fail at its average thickness; it fails where it is weakest.
For PVC pipe, the markings are usually your best friend. If the printing is still visible, it often gives you the schedule and standard faster than any calculation. However, sunlight, paint, burial, and age can hide the markings. In that case, measuring OD and comparing it to a schedule chart can help, but remember that plastic pipe may have different pressure ratings depending on material, temperature, diameter, and manufacturer.
Ultrasonic gauges are excellent, but they are not magic wands. Surface preparation matters. Couplant matters. Calibration matters. Material setting matters. A gauge set for steel will not automatically give accurate readings on every plastic or nonmetal pipe. If readings jump around, do not simply pick the number you like best. Clean the surface, recalibrate, try another location, and compare with known dimensions whenever possible.
The most reliable approach is to combine methods. Read the pipe marking, measure the OD, measure the ID if possible, calculate the wall thickness, and compare it with a chart. When the pipe is installed or corroded, use ultrasonic testing and take multiple readings. This layered approach keeps you from relying on one clue too much. Pipe identification is a little like detective work, except the suspect is round and refuses to talk.
Conclusion
Finding the wall thickness of a pipe is simple when you follow a clear process. Start by identifying the material, clean the surface, measure the outside diameter, measure the inside diameter if you can, then use the formula (OD – ID) ÷ 2. If the pipe is installed and cannot be cut, use markings, pipe schedule charts, or an ultrasonic thickness gauge. For older or corroded pipe, take several readings and pay close attention to the thinnest areas.
The key is not to guess. Pipe sizing can be confusing because nominal size, actual outside diameter, inside diameter, and schedule are all related but not identical. A few careful measurements can prevent wrong fittings, poor flow, unsafe repairs, and that special kind of frustration only plumbing aisles can provide.
Final note: For casual identification, a caliper and schedule chart may be enough. For pressure systems, structural use, corrosion evaluation, or code-regulated work, verify the result with the proper standard, manufacturer documentation, and a qualified professional.











