
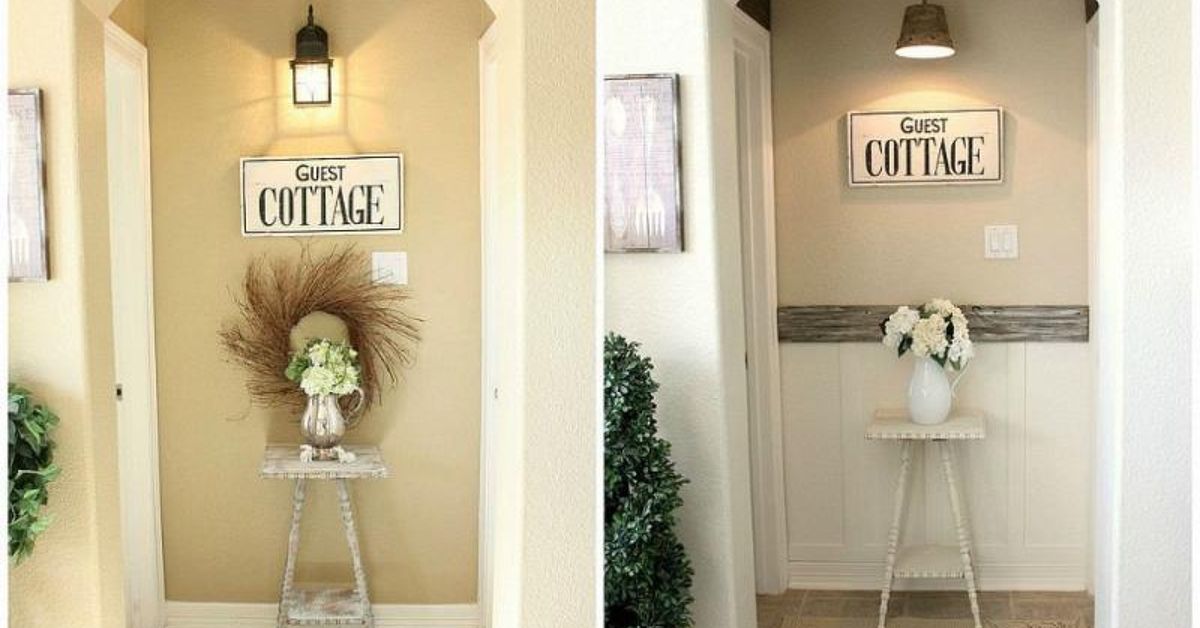
There are two kinds of walls in this world: walls that politely mind their own business, and walls that look at you every day as if to say, “Really? This is the best we can do?” If your dining room, hallway, bathroom, mudroom, or bedroom has fallen into the second category, an inexpensive DIY wainscoting fix may be the stylish rescue mission your home has been waiting for.
Wainscoting sounds fancy, like something that requires a heritage mansion, a carpenter named Augustus, and a budget that makes your wallet faint. In reality, modern DIY wainscoting can be surprisingly affordable. With simple trim, MDF boards, beadboard panels, paint, caulk, and a little patience, you can turn a plain wall into a custom-looking feature without demolishing anything or applying for a second mortgage.
This guide breaks down practical, budget-friendly ways to fix boring walls with DIY wainscoting, including faux panel molding, board and batten, beadboard, and clever repairs for existing wainscoting. You will learn how to plan the design, choose materials, avoid common mistakes, and get a clean finish that looks more expensive than it actually was. That, my friend, is the kind of home improvement magic we fully support.
What Is Wainscoting, and Why Is It Such a Smart Budget Upgrade?
Wainscoting is decorative wall paneling usually installed on the lower portion of a wall. Traditionally, it protected plaster walls from scuffs, chair backs, and everyday household chaos. Today, it still does that job, but it also adds texture, character, and architectural detail to rooms that otherwise feel flat.
The beauty of an inexpensive DIY wainscoting fix is that you do not always need full wood panels. Many homeowners create the look by attaching narrow trim pieces directly to drywall. Once everything is caulked and painted the same color, the wall itself becomes part of the design. This is often called faux wainscoting or picture frame molding, and it is one of the easiest ways to create a high-end look on a small budget.
Best Rooms for an Inexpensive DIY Wainscoting Fix
Wainscoting works almost anywhere, but some rooms benefit from it more than others. Entryways and hallways are excellent candidates because they take a lot of abuse from bags, shoes, elbows, and the mysterious wall scuffs nobody in the house admits to making. A painted wainscoting treatment can make these areas easier to clean and more visually interesting.
Dining rooms are another classic choice. A chair rail with lower wall molding gives the space a polished, traditional look without requiring expensive furniture or dramatic wallpaper. Bathrooms and powder rooms are also popular places for beadboard or board and batten, especially when you want charm in a small space. Just remember that bathrooms need moisture-aware materials, good ventilation, and proper paint.
Popular Low-Cost Wainscoting Styles
1. Faux Picture Frame Wainscoting
Faux picture frame wainscoting uses thin molding arranged in rectangular boxes below a chair rail. It is one of the most affordable options because you do not need large panels. You simply measure, cut, nail or glue the trim to the wall, fill the gaps, and paint everything together.
This style works beautifully in dining rooms, stairways, bedrooms, and formal spaces. It gives the wall depth without making the room feel heavy. Better yet, it can be done with basic tools and beginner-level DIY skills, assuming you measure carefully and do not let your miter saw develop a personal grudge against you.
2. Board and Batten Wainscoting
Board and batten is a clean, vertical style made with horizontal rails and vertical battens. It can look farmhouse, coastal, modern, or traditional depending on the spacing, height, and paint color. This option is forgiving because straight boards create a strong visual rhythm, even in rooms that are not perfectly square.
For a budget version, many DIYers use MDF strips or primed lattice boards directly over drywall. The key is spacing the battens evenly and using a level. A crooked batten will stare at you forever. It may not speak, but it will judge.
3. Beadboard Wainscoting
Beadboard uses narrow vertical grooves to create a cottage-style look. It is common in bathrooms, laundry rooms, kitchens, mudrooms, and cozy bedrooms. Beadboard panels are often sold in sheets, making installation faster than building every detail from separate trim pieces.
If you want a classic look with less measuring, beadboard may be your best friend. It hides minor wall flaws, adds texture, and pairs nicely with a simple chair rail or cap molding. For bathrooms, choose materials and paint designed to handle humidity.
4. Thin Trim Accent Wainscoting
If you are working with a very tight budget, thin trim can deliver a surprisingly elegant result. Instead of thick boards, use small molding profiles to create rectangles, squares, or simple grid patterns. This approach uses fewer materials and keeps the wall from feeling bulky.
Thin trim is especially useful in small spaces where heavy molding might look crowded. A powder room, narrow hallway, or small bedroom can feel more finished without losing visual breathing room.
Tools and Materials You May Need
Your exact supply list depends on the style you choose, but most inexpensive DIY wainscoting projects use similar basics. You may need MDF boards, pine trim, lattice strips, beadboard panels, chair rail molding, base cap molding, construction adhesive, finishing nails, caulk, wood filler, primer, paint, painter’s tape, sandpaper, a level, a tape measure, and a saw.
A brad nailer makes the work faster, but it is not always required. For lightweight trim, some homeowners use construction adhesive and finishing nails. However, adhesive should be used carefully because removing glued trim later can damage drywall. If you rent or change your mind every three months like a person browsing paint swatches at midnight, plan accordingly.
How to Plan Your DIY Wainscoting Layout
Planning is where the project is won or lost. Before cutting anything, decide how high the wainscoting should be. A common height is roughly one-third of the wall, often around 32 to 42 inches, but the right height depends on your ceiling height, room style, existing trim, outlets, windows, and furniture.
Use painter’s tape to mock up the design directly on the wall. This is the cheapest design tool in the universe and possibly the most underrated. Tape lets you see whether the boxes feel too tall, too short, too skinny, or too dramatic. Take a step back. Look from the doorway. Squint like an interior designer who just smelled overpriced wallpaper. Adjust until the proportions feel balanced.
Measure the Wall Carefully
Measure the full width of the wall and subtract the space you want between panels and at the edges. Divide the remaining space by the number of boxes or battens. The goal is even spacing, not mathematical suffering. If the numbers do not work perfectly, slightly adjust the gap size until the layout looks intentional.
Also check outlet locations. Nothing ruins a beautiful panel layout faster than a rectangle that crashes awkwardly into an electrical outlet. You can work around outlets by adjusting box size, moving trim spacing, or using a simpler board and batten layout.
Step-by-Step: An Inexpensive Faux Wainscoting Fix
Step 1: Clean and Prep the Wall
Start with a clean wall. Dust, grease, and old paint texture can prevent trim and paint from bonding properly. Remove outlet covers, patch holes, and sand rough spots. If your baseboards are in good shape, you can often leave them in place and build above them.
Step 2: Mark the Height
Use a level and pencil to mark the top line for your chair rail or upper trim. Do not trust the floor or ceiling to be perfectly level, especially in older homes. Houses settle, shift, and occasionally behave like they were assembled during a lunch break.
Step 3: Install the Chair Rail or Top Rail
Cut your chair rail or top board to size. Apply construction adhesive if desired, then secure it with finishing nails into studs where possible. Check with a level as you go. This top line becomes the visual anchor for the entire project.
Step 4: Add Vertical and Decorative Trim
For picture frame molding, preassemble each rectangle on the floor if that feels easier, or attach each piece directly to the wall. Use a spacer block to keep gaps consistent. For board and batten, install the left and right edge pieces first, then space the remaining battens evenly across the wall.
Keep checking for level and plumb. Small errors multiply across a wall, and by the end your “custom wainscoting” can start looking like it has had too much coffee.
Step 5: Fill Nail Holes and Caulk Gaps
This is the step that separates “DIY but adorable” from “DIY and possibly haunted.” Fill nail holes with wood filler or spackle. After it dries, sand smooth. Then run a thin bead of paintable caulk along the edges where trim meets the wall.
Caulk hides tiny gaps and makes the molding look built-in. Do not skip it. Caulk is basically Photoshop for trim work.
Step 6: Prime and Paint
If you are using raw MDF or bare wood, prime before painting. Many trim products come pre-primed, which saves time. Use a durable interior paint, especially in busy areas. Satin or semi-gloss finishes are common for trim because they are easier to wipe clean than flat paint.
For a seamless look, paint the wall, trim, baseboard, and chair rail the same color. White is classic, but soft greige, warm taupe, navy, sage green, charcoal, or muted blue can make the wainscoting feel more custom.
How to Fix Existing Wainscoting on a Budget
Sometimes you do not need to install new wainscoting. You simply need to rescue what is already there. Existing wainscoting can look dated, chipped, uneven, or poorly painted, but many issues are fixable with basic supplies.
Fix Gaps and Seams
Small gaps between panels, trim, and walls can usually be fixed with paintable caulk. For larger cracks, use wood filler or a suitable patching compound. Sand after drying, then repaint. If seams keep opening, check whether the material is expanding and contracting because of humidity.
Repair Dents and Nail Holes
Dents in MDF or wood trim can be filled, sanded, and painted. For deeper damage, apply filler in thin layers rather than one giant blob. Giant blobs are great for mashed potatoes, not wall repair.
Update the Color
Paint can completely change the personality of wainscoting. Old honey-oak beadboard can become crisp and coastal with white paint. Builder-basic trim can look dramatic in deep green or charcoal. If the room feels choppy, painting the wainscoting and wall above in related tones can create a smoother transition.
Money-Saving Tips for DIY Wainscoting
To keep costs low, choose simple profiles and use the wall itself as the panel. Full raised panels are beautiful, but they require more material and skill. Faux wainscoting with trim is more affordable and still delivers a strong visual upgrade.
Buy primed MDF when appropriate. It is usually less expensive than hardwood and paints well. Use leftover paint if it matches your design plan. Check the discount paint section at home improvement stores for mistinted gallons. Sometimes another person’s “oops” color becomes your dining room’s moment of glory.
Plan cuts carefully before buying trim. A cut list helps reduce waste. Also consider starting with one accent wall rather than an entire room. A single wall behind a bed, dining table, or entry bench can make a big impact for less money.
Common DIY Wainscoting Mistakes to Avoid
Skipping the Layout
Do not eyeball the spacing. The human eye is excellent at noticing when something is slightly off, especially after the paint dries and you have already put the tools away. Use tape, pencil marks, and a level.
Ignoring Uneven Floors
Older homes often have floors that slope. If you follow the floor instead of a level line, your wainscoting may look crooked. Establish a level top line first, then adjust lower elements as needed.
Using the Wrong Paint
Flat paint may show scuffs and be harder to clean. In high-traffic areas, use a more durable finish. In bathrooms, choose paint that can handle moisture and frequent wiping.
Forgetting About Scale
Tiny trim in a large room can look underwhelming. Huge battens in a narrow hallway can feel cramped. Match the size of the trim to the room. When in doubt, tape the design first and live with it for a day.
Design Ideas That Look Expensive but Are Not
One of the easiest ways to make inexpensive wainscoting look custom is to continue the color onto the doors and trim. This creates a tailored, designer-style effect. Another option is to pair wainscoting with wallpaper above it. In a powder room or dining area, wallpaper above simple panel molding can make the room feel layered and intentional.
You can also add a narrow ledge or cap rail at the top of the wainscoting. This provides a finished edge and can hold small frames or decorative objects in certain rooms. Keep the ledge shallow in hallways so it does not become a hip-check obstacle course.
For modern homes, try square grid wainscoting painted in a bold color. For cottage spaces, beadboard with a soft white or pale blue finish works beautifully. For transitional homes, picture frame molding in a warm neutral keeps things elegant without shouting, “I spent my weekend inhaling sawdust.”
How Much Can DIY Wainscoting Cost?
The cost depends on room size, material choice, trim style, and tools you already own. A small accent wall using thin MDF trim may cost very little compared with professionally installed raised panel wainscoting. Beadboard sheets and chair rail molding cost more than simple trim strips, but they cover wall space quickly.
The biggest savings come from doing the labor yourself. Professional installation can be worth it for complex rooms, stairs, or high-end custom millwork, but a simple DIY wainscoting fix is very approachable for careful beginners. The secret is not speed. The secret is patience, measuring twice, and resisting the urge to declare “good enough” while holding a crooked board.
Maintenance Tips After Installation
Once your wainscoting is installed and painted, keep it looking fresh with gentle cleaning. Wipe scuffs with a damp cloth and mild soap. Touch up chips as needed. Save a small labeled container of your paint color for future repairs. Future you will be grateful, and future you deserves nice things.
Check caulk lines over time, especially in bathrooms or areas with seasonal humidity changes. If a gap appears, remove loose caulk, reapply a thin bead, and touch up the paint. A little maintenance keeps the project looking professional for years.
Real-Life Experience: What an Inexpensive DIY Wainscoting Fix Actually Feels Like
The first thing you learn during a DIY wainscoting project is that walls are not as innocent as they look. From a distance, they appear straight, smooth, and cooperative. Up close, they reveal bumps, waves, mystery dents, uneven corners, and at least one spot where the previous paint job seems to have been completed with a broom. This is normal. Do not panic. Wainscoting is actually a great way to make imperfect walls look intentional.
One practical experience worth sharing is to spend more time planning than cutting. It is tempting to rush into the fun part, especially when the trim is stacked in the garage and you are imagining your finished room looking like a magazine photo. But the layout matters more than the materials. A simple painter’s tape mockup can save hours of frustration. Tape the top rail, vertical battens, or picture frame boxes on the wall before cutting anything. Walk away, come back, and look again. What seems perfect at noon may look strangely narrow by dinner.
Another lesson: caulk and paint are not minor finishing touches. They are the magic cloak. Before caulk, your project may look like a bunch of boards attached to drywall. After caulk and paint, it starts looking built-in. The transformation is almost suspicious. Use paintable caulk, smooth it with a damp finger or caulk tool, and avoid applying too much. A clean thin line is better than a chunky bead that looks like frosting from a nervous cupcake decorator.
It also helps to accept that DIY projects move in emotional stages. Stage one is confidence. Stage two is measuring. Stage three is wondering why math has betrayed you. Stage four is making one bad cut and staring into the distance. Stage five is painting the finished wall and suddenly deciding you are basically a craftsperson with a legacy. This emotional roller coaster is part of the process.
If you are fixing existing wainscoting, start with the least expensive improvements first. Clean it, fill holes, caulk gaps, sand rough spots, and repaint. Many older installations do not need replacement; they need attention. A fresh coat of durable paint can make dated paneling feel new, especially if you choose a modern color that works with the flooring, lighting, and furniture.
For beginners, a small wall is the best training ground. Try an entry wall, bathroom wall, or short hallway before committing to an entire dining room. You will learn how your walls behave, how your tools handle trim, and how much patience you truly have when a nail refuses to sink properly. By the time you finish, you will understand why professionals charge what they chargebut you will also enjoy the satisfaction of knowing you created a polished architectural detail with your own hands.
The biggest takeaway is simple: inexpensive DIY wainscoting does not have to look cheap. Careful spacing, smooth caulk, clean paint, and balanced proportions matter more than expensive materials. A modest project done neatly can look better than a costly one done carelessly. And every time someone compliments the wall, you get to say, “Thanks, I did it myself,” while pretending you were calm the entire time.
Conclusion: A Small Wall Fix With Big Style Payoff
An inexpensive DIY wainscoting fix is one of the smartest ways to upgrade a room without tearing it apart. Whether you choose faux picture frame molding, board and batten, beadboard, or a simple repair-and-paint refresh, the result can add charm, structure, and value to your home.
The project rewards planning, patience, and clean finishing. Measure carefully, choose materials that fit your room and budget, and do not underestimate the power of caulk and paint. With the right approach, even a plain wall can become the architectural feature your home secretly wanted all along.
Note: This article is original, web-publishing-ready content created from real DIY wainscoting practices and rewritten in a natural style without source-link clutter or citation placeholders.













