
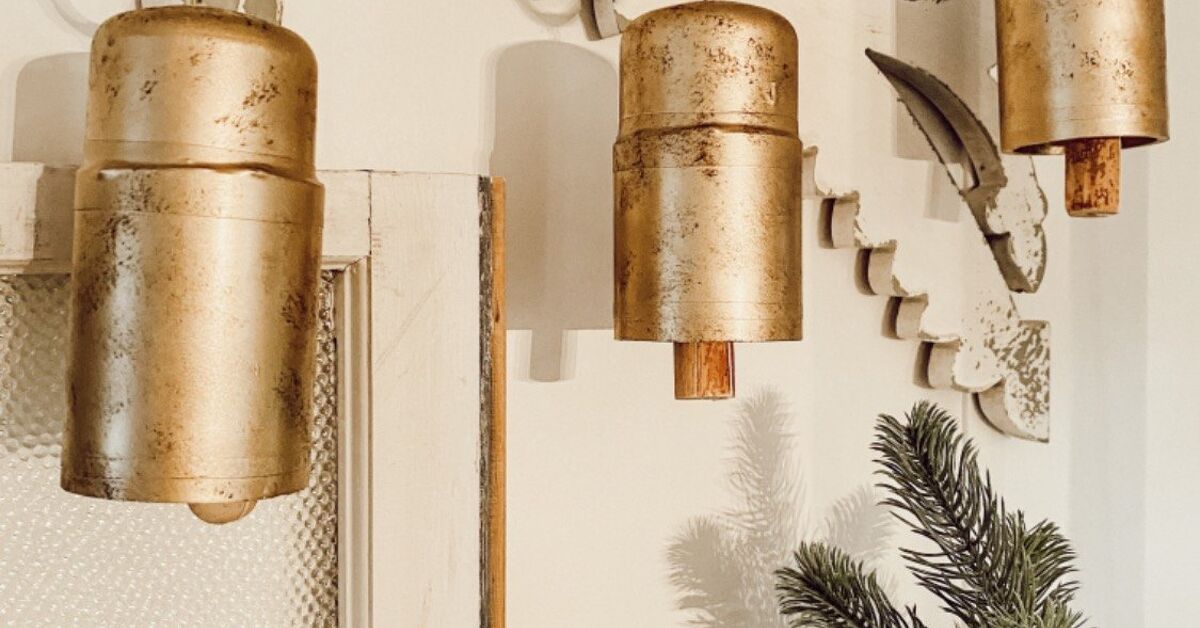
Christmas decorating has a funny way of making perfectly normal adults stand in the garage, holding a piece of pipe, and thinking, “Yes, this could absolutely become a bell.” And you know what? It can. Making Christmas bells from PVC is one of those cheerful DIY projects that feels surprisingly fancy when finished, even though the main material may have started life in the plumbing aisle.
PVC pipe is lightweight, affordable, easy to cut, and sturdy enough for indoor or covered outdoor holiday décor. With a little sanding, primer, metallic paint, ribbon, greenery, and patience, a plain white pipe can turn into a charming Christmas bell ornament, porch decoration, wreath accent, or oversized statement piece. The best part is that PVC does not shatter like glass, does not dent like thin metal, and does not demand a professional workshop. It mostly asks for measuring, safe cutting, and a willingness to get glitter somewhere it will never be found again.
This guide walks through how to make PVC Christmas bells, which materials work best, how to paint them, how to decorate them, and how to avoid the common mistakes that make DIY décor look more “basement experiment” than “holiday magic.”
Why Use PVC for Christmas Bells?
PVC is a practical choice for homemade Christmas decorations because it gives you structure without much weight. A large metal bell can be expensive and heavy. A ceramic bell can break if it drops. A cardboard bell can look great indoors but may struggle with moisture. PVC sits nicely in the middle: tough, shapeable, paintable, and budget-friendly.
For Christmas bells, PVC works especially well because pipe sections already have a round form. That means you do not have to build the basic shape from scratch. A short length of pipe becomes the bell body, a cap or ornament can become the top, and a round plastic ornament, wooden bead, or foam ball can become the clapper. Add a bow and suddenly the pipe has retired from plumbing and joined the holiday choir.
Best PVC Pieces for Making Christmas Bells
The easiest PVC Christmas bell starts with a short section of pipe, but you have several design options depending on the size and style you want.
Small Tree Ornaments
For ornaments, use 1 1/2-inch to 2-inch PVC pipe cut into pieces about 2 to 3 inches long. These small bells are light enough for Christmas trees, garlands, and gift toppers. They look beautiful in gold, silver, red, white, or antique bronze.
Medium Wreath Bells
For wreaths or mantel garlands, 3-inch PVC pipe works well. Cut each bell body about 4 to 5 inches tall. Pair two bells together with ribbon and faux pine picks for a classic holiday look.
Large Porch Bells
For front porch décor, use 4-inch PVC pipe or a PVC coupling. Cut each bell about 6 to 8 inches tall. Oversized bells look festive hanging from a porch hook, attached to a large wreath, or grouped beside a front door with evergreen branches.
Reducer Fittings for a Bell Shape
If you want a more traditional flared bell silhouette, look for PVC reducer fittings. A reducer naturally narrows at one end and widens at the other, which gives the project a more bell-like profile. You can also add a decorative trim around the open bottom to create the illusion of a flared rim.
Materials and Tools You Will Need
You do not need an advanced tool collection to make Christmas bells from PVC, but clean cuts and good surface prep make a huge difference. Gather your supplies before starting so you are not hunting for sandpaper while wet paint is quietly making friends with your workbench.
- PVC pipe, PVC coupling, or PVC reducer fittings
- PVC pipe cutter, miter saw, or fine-tooth handsaw
- Sandpaper, sanding sponge, or deburring tool
- Drill with small drill bit
- Plastic primer or bonding primer suitable for PVC
- Spray paint for plastic or indoor/outdoor craft paint
- Clear sealer for outdoor or high-touch décor
- Ribbon, bows, faux greenery, berries, pinecones, or bells
- Plastic ornament, foam ball, wooden bead, or jingle bell for the clapper
- Hot glue, construction adhesive, floral wire, or strong craft adhesive
- Twine, fishing line, or ribbon for hanging
- Safety glasses, gloves, and a dust mask when cutting or sanding
Safety First: The Un-glamorous but Important Part
DIY Christmas décor should create joy, not an emergency room story that begins with, “So there I was with a pipe cutter and too much confidence.” Always wear eye protection when cutting or drilling PVC. Small plastic chips can fly, and they are not festive confetti. Gloves can help protect your hands from sharp edges, especially after cutting.
Cut and sand PVC in a well-ventilated area. Avoid breathing dust, and clean the workspace afterward. If you use spray paint, work outdoors or in a well-ventilated area and follow the paint label for temperature, humidity, drying time, and recoating. Do not heat PVC to reshape it for this project. Heating PVC can release unpleasant and potentially harmful fumes, and the bell effect can be created with fittings, trim, paint, and styling instead.
If you add lights to your PVC bells, use only lights rated for the location. Outdoor displays need outdoor-rated lights and cords. Inspect wires for cracks, frays, or loose connections, and turn decorative lights off when leaving home or going to sleep. The goal is a cozy Christmas glow, not a tiny electrical drama in a bow.
Step-by-Step: How to Make Christmas Bells From PVC
Step 1: Choose Your Bell Size
Decide where the bells will go before cutting anything. Tree ornaments should stay small and light. Wreath bells need enough presence to be seen among greenery. Porch bells can be larger because they are viewed from several feet away. A good beginner size is a 4-inch-tall section of 3-inch PVC pipe. It is easy to handle, easy to decorate, and large enough to look intentional.
Step 2: Measure and Mark the PVC
Use a measuring tape and pencil to mark your cut line. For a straight bell, mark one clean line around the pipe. For a more dynamic look, cut the bottom at a slight angle so the bell appears to swing. If making a pair, measure both pieces carefully so they look like siblings, not distant cousins who met at a holiday party.
Step 3: Cut the Pipe
Cut the PVC with a pipe cutter, fine-tooth saw, or miter saw. A pipe cutter gives a clean edge on smaller diameters, while a saw works better for larger pieces. Keep the pipe stable as you cut. Do not rush the process; a crooked cut can be fixed, but it usually costs extra sanding and a few dramatic sighs.
Step 4: Smooth the Edges
Freshly cut PVC can have burrs or sharp plastic edges. Smooth the top and bottom using sandpaper, a sanding sponge, file, or deburring tool. This step matters for appearance and safety. It also helps paint and trim sit better. If the bell will hang near fabric ribbon or greenery, smoothing the edge prevents snagging.
Step 5: Create a Top Hole
Drill a small hole near the top center of the bell or through a PVC cap if you are using one. This hole will hold twine, ribbon, or wire for hanging the bell. For larger bells, drill two small holes opposite each other and run wire through both sides. That gives the bell better balance and keeps it from tilting like it has had too much eggnog.
Step 6: Add the Clapper
A real bell has a clapper inside, and your PVC version should have one too. Use a large jingle bell, plastic Christmas ornament, foam ball, wooden bead, or painted ping-pong ball. Tie it to a piece of twine or fishing line and hang it inside the PVC bell. The clapper does not need to make sound unless you want it to. Visually, it completes the design.
Step 7: Prep the PVC for Paint
PVC has a smooth surface, so paint needs help sticking. Wash the pieces with mild soap and water to remove dust, oil, and label residue. Rinse and dry completely. Lightly sand the exterior to dull the shine. Wipe away sanding dust before priming. A bonding primer or spray paint designed for plastic will usually give a more durable finish than regular paint alone.
Step 8: Paint the Bells
Spray paint gives PVC bells a clean, smooth finish. Apply several light coats instead of one heavy coat. Heavy coats can drip, pool, and create that unfortunate “melting candle” look. Metallic gold and silver are traditional, but do not overlook satin white, matte black, candy apple red, forest green, champagne, or antique copper. For a vintage effect, lightly dry-brush darker paint around edges and grooves.
Step 9: Seal the Finish
If the bells will be used outdoors, add a clear protective sealer after the paint fully cures. This helps protect against moisture, handling, and mild weather. Even with sealer, PVC bells last longer when displayed on a covered porch or under an overhang rather than directly in harsh sun, heavy rain, or snow.
Step 10: Decorate Like You Mean It
Now comes the fun part. Add ribbon around the top, glue faux greenery to the hanger, attach berries, tuck in pinecones, or add a large bow where two bells meet. For a polished look, choose two or three colors and repeat them. For example, gold bells with burgundy ribbon and evergreen sprigs look traditional. White bells with silver ribbon and frosted greenery feel elegant. Red bells with buffalo-check ribbon lean farmhouse and friendly.
Design Ideas for PVC Christmas Bells
Classic Gold Double Bells
Make two medium PVC bells, paint them metallic gold, and hang them side by side from a wide red velvet ribbon. Add faux pine branches and red berries at the top. This style works beautifully on a front door wreath or above a mantel.
Rustic Farmhouse Bells
Paint the PVC bells matte black, oil-rubbed bronze, or antique brass. Sand tiny areas around the edges after painting to create a worn finish. Pair with burlap ribbon, pinecones, and natural twine. The result looks less shiny and more “found in a charming winter cabin,” even if it was made beside a laundry basket.
Peppermint Stripe Bells
Paint the bells white, then use painter’s tape to create diagonal red stripes. This playful style is great for kids’ rooms, classroom décor, candy-themed trees, or whimsical porch displays. Add a red bow and a small candy cane ornament for extra cheer.
Snowy White Bells
Use white paint, pearl spray, or iridescent glitter to create a frosty look. Add silver ribbon and snow-dusted greenery. White PVC bells can look surprisingly high-end when the finish is clean and the decorations are restrained.
Lighted Porch Bells
For larger bells, place a battery-powered LED fairy light strand inside each bell. Secure the battery pack discreetly behind the bow or greenery. This creates a warm glow without complicated wiring. Use lights intended for the display location, especially if the bells will be outdoors.
Common Mistakes to Avoid
The first mistake is skipping surface prep. Paint may look fine at first, but without cleaning, sanding, and priming, it can scratch or peel. The second mistake is using too much glue. Hot glue blobs are the glitter glue of adulthood: useful, but dangerous in large amounts. Use small dots and hide attachment points under ribbon or greenery.
Another common issue is making the bells too heavy. PVC is lightweight, but decorations can add weight quickly. Large ornaments, thick bows, wired garland, and heavy clappers may pull the design forward. Test the balance before final hanging. If needed, move the hanger slightly back or use two hanging points.
Finally, do not overcrowd the design. A bell should still look like a bell after decorating. If the greenery covers the entire PVC piece, you have made a very committed shrub with a ribbon.
How to Display PVC Christmas Bells
PVC Christmas bells are flexible décor pieces. Hang small bells on a tree, tie them to wrapped gifts, or use them as napkin-ring accents for a holiday table. Medium bells work well on wreaths, stair railings, mantel garlands, and wall hooks. Large bells can decorate porch columns, front doors, fences, or oversized outdoor planters.
For outdoor displays, secure bells with floral wire, zip ties, or strong ribbon. Wind can turn lightweight decorations into flying holiday opinions, so attach them firmly. If displaying on a front door, check that the bells do not bang against glass or paint every time the door opens.
Budget Tips for Making PVC Bells
One reason this project is popular is the low cost. You can often make several bells from one length of PVC pipe. Look for leftover pipe from home projects, but only use clean pieces in good condition. Scrap ribbon, old ornaments, and leftover spray paint can also reduce cost.
Dollar-store ornaments work well as clappers, and faux greenery can be clipped from an old garland. If you want the bells to look expensive, spend your attention on the finish rather than the supplies. Smooth cuts, even paint, balanced ribbon, and clean glue lines make inexpensive materials look intentional.
Care and Storage
At the end of the season, wipe the bells with a dry or slightly damp cloth. Avoid harsh cleaners that may dull the paint. Store them in a box with tissue paper, bubble wrap, or soft cloth between pieces so the finish does not scratch. Keep them away from extreme heat, since PVC and paint finishes can be affected by high temperatures.
If a bow gets crushed, replace it next year instead of remaking the entire bell. That is one of the underrated joys of DIY décor: repairs are usually simple, and upgrades are encouraged. A bell made this year can become a better bell next year with fresh ribbon, new greenery, or a different paint finish.
Experiences and Practical Lessons From Making Christmas Bells From PVC
The first time you make Christmas bells from PVC, the project may feel almost too simple. Cut pipe, paint pipe, decorate pipehow hard could it be? Then the first coat of paint reveals every sanding mark, the ribbon refuses to sit straight, and the clapper hangs half an inch off center like it has chosen a rebellious lifestyle. This is normal. DIY projects often have a “trust the process” phase, and PVC bells are no exception.
One useful experience is learning that the cut edge determines the entire personality of the bell. A clean, level edge makes the decoration look crisp and professional. A rough edge makes it look unfinished, even under paint. Taking five extra minutes to sand the bottom rim can make the difference between “handmade holiday décor” and “pipe wearing a bow.” If you want a softer bell shape, adding decorative trim around the bottom helps. A thin line of rope, ribbon, beads, or flexible garland can visually widen the base and hide minor imperfections.
Paint testing is another lesson worth learning early. PVC can be slick, and not every paint behaves the same way. A small test patch on the back of the bell helps you see whether the paint sticks, dries smoothly, and gives the finish you want. Metallic paints are beautiful, but they show drips quickly. Matte paints hide small flaws better. Glitter paint looks festive, but it often needs a base color underneath unless you enjoy applying seven coats while questioning your life choices.
When decorating, restraint usually wins. It is tempting to attach every berry, bow, pinecone, ornament, and snowflake in the craft drawer. But PVC bells look best when the accessories support the shape instead of swallowing it. A strong ribbon, a few greenery sprigs, and one focal accent often look better than a crowded arrangement. Think of the bell as the star and the embellishments as backup singers. Talented backup singers, yes, but still backup singers.
Another practical experience is that PVC bells are great family projects when the cutting and drilling are handled by an adult. Kids can help choose colors, paint with brushes, add stickers, tie ribbons, or select the clapper ornament. The project can become a yearly tradition: one bell for each child, each year, dated on the inside with a permanent marker. Over time, the collection becomes more than decoration. It becomes a little plastic archive of holiday afternoons, paint-smudged fingers, and someone insisting that neon purple is definitely a Christmas color.
For outdoor use, the biggest lesson is secure hanging. PVC bells are light, which is wonderful until the wind arrives with opinions. A single ribbon may look pretty but may not hold the angle you want. Floral wire hidden under a bow is stronger and more reliable. On wreaths, attach the bells to the frame, not just to the greenery. On porch columns, use zip ties or sturdy wire under ribbon so the display looks soft but stays put.
The best experience, though, is seeing how ordinary materials can become something joyful. PVC is not glamorous on its own. It is plain, practical, and usually found near elbows, caps, and fittings. But with a thoughtful design, it becomes holiday décor with personality. That is the heart of DIY Christmas decorating: turning everyday objects into pieces that make people smile. And if someone asks where you bought your bells, you get the quiet satisfaction of saying, “I made them,” which is basically the crafter’s version of ringing a victory bell.
Conclusion
Making Christmas bells from PVC is a smart, affordable, and creative way to personalize your holiday décor. With simple tools, safe cutting practices, proper paint preparation, and a few festive accents, PVC pipe can become ornaments, wreath bells, porch decorations, or glowing seasonal displays. The project is beginner-friendly but still leaves plenty of room for creativity, from rustic farmhouse bells to elegant metallic designs.
The key is to treat the details seriously: smooth the edges, prep the surface, paint in light coats, balance the hanger, and decorate with intention. Do that, and your finished bells can look far more expensive than they are. PVC may not sound magical at first, but add ribbon, greenery, and a little holiday imagination, and it rings in the season beautifully.
SEO Tags
Note: This HTML article is written for web publishing with clean body-only markup, no source links, and no unnecessary reference placeholders.












