
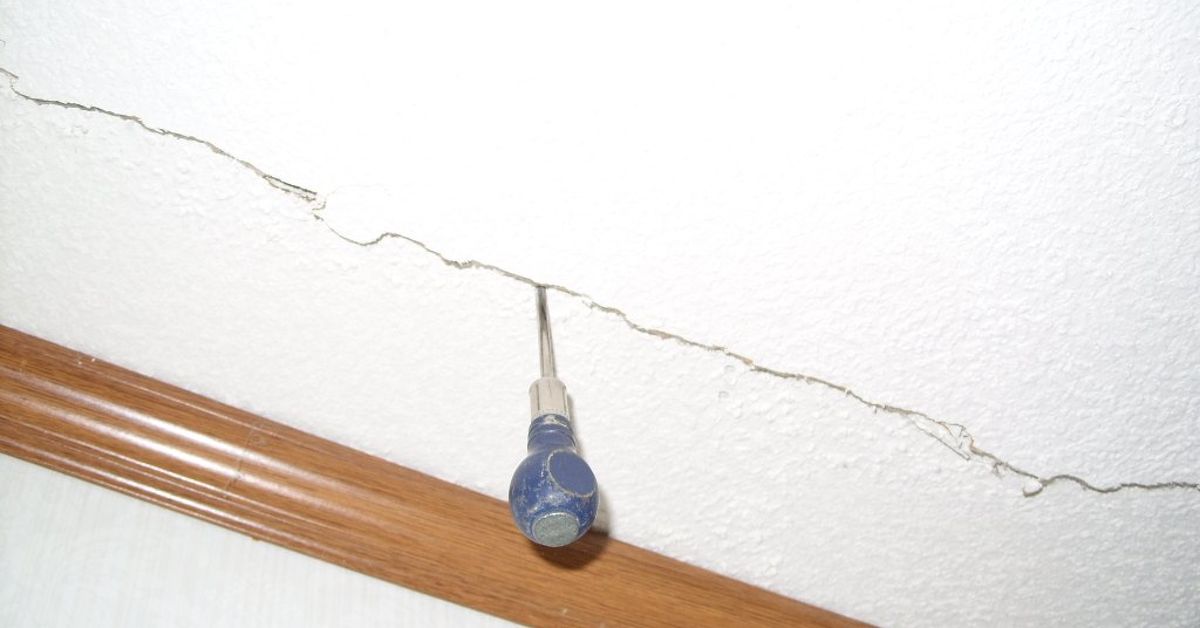
Moving a mobile home is a little like moving a giant layer cake down the highway: even when everything goes well, something inside may arrive slightly shifted, cracked, or grumpy. One of the most common post-move surprises is ceiling damage. A seam opens. A panel sags. A crack appears where yesterday there was nothing but a perfectly boring ceiling. Suddenly, you are standing in the living room with a flashlight, wondering whether your home is settling, leaking, or simply auditioning for a renovation show.
The good news is that many mobile home ceiling problems after transport are repairable. The not-so-good news is that the ceiling is often the messenger, not the original troublemaker. Before you patch, paint, or cover anything, you need to know why the damage appeared. Was the home flexed during transport? Is it slightly out of level? Did a roof seal open up? Is the marriage line of a double-wide still adjusting? A clean repair starts with smart detective work.
This guide explains how to inspect, repair, and prevent ceiling problems after a mobile home has been moved. We will cover drywall cracks, ceiling panels, sagging seams, water stains, texture matching, safety checks, and real-world lessons from the kind of repairs that teach patience faster than a three-coat mud job.
Why Mobile Home Ceilings Crack After a Move
A manufactured or mobile home is designed to be transported, but that does not mean the trip is gentle. During moving, the frame, walls, roof system, and interior finishes can flex. Even small movement can show up as hairline cracks along drywall seams, gaps near trim, loose battens, or slight separation where the wall meets the ceiling.
In a single-wide, the movement may appear as long cracks following the ceiling joists or panel seams. In a double-wide, the most obvious trouble spot is often the marriage line, where the two sections meet. If that center seam was disturbed during transport or setup, ceiling trim may loosen, drywall tape may crack, or a decorative strip may pull away. The ceiling is basically saying, “I survived the highway, but I would like a spa day.”
Common Post-Move Ceiling Problems
After a mobile home has been moved, watch for these signs:
- Hairline cracks along drywall seams
- Loose or bowed ceiling panels
- Sagging ceiling tile or fiberboard
- Gaps around crown molding or ceiling battens
- Brown or yellow stains that suggest moisture
- Cracked texture or peeling paint
- Repeated cracks after a fresh repair
A small crack may be cosmetic. A sagging, wet, soft, or spreading area is not cosmetic. That is the ceiling waving a tiny red flag.
Step One: Inspect Before You Repair
Do not start with joint compound. Start with inspection. Patching too soon is like putting a bandage on a shoe squeak. It may look productive, but the problem will come back with better timing and worse manners.
Begin by checking whether the damage is dry, stable, and limited. Press gently around the damaged area. A firm ceiling with a fine crack is usually a simpler repair. A soft, crumbly, stained, swollen, or sagging surface may indicate moisture damage. If water has entered the ceiling cavity, the repair may require removal and replacement rather than a surface patch.
Check the Roof First
If the ceiling has stains or sagging, inspect the roof before touching the inside. Look around vents, skylights, seams, roof edges, plumbing stacks, and any areas that were stressed during transport. Mobile home roofs can develop leaks at sealed penetrations, especially if old sealant cracked or if movement disturbed a previous repair.
If you patch the ceiling before fixing the roof leak, the stain will return like an unwanted sequel. Repair the leak, confirm the area stays dry through rain, and then repair the ceiling.
Check Leveling and Setup
Ceiling cracks can also point to leveling issues. After a move, the home should be properly blocked, supported, anchored, and leveled according to the manufacturer’s instructions and local requirements. Warning signs include doors that swing open by themselves, windows that bind, uneven floors, gaps along trim, or cracks that keep growing.
If several ceiling cracks appeared after setup, especially around doors, windows, or the marriage line, consider having the home checked by a licensed manufactured-home installer, inspector, or leveling contractor. Cosmetic ceiling repair should wait until the home is stable. Otherwise, your fresh patch may crack again before the paint roller is even dry.
Know What Type of Ceiling You Have
Mobile homes do not all have the same ceiling system. Before buying materials, identify what you are repairing.
Drywall Ceilings
Newer manufactured homes often use drywall or gypsum board. Drywall cracks are usually repaired with mesh or paper tape, joint compound, sanding, primer, and paint. If the drywall is badly broken, wet, or sagging, the damaged section may need to be cut out and replaced.
Ceiling Panels or Fiberboard
Many older mobile homes use lightweight ceiling panels, fiberboard, or acoustic-style panels. These may be installed in long sheets and covered at the seams with plastic spline, battens, or decorative strips. Matching old panels can be difficult because styles change and original materials may no longer be available.
Suspended Ceiling Tiles
Some homes use a suspended grid ceiling. Damaged tiles are usually easier to replace, but you still need to fix leaks, sagging supports, or moisture issues before dropping in new tiles.
Tools and Materials You May Need
Your exact shopping list depends on the ceiling type, but common supplies include:
- Safety glasses and dust mask
- Utility knife
- Drywall saw
- Stud finder or strong magnet
- Drywall screws
- Joint compound
- Self-adhesive mesh tape or paper tape
- Putty knives in several widths
- Sanding sponge or pole sander
- Stain-blocking primer
- Ceiling paint
- Replacement ceiling panel, drywall patch, or batten trim
If the ceiling contains older materials, unknown insulation, visible mold, or electrical fixtures, slow down. Large repairs near wiring, insulation, structural framing, or active leaks are worth professional help.
How to Repair Small Drywall Ceiling Cracks
Small cracks caused by transport movement are common. The key is to create a flexible, well-bonded repair instead of smearing compound over the crack and hoping for the best. Hope is nice. Tape is better.
1. Clean and Open the Crack Slightly
Use a utility knife to remove loose paint, broken texture, and crumbly compound. Lightly widen the crack into a shallow V-shape so the new compound has a place to bond. Do not gouge deeply into the ceiling.
2. Apply Tape
For a seam crack, apply drywall tape over the damaged line. Mesh tape is easy for DIY repairs, while paper tape can create a strong seam when embedded properly. The goal is to bridge the crack so movement does not immediately split the repair.
3. Add Thin Coats of Joint Compound
Apply a thin first coat over the tape. Let it dry completely. Sand lightly. Apply a second coat wider than the first, feathering the edges. Repeat with a third, wider coat if needed. Ceiling repairs look best when the compound is spread wider than you think necessary. A tiny lump on a ceiling catches light like it is trying to win an award.
4. Prime Before Painting
Never paint directly over raw joint compound and expect an invisible finish. Primer seals the patch and helps the paint absorb evenly. Without primer, the repaired area may flash, meaning it looks duller or shinier than the surrounding ceiling.
How to Repair a Damaged Ceiling Panel
Panel ceilings are common in mobile homes, and repairs can be trickier because matching the original pattern is not always easy. If only a seam has loosened, you may be able to resecure the panel and cover the seam with a batten strip. If the panel is cracked, swollen, or sagging from water damage, replacement is usually better.
1. Remove Loose Trim or Battens
Carefully remove plastic strips, wood battens, or decorative trim from the damaged area. Save them if they are in good condition and can be reused.
2. Locate the Framing
Find the ceiling joists or trusses before fastening anything. Screws need solid framing, not just thin panel material. A stud finder may work, but a magnet can also help locate existing fasteners.
3. Refasten or Replace the Panel
If the panel is dry and mostly intact, you may be able to resecure it with screws and finish washers or cover the seam with trim. If the panel is soft or warped, remove the damaged section and install a replacement panel or a new drywall section. Keep replacement materials lightweight, because mobile home ceilings were not designed for unnecessary extra load.
4. Hide the Seam Cleanly
In many mobile homes, seams are intentionally covered with battens instead of taped like standard drywall. That is not a shortcut; it is part of the original design. A clean, evenly spaced batten can look better than a forced drywall-style seam that keeps cracking.
Fixing Sagging After a Move
A sagging ceiling panel may happen because fasteners loosened during transport, moisture weakened the material, or the home shifted during setup. First, decide whether the sag is dry and firm or damp and soft.
If the panel is dry and the sag is minor, reattaching it to framing may work. Use proper screws and avoid overdriving them. If the sag is caused by water damage, replacement is safer. Wet fiberboard and ceiling tile often do not return to their original shape, even after drying. They may look better for a week, then sag again with the confidence of a hammock.
Repairing Water Stains on a Mobile Home Ceiling
Water stains require a different approach. First, stop the source of moisture. Then confirm the ceiling is dry. If the material is solid, you can clean the surface, apply stain-blocking primer, and repaint. Use a primer designed to block water stains, because ordinary paint may allow brown discoloration to bleed through.
If the ceiling is soft, moldy, swollen, or separating, do not simply prime over it. Remove damaged porous material and replace it. Water damage inside a ceiling cavity can affect insulation and framing, so larger areas should be inspected carefully.
Matching Ceiling Texture Without Losing Your Mind
Texture matching is where many ceiling repairs go from “weekend project” to “why is this patch shaped like Idaho?” Mobile home ceilings may have sprayed texture, stipple patterns, acoustic texture, smooth drywall, or printed panels. Before repairing the visible area, test your texture method on scrap cardboard or leftover drywall.
For small drywall repairs, aerosol ceiling texture may be enough. For larger areas, a hopper sprayer or roller-applied texture may create a better match. Feather the new texture beyond the patch so the transition is less obvious. Once dry, prime and paint the entire ceiling section if possible. Painting only the patch often creates a noticeable rectangle, which is the ceiling equivalent of wearing one clean sock.
When to Call a Professional
DIY repair is reasonable for small, dry, stable cracks or minor panel issues. Call a professional if you see active leaks, large sagging areas, mold growth, electrical fixture damage, repeated cracking, roof problems, or signs the home is out of level. Also get help if the ceiling damage runs along the marriage line of a double-wide and the sections appear misaligned.
A professional may include a manufactured-home installer, roofer, drywall contractor, handyman experienced with mobile homes, or home inspector. The best person depends on the cause. A drywall contractor can make a crack disappear, but if the roof leaks or the home is settling, the crack will return with a tiny villain laugh.
Preventing Future Ceiling Damage
After the ceiling is repaired, prevention matters. Inspect the roof at least twice a year and after major storms. Keep sealants around roof penetrations in good shape. Watch for stains near vents, skylights, and exterior walls. Make sure the home has proper drainage so water moves away from the foundation and support system.
Inside the home, control humidity with ventilation, especially in kitchens, bathrooms, and laundry areas. Moisture rises, and the ceiling is often where poor ventilation announces itself. If you see recurring stains, peeling paint, or musty odor, investigate early. Small moisture problems are cheaper when they are still small.
Budget-Friendly Repair Options
If the original ceiling panels are impossible to match, you still have options. You can replace a damaged section and use decorative battens to make the repair look intentional. You can install lightweight beadboard panels over a damaged but stable ceiling. You can use a suspended ceiling in some rooms. You can also skim, texture, and repaint if the existing surface is sound.
The best budget repair is not always the cheapest material. It is the method that solves the problem without creating another one. Heavy materials, poor fastening, skipped primer, and ignored leaks can turn a low-cost repair into an expensive redo.
Experience Notes: What Homeowners Learn the Hard Way
Repairing a mobile home ceiling after a move teaches a few memorable lessons. The first is that cracks are not all equal. A short hairline crack near a seam may be simple settling from transport. A long crack that keeps growing may mean the home is still shifting. A brown crack with a soft edge is not “character.” It is moisture, and moisture is the boss level of ceiling repair.
Another lesson is that mobile home ceilings often need mobile-home thinking. Many homeowners try to repair every seam like a site-built drywall ceiling. Sometimes that works. Sometimes the original ceiling system was designed with battens, strips, or lightweight panels that move slightly with the home. In those cases, forcing a rigid, seamless finish can lead to repeat cracking. A neat batten strip, painted to match the ceiling, may look cleaner and last longer than a heroic mud job that splits during the next seasonal shift.
It also helps to wait until the home has settled after setup before doing perfection-level finishing. This does not mean ignoring leaks or unsafe sagging. Those need prompt attention. But if the issue is cosmetic cracking after transport, monitor it for a short period, take photos, and see whether the crack changes. Freshly moved homes can reveal small adjustments after blocking, anchoring, weather changes, and normal use.
One practical trick is to repair from cause to surface: roof, leveling, framing, panel, seam, primer, paint. Skipping steps usually shows. For example, painting over a stain before confirming the roof is dry is a classic “future me problem.” Future you will not be impressed. Another common mistake is using too much joint compound at once. Thick mud shrinks, cracks, and requires more sanding. Thin coats take longer, but they create a smoother finish and much less ceiling dust in your hair.
Finally, matching the ceiling finish is often harder than the structural patch. Keep expectations realistic, especially in older homes with aged paint or discontinued ceiling panels. Sometimes the cleanest repair is to repaint the whole room ceiling, add symmetrical battens, or turn the repaired area into a planned design feature. The goal is not just to hide damage. The goal is to make the ceiling stable, dry, safe, and visually calm enough that you stop staring at it during dinner.
Conclusion
Repairing a mobile home ceiling after having it moved starts with understanding why the damage happened. Transport movement, leveling issues, loose panels, water intrusion, and marriage-line separation can all show up overhead. A lasting repair begins with inspection, moisture control, and stabilization before cosmetic finishing.
For small drywall cracks, tape, joint compound, primer, and paint can restore a smooth ceiling. For damaged ceiling panels, resecure or replace the material and use battens or trim where appropriate. For water stains, fix the leak first and use stain-blocking primer only after the ceiling is dry and sound. For large sagging, mold, electrical concerns, or recurring cracks, bring in a qualified professional.
A moved mobile home may need a little settling time, but your ceiling should not be ignored. Treat it like a helpful warning system. When you listen early, repairs are usually cleaner, cheaper, and far less dramatic. And frankly, ceilings should be boring. Boring ceilings are underrated.












