
Some school projects begin with glitter. Some begin with panic. And then there is the glorious moment when a teacher says, “Make an Ancient Egyptian coffin out of a shoe box,” and suddenly your old sneaker packaging becomes a time machine to the Nile Valley. Good news: you do not need a royal workshop, a team of scribes, or a pet crocodile named Gary. You need a shoe box, basic craft supplies, a little historical inspiration, and enough patience to let paint dry without poking it every seven seconds.
This guide will show you how to make an Ancient Egyptian coffin out of a shoe box in a way that looks impressive, teaches real history, and does not require expensive materials. The project is perfect for school assignments, homeschool history units, classroom displays, museum-inspired crafts, or a weekend activity when “I’m bored” has been declared for the 47th time.
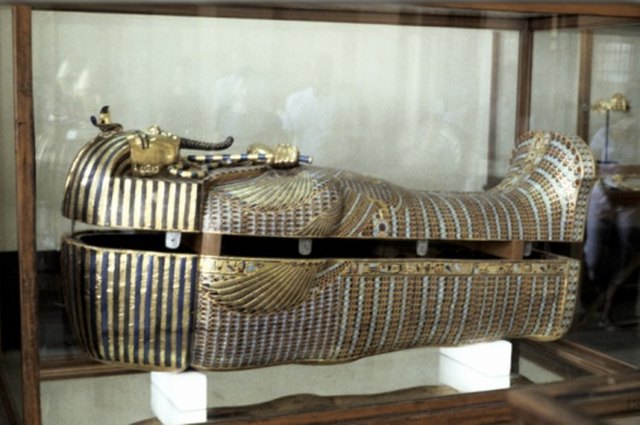
Ancient Egyptian coffins were not just containers. They were carefully decorated objects connected to beliefs about protection, identity, memory, and the afterlife. Many coffins included painted faces, collars, symbols, hieroglyph-like writing, and images of protective gods or sacred creatures. Your shoe box version will not be archaeologically perfect, but it can borrow those visual ideas respectfully and creatively. Think of it as a tiny history lesson wearing a very fancy hat.
What Is an Ancient Egyptian Coffin?
Before cutting cardboard like a craft-store pharaoh, it helps to understand what you are making. In ancient Egypt, coffins were often designed to protect the body and help represent the person inside. Some coffins were rectangular, especially in earlier periods. Others were anthropoid, meaning shaped like a human figure. Many were made from wood, painted with bright colors, and covered with symbols, prayers, and images linked to Egyptian beliefs.
People often use the word “sarcophagus” for Egyptian burial containers, but technically a sarcophagus is usually the outer stone container. A coffin is more often the wooden or inner container that held the mummy or nested inside other cases. For a shoe box craft, the word “coffin” works perfectly because your box becomes the main decorated container.
The most recognizable Egyptian coffin style includes a painted face, a striped headcloth, a broad collar, arms crossed over the chest, decorative bands, and symbols such as the ankh, scarab, lotus, falcon wings, or Eye of Horus. You can include some of these details to make your shoe box coffin look instantly Egyptian-inspired without turning your kitchen table into an archaeological excavation site.
Materials You Will Need
The best part of this Ancient Egyptian shoe box coffin project is that most materials are easy to find. You can keep it simple or go full “museum gift shop masterpiece,” depending on your time, budget, and how emotionally attached you are to gold paint.
Basic Supplies
- One clean shoe box with lid
- Cardboard scraps or cereal box cardboard
- Pencil and eraser
- Ruler
- Scissors
- School glue or craft glue
- Tape or masking tape
- Paintbrushes
- Acrylic paint or poster paint
- Markers, especially black, blue, red, and gold
- Construction paper or colored cardstock
- Aluminum foil or metallic paper for shiny details
Optional Supplies for Extra Detail
- Gold paint or gold paper
- Air-dry clay for small raised ornaments
- Craft gems or sequins
- String, yarn, or ribbon
- Printed hieroglyph reference chart
- Brown paper bags for an aged papyrus look
- Clear glue or Mod Podge for sealing
A quick safety note: younger crafters should ask an adult for help with scissors or craft knives. The project should involve history, not a dramatic cardboard injury scene.
Step 1: Choose the Coffin Shape
Start by deciding whether your Ancient Egyptian coffin will be rectangular or human-shaped. A rectangular coffin is easier and works well for younger students. An anthropoid coffin looks more dramatic because it follows the outline of a person, with a rounded head and narrower foot area.
If you want the anthropoid style, keep the shoe box lid as the base structure and add cardboard pieces to shape the top. Draw a rounded head shape on cardboard, wide enough to cover the top end of the lid. Then draw two long side panels that taper slightly toward the feet. Glue or tape these pieces onto the lid so the box looks less like it once held sneakers and more like it is ready for a royal history fair.
For a simpler version, leave the shoe box exactly as it is and decorate the lid as if it were the top of the coffin. This still works beautifully. Ancient Egyptian coffins came in different forms over time, so your project can be accurate in spirit even if it does not have a sculpted body shape.
Step 2: Prepare the Shoe Box
Remove labels, stickers, price tags, and anything that screams “size 8 running shoes.” If the box has glossy printing, cover it with white paper, brown paper, or a layer of paint primer. This gives you a clean surface for decorating.
For a sturdy finish, wrap the box and lid separately with construction paper or plain printer paper. Use glue for smooth areas and tape inside the box where it will not show. If your paper wrinkles a little, do not panic. Ancient artifacts are rarely perfectly smooth after thousands of years, so call it “historical texture” and move confidently onward.
Paint the outside of the box in a base color. Gold, tan, deep blue, black, and reddish brown are all strong choices. Gold gives a royal look. Tan feels like desert stone or aged wood. Blue and black make bright decorations pop. Let the paint dry completely before adding details. Yes, completely. No, “mostly dry” is not the same thing.
Step 3: Design the Face and Headcloth
The face is usually the focal point of an Ancient Egyptian coffin craft. On the top third of the lid, lightly sketch an oval face. Add almond-shaped eyes, arched brows, a nose, and a small mouth. Egyptian art often showed people with bold eye outlines, so use black marker or paint to define the eyes.
Above and around the face, draw a striped headcloth. This style is inspired by the nemes headcloth often associated with Egyptian royal imagery. You can use alternating blue and gold stripes, black and gold, or any color combination that looks strong and balanced. The key is symmetry. Ancient Egyptian art loved order, balance, and clear shapes, while your glue bottle may love chaos. Try not to let the glue bottle win.
If you want a raised face, cut the face shape from cardboard, paint it separately, and glue it to the lid. This gives the coffin a more sculptural look. Add a small cardboard beard if your design is inspired by royal coffins. Paint it blue or gold and attach it under the chin.
Step 4: Add the Broad Collar
Below the face, add a broad collar. Egyptian coffin decoration often included wide, colorful collars made from rows of beads or floral patterns. On your shoe box coffin, draw several curved bands across the chest area. Fill them with repeating shapes such as rectangles, dots, teardrops, small flowers, or stripes.
Use bright colors like turquoise blue, red, green, white, and gold. These colors appeared often in Egyptian-inspired artwork and modern museum reproductions because they echo materials such as faience, precious stones, gold, and pigments. You do not need real gemstones. Markers are significantly friendlier to the family budget.
For a 3D effect, glue small paper circles, sequins, or painted pasta pieces onto the collar. If you use pasta, choose tiny shapes and paint them before attaching. Nothing says “ancient luxury” quite like macaroni pretending to be lapis lazuli.
Step 5: Decorate the Body of the Coffin
The body section is where your Ancient Egyptian shoe box coffin can become truly eye-catching. Divide the lower part of the lid into horizontal bands. Each band can contain a pattern, symbol, or hieroglyph-inspired design. Use a ruler to keep the lines neat, but do not worry if everything is not perfect. Handmade crafts should look handmade, not like they were printed by a robot with a history degree.
Symbols You Can Include
- Ankh: A symbol often associated with life.
- Eye of Horus: A protective symbol used in Egyptian art.
- Scarab beetle: Linked with renewal and transformation.
- Lotus flower: Associated with rebirth and the Nile environment.
- Djed pillar: Often connected with stability.
- Falcon wings: Inspired by protective divine imagery.
Use these symbols as decoration rather than random doodles. For example, place a scarab in the center of the chest, add wing shapes stretching outward, and draw small ankhs in the side panels. This creates a more organized design and makes your project look intentional.
Step 6: Create Hieroglyph-Inspired Borders
Hieroglyphs were an important writing system in ancient Egypt, combining signs that could represent sounds, words, or ideas. For your craft, you can create hieroglyph-inspired borders using simple repeated marks. If this is a school project, you may also write your name using a children’s hieroglyph chart. Just remember that modern classroom charts are simplified, so do not claim you have written a perfect ancient inscription unless you want an Egyptologist to raise one eyebrow from across the internet.
Draw vertical or horizontal bands along the sides of the coffin. Fill them with birds, reeds, zigzags, circles, seated figures, water lines, and simple shapes. Use black marker first, then add color. The goal is to suggest the visual rhythm of Egyptian inscriptions while keeping the project age-appropriate and manageable.
If you want the writing to look like aged papyrus, tear strips from a brown paper bag, wrinkle them gently, flatten them, and glue them onto the coffin. Then draw your symbols on top. This gives your shoe box coffin a textured, handmade look.
Step 7: Decorate the Sides of the Box
Do not forget the sides. A coffin decorated only on top can look unfinished, like wearing a tuxedo jacket with pajama pants. Paint the sides in a matching base color, then add borders, columns, stars, or simple geometric patterns.
You can divide the sides into panels and add repeated motifs: ankhs, lotus petals, diagonal stripes, or small rectangles. If your project is for a class presentation, label one side with a short explanation: “Ancient Egyptian coffins were decorated with symbols connected to protection, identity, and beliefs about the afterlife.” This turns your craft into both an art object and a mini history report.
For the inside of the box, line it with dark blue paper and add tiny gold stars. Ancient Egyptian tomb and coffin decoration sometimes used starry imagery connected with the sky and rebirth. This detail is simple but impressive, especially when someone opens the lid and discovers that the inside is not just raw cardboard and old sneaker energy.
Step 8: Make a Mini Mummy or Scroll
If your assignment allows it, create a small mummy figure to place inside. Roll a piece of paper, cotton, or cloth into a simple body shape. Wrap it loosely with white strips of tissue or gauze. Keep the design respectful and non-scary. The purpose is educational, not haunted-house dramatic.
You can also include a small “artifact bundle” instead of a mummy. Add a paper scroll explaining the symbols you used, a tiny cardboard amulet, or a folded biography card for an imaginary ancient Egyptian person. For example, you might invent a scribe, musician, farmer, or artisan and decorate the coffin based on that person’s life. This gives the project more storytelling power.
Step 9: Add Final Details and Seal the Project
Once the main decoration is finished, step back and look for empty spaces. Add dots, borders, stars, or thin black outlines to sharpen the design. Outlining is one of the easiest ways to make a craft look cleaner. It is like eyeliner for cardboard: suddenly everything looks more awake.
If you used paint, let it dry fully. Then apply a thin layer of clear glue or craft sealer if you want a slightly glossy finish. Do not overdo it, because too much sealer can smear marker or wrinkle paper. Test a small area first if you are unsure.
Finally, make sure the lid still fits the box. This is the moment when many craft heroes discover they added fourteen layers of cardboard and the lid now sits on top like a confused hat. If needed, trim extra paper from the edges or gently adjust the side panels.
Historical Details That Make Your Project Better
A strong Ancient Egyptian coffin craft is not just pretty; it shows that you learned something. Add a few historically inspired details to make your project stand out.
Use Symmetry
Ancient Egyptian art often used balanced compositions. Place matching symbols on both sides of the coffin. If you put an ankh on the left, add one on the right. If you add wings, make them extend evenly. Symmetry gives the coffin a formal, ceremonial look.
Choose Colors with Purpose
Gold can suggest wealth and divine associations. Blue can suggest the sky, water, or precious materials. Green can suggest growth and renewal. Black can suggest fertile Nile soil and regeneration. Red can create contrast and energy. You do not need to write a dissertation on pigment history, but choosing colors with meaning makes the project feel more thoughtful.
Add Protective Symbols
Many Egyptian coffin decorations included protective imagery. The Eye of Horus, winged forms, scarabs, and deities such as Anubis appeared in funerary art. For a classroom craft, symbols should be used respectfully as historical references. Keep the tone educational rather than spooky.
Common Mistakes to Avoid
The first mistake is rushing. Paint needs time to dry, glue needs time to set, and cardboard needs time to stop pretending it is a soggy pancake. Work in stages if possible.
The second mistake is adding too many unrelated decorations. Glitter, rainbow stickers, and smiley faces may be fun, but they can distract from the Ancient Egyptian theme. Choose patterns and symbols that support the overall design.
The third mistake is ignoring the box structure. If the lid becomes too heavy, it may bend. Use lightweight materials for the top, and reinforce weak areas with extra cardboard underneath.
The fourth mistake is copying modern images without understanding them. Instead, use museum-style references for inspiration and simplify them in your own way. This helps you create an original project while still respecting the history.
Classroom Presentation Tips
If you need to present your Ancient Egyptian shoe box coffin to a class, prepare a short explanation. Describe your materials, the symbols you chose, and what you learned about Egyptian coffins. Keep it simple and confident.
You might say: “I made an Ancient Egyptian-inspired coffin using a shoe box, cardboard, paint, and markers. The face and striped headcloth are based on coffin designs that represented the person inside. I added a broad collar, ankh symbols for life, a scarab for renewal, and stars inside the box to connect with Egyptian ideas about the sky and afterlife.”
That explanation is clear, educational, and much better than “I used gold paint because it looked cool,” even though, honestly, gold paint does look cool.
Creative Variations
Once you know the basic method, you can customize the project in several ways. Make a royal-style coffin with lots of gold and blue. Create a scribe’s coffin with paper scroll patterns and reed pen symbols. Design a musician’s coffin with small painted instruments. Make a family-friendly museum display by placing your coffin on a cardboard base with labels and a title card.
For younger children, simplify the project by using a printed coffin outline glued to the lid. For older students, add more research-based details, such as nested coffins, coffin texts, canopic jar drawings, or a short written report. The project can grow from a simple craft into a full history presentation.
of Experience: What I Learned Making an Ancient Egyptian Coffin Out of a Shoe Box
Making an Ancient Egyptian coffin out of a shoe box sounds easy until the shoe box begins acting like it has personal opinions. The first lesson is that cardboard has moods. Thin cardboard bends when painted too heavily, glossy cardboard refuses to accept glue like a stubborn cat, and corners can pop open at the exact moment you feel proud of yourself. The solution is preparation. Covering the box with paper first makes everything easier, and using thin layers of paint keeps the surface from warping.
The second lesson is that planning the design before decorating saves a lot of frustration. At first, it is tempting to draw a face, add some stripes, throw on an ankh, and declare victory. But the best results come from lightly sketching the layout in pencil. Divide the coffin into zones: face, headcloth, collar, chest, lower body, and side borders. Once each area has a job, the design looks much more polished. It is the difference between “ancient Egyptian coffin” and “cardboard box that got attacked by markers.”
The third lesson is that simple repeated patterns look surprisingly professional. Tiny dots, parallel lines, triangles, and small rectangles can create a rich decorative effect without requiring advanced drawing skills. You do not need to paint perfect gods, queens, or falcons. A neat border can do a lot of visual work. Repetition makes the project feel organized, and organization is basically craft magic wearing sensible shoes.
The fourth lesson is that gold should be used wisely. Gold paint or paper immediately makes the coffin look special, but too much gold can flatten the design. It works better as an accent: around the face, on the collar, in small symbols, or along borders. Pairing gold with blue, black, red, or green gives the design contrast. If everything is gold, nothing stands out. Even pharaohs needed visual hierarchy.
The fifth lesson is that mistakes can become decoration. A smudged line can turn into a thicker border. A crooked band can become a patterned stripe. A glue mark can be covered with a paper jewel or symbol. Crafting is not about never making mistakes; it is about becoming very good at disguising them with confidence. Ancient artisans planned carefully, but modern students have the mighty power of extra cardstock.
The sixth lesson is that adding a written explanation makes the project feel complete. A small label describing the symbols, colors, and purpose of the coffin helps viewers understand the history behind the craft. It also shows the teacher that the project involved research, not just a dramatic relationship with metallic markers. The best shoe box coffin combines creativity with learning.
Finally, the experience is fun because it transforms ordinary materials into something memorable. A shoe box is usually trash or storage for mysterious cables. But with paint, paper, and historical imagination, it becomes a miniature Ancient Egyptian-inspired artifact. That transformation is the heart of a great history craft: it helps you see the past not as a boring list of dates, but as a world full of artists, symbols, beliefs, and big ideas. Plus, when someone asks where the coffin came from, you get to say, “It used to hold shoes,” which is always a satisfying plot twist.
Conclusion
Learning how to make an Ancient Egyptian coffin out of a shoe box is more than a craft project. It is a hands-on way to explore art, history, symbolism, and design. By shaping the box, painting a face and headcloth, adding a broad collar, decorating with meaningful symbols, and including a short explanation, you can create a project that looks impressive and teaches real historical ideas.
The best version does not need to be expensive or perfect. It needs thoughtful details, clean organization, and a little patience. Whether you are making it for school, homeschool, a museum-themed lesson, or just a creative afternoon, your shoe box coffin can turn recycled cardboard into a tiny tribute to one of the world’s most fascinating ancient cultures. Not bad for something that once lived under a pair of sneakers.











