
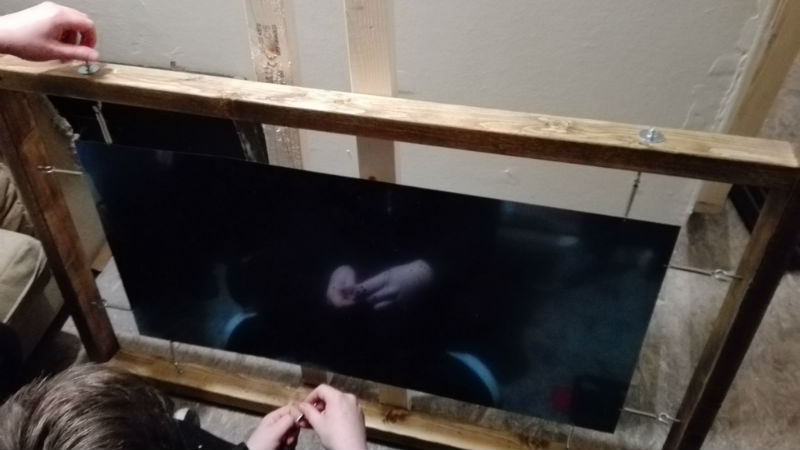
There are two kinds of people in the recording world: people who love plate reverb, and people who have not yet put a vocal through one. A good plate reverb adds shimmer, density, and that “expensive studio” glow that makes a dry sound feel like it just put on a velvet jacket. The problem? Classic plate reverb units are huge, heavy, and priced like they were handcrafted by monks in a secret mountain studio.
Thankfully, the basic idea behind a plate reverb is beautifully simple. You send audio into a metal sheet, make that sheet vibrate, capture the vibration with pickups, and blend the result back into your mix. That is it. No wizardry. No cathedral. No need to sell a kidney on the vintage gear market.
This guide explains how to build a plate reverb on the cheap using affordable materials, common audio gear, and a little patience. The goal is not to clone a legendary EMT 140 perfectly. The goal is to create a real, physical, musical reverb that has personality, texture, and enough charm to make your plug-ins nervously check their presets.
What Is a Plate Reverb?
A plate reverb is an electromechanical reverb device. Instead of recording sound bouncing around a room, it uses a suspended metal plate as the “space.” A driver or surface transducer shakes the plate with the audio signal. The metal vibrates in complex patterns, and one or more pickups capture those vibrations as a reverberated signal.
The famous studio plate reverbs of the 1950s and 1960s became popular because they offered a dense, smooth alternative to spring reverb and a more practical option than building a dedicated echo chamber. Classic plates were large, heavy, and often housed in wooden cabinets. They usually included a damping system, allowing engineers to shorten or lengthen the decay time.
In modern studios, plate reverb plug-ins are everywhere, and many sound excellent. But a homemade plate has something software rarely gives you: unpredictability. It rattles, sings, hums, blooms, and occasionally behaves like a stubborn antique appliance. In other words, it has character.
Why Build a DIY Plate Reverb?
The first reason is obvious: cost. Commercial plate reverbs and restored vintage units can cost thousands of dollars. A DIY plate reverb can be built for a fraction of that, especially if you already own a small amp, audio interface, mixer, or spare preamp.
The second reason is sound. A cheap plate reverb will not always sound polished right away, but it can deliver a physical depth that feels different from a digital reverb. Vocals gain a glossy tail. Snare drums get a dramatic slap of atmosphere. Guitars can become wide and ghostly. Synths can turn into weather systems.
The third reason is learning. Building one teaches you about transducers, resonance, pickup placement, damping, impedance, gain staging, and acoustic isolation. It is part audio project, part science experiment, part furniture problem.
How a Homemade Plate Reverb Works
A cheap plate reverb has four main parts:
1. The Plate
The plate is usually a thin sheet of steel, stainless steel, aluminum, or another resonant material. Steel is common because it is affordable, durable, and musically bright. Aluminum can sound lighter and sometimes more metallic. Stainless steel often has a smooth ring but may cost more.
2. The Frame
The frame holds the plate under tension. It can be built from wood, metal, or even repurposed shelving. The frame must be sturdy enough to keep the plate suspended without flexing like a cheap lawn chair in a thunderstorm.
3. The Driver
The driver sends audio into the plate. Many DIY builders use a surface transducer, small speaker driver, tactile exciter, or modified loudspeaker. The driver is powered by a headphone amp, small power amp, or similar device.
4. The Pickups
The pickups capture the plate’s vibration. Piezo contact microphones are common because they are inexpensive and easy to attach. For stereo plate reverb, use two pickups in different positions on the plate.
Cheap Plate Reverb Parts List
You can build a basic DIY plate reverb with the following materials:
- One thin metal sheet, roughly 2 feet by 3 feet or larger
- Wood or metal for the frame
- Springs, bolts, eye hooks, turnbuckles, or wire for suspension
- One surface transducer, tactile exciter, or small speaker driver
- One or two piezo contact microphones
- Adhesive, epoxy, double-sided tape, or mounting putty
- Small power amp, headphone amp, or spare amplifier
- Audio interface, mixer, or preamp
- Foam, felt, moving blanket, or acoustic material for damping
- Shielded cable and basic connectors
A very frugal build may cost around $100 if you already have audio gear. A nicer version with a cleaner frame, better transducers, and proper wiring may land closer to $250–$500. Either way, that is still cheaper than buying a vintage plate reverb that weighs as much as a refrigerator with emotional baggage.
Choosing the Right Metal Plate
The plate is the heart of the project, so choose carefully. The best cheap option is often a thin steel sheet from a hardware store, metal supplier, or salvage yard. Look for something thin enough to vibrate freely but not so flimsy that it bends into modern art every time you touch it.
Common DIY thickness ranges from about 0.5 mm to 1 mm. Thinner plates tend to respond more easily and produce a brighter, longer decay. Thicker plates may sound tighter and less lively unless driven harder. Size also matters. A larger plate usually produces a richer, smoother reverb, while a smaller plate can sound clangy, metallic, and more like a special effect.
Do not worry if your first plate is not perfect. The fun of DIY plate reverb is experimentation. Try steel, aluminum, baking trays, thin sheet metal, or even found objects. Some “wrong” materials create fantastic sounds.
Building the Frame
The frame should hold the plate vertically or slightly angled. Vertical mounting saves floor space and reduces dust collection. A rectangular wooden frame is usually the easiest for beginners. Use 2×4 lumber, plywood braces, or a repurposed shelving unit. If you can weld, a metal frame is excellent, but welding is not required.
The plate should hang inside the frame without touching the sides. Use springs, wire, or turnbuckles at the corners. The suspension needs to keep the plate under moderate tension. Too loose, and the plate flops around like a cymbal in a backpack. Too tight, and the sound may become choked or overly bright.
Turnbuckles are useful because they let you fine-tune tension after assembly. Small changes in tension can alter decay, pitch, and resonance. Think of it like tuning a strange, rectangular instrument that does not care about your schedule.
Mounting the Driver
The driver is where your dry audio enters the plate. A surface transducer or tactile exciter is the easiest option. These devices are designed to turn surfaces into speakers, which makes them perfect for shaking a metal plate.
Mount the driver near the center of the plate or slightly off-center. Dead center often gives a balanced response, while off-center placement can reduce overly symmetrical ringing. Use strong adhesive, mechanical mounting, or a combination of both. The driver must transfer vibration efficiently into the plate.
Feed the driver from a small amplifier. Start with low volume. You are not trying to punish the plate; you are trying to excite it. Too much power can distort the driver, rattle the frame, or create an angry metallic roar that sounds less like Abbey Road and more like a haunted garage door.
Adding Piezo Pickups
Piezo contact mics are cheap and widely used for DIY plate reverb pickups. For mono, use one pickup. For stereo, use two pickups placed in different areas of the plate. Good starting points are left and right of center, or one higher and one lower. Avoid placing pickups too close to the driver, or you may capture more direct vibration and less spacious decay.
Piezo pickups usually sound best when connected to a high-impedance input, often around 1 megohm or higher. A standard line input may make them sound thin, harsh, or weak in the bass. An active DI box, instrument input, dedicated piezo preamp, or buffer can dramatically improve tone.
Attach pickups with removable putty or tape while testing. Once you find a sweet spot, you can use a more permanent adhesive. Pickup placement changes the sound a lot, so do not glue anything permanently until your ears vote yes.
Creating a Damping System
Damping controls decay time. Classic plate reverbs used a damping pad that moved closer to the plate without necessarily touching it. You can make a simple version with foam, felt, carpet, acoustic panel material, or a moving blanket mounted on a movable board.
Place the damping material behind or in front of the plate. Moving it closer shortens the decay. Moving it away allows the plate to ring longer. If the material touches the plate, the sound may become much shorter and duller, which can be useful for special effects but less ideal for lush vocal reverb.
A cheap sliding damper can be made with a board, foam, and simple drawer slides. A simpler option is to hang a blanket nearby and move it by hand. Not elegant? Maybe. Effective? Absolutely.
Wiring and Signal Flow
The signal chain is simple:
- Send audio from your mixer, interface, or DAW output to a small amplifier.
- The amplifier drives the surface transducer attached to the plate.
- The plate vibrates and creates reverb.
- Piezo pickups capture the vibration.
- The pickup signal goes into a DI box, preamp, mixer, or audio interface.
- The returned signal is blended with the dry track.
In a DAW, use an auxiliary send. Send vocals, drums, guitar, or synth to the plate output. Record the pickup return on a new track. This gives you full control over EQ, compression, panning, and editing later.
Keep cables short where possible, especially from piezo pickups. Shielded cable helps reduce hum. If you get buzz, check grounding, cable routing, and whether the plate is picking up vibration from the floor, nearby speakers, or your neighbor’s heroic leaf blower.
How to Tune a DIY Plate Reverb
Tuning is where the project becomes musical. Start by sending a snare hit, handclap, or short vocal phrase into the plate. Listen to the return. Is it bright? Dark? Too metallic? Too short? Too ringy?
Adjust Plate Tension
Tightening the plate may increase brightness and sustain. Loosening it can make the sound darker or more chaotic. Make small adjustments and listen after each change.
Move the Driver
If the reverb sounds too direct or harsh, move the driver slightly off-center. If it sounds weak, improve the driver contact or try a more powerful exciter.
Move the Pickups
Pickup placement is a major tone control. Near the center can sound stronger and more immediate. Toward the edges can sound more diffuse. Two pickups placed asymmetrically often create a wider stereo image.
Add EQ
Most plate reverbs benefit from EQ. A high-pass filter can remove rumble. A small cut in harsh upper mids can tame metallic bite. A gentle high-frequency boost can add sparkle if the plate sounds dull.
Best Sounds to Try Through Your Cheap Plate
Vocals are the classic plate reverb test. A short-to-medium decay can make a vocal feel larger without washing away the lyrics. Use a high-pass filter on the return so the low end does not turn into soup.
Snare drum is another winner. A plate can add explosive size, especially on rock, soul, indie, and retro-inspired productions. Try compressing the reverb return for extra drama.
Electric guitar can become wide and cinematic through a plate. Clean guitar loves it. Fuzz guitar may become enormous, but be careful: too much plate on distorted guitar can turn your mix into a silverware drawer falling down the stairs.
Synths and pads are perfect for experimental textures. Send short synth plucks into the plate and record the return. Reverse it, pitch it down, chop it into samples, or layer it under the original sound.
Common Problems and Easy Fixes
The Reverb Sounds Thin
Check the pickup input impedance. Piezo pickups often need a high-impedance input to sound full. Try an active DI, instrument input, or piezo buffer.
The Plate Rattles Too Much
Inspect the frame, hooks, springs, and mounting hardware. Add rubber washers or felt where metal parts vibrate against each other.
The Sound Is Too Metallic
Try damping, EQ, a different pickup position, or a slightly larger plate. A small plate often has a stronger clangy character.
The Return Is Noisy
Use shielded cables, move power supplies away from audio lines, and check grounding. Also make sure the amp driving the plate is not excessively loud.
The Decay Is Too Long
Move damping material closer to the plate or add a soft absorber near one side. You can also gate the return in your DAW for tight, vintage-style effects.
Safety Notes Before You Start
A DIY plate reverb is not dangerous when built sensibly, but it does involve metal edges, tools, amplifiers, and suspended materials. Wear gloves when handling sheet metal. File or tape sharp edges. Secure the frame so it cannot tip over. Keep wiring neat and avoid exposed electrical connections.
Do not modify mains-powered equipment unless you know exactly what you are doing. Use safe, low-voltage audio gear whenever possible. A plate reverb should make your tracks sound alive, not make your insurance company ask follow-up questions.
Budget Build Example
Here is a realistic low-cost setup:
- Thin steel sheet from a hardware store: $30–$80
- Wood frame materials: $25–$60
- Springs, hooks, bolts, and turnbuckles: $20–$50
- Surface transducer: $15–$40
- Two piezo pickups: $10–$30
- Adhesives, cable, connectors, and damping material: $20–$50
If you already own a mixer, interface, amplifier, or DI box, the total can stay surprisingly low. The biggest upgrade is usually not a more expensive plate. It is better pickup buffering, cleaner wiring, and more careful mechanical isolation.
Is a Cheap Plate Reverb Worth It?
Yes, if you enjoy hands-on audio experiments and want a reverb with personality. No, if you need silent operation, instant recall, perfect stereo imaging, and zero maintenance. A DIY plate reverb is not a preset. It is an instrument. It rewards patience, trial, error, and the willingness to say, “That weird sound is actually kind of amazing.”
For home studios, a cheap plate reverb can become a signature tool. It may not replace your favorite plug-ins, but it can add a real-world flavor that stands out. Even if you only use it on a few tracks, it can give your productions a unique fingerprint.
Extra Experience: Lessons From Building a Plate Reverb on the Cheap
The first lesson is that the frame matters more than beginners expect. Many people focus on the plate material and electronics, but a weak frame can ruin the sound. If the frame shakes, buzzes, or flexes, those noises become part of the recording. Sometimes that is cool. Most of the time, it sounds like a toolbox arguing with a snare drum. A rigid frame gives the plate room to sing without adding unwanted mechanical noise.
The second lesson is that “cheap” should not mean “careless.” You can use affordable parts, but the build still needs attention. The plate should hang evenly. The driver should be firmly attached. The pickups should be tested in several positions. Cables should be secured so they do not tug on the piezos. A five-dollar wiring mistake can make a hundred-dollar project sound like a broken doorbell.
The third lesson is that pickup placement is the secret sauce. Moving a piezo just a few inches can change the tone dramatically. One position may sound harsh and papery. Another may sound deep, wide, and surprisingly professional. Before permanently attaching pickups, record several tests. Label each test by pickup position, driver level, and damping distance. Future you will be grateful, especially after present you has forgotten everything and gone looking for snacks.
The fourth lesson is that damping is not optional. A totally open plate can be exciting, but it may ring too long for practical mixing. Vocals often need a controlled decay so the reverb does not swallow consonants. Drums may need a shorter, punchier tail. A movable damping panel gives you flexibility. Even a blanket clipped near the plate can transform the unit from “interesting noise machine” into “usable studio effect.”
The fifth lesson is that EQ is your friend. Homemade plates can produce strong resonances. Do not judge the raw return too quickly. High-pass the low rumble. Notch out harsh frequencies. Roll off fizzy top end if needed. Add a little compression if the reverb blooms unevenly. A plate reverb is usually part of a mix chain, not a finished sound by itself.
The sixth lesson is that isolation matters. A plate reverb is a giant vibration collector. If it sits near loudspeakers, foot traffic, HVAC noise, or a rattly wall, it may capture more than your audio send. Put it in a quiet corner if possible. Add rubber feet under the frame. Keep it away from subwoofers. Otherwise, your tender vocal ballad may include a guest performance by the washing machine.
The seventh lesson is that imperfection is the whole point. A cheap plate reverb may hum a little, ring strangely, or favor one side of the stereo field. Those flaws can become creative strengths. The best DIY plate reverbs often do not sound like expensive commercial units. They sound like themselves. That uniqueness can be more valuable than accuracy, especially in a world where everyone has access to the same plug-in presets.
Finally, building a plate reverb changes how you hear reverb. You stop thinking of it as a menu option and start hearing it as physical motion. You understand why decay, density, damping, and resonance matter. You learn that sound is not just math inside a computer; sometimes it is a sheet of metal trembling in a wooden frame, making your snare drum feel ten feet tall.
Conclusion
Building a plate reverb on the cheap is one of the most rewarding DIY audio projects for musicians, producers, and home studio owners. It is affordable, educational, and genuinely useful. With a thin metal plate, a solid frame, a driver, a couple of piezo pickups, and some careful tuning, you can create a real electromechanical reverb that brings depth and personality to your recordings.
Will it be perfect? Probably not. Will it be fun, inspiring, and occasionally magical? Absolutely. A homemade plate reverb reminds us that great sound does not always come from expensive gear. Sometimes it comes from curiosity, a hardware-store receipt, and the courage to attach audio cables to a vibrating sheet of metal.
Note: This article is written for educational and creative studio use. Always follow basic tool safety, secure suspended materials properly, and avoid modifying mains-powered electronics unless qualified.












