
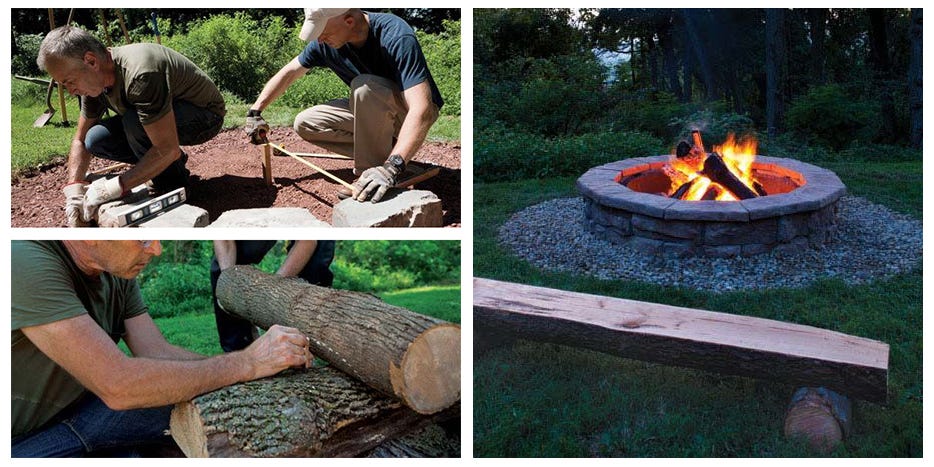
A backyard fire pit can turn an overlooked patch of lawn into the most popular “room” at your house. Suddenly, everyone wants to sit outside, marshmallows become a food group, and relatives who normally leave at 8:00 p.m. discover they can stay for one more log.
Fortunately, learning how to build a fire pit does not require a masonry degree or a television crew dramatically arriving with matching tool belts. A simple circular fire pit made with heat-rated blocks, a metal liner, and a properly compacted base can be completed by a careful DIYer over a weekend.
This guide explains how to choose a safe location, calculate materials, prepare the ground, install the base, stack the walls, create drainage, and finish the surrounding area. It also covers common mistakes and experience-based lessons that can save you from rebuilding the whole thing after the first rainy season.
Before Building a DIY Fire Pit, Check the Rules
The first step is not buying stone. It is checking whether an outdoor wood-burning fire pit is allowed on your property. Municipal fire codes, neighborhood rules, homeowner association restrictions, seasonal burn bans, and air-quality regulations may control the size, location, fuel type, and permitted hours of use.
Some communities permit recreational fires but require specific setbacks from buildings and property lines. Others restrict wood-burning pits during dry or windy weather. Contact your local fire department or building office before construction, and ask your insurance provider whether a permanent fire feature needs to be disclosed. Major home-improvement guides also recommend confirming local codes and HOA restrictions before beginning the project.
Call 811 Before Digging
Even a shallow fire-pit excavation can cross buried electrical, communication, irrigation, or gas lines. In the United States, contact 811 or your state’s 811 center several business days before digging. Wait until the affected utilities have responded and marked the approximate locations of their lines. A shovel and an unmarked gas line are not the kind of sparks you want at your new fire pit.
Choose a Safe Fire Pit Location
Select an open, level area with no low branches, fences, sheds, decks, roof overhangs, dry vegetation, or other combustible materials nearby. National fire-safety guidance recommends placing outdoor fire pits at least 10 feet from the house and anything that can burn. Local codes may require a greater distance, so the local requirement always wins.
Avoid positioning the pit directly under string lights, utility lines, shade sails, covered patios, or tree canopies. Consider the usual wind direction as well. You do not want smoke traveling directly into the house, across a neighbor’s patio, or toward the one chair occupied by the person who complains about everything.
The surrounding surface should be stable and noncombustible. Pavers, brick, compacted gravel, or concrete are generally better than grass or a wood deck. Leave enough open space for chairs, walking paths, and a clear route away from the fire.
Decide on the Size and Style
For a straightforward backyard project, a circular, above-ground fire pit is usually the easiest design. Trapezoidal wall blocks naturally form a ring, while rectangular blocks work better for square or rectangular pits. Many residential fire pits measure approximately 3 to 4 feet across, although the dimensions should match the selected metal insert or fire-pit kit.
A finished wall height of roughly two or three block courses often provides a comfortable visual barrier without trapping excessive heat. Follow the instructions for your specific block and liner system rather than improvising the dimensions.
Wood-Burning Versus Gas
A wood-burning fire pit is relatively simple and creates the traditional crackling-fire experience. It also produces smoke, sparks, ash, and occasional debates about who was supposed to bring more firewood.
A gas fire pit offers cleaner ignition and easier flame control, but fuel lines, burners, ventilation, shutoff valves, and drainage must be installed correctly. Gas systems should use listed components and may require a licensed professional. This guide focuses on a wood-burning pit made with masonry blocks and a metal liner.
Materials and Tools
Recommended Materials
- Heat-rated fire-pit blocks or a compatible fire-pit kit
- A steel fire ring or manufacturer-approved metal liner
- Crushed stone or paver base
- Leveling sand, if specified by the block manufacturer
- Firebrick and refractory mortar for a masonry liner, if desired
- Heat-resistant masonry adhesive approved for the chosen system
- Drainage gravel or manufacturer-approved lava rock
- Marking paint, stakes, and string
- Pavers or gravel for the surrounding seating area
Choose blocks specifically approved for fire-pit construction. Decorative retaining-wall blocks that are not designed for direct or repeated heat exposure can deteriorate. A steel insert or firebrick liner protects the exterior masonry from the highest temperatures. Fire-feature installation guidance recommends liners or fire-rated brick to reduce heat damage to concrete blocks.
When building a permanent firebrick interior, use refractory mortar rather than ordinary mortar. High-heat mortar is formulated for fireplaces, ovens, and fire pits exposed to repeated thermal cycling.
Useful Tools
- Shovel and garden rake
- Hand tamper or plate compactor
- Two-foot or four-foot level
- Rubber mallet
- Tape measure
- Caulk gun
- Work gloves, safety glasses, and dust protection
- Masonry saw or chisel, only if cuts are required
How to Build a Fire Pit Step by Step
Step 1: Lay Out the Fire Pit
Place the metal fire ring on the chosen site and arrange one temporary course of blocks around it. This dry layout shows the actual footprint, identifies awkward gaps, and confirms that the liner fits correctly.
Leave the clearance recommended by the kit manufacturer between the liner and the exterior blocks. Mark the outside edge with landscape paint. For a larger circular seating area, drive a stake into the center, tie marking paint to a measured string, and use it like a giant compass. Lowe’s recommends the stake-and-string method for marking circular fire-pit layouts.
Step 2: Remove Grass and Excavate
Move the blocks and liner aside. Remove sod, roots, and loose organic soil from the marked area. Excavate deeply enough to accommodate the compacted aggregate base and the partially buried first course.
Many installations use approximately 4 to 6 inches of compacted aggregate, although soil conditions and product instructions may change the required depth. Concrete fire-pit projects may require deeper excavation and a substantial gravel layer, while modular-block systems commonly use a standard paver base.
Keep the bottom of the excavation as flat as possible. Do not assume that covering uneven soil with sand will magically create a durable foundation. Sand is useful for fine adjustments; it is not a substitute for compacted structural base material.
Step 3: Compact the Subgrade
Use a hand tamper to compact the exposed soil. If the soil is extremely soft, muddy, or filled with organic material, remove more of it and replace it with suitable aggregate. A stable subgrade helps prevent blocks from sinking, rotating, or developing the charming but unwanted appearance of ancient ruins.
Check the area with a level in several directions. Correct low or high spots before adding the base.
Step 4: Install the Aggregate Base
Add crushed stone or paver base in shallow layers. Spread each layer evenly, lightly moisten it if appropriate for the material, and compact it thoroughly before adding the next layer. Continue until the base reaches the required depth.
A well-compacted aggregate foundation distributes weight, limits movement, and promotes drainage. Belgard installation guidance recommends preparing a level site, installing a compacted aggregate base, and setting the first course below grade.
Check the base from side to side and front to back. The bubble on the level should be centered everywhere, not merely in the one position where you can persuade yourself that it is “close enough.”
Step 5: Set the First Course
Place the first block on the prepared base and tap it gently with a rubber mallet. Add the next block, checking both blocks for level. Continue around the circle while monitoring the height, alignment, and diameter.
The first course determines the accuracy of every course above it. Spend extra time here. If one block is low, lift it and add a small amount of leveling material. If it is high, remove material beneath it. Do not build three additional rows and hope gravity becomes more cooperative.
Place the metal ring inside the course periodically to confirm the fit. Adjust the circle before moving forward.
Step 6: Stack the Remaining Courses
Brush dirt and grit from the first course. Position the second course so that its joints are staggered over the blocks below. Staggering the seams improves stability and creates a more finished appearance. Continue with the remaining courses, checking for level as you work.
Some fire-pit kits are designed to be dry-stacked, while others use beads of approved masonry adhesive between courses. Follow the manufacturer’s directions. Keep adhesive away from exposed interior surfaces unless it is specifically rated for that location and temperature. Kit-based construction is popular because it avoids extensive stone cutting and traditional mortar work.
Step 7: Install the Fire Ring or Firebrick Liner
Lower the steel ring into the completed block surround. The flange should rest evenly on the upper course if that is how the insert is designed. Confirm that the liner does not rock, bind, or force the blocks outward.
For a custom masonry interior, install firebrick with refractory mortar according to the product instructions. Ordinary decorative brick is not automatically suitable for direct fire exposure. Use components rated for the intended temperature and application.
Step 8: Provide Airflow and Drainage
A wood fire needs oxygen, and an outdoor pit needs somewhere for rainwater to go. Follow the fire-pit kit instructions for ventilation openings. Some systems incorporate intentional gaps near the bottom course, while others provide airflow through the liner.
Do not seal the bottom into a watertight bowl unless the design includes a proper drain. Standing water creates muddy ash, accelerates corrosion, and may damage masonry during freeze-thaw cycles. In-ground designs may use a gravel base and drainage pipe where soil drains poorly.
Add the recommended amount of drainage aggregate inside the pit. Do not cover designed air openings or fill the pit so deeply that the usable fire chamber becomes too shallow.
Step 9: Finish the Surrounding Area
Extend a noncombustible surface around the fire pit using pavers, compacted gravel, or another locally approved material. This creates cleaner seating, reduces muddy foot traffic, and limits nearby grass or leaves that could catch a spark.
For a gravel seating area, install edging to contain the material. Landscape fabric can be placed beneath the surrounding gravel where appropriate, but it should not be installed directly beneath the burning chamber unless the fire-pit system specifically permits it. A minimum gravel depth of around 2 inches is commonly used for seating areas, with a compacted base added where greater stability is required.
How to Use the Finished Fire Pit Safely
Wait for adhesives, mortar, or poured concrete to cure for the full period listed by the manufacturer before lighting the first fire. A material that feels dry on the surface may not have developed its intended strength internally.
Begin with a small fire. Use dry, seasoned wood and commercial fire starters intended for outdoor fires. Never use gasoline, lighter fluid, or another flammable liquid to start or revive the flames. Dry wood burns more efficiently and generally produces less smoke than wet wood.
Keep a hose, bucket of water, or suitable extinguisher nearby. Use a metal spark screen when required or recommended. Never leave the fire unattended, and extinguish it completely before going inside. Children and pets should remain outside a 3-foot safety zone around the pit.
Avoid fires during windy, extremely dry, or restricted conditions. Flying embers have ambitions far beyond your patio.
Common DIY Fire Pit Mistakes
Using the Wrong Blocks
Standard decorative blocks may not tolerate repeated direct heat. Use a fire-pit kit, heat-rated masonry, a metal insert, or a properly designed firebrick liner.
Skipping the Compacted Base
Blocks placed directly on loose soil often settle unevenly. Digging and compacting the base is less exciting than stacking stone, but it is the part that keeps the finished project looking intentional.
Ignoring Water
A low spot with no drainage becomes a small ash-flavored pond after heavy rain. Consider the soil, slope, aggregate base, and drainage route before construction.
Making the Pit Too Large
A huge pit requires more fuel, produces more heat, and may violate local limits. Build for a controlled recreational fire, not for signaling passing aircraft.
Placing Chairs Too Close
Allow room for people to stand, walk, and move chairs without backing into the fire. Keep blankets, cushions, firewood, and loose clothing away from sparks and flames.
Forgetting Maintenance
Remove cooled ash regularly, inspect the liner for corrosion, and check blocks for cracks or movement. Store cold ashes in a dedicated metal container with a tight-fitting lid, away from combustible materials. Never dump warm ashes directly into a plastic trash bin.
Experience-Based Lessons From DIY Fire Pit Projects
The most common lesson from backyard fire-pit projects is that preparation takes longer than stacking. The finished wall may go together in an hour or two, but marking, excavating, hauling aggregate, leveling, and compacting can consume most of the weekend. That is normal. The foundation is the project; the attractive blocks are simply the part that appears in photographs.
Buying all the blocks at once is another practical advantage. Blocks from different manufacturing batches can vary slightly in shade and texture. When they must be purchased separately, mix blocks from multiple pallets throughout the courses instead of creating one noticeably different section.
Dry-fitting the entire first course before applying adhesive prevents several headaches. It reveals whether the selected block count produces the expected diameter, whether the liner actually fits, and whether small gaps are distributed evenly. Discovering that the final block does not fit is much less amusing after half the ring has been glued.
A long level is extremely helpful, but checking individual blocks still matters. A course can appear level across its diameter while one block rocks under pressure. Test every block as it is placed. Correcting a small wobble in the first course may take two minutes; correcting it after three courses may require vocabulary unsuitable for a family backyard.
It is also wise to plan where excavated soil will go before digging. Even a modest circle produces more dirt than expected. A tarp keeps soil off the lawn and makes cleanup easier. Usable topsoil can be moved to garden beds, while sod can sometimes patch bare areas elsewhere in the yard.
Drainage deserves extra attention in clay soil. A shallow gravel layer may not solve the problem when the surrounding ground holds water like a bathtub. In that situation, a deeper aggregate base, an approved drain route, or professional advice may be needed. Watch the proposed location after heavy rain before committing to construction. If water naturally collects there, the fire pit will not persuade it to leave.
Leave enough room for seating before choosing the pit diameter. Place temporary chairs around the marked circle and walk between them. Test how people will enter and exit the area. A beautiful pit surrounded by cramped chairs quickly becomes an obstacle course involving hot drinks, blankets, and poor decisions.
Do not rush the first fire. Allow every adhesive, mortar joint, or concrete component to cure according to its instructions. Start with a modest flame and observe how the pit drafts, where the smoke travels, and whether the exterior becomes unusually hot. The first burn is a functional test, not an audition for the largest bonfire in the county.
Finally, keep the design simple. Built-in benches, elaborate patios, cooking grates, and decorative caps can be added later. A level, well-drained, correctly lined fire pit in a safe location is more valuable than a complicated design built on a weak foundation. Build the dependable version first. The dramatic backyard makeover can wait until your shoulders recover from moving the blocks.
Conclusion
Building a DIY fire pit is a manageable weekend project when safety and foundation work come first. Confirm local rules, contact 811, select a clear location, and use materials intended for repeated heat exposure. Excavate carefully, compact the aggregate base, level the first course, stagger the remaining joints, and install an approved liner.
Once complete, maintain a clear safety zone, burn only appropriate fuel, supervise every fire, and extinguish the embers completely. Follow those steps and your backyard fire pit can provide years of comfortable evenings, toasted marshmallows, and stories that become approximately 40 percent more dramatic when told beside a flame.












