
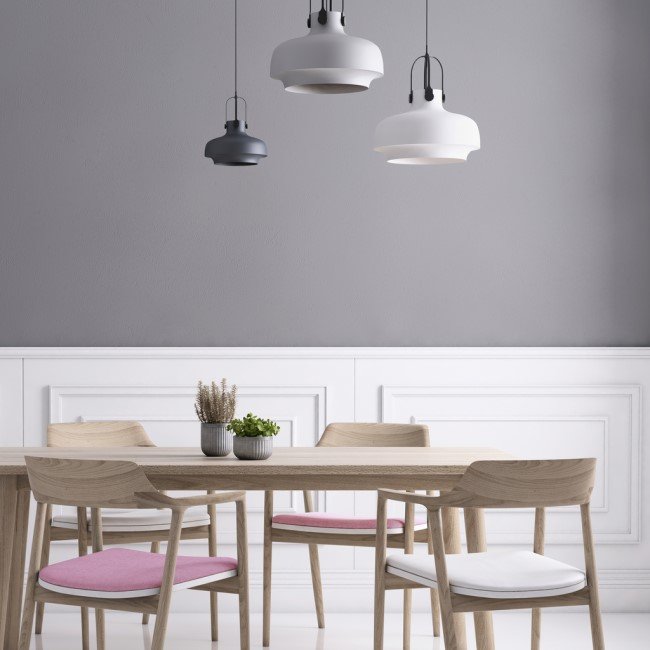
Choosing a wainscoting height sounds like a pleasantly simple projectright up until you stand in the room holding a tape measure and realize that 32, 36, 42, and 48 inches all look strangely possible. Then the window sill gets involved. The light switch files an objection. A dining chair enters the meeting. Suddenly, your “easy weekend upgrade” has become an architectural summit.
The good news is that there is a dependable starting point: Traditional wainscoting usually rises about one-third of the wall’s total height. The better news is that this rule is flexible. The correct finished height depends on the ceiling, room function, panel style, furniture, existing trim, and the visual effect you want.
Wainscoting originally helped insulate interiors and protect lower walls from dampness, scuffs, chair backs, and everyday abuse. Modern installations still provide protection, but they are equally valued for adding architectural character to plain drywall.
The Basic Rule for Wainscoting Height
For a traditional installation, multiply the wall height by one-third. Measure from the finished floor to the top of the cap rail, chair rail, or upper moldingnot merely to the top of the panel material.
- An 8-foot wall is 96 inches high, so one-third equals 32 inches.
- A 9-foot wall is 108 inches high, so one-third equals 36 inches.
- A 10-foot wall is 120 inches high, so one-third equals 40 inches.
- A 12-foot wall is 144 inches high, so one-third equals 48 inches.
This formula produces balanced proportions in many rooms, and 32 to 36 inches remains a common finished range for standard-height ceilings. Classic installations may also reach 36 to 42 inches, especially when the room is large or the trim profile is substantial.
However, the one-third calculation is a starting line, not a building-code requirement handed down on a stone tablet. A 32-inch rail may collide awkwardly with a window sill. A 40-inch treatment may cut through a light switch. A 48-inch installation might overpower a small bedroom even though the calculator says it is technically proportional.
Quick Wainscoting Height Chart
| Ceiling Height | Traditional Starting Height | Common Practical Range | Possible Tall Treatment |
|---|---|---|---|
| 8 feet | 32 inches | 30 to 36 inches | 60 to 64 inches |
| 9 feet | 36 inches | 34 to 42 inches | 68 to 72 inches |
| 10 feet | 40 inches | 36 to 44 inches | 76 to 80 inches |
| 12 feet | 48 inches | 42 to 54 inches | 90 to 96 inches |
Traditional, Tall, or Full-Wall Wainscoting?
Lower-Third Wainscoting
Covering roughly the bottom third of the wall creates the most familiar appearance. It works particularly well with raised panels, recessed panels, picture-frame molding, and beadboard. Because the upper wall remains open, there is plenty of space for paint, wallpaper, artwork, mirrors, and sconces.
A horizontal rail around 32 to 40 inches can also make a room appear wider. In dining rooms, a traditional height gives the space definition without forcing the furniture to compete with a towering wall treatment.
Two-Thirds-Height Wainscoting
Tall wainscoting typically reaches approximately two-thirds of the wall. On an 8-foot wall, that means roughly 60 to 64 inches. On a 9-foot wall, it might finish near 68 to 72 inches.
This height creates a dramatic, enveloping effect and works well in formal dining rooms, libraries, entryways, bathrooms, and bedrooms with high ceilings. It is also useful when the lower wall needs extra protection or when the design includes a plate rail or picture ledge. Two-thirds coverage is an established alternative to the traditional lower-third treatment.
Three-Quarter or Full-Wall Paneling
Three-quarter-height board and batten, beadboard, or applied molding can create a bold transitional look, particularly when topped with patterned wallpaper. Floor-to-ceiling paneling feels more architectural and immersive, but it is usually better described simply as wall paneling rather than traditional wainscoting.
Taller treatments can make a strong design statement in bedrooms, studies, powder rooms, and vaulted spaces. They can also overwhelm low ceilings if the rails, stiles, and colors are too heavy. Modern designers frequently vary panel heights and use monochromatic paint to keep elaborate millwork from becoming visually busy.
The Best Wainscoting Height for Each Room
Dining Room: 32 to 42 Inches
The dining room is wainscoting’s natural habitat. A finished height between 32 and 36 inches works well when the rail is expected to protect the wall from chair backs. In a room with 9- or 10-foot ceilings, moving the cap to 38, 40, or 42 inches can give the paneling more presence.
Do not automatically match the rail to the top of every chair. Dining chairs vary considerably, and the room should still look balanced after the furniture is replaced. Instead, evaluate the ceiling height, table height, sideboard, window trim, and the amount of wall visible above the paneling.
Living Room: 32 to 40 Inches
Lower-third paneling is generally the safest choice for a living room because it leaves room for large art, televisions, shelving, and windows. In an 8-foot room, begin by testing 32 to 36 inches. For a 9- or 10-foot room, test 36 to 40 inches.
If the living room is formal or has tall ceilings, a two-thirds treatment can look stately. Just confirm that the top rail does not run directly behind the middle of the television, artwork, or wall sconces. A trim line through the visual center of every object can make the wall look as though it was designed by a committee that never met.
Bathroom or Powder Room: 36 to 48 Inches
Bathrooms often benefit from slightly taller wainscoting because more wall coverage provides better protection against splashes, fingerprints, and cleaning products. Traditional bathroom installations frequently fall between 36 and 42 inches, while 48-inch beadboard or tile can make sense beside a vanity or freestanding tub. Taller 60- to 72-inch treatments are also possible when the design calls for a dramatic chair rail or extensive moisture protection.
Material selection matters as much as height. Standard MDF can swell when repeatedly exposed to moisture. Properly finished solid wood, moisture-resistant products, tile, and PVC are more appropriate for humid locations. PVC wainscoting systems are specifically marketed for high-humidity applications such as bathrooms.
Kitchen and Breakfast Area: 36 to 42 Inches
In a kitchen dining area, 36-inch wainscoting can align neatly with standard countertop height and create a visual connection between separate parts of the room. A slightly taller rail may work better when the wall includes a bench, breakfast nook, or tall chair backs.
Avoid forcing the cap rail into the bottom of a window apron or creating a tiny strip of painted wall between two pieces of trim. It often looks more intentional to finish directly beneath a sill or several inches below it.
Hallway and Entryway: 32 to 42 Inches
Hallways and entryways take more punishment than they receive credit for. Bags, shoes, vacuum cleaners, moving boxes, pets, and mysterious household impacts all seem drawn to lower walls. A 36- to 42-inch treatment offers useful protection while adding structure to a narrow passage.
In a two-story foyer, a taller application can break up a large field of drywall and make the architecture feel more deliberate. Wainscoting is commonly recommended for high-traffic entry areas because it combines decorative detail with a more durable lower-wall surface.
Bedroom or Nursery: 30 to 36 Inches
Traditional low wainscoting gives bedrooms subtle character without crowding headboards, nightstands, or artwork. For a nursery or child’s room, taller board and batten between 42 and 60 inches can provide additional protection and introduce color.
Before settling on a height, compare it with the headboard. A cap rail that disappears halfway behind the bed may look accidental. Either keep the wainscoting clearly below the headboard’s major details or take it high enough to form a deliberate backdrop.
Mudroom or Laundry Room: 42 to 60 Inches
Mudrooms reward practical decisions. Taller beadboard or board and batten protects more of the wall and creates space for hooks, pegs, shelves, and a picture ledge. In this scenario, the storage plan should determine the height more than a strict proportion formula.
Use a washable finish and make sure hooks are fastened into studs or solid blocking rather than relying on thin paneling alone. Durable beaded-board treatments with pegs and ledges are frequently used to combine wall protection with drop-zone storage.
Stairway: Follow the Stair Pitch
Stair wainscoting is usually measured above the stair nosings and carried parallel to the staircase rather than held horizontally across the sloped wall. At landings, the cap transitions to a level line.
The exact height may be adjusted to align with newel posts, handrails, window casings, or the wainscoting in an adjoining hall. Plan the full run before cutting the first angled rail. Stair installations magnify small layout mistakes with impressive enthusiasm.
How Existing Architecture Changes the Correct Height
Windows and Door Casings
The top rail should relate cleanly to nearby trim. Finishing beneath a window sill is often preferable to running into the sill, stopping an inch below it, or creating an awkward trim collision. Installation guidance commonly recommends adjusting the planned height to avoid interference with windows and existing molding.
Light Switches and Outlets
A cap rail running directly through a light switch looks untidy and complicates installation. Test heights a few inches higher or lower. Outlets can usually remain inside a panel field, but avoid placing a stile directly through the middle of an electrical box.
Electrical boxes may require approved extenders when new paneling makes the wall surface thicker. Carefully measure and cut panel openings before fastening anything permanently.
Built-Ins, Cabinets, and Countertops
When wainscoting meets a built-in cabinet, window seat, vanity, or countertop, alignment can create a custom appearance. However, exact alignment is not mandatory. A clearly intentional offset usually looks better than a near match that misses by half an inch.
Furniture and Artwork
Place painter’s tape at the proposed height, return the furniture to the room, and view the wall from the doorway. Check whether the line cuts through chair backs, the headboard, artwork, mirrors, or the television. The wainscoting should frame the room’s contents rather than fight them for territory.
Match the Height to the Wainscoting Style
Beadboard
Beadboard commonly comes in 32-inch wainscot panels, although full 8-foot sheets and boards can be trimmed for taller installations. Heights between 32 and 42 inches suit cottage, farmhouse, coastal, and traditional rooms.
Raised or Recessed Panels
Formal raised-panel systems often finish between 30 and 40 inches, but high-ceilinged rooms may use two stacked rows separated by a center rail. Because the rails and stiles are visually substantial, panel proportions should be planned before the overall height is finalized.
Picture-Frame Molding
Applied molding offers more freedom because it does not require solid panel sheets. It can create low traditional boxes, tall rectangles, or floor-to-ceiling grids. Keep the spacing between frames consistent and coordinate it with baseboards, door casings, crown molding, and corners.
Board and Batten
Board and batten has heavier vertical lines than delicate picture molding, so it often looks convincing at 42 inches, half-wall height, or three-quarter-wall height. Taller battens can visually stretch a room, while short, wide panel sections may make a compact room feel broader.
How to Test the Height Before Installation
- Measure the actual walls. Do not assume that an “8-foot ceiling” is exactly 96 inches throughout the room.
- Mark several options. Test the one-third calculation plus one height slightly above and below it.
- Use painter’s tape. Run a continuous tape line around at least two walls so you can understand the full horizontal effect.
- Add mock rails and stiles. Tape paper strips to the wall to approximate their true widths.
- Replace the furniture. Evaluate the height with chairs, tables, beds, lamps, and artwork in position.
- Check every obstruction. Look for switches, outlets, thermostats, windows, vents, cabinets, and door hardware.
- View it at different times. Natural and artificial light can change how strongly a horizontal division reads.
A full-size mock-up is more reliable than a tiny sketch. Moving painter’s tape costs almost nothing. Moving installed paneling costs considerably more and introduces your vocabulary to several exciting new words.
Installation Details That Affect the Finished Result
Establish a Level Top Line
Floors, especially in older homes, are rarely perfectly level. Measuring the same distance from the floor at dozens of points can create a cap rail that visibly rises and falls around the room. Establish a truly level reference line for the top of the treatment, then allow the baseboard to conceal minor variation near the floor.
Include the Cap in Your Measurement
If your target finished height is 36 inches, the top of the cap should generally finish at 36 inches. Cutting the panel itself to 36 inches and then adding a 3-inch rail may produce a 39-inch installation that changes the proportions.
Plan the Panel Layout Before Cutting
Equal-looking panels matter more than forcing every panel to an identical dimension. Adjust spacing so narrow walls, corners, doors, and windows do not end with tiny leftover rectangles. For framed installations, balanced openings and consistent stile spacing make the work appear custom.
Choose a Practical Finish
Satin and semi-gloss paints are commonly selected for trim because they are easier to wipe clean than flat wall paint. A high-gloss finish can emphasize architectural detail, but it also highlights dents, seams, brush marks, and surface imperfections. Benjamin Moore and other design sources demonstrate that wainscoting can be traditional white, dark and dramatic, monochromatic, or boldly contrasted with the upper wall.
Experience-Based Lessons: What Homeowners Often Discover
The following composite scenarios reflect common lessons reported across DIY projects, renovation guidance, and professional installation advice. They are useful because wainscoting mistakes rarely begin with terrible carpentry. They usually begin with a measurement that looked perfectly reasonable on paper.
The Mathematically Correct Height Can Still Look Wrong
Consider an 8-foot dining room. The one-third calculation suggests 32 inches, and that number is historically defensible. After painter’s tape is installed, however, the rail may appear low beside a substantial buffet, tall dining chairs, and wide crown molding. Raising the mock-up to 35 or 36 inches can make the lower wall feel more connected to the furniture without abandoning traditional proportions.
The lesson is not that 32 inches is wrong. The lesson is that mathematical proportion must share authority with visual weight. A room containing delicate furniture may look graceful with a 32-inch treatment, while the same ceiling height with heavier furniture may benefit from a few additional inches.
Measuring From an Uneven Floor Creates a Wandering Rail
In older homes, installers sometimes measure 36 inches upward from the floor every few feet. The marks seem accurate individually, but connecting them reveals a top line that slopes or waves. The floor, not the tape measure, is the culprit.
A more successful approach is to select the height at a visually important point, establish a level line around the room, and fit the lower pieces to the floor. Baseboard and shoe molding can conceal small variations. This keeps the cap rail level, which is where the eye is most likely to detect an error.
A Light Switch Can Change the Entire Plan
A homeowner may settle on 42 inches only to discover that the cap rail runs through three light switches and a thermostat. Moving all that electrical equipment is possible, but it turns a decorative carpentry project into a more complicated renovation.
Dropping the treatment to 39 inches or raising it to 45 inches may preserve the design while avoiding electrical work. This is why the most successful layouts are drawn directly on the walls before lumber or panels are ordered.
Ready-Made Panels Should Not Dictate the Design
Many beadboard products are sold in convenient 32-inch sections. That does not mean every room must have 32-inch finished wainscoting. The baseboard, panel, and cap can be combined or trimmed to achieve a different total height. Conversely, buying full-length material may be necessary for a 48- or 60-inch application.
Product dimensions are helpful for estimating waste and labor, but they should support the room’s proportions rather than control them.
Moisture Problems Often Appear After the Photographs
Freshly painted MDF can look beautiful in a bathroom on installation day. Trouble may develop later if exposed edges absorb repeated splashes or humid air. Swelling near the baseboard, seams, or vanity is difficult to hide permanently.
Bathrooms and laundry rooms reward moisture-resistant materials, sealed edges, careful caulking, adequate ventilation, and durable coatings. The prettiest panel profile in the showroom is not a bargain if it behaves like a breakfast cereal after meeting water.
Paint Color Changes the Perceived Height
Dark wainscoting with a light upper wall creates a strong horizontal division, making the exact height more noticeable. Painting the paneling, upper wall, and trim in related colors softens the boundary and allows taller treatments to feel less imposing.
When unsure, mock up both the height and color. A 48-inch dark panel may look heavy in a small room, while the same panel painted in a soft monochromatic scheme can feel elegant and calm.
The Best Final Measurement Is Often an Odd Number
Homeowners naturally gravitate toward tidy measurements such as 32, 36, or 48 inches. Yet the best height may be 34¾ inches because that aligns perfectly beneath a window stool, or 41¼ inches because it clears a switch plate and balances the door casing.
There is no prize for selecting the roundest number. The visible relationship between architectural elements matters more than whether the tape measure lands on an especially satisfying fraction.
Common Wainscoting Height Mistakes
- Measuring the panel height but forgetting to include the cap rail.
- Using the one-third rule without checking windows, switches, and furniture.
- Installing every panel box at the same width and leaving tiny boxes at corners.
- Measuring repeatedly from a floor that is not level.
- Choosing MDF for a wet location without proper moisture protection.
- Running a top rail directly into window or door trim.
- Skipping a full-size painter’s-tape mock-up.
- Making tall paneling too visually heavy for a small room.
- Assuming chair-rail height and wainscoting height must always be identical.
Final Verdict: How High Should Wainscoting Be?
For most rooms, begin with one-third of the wall height: approximately 32 inches for an 8-foot ceiling, 36 inches for a 9-foot ceiling, and 40 inches for a 10-foot ceiling. Then adjust the finished height to work with windows, doors, switches, furniture, cabinetry, and the proportions of the panel design.
Use 32 to 42 inches for a classic treatment, 42 to 60 inches when extra wall protection or visual drama is needed, and roughly two-thirds of the wall for tall formal paneling. Bathrooms, mudrooms, and stairways deserve special consideration because moisture, storage, and changing floor lines can matter more than a universal formula.
The right wainscoting height is the measurement that looks intentional from every important viewpoint. Calculate first, mock it up second, and cut only after the painter’s tape has survived a few days of inspection.












