
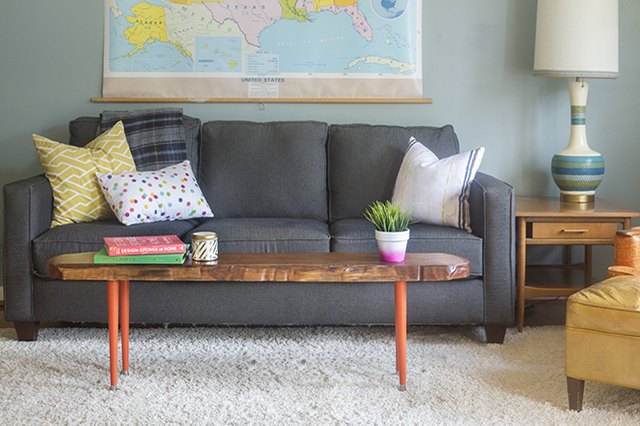
A wood slab coffee table has a magical way of making your living room look like it hired a wilderness stylist. One minute you have a plain seating area; the next, there is a dramatic piece of walnut, oak, maple, ash, or cedar sitting in the middle of the room like it has stories to tell. Maybe it once shaded a backyard. Maybe it survived a storm. Maybe it was just waiting for you to attach legs and stop calling it “that heavy thing in the garage.”
The good news is that learning how to make a wood slab into a coffee table is not reserved for master furniture makers with secret handshakes and suspiciously sharp chisels. With the right slab, careful flattening, patient sanding, a stable base, and a durable finish, a DIY wood slab coffee table can be a realistic weekend-to-week project for a motivated beginner. The not-so-secret secret is preparation. A slab table looks organic and effortless, but the best ones are secretly very well planned.
This guide walks you through the entire process: choosing a slab, checking moisture, flattening, cleaning the live edge, filling cracks, sanding, finishing, attaching legs, and avoiding the mistakes that turn “rustic charm” into “wobbly pancake.” Let’s build something sturdy, beautiful, and coffee-mug-approved.
What Is a Wood Slab Coffee Table?
A wood slab coffee table is a table made from a thick, wide piece of solid wood, often cut directly from a tree trunk. Many slabs include a live edge, which means the natural outer shape of the tree remains visible along one or both sides. Instead of hiding the irregular grain, knots, checks, and curves, this style celebrates them.
Unlike a standard coffee table built from several boards glued together, a slab table usually lets one dramatic piece of wood become the star. The legs, base, and finish should support the slab without competing with it. Think of the slab as the lead singer and the legs as the rhythm section: important, but nobody came to see them do a 12-minute solo.
Tools and Materials You’ll Need
Basic Materials
- One kiln-dried or properly air-dried wood slab
- Table legs, hairpin legs, metal base, wooden base, or custom frame
- Threaded inserts, wood screws, bolts, or figure-eight fasteners
- Wood glue, if adding stabilizers or patches
- Epoxy resin or wood filler for cracks and voids
- Painter’s tape or sheathing tape for epoxy dams
- Wood stain, hardwax oil, polyurethane, varnish, or other protective finish
- Clean rags, tack cloth, and mineral spirits or denatured alcohol as appropriate
Useful Tools
- Random orbital sander
- Router sled, hand plane, belt sander, or access to a wide planer
- Drill and drill bits
- Measuring tape, pencil, and straightedge
- Clamps
- Chisels or stiff nylon brush for bark removal
- Moisture meter
- Safety glasses, hearing protection, gloves, and dust mask or respirator
You do not need every tool on this list, but you do need a plan for flattening. A slab may look flat when leaning against a wall, then reveal its potato-chip personality once you place it on a level surface.
Step 1: Choose the Right Wood Slab
The best slab for a coffee table is dry, stable, attractive, and appropriately sized. For most living rooms, a slab between 36 and 54 inches long, 18 and 30 inches wide, and about 1.5 to 3 inches thick works well. Thinner slabs look sleek but may feel less substantial. Very thick slabs look impressive but can become heavy enough to make moving day feel like a powerlifting event.
Best Woods for a Slab Coffee Table
Walnut is a favorite for live edge coffee tables because of its rich chocolate color and striking grain. Maple offers a lighter, cleaner look and can show beautiful figuring. Oak is strong and classic, with bold grain that fits farmhouse, industrial, and modern interiors. Ash is tough, bright, and visually lively. Cherry darkens warmly over time. Cedar and pine are softer, easier to dent, and better suited for rustic designs where a few marks are part of the charm.
When selecting your slab, look for character, but do not confuse character with chaos. A few checks, knots, and bark pockets can be beautiful. Severe twisting, deep rot, active insect holes, or a giant crack running end to end may require advanced repair. If this is your first DIY live edge coffee table, pick a slab with personality but not a full emotional support team.
Step 2: Check Moisture Before You Build
Wood moves as humidity changes. That is not a flaw; it is just wood being wood. However, if you build with a slab that is too wet, the table may cup, crack, twist, or open new checks after it enters your home. Indoor furniture generally performs best when the wood has reached a moisture level close to the environment where it will live.
Use a moisture meter to check the slab in several places, including the center and both ends. A slab intended for indoor furniture is commonly best when it is in the neighborhood of indoor equilibrium moisture content, often around 6 to 10 percent in many conditioned homes. The exact target depends on your climate, heating, air conditioning, and seasonal humidity.
If the slab was recently milled, it may need many months or even years to air-dry, especially if it is thick. Kiln drying speeds the process and helps reduce insect risk, but even kiln-dried slabs should acclimate in your shop or home before final milling. Give the slab time to settle. The coffee table can wait. Your future self, the one not fixing a warped tabletop, will thank you.
Step 3: Decide on the Design
Before cutting or sanding, decide what kind of coffee table you want. The slab should guide the design. A dramatic live edge may look best with simple black metal legs. A clean rectangular slab might shine on a sculptural wooden base. A thick rustic slab could pair beautifully with chunky square legs or a trestle-style support.
Common Coffee Table Styles
- Modern live edge: Natural slab with slim metal hairpin or trapezoid legs.
- Rustic farmhouse: Thick slab with chunky wood legs or a distressed base.
- Industrial: Walnut, oak, or ash slab paired with steel legs or pipe-style supports.
- Minimalist: Clean slab, clear finish, simple base, and no unnecessary decoration.
- Waterfall table: One slab cut and mitered so the grain appears to flow down one side.
For a beginner, separate legs or a pre-made metal base are the easiest options. Waterfall tables are gorgeous, but they demand accurate cuts, strong joinery, and more patience than a line at the DMV.
Step 4: Flatten the Wood Slab
Flattening is the step that separates a beautiful coffee table from a rocking tray with delusions of grandeur. Most slabs come rough-sawn, cupped, twisted, or uneven. Your goal is to make the top surface flat enough for drinks, books, remotes, and that one decorative object nobody is allowed to touch.
Option 1: Use a Professional Shop
The easiest method is to pay a local millwork shop, cabinet shop, or lumber supplier to flatten the slab with a wide planer, CNC machine, or large drum sander. This costs more, but it saves time and produces excellent results.
Option 2: Use a Router Sled
A router sled is a popular DIY solution. You build two straight rails, set the slab between them, and run a router back and forth across the surface using a flattening bit. Take shallow passes, work slowly, and keep the router base stable. After one face is flat, flip the slab and repeat the process on the bottom if needed.
Option 3: Use Hand Tools and Sanding
A hand plane, winding sticks, straightedge, and patience can also flatten a slab. This method is quieter and deeply satisfying, assuming you enjoy exercise disguised as craftsmanship. A belt sander can remove high spots, but it is easy to create dips if you linger too long in one area.
Do not aim for machine-shop perfection unless your design requires it. A coffee table can tolerate subtle natural variation. What it cannot tolerate is a hump so large your coffee slides toward the couch like it has somewhere better to be.
Step 5: Trim or Shape the Slab
Once the slab is flat, decide whether to cut it to final length. Use painter’s tape along your cut line to reduce tear-out, then cut with a circular saw and a straightedge guide, track saw, or table saw if the slab is manageable. For large slabs, a circular saw is usually more realistic.
You can square off both ends for a clean contemporary look, leave one end irregular for a more organic shape, or cut a gentle curve if the slab calls for it. Keep the proportions in mind. A coffee table that is too long can dominate the room, while one that is too small may look like a cheese board with ambition.
Step 6: Remove Bark and Clean the Live Edge
Bark looks charming, but it often loosens over time. For an indoor coffee table, it is usually better to remove loose bark and expose the natural edge underneath. Use a chisel, putty knife, stiff nylon brush, or wire brush carefully. Work with the shape of the edge, not against it.
Try not to over-sculpt the edge. The goal is to clean it, not turn it into a perfectly smooth factory curve. A live edge is appealing because it looks like nature had a hand in the design. Nature does not use a belt sander on everything, and neither should you.
Step 7: Fill Cracks, Knots, and Voids
Small cracks and knots can stay as they are if they do not weaken the slab or trap crumbs. Larger checks, holes, and bark inclusions may need epoxy. Clear epoxy preserves the natural look. Black epoxy creates a bold modern contrast. Tinted epoxy can highlight dramatic cracks, but use restraint unless you want the table to look like it is auditioning for a superhero movie.
How to Fill Voids with Epoxy
- Clean dust and debris from the crack or hole.
- Tape the underside tightly to prevent leaks.
- Mix epoxy according to the manufacturer’s directions.
- Pour slowly and slightly overfill the void.
- Allow the epoxy to cure fully.
- Scrape, sand, or plane the epoxy flush with the wood.
For cracks that affect structural strength, consider adding bow-tie keys, also called butterfly inlays. These are decorative patches shaped like tiny bow ties that bridge a crack and help prevent it from spreading. They look great, but they require careful layout and chisel work. For a first project, epoxy alone may be enough if the crack is not severe.
Step 8: Sand the Slab Smooth
Sanding is where the coffee table begins to feel like furniture instead of lumber. Start with the lowest grit needed to remove milling marks, router tracks, or rough patches. A typical progression might be 80, 120, 150, 180, and 220 grit. If the slab was professionally sanded, you may be able to start at 120 or 150.
Do not skip grits. Sanding from 80 directly to 220 is like trying to clean a muddy truck with a silk napkin. Each grit removes the scratches from the previous grit. Move steadily, avoid pressing too hard, and let the sander do the work.
Important Sanding Tips
- Sand with the grain whenever possible.
- Use a pencil to scribble light lines across the surface; when the lines disappear evenly, you know you covered the area.
- Ease sharp edges so they feel comfortable to hands and arms.
- Vacuum dust between grits.
- Do not over-sand the live edge until it loses its natural texture.
Always wear respiratory protection when sanding. Wood dust can irritate the lungs, eyes, and skin, and some species are more irritating than others. A dust collector, shop vacuum, open ventilation, and a properly fitted respirator make the job safer and much less sneezy.
Step 9: Choose the Best Finish
A coffee table finish must survive mugs, snacks, feet, books, laptops, children, pets, and the occasional “I’ll just set this wet glass here for one second.” Choose a finish based on the look you want and the level of protection you need.
Polyurethane
Polyurethane is durable, widely available, and beginner-friendly. Oil-based polyurethane adds warmth and amber color, which can make walnut, oak, and cherry look richer. Water-based polyurethane dries clearer and is a good option when you want to preserve a pale wood tone. Apply multiple thin coats and sand lightly between coats as directed.
Hardwax Oil
Hardwax oil gives a natural, low-sheen look that feels close to the wood. It is popular for live edge furniture because it highlights grain without creating a thick plastic-like film. It is easier to repair than many film finishes, but it may require maintenance over time.
Oil Finish
Oil finishes can deepen the color and make grain pop beautifully. However, pure oil finishes may not offer as much protection against water rings and heavy use as polyurethane or hardwax oil. They are best for people who love a natural look and do not mind occasional upkeep.
Epoxy Top Coat
A full epoxy flood coat creates a glossy, thick, high-protection surface. It can look dramatic, but it also changes the tactile feel of the table. Use it when you want a shiny modern finish, not when you want the surface to feel like natural wood.
Before finishing the entire slab, test your chosen finish on the underside or an offcut. Wood can surprise you. A finish that looks soft and honey-colored on maple may turn another species orange enough to direct traffic.
Step 10: Apply the Finish Properly
Clean the slab thoroughly before applying finish. Vacuum the surface, wipe away dust, and make sure the wood is dry. Follow the product instructions for temperature, humidity, drying time, recoat windows, and ventilation.
Apply thin, even coats. Thick coats may drip, wrinkle, stay tacky, or cure unevenly. Sand lightly between coats when required, often with fine 220-grit paper or a finishing pad. Remove dust before each new coat. Finish both the top and bottom of the slab to help slow uneven moisture exchange, which can reduce the risk of cupping.
Let the final coat cure before putting the coffee table into service. Dry to the touch does not always mean fully cured. Waiting a few extra days before using coasters, books, or decorative trays can prevent dents and finish marks.
Step 11: Attach the Legs or Base
The base must be strong, balanced, and attached in a way that allows wood movement. Solid wood expands and contracts across its width as humidity changes. If you screw a wide slab rigidly to a base without allowing movement, the slab may crack or the fasteners may loosen.
Best Leg Options for Beginners
- Hairpin legs: Easy to install and great for modern or mid-century style.
- Trapezoid metal legs: Strong, stable, and visually clean.
- Wood block legs: Rustic and simple, especially for thick slabs.
- Pre-made metal base: Excellent stability with minimal joinery.
Mark leg placement carefully. Coffee table legs often look best set in from the ends by 4 to 8 inches, depending on slab size. Keep the base wide enough to prevent tipping. If using metal legs, drill pilot holes and consider threaded inserts for a stronger, removable connection.
For wooden bases, use elongated screw holes, figure-eight fasteners, Z-clips, or other tabletop fasteners that allow seasonal movement. This small detail can make a big difference in long-term stability.
Step 12: Level and Protect the Finished Table
After attaching the base, flip the table upright and check for wobble. Use adjustable feet, felt pads, or leveling glides if needed. This is also the moment to discover whether your floor is secretly shaped like a ski slope.
Add felt pads under the legs to protect flooring. Use coasters for drinks, especially during the first few weeks. Avoid placing the table directly over heating vents or in harsh sunlight all day, as extreme changes in heat and humidity can encourage movement.
Common Mistakes to Avoid
Using a Wet Slab
A wet slab may look fine today and become a twisted abstract sculpture later. Check moisture and acclimate the wood before final flattening.
Skipping the Bottom Finish
Finishing only the top can allow the bottom to absorb and release moisture differently. Coat both sides for better balance.
Over-Sanding the Live Edge
A live edge should look refined, not erased. Clean it, soften it, and stop before it loses its natural character.
Ignoring Wood Movement
Solid wood moves. Use attachment methods that allow the slab to expand and contract across its width.
Choosing Weak Legs
A heavy slab needs a serious base. Decorative legs are fine only if they are also structurally strong.
How Much Does a DIY Wood Slab Coffee Table Cost?
The cost depends on wood species, slab size, drying method, base style, and finish. A small local slab may cost under $150, while a large kiln-dried walnut slab can cost several hundred dollars or more. Hairpin legs may be budget-friendly, while custom steel bases can cost as much as the slab itself.
For a realistic beginner project, expect a range of about $250 to $800. You can spend less by using a smaller slab, local species, and simple legs. You can spend more by choosing premium walnut, professional flattening, bow-tie inlays, and a custom metal base. Either way, the final result often looks more expensive than it is, which is one of the great joys of DIY furniture.
Maintenance Tips for a Wood Slab Coffee Table
Clean the table with a soft damp cloth and dry it promptly. Avoid harsh cleaners unless the finish manufacturer says they are safe. Use coasters, especially with cold drinks. Keep hot pans, candles, and wet planters off the surface unless protected by a tray.
If the table has a hardwax oil finish, refresh it according to the product directions when it starts to look dry or dull. If it has polyurethane, minor scratches can sometimes be buffed or touched up, but deeper damage may require sanding and refinishing the affected area.
Real-World Experience: What You Learn While Making a Wood Slab Coffee Table
The first thing you learn when making a wood slab into a coffee table is that slabs are heavier than they look. A board at the lumberyard seems charming and manageable until you try to carry it through a doorway without knocking over a lamp, a shoe rack, and your confidence. Always measure your space, measure your slab, and recruit help before moving a large piece of hardwood. Pride is not a lifting technique.
The second lesson is that sanding takes longer than expected. Everyone imagines the glamorous final wipe of finish, when the grain suddenly glows and you feel like a furniture wizard. Fewer people imagine the long middle chapter where you are hunched over an orbital sander, wondering if 120 grit is a lifestyle choice. But sanding is where the table becomes touchable. It is worth slowing down, changing discs often, and inspecting the surface from different angles under good light.
Another experience many DIYers share is the moment epoxy leaks through a crack you were absolutely sure you taped properly. Epoxy has the personality of syrup with a legal degree; it will find the smallest gap and escape. The fix is simple: tape more aggressively than you think you need to, support the underside, and pour in stages if the void is deep. Keep cardboard under the slab unless you want a permanent shiny memory on your shop floor.
You also learn that the live edge is the soul of the project. At first, you may want to clean every bump and groove until it looks perfect. Then you realize the imperfections are the point. A small knot, a wave in the edge, or a darker mineral streak can make the table feel like it came from a real tree, not a furniture catalog that smells faintly of cardboard.
Attaching the legs teaches one more important lesson: stability beats drama. Those delicate legs may look amazing online, but if they make the table wobble every time someone reaches for popcorn, they are not the right legs. A coffee table lives in the busiest part of the room. It should handle mugs, books, board games, laptops, and the occasional person who forgets furniture is not a chair unless specifically invited.
The best part arrives when the finish goes on. The grain darkens, the figure appears, and the slab suddenly looks alive again. This is the moment all the dust, measuring, flattening, and second-guessing pays off. A handmade wood slab coffee table is not just a surface. It is a conversation piece, a practical object, and a reminder that making something slowly can be deeply satisfying in a world full of instant everything.
And yes, once it is finished, someone will ask where you bought it. Try to answer casually. Do not immediately give a 40-minute explanation about moisture content, router sleds, and the emotional journey of bark removal. Or do. You made the table. You earned the speech.
Conclusion
Making a wood slab into a coffee table is one of the most rewarding DIY furniture projects because it combines natural beauty with practical craftsmanship. The process is straightforward: choose a dry and stable slab, flatten it, clean the live edge, fill cracks if needed, sand patiently, apply a durable finish, and attach a strong base that allows for wood movement.
The project does not require perfection. In fact, the best slab coffee tables are memorable because they are not perfect. They have grain, knots, curves, color shifts, and small reminders that the material came from a living tree. Your job is to make that natural beauty useful, stable, and ready for everyday life.
Whether you choose walnut with black metal legs, oak with a farmhouse base, or maple with a clean modern finish, a DIY wood slab coffee table can become the centerpiece of your living room. Build it carefully, protect it well, and enjoy every “Wait, you made that?” moment that follows.











